


The fire starter recommendations are all good, and they do work. This article is not intended to take away from those talented writers, but I did want to write something that may provide an alternative that takes little prep time, zero storage considerations, is light weight, works in wet conditions, and can be started with one strike of a ferrocerium rod. If you are familiar with Fat wood and building a good pyre, skip down to the 4th paragraph.
I have started fires with a Bow and Spindle, Cotton Ball and Petroleum jelly, char cloth, 9-volt battery and steel wool, bic lighters, magnifying glass, matches, kerosene et cetera. Having knowledge of multiple ways of starting a file adheres to the redundancies theory. But even with GAS (strongly discouraged), you have to create the conditions that promote the transferring of the flame from the initial ignition to your high quantity of surface area. Creating the quantity of surface areas is simply gathering small sticks to be placed in close proximity of the source of the initial ignition regardless of which ignition method is used. Then using slightly larger sticks on top of the initial small sticks and gradually increase the size until you are at standard firewood size material.
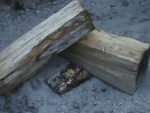
The alternative I am referring to is from the core of pine trees. It has many names such as fat wood, fat lighter, lighter wood, Pine knot, heart pine, et cetera. Dead pine trees have a resin saturated heart at the center of the tree, the stump, the tap root, and even joints where limbs intersect. Most resinous pine trees produce fat wood to some level. In the southern states, it is more common with the long leaf pine and Virginia Pine. Sometimes, you may even find a deposit of pine pitch where a tree was injured and the resin builds in one area on the exterior of a living tree. This pitch is highly flammable and will produce a thick black smoke similar to burning rubber.
How to use Fat lighter in fire starting.
If you are using a ferro rod, you will want to create a quantity of surface area to receive the sparks and ignite the fat wood. Fat wood can be scraped by holding your knife at a 90 degree angle to the wood and repeatedly scraping the surface. This will produce a pile of shavings, which look more like tan snow than wood. You only need a very small amount to ignite, but the art is in being able to transfer the flame to other combustible material before the flame consumes the pine pitch material. You can slice off slivers of the fat lighter and position them to catch fire as well, so the life of the flame will be extended.


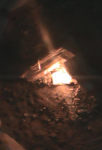
Now you are ready to strike this material to make a flame. The material in the image above will burn for about 45 seconds. At this point, use your preferred method of building a pyre. Some build the pyre and provide room for the flame source to be inserted. My preferred method is to have the material set next to the fire ring and place the kindling over the flame starting with the smallest, to the largest pieces. Definition: Tinder is what you use to receive the spark and create the flame; kindling is larger than tinder and is used to expand the fire. Feel free to comment on this, as I have heard folks state the opposite.
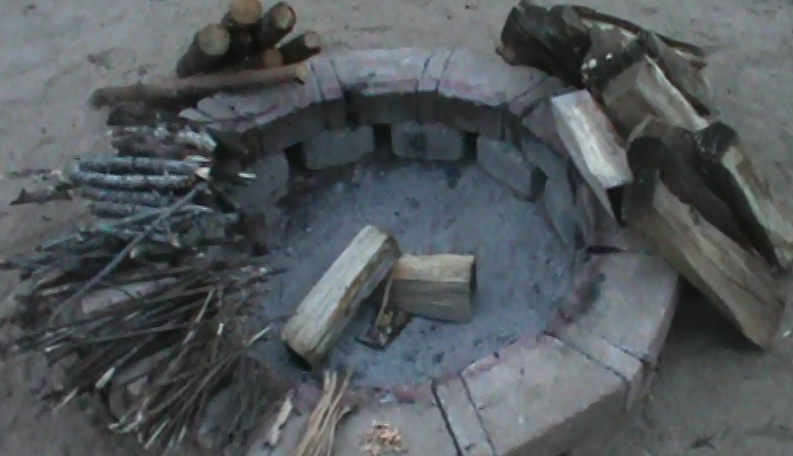
- Place the pine pitch Tinder in the fire ring on a piece of bark or some material that will aid in keeping it consolidated in one pile.
- Place a branch, piece of firewood, or something flammable next to it that you can lean-to your Tinder over the flame and leave a gap so as to not put out the fire.
- Strike the ferro rod and ignite the fat lighter. Add optional fat lighter slivers that will extend the life of the flame.
- Place a stack of the smallest tinder over the flame, and let it sit until you see that it has started to catch. (It should catch fast if material is dry. Don’t rush this process as you have time and you don’t want to collapse the pyre and put out the flame.)
- Gradually keep adding the larger tinder.
- Finish by putting the main firewood all around the pyre.
- Build the fire wood ring around the pyre so that you can put a “hat” (a flat piece of fire wood) on the fire. This hat keeps the heat from freely escaping and helps the fire build at the lower levels.
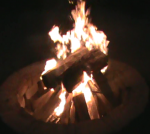
- Stand back and don’t mess with it. In about 20 minutes you can add more firewood, but this method is meant to build a coal bed quickly so that your physical fire maintenance is reduced.


Caveats:
- As you are lighting the fat wood, protect it from wind as you would most any other kindling. Wind will put it out, but by building a wind break it will stay lit. After the fat lighter is lit, immediately put the first layer of kindling over it to protect it from the wind.
- This will produce a lot of smoke, but it will only last a short amount of time. If you are in a situation where you are concerned about someone seeing your smoke or fire, wait until it is almost dark but not quite there yet. This will make the smoke not so obvious and as the initial fire is creating the coal bed, and the light from the fire will not be that noticeable. You can then use the coal bed to keep the fire going but reduce the amount of wood so the light is not that obvious. There is not much you can do about the smell of the fire.
The reasons why I like fat lighter:
- Where I am it is readily available in the woods. However it can be ordered on Amazon. Home Depot sometimes carries it as well as Plow & Earth, eBay, QVC, and other online retailers.
- It is light; one stick weighs a few ounces.
- You don’t need to put it in a container, wrap it, or protect it. The resin is embedded in the wood. Just choose a piece that doesn’t feel sticky, and you can drop it in your bug out bag. It won’t leak or stick to other materials.
- No preparation. Find a stick, and keep it for use.
- You can literally dunk this in water, even over night or for days, dry it with a towel, scrape and ignite it. Even wet, if you expose it to a flame, it will ignite.
- One stick will create many fires. The stick pictured above was used to start over 30 fires and can be used more conservatively to last a long time.
Thank you for your excellent and informative article. But what’s the best way to store fatwood long-term? I live in a ‘hurricane magnet’ (New Orleans) so I have to consider every weak link of every ‘prep’ I make — then fix it or firm it up. There’s one or two regarding fatwood, I’m sure. But let’s start with storage basics: Paper, or plastic? Any other tips would be greatly appreciated. A thousand thanks. (–Donald)