


Leather has been used for millennia as a durable resource for clothing, shelter, armor, and more. If you pay attention, there is an abundance of leather all around you. It’s on furniture and baseball fields, in cars, and on garment racks. If you found yourself in a post-collapse situation, leather is a readily available scavenge resource. If you know how to work with it and have a few simple tools and supplies, you have the solution to countless problems. Later I’ll explain some basics. My journey with leather began a few years ago.
I was attending a homeschool conference and saw a beautiful leather backpack. It was extremely durable, functional, and handsome to look at. It had been constructed to minimize points of failure and last a lifetime. Zippers, for example, were eschewed in favor of buckles, as zippers are typically the first thing to fail on a bag or garment.
I immediately began my online search for this glorious bag only to find that it retailed for $695. Knowing my wife would have an aneurysm if I paid that much for a bag, my dream of carrying this pack died a little that day. A few weeks passed, but I couldn’t shake the thought of the bag. I began to wonder if I could possibly make a backpack. Never mind that my leather-working had been confined to Boy Scout camp 30 years earlier and a failed attempt to make a pair of sandals, I knew I had to try.
Several months earlier I had bought a shoulder of vegetable tanned leather in at attempt at making a pair of sandals. While that effort ended in failure, I was undeterred at a much more difficult undertaking in this backpack project. I began in the same way all beginners since the beginning of time have begun, on Youtube. Several hours later, I was ready to head to my local leather supply store– Tandy Leather.
If you’ve ever taken up a hobbyist endeavor, you likely had the same experience I did as I walked into Tandy that first time. I asked very dumb questions, and they treated me like the idiot I was. But I got my supplies and headed home to begin the first of many leather projects.
I started with the smallest project I could think of, card wallets. These simple creations are literally one piece of leather folded in half and stitched on each side. Simple as it may seem, my first attempts were in hindsight Frankenstein-like. I had yet to realize the importance of patterns, stitch techniques, and overall finishing details. Nevertheless, I was proud of those first pieces. I had created something!
By trade, I’m a sales person. I sit at a desk, write emails, and talk on the phone all day. I don’t work with my hands, and there’s no lasting evidence of my trade. So it was monumentally satisfying to create something functional and lasting.
I started creating larger pieces, like notebook covers and Field Notes holders. Then I made my first shoulder bag. I’ll admit that it was a thrill when people noticed it. Looking back, however, I’m amazed that anyone even mentioned it. My skills were so limited that it was still very amateurish looking. It was those comments though that led me to a revelation, the vast majority of people are overwhelmed at the prospect of learning a trade like leather working. And yet, with less than one week’s worth of self-led training, I was able to make basic goods.
At this point, I decided I was ready to tackle the bag. I’d spent hours researching construction and planning the design. I read online forums and watched more videos and went back to Tandy to buy the hide I would use. I asked them more questions, and they still looked at me like I was an idiot. Undeterred, I began.
I spent every free minute for weeks working on my bag. I worked slowly (mainly because I was slow) to minimize error. I lined it with pigskin and melted down when I made a mistake. After nearly 40 working hours, I completed my bag. It was an amazing feeling. Everywhere I went people commented on it and asked where I bought it. Even now, I carry that bag every day to work. The bag I didn’t want to spend $695 on probably ended up costing me about four times that to make myself when considering time and materials, but I’d learned a trade.
Now I run my own small leather-working business selling duffle bags, tote bags, wallets, belts, and other assorted custom leather goods. It will likely always be a side project for me, which is fine. I don’t do it for the money. Now I know that if I need to make something, I have the basic skills necessary to do so by hand without electricity. Here’s the best part– so can you!
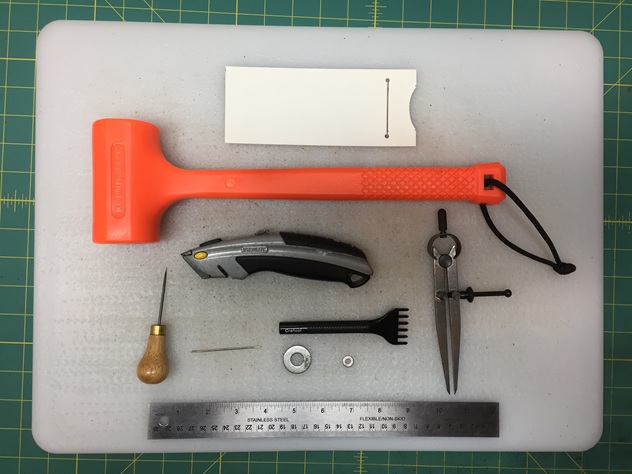
There are really only a few basic tools that are needed for simple leather projects. Several of these are likely already lying around any modestly appointed garage.
First, the tools you likely have:
- Rubber mallet or dead blow hammer (do not use a standard hammer, as it will damage your punches)
- Utility knife
- Lighter – for melting the ends of your stitch
- A few small-to-mid-sized washers – handy for cutting rounded corners
- Awl – used for marking your cutting lines and punching through a hole that’s too small
- Plastic kitchen cutting board – when you punch through the leather it’ll save your tools to punch into this board
- Ruler – preferably flat, metal
Leather-working-specific tools you’ll need to buy:
- Diamond punches
- Needles
- Cutting mat – These can be bought at a sewing shop or Wal-Mart. While not required, it’ll save your table top and extend the life of your cutting blades, not to mention prove a handy measuring tool.
- Wing Divider
Materials:
- Waxed poly cord – I use the waxed cord from Maine Thread Company. It is made in the U.S.A and great quality. I prefer a .030” diameter cord.
- Leather hides – I could write a series of articles on this topic alone. Let’s assume that you won’t be dyeing your leather at this point. Considering we’re talking about a survival situation, you’d be re-purposing whatever you can find. My advice is to make life easy on yourself and find a hide that’s already tanned at the thickness for your desired project. Get creative as your skillset grows.
- Poster board – Buy good, thick stock for making your patterns. Leather moves when you work with it, so you’ll definitely want to make patterns of the pieces you’ll be cutting out.
Depending on your project, there could be a much longer tool and material lists. Things like rivets, buckles, snaps, and d-rings could be on this list. Let’s start small, shall we?
The Project
Now that you have your materials, you are ready to begin. For the purposes of this article, we will begin where I began– with a card wallet.
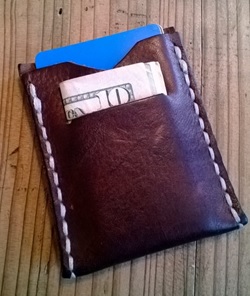
This is one of the first card wallets that I made. As you can see, it’s a very simple straight-forward design.
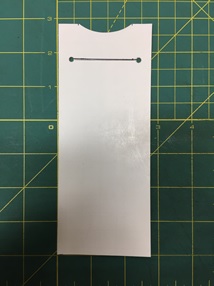
- Make your pattern
Measure out and mark the following dimensions on your poster board: 2 3/4” x 6 3/4”. The slit should be 2 1/8” wide.
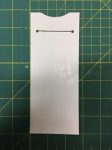
Use your utility knife and the edge of your metal ruler to cut out the pattern. Be as exact as possible. This will help immensely later in the process. Cut the slit open at this point as well.
- Mark your pattern on the hide
Lay your pattern on the finished side of the hide. I like to use a paperweight to hold the pattern in place so it doesn’t slip while tracing it. Use the awl to trace the outside of the pattern and the slit.
- Cutting the leather
Using your metal ruler as a guide, cut along the lines you marked on the finished side of the hide, being careful to keep your knife upright and the ruler still throughout the process.
This is a stressful part of the process when you’re just beginning. You’ve probably paid a decent amount for your hide and don’t want to mess up. Have no fear; we’re starting with a small project and you can’t mess it up that badly.
Now take one of your small washers and align it flush to the edges of the top right corner. Use your utility knife to trim off the edge using the washer as a guide. This should result in a nice, rounded corner. Repeat for each of the four corners.
- Marking your stitch lines
Set your Divider Wing to a width of 1/8”. You’ll notice that one of the tines on the tool is slightly longer than the other. Place the shorter tine on the leather and use the longer tine as a guide along the outside edge of the length of the hide. This allows you to mark a straight line a consistent width from the side of the piece. Do this on Side A and Side B.
- Punch stitching holes
Using your diamond punch, align the first tine of the punch just off the top of side A. The first tine won’t actually punch through the leather, if you do it correctly. This simply allows you to get a consistent alignment of the holes on each side. Line the remaining tines up along the line you just marked in step 4.
Use your mallet to hammer the punch through the leather into the cutting board. (Pro-tip: Do not do this into a table top or your cutting mat. It’ll ruin the table and is very hard on your punches over time.)
After punching through the leather, place your finger lengthwise along the face of the punch and hold the leather down while you extract the punch with your other hand. This will help keep the leather from stretching out as you remove the punch.
Now put the first tine of the punch in the last hole on the piece and hammer the next set of holes. Do this until you have a row of holes along the length of side A. Once that’s complete, do the same on side B.
- Fold and stitch
Now, fold your piece in half so the holes are aligned. To measure the amount of thread you’ll need, pull off a piece that is roughly 4” longer than the length of the folded piece and then double that length. You can cut two pieces to that length, as you’ll need the second piece for side B.
Thread your waxed cord through your stitching needle. We’ll be using what is called a saddle stitch. A saddle stitch is essentially a running stitch that is stitched in each direction. It’s especially durable, as you’re basically stitching the piece twice. This ensures that if one stitch breaks, the other will still be intact.
Start at the bottom where the piece is folded and push your needle and waxed cord through (yes, it may be difficult; yes, your hand will hurt if you stitch long enough!). Leave about two inches out of the end of the initial hole. Now, with your needle, go up to the next hole and back through. Weave your way to the top of the piece and then back down to where you started. Your stitch should look like the picture of the card wallet shown above.
Now you should have one end of the waxed cord point one way out of the initial hole and the other end with the needle pointing the other way. Take the needle and stitch back up one hole so your threads are both pointing the same direction, one hole above the other. Take your needle and thread it under the stitching to the immediate north (up) from where it is. Push the needle all the way through, which should create a small loop. Put the needle back through the loop and pull it tight. This will knot the thread.
Remove the needle and re-thread the other end of the waxed cord and knot that one in the same manner.
Now trim the loose ends to about 1/8”, and use the lighter to singe them down to nothing.
Voila, you have a card wallet!
With these simple skills and tools, you have the foundation you need to start creating (or surviving) using leather craft.