


I am sharing a better solution for protecting sensitive electronics stored in metal military surplus ammunition cans made into a Faraday cage. In the Part 1, I talked about the ammunition cans that can be used and began the instructions for building ammunition can gaskets by listing the materials and tools required. Part 2 of this series consisted of the bulk of the instructions of how to make and assemble the RF and EMP shielding gasket, and we are continuing with these today, in Part 3. The following instructions are for a 20mm M548 ammunition can.
16. If you want to “belt-n-suspender” the conductivity between the sheet metal gasket and the lid, then remove some of the paint to reveal bare metal so that you have a good bare metal contact between the sheet metal gasket and the lid.
The sheet metal gasket with the copper mesh tape will be the gasket that will attenuate any electromagnetic radiation. The highly-charged radiation will stay on the outside of the metal can, which is where you want it rather than inside the can. You also may tack a strip of tinned copper mesh to the bare metal areas of the lid to ensure good conductive and bonding between the sheet metal gasket and the lid.
17. On the lid, the gasket and copper mesh tape should now fit equidistance with the four sides of the lid.
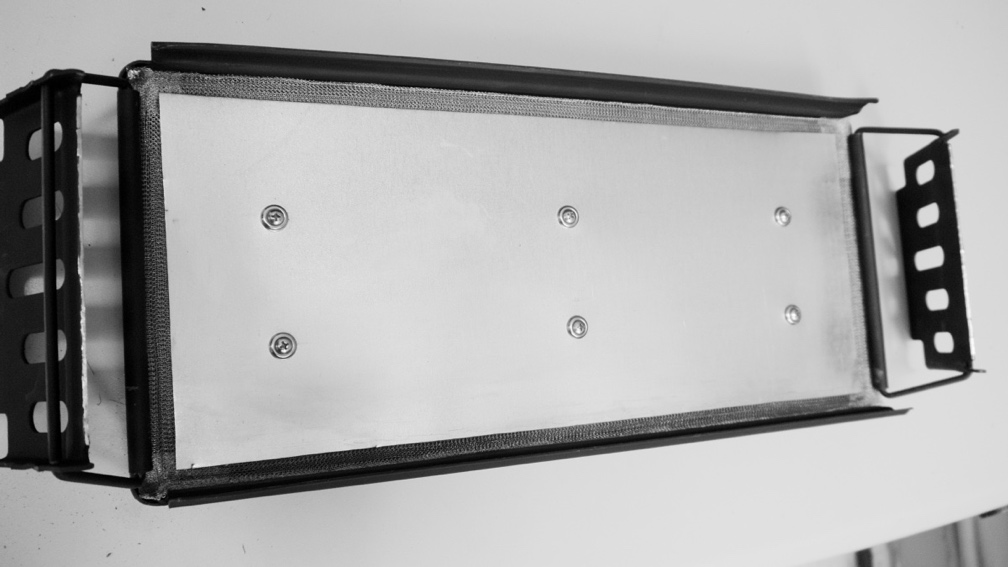
You should only see the sheet metal and the copper mesh tape on the perimeter of the gasket. You shouldn’t see any solder tack points. Otherwise flip the gasket over, unless you want to later admire your soldering work. Once you’ve got the gasket screwed and secured to the underside of the lid, now carefully push the shielding tape under the inside space between the lid and the rubber gasket. You should be able to push some of the mesh tape into the groove between the rubber seal and the lid. It’s important to use a rounded, blunt edge tool. Otherwise you could cut or tear the mesh tape with something that’s too thin and too sharp. (See picture.) As described above, you could use a very small bead of caulking to hold the copper mesh tape tightly against the inside edge of the lid.
18. The second critical step in the construction of the gasket is to make sure that you have bare metal contact and bonding between the lip or edge of the ammo can with the copper mesh shielding tape.
Furthermore, to have a contiguous and continuous exterior metal surface to shield or conduct any electrical charge, the copper shielding tape must be bonded to the sheet metal portion of the gasket, the sheet metal gasket must be bonded to the lid, the copper shielding tape must be bonded to the bare edge or the lip of the ammo can (e.g., sandwiched between the rubber gasket and the edge of lip of the ammo can when latched), and the latch on the lid must be bonded to the lower part of the can. Bonding means that there must be a bare metal to bare metal contact point or surface that would conduct any electrical charge on the exterior of the can.
Painted surfaces may be sufficiently thick to prevent the conduction of an electrical charge or current, unless this paint is removed at each of these locations. Make sure that you have bare metal-to-metal contact at the places described above. The most important area is the gasket and the copper mesh tape, which are bonded to the bare metal edge of the lip of the ammo can once the lid is securely latched. Remove any paint from those other areas that need a “bare metal-to-metal” contact and bond. Here’s where the Dremel tool makes this job really easy.
Soldering Tips
Here are some good soldering tips that should be considered before starting this project. They are important if you are unfamiliar with soldering copper, galvanized metal or sheet metal.
- The secret to good soldering is to clean the surface of any oxidation by lightly sanding or burnishing with course steel wool, use muriatic acid for flux to clean any oxidation on the metal surface, but rosin flux will work well too.
- I suggest an iron rather than a torch to heat the metal because the torch tends to get the material too hot too fast, and it may burn up the copper mesh electrical shielding tape.
- If you use acid flux (core, paste, or liquid), then make sure that you thoroughly wash off all of the flux to prevent any corrosion to the ammo box surfaces.
Effectiveness, Durability, and Reliability of the Copper Mesh Tape Metal Gasket
So, how effective are these shielded cans? I don’t have the sophisticated equipment to test the effectiveness of attenuating high frequency electromagnetic radiation or radio frequency interference. I do have some examples as to how effective these gaskets are in sealing and shielding the cans.
Water Tight Seal Tested
The first test was to fill one of the cans with a few gallons of water. The lid with the gasket was placed on the can and latched tight. I turned the can upside down and let is sit overnight. Then I looked for water leaks the next morning. There was no evidence that water leaked out. Impressive.
Cell Service Tested
Then tested the can by first placing a cell phone in the can to see if it would ring. No connection with the cell phone was made, and I heard no ring when the cell phone was called. While that was impressive, it was no assurance that the solution will effectively work. Attenuating any high frequency, high energy electromagnetic interference or radiation may be different
Radio Frequency Tested
Then I tested the can by placing my Yaesu VX-6 tri-band and Baofeng UV-5X3 handheld radios inside the can and using my Yaesu 50-watt mobile radio, a FT-8900R, to create a strong frequency. Tuned all radios to the same frequency in the 144, 220, and 440 Mhz ranges. Then I placed the mobile antenna about two feet away from the can. I then did a short transmission at 50 watts. I found it difficult to hear if the handheld radio picked up the transmission. So, I resorted to listening with a stethoscope to see if I could hear the radio inside the can. This didn’t work well. Finally, I used a small handheld tape recorder.
Yes, I have one of these from long ago when I’d dictated memos to my administrative assistant. So, I started the recorder and place it and the handhelds into the can. Then I keyed up the mobile VHF/UHF radio several times. There was nothing picked up inside the can by either radio. That was impressive.
These tests are fine and dandy for quick feedback. However they are unlikely to give meaningful data. They cannot simulate other high energy, high frequency, fast pulse electromagnetic radiation or geomagnetic radiation or similar interference. But there seems to be significant amount of attenuation of the different cellular and UHF/VHF radio frequencies with this simple gasket shielding solution. It’s better than nothing and will likely be effective. Each ammunition can that was tested also kept a water tight seal with the installed shielding gasket.
Modular and Compartmentalized Ammo Cans with RF and EMP Shielding
After several prototypes and testing of the shielding gasket, I quickly became convinced that this approach of shielding different sized ammo cans would be practical and effective. These cans are durable, water and air tight, stackable, and small enough to be easily moved by one person.
Building Several Modules
With all of the talk about the North Korea or Iran EMP threats, I’m glad to have gotten a head start in creating a solution to protect my sensitive electronics from EMP or a repeat of the massive geomagnetic solar storm in 1859. Using the shielding gasket on each 20mm ammo can, I went on to build out several modules. These were based on these shielded 20mm ammunition cans that now house my sensitive electrical equipment. They also hold computers, radios, and back-up solar power and generator parts.
Contents Should NOT Touch Interior Walls or Surface of Ammo Can
Remember, these ammo cans don’t need to be grounded to be effective. However, the interior of the cans and the items (especially the metallic surface of any item) inside the cans must not touch the interior surface of the can. Otherwise, you’ve defeated the purpose of the ammo can as a Faraday cage. Nothing metallic that is inside the can should touch the interior walls or surface of the ammo can. Everything inside the can should be wrapped in an insulating material. It could perhaps be placed in a cardboard box or mounted on polyethylene sheets to prevent anything from touching the interior surfaces of each can. Dense foam padding is also effective in keeping items in place and insulating the items from the interior surfaces of the can.
Storing Eight 20mm Ammo Cans
Using eight 20mm ammo cans, the following modules have been built, assembled, and stocked. Each can will accommodate the components described below. These eight cans are kept in a basement closet. The cans are stacked four across the back wall and two deep. They take up approximately 14 square feet of floor space and less than 27 cubic feet of space. All cans fit in the closet, are easily accessible, and doesn’t disturb the clothes hanging in the closet. This makes for a happy wife and a happy life.
Detailed, step by step pictures would be a huge bonus.
Did you do the same testing to an un-modified ammo can? Did it fail? If not, this is a whole bunch of time and effort (probably) better spent at a Red Cross class, at the range, or spending time with family.
If you think it’s worth it, then use what the pros use-
http://www.tech-etch.com/shield/fsgaskets.html in a style that just slips over the edge of the can. Shouldn’t take more than a minute per can.
or
https://www.lairdtech.com/product-categories/emi-shields-gaskets/fingerstock
nick
Would wrapping the stored items in aluminum foil before placing them in the ammo can add an additional layer of protection?
I use anti-static bags both to prevent any condensation / moisture and as a second layer of protection.
Paul – you can download the a couple of pictures from the blog that may be worth a thousand more words. May do a YouTube to
I’ve used the Laird finger stock – took more time to get it installed using some rivets, but in the end, the gasket seemed to be the better approach. Finger stock will work and with the double mesh layer around the perimeter you get RFI/EFI protection, while keeping the seal.
Just finished making 4 of these – took me about 45 minutes – from start to finish – gave them to a friend who will screw them on the lid.
Nick – didn’t test the cans with just the rubber seals – could work but I’m a “belt-n-suspenders” guy – but will see if there’s a difference. I use the modules described below as the go-gear for our local ARES group – the designated survivor if other gear gets burnt up.
From my research, the key consideration is to keep the exterior of the container (that would carry any of the charged radiation) from touching any conductive surface on the interior of the ammo can.
In one of the cans, I have 4 of the 10 watt Renogy PVC’s and double wrapped them using towel to keep them from touching the interior metal surface – snug fit and should do the job. In a couple of other cans, have the cans lined with polycarbonate sheets – 1/4″ for insulation. Here’s what I’ve got in the other cans:
1. Emergency Local Communication – a 50 Watt Quad Band Yaesu FT-8900R powered by two 7.5 amp hour batteries but with internal PowerPole connectors that may also be connected to the larger 140 amp hour Emergency Battery Bank (see below), plus a rollup j-pole antenna and LED flashlight with rechargeable batteries.
2. Emergency and Regular Use High Frequency Communication – a 100 watt Yaesu FT-896D with SignaLink USB for digital communication, and the can was able to accommodate a LGD tuner. The radio is powered by the 12-volt Emergency Battery Bank, or the power supply if running 120V or while using the inverter.
3. Emergency Battery Bank – four 12 volt 35 amp hour AGM batteries, including a Noco charger to trickle charge and maintain the batteries. Also keep a backup charging unit (sealed in a Mylar bag) in the Solar Power can just in case the charger gets fried while attached to the 120V household wiring. The can is very heavy and requires two people to tote this around since it weighs in at about 110 pounds.
4. Solar Power – contains one solar charge controller, a compact distribution box for six 100 watt solar panels, and the meters to monitor each component plus a some PVC connectors, wire and diodes, and my HF 120V 35-amp power supply. The Solar Power Can is charged by six 100 watt Renogy PVC panels but there are other better and tested solar power products that are worthy of consideration and use. These previously acquired PVC panels are stored in a metal cabinet that is shielded to some degree using Laird shielding products. Likely another good article needed to describe how this product was used to shield these PVC’s in the metal cabinet.
5. Computer, Data and Digital Information – contains an old but reliable 15” Windows 7 laptop with new hard drive, spare battery and power cord; an iPad with lots of documents and books stored in Amazon and iBook applications; backup hard drive; DVD and CD disks to restore operating system and key programs or applications; password protected thumb drives with important personal documentation, including the SurvivalBlog thumb drive with the full blog archive for reference in the future.
6. Electrical Equipment and Backup Parts – contains a couple of volt ohm meters, small weather radio, a rechargeable battery charger, a few backup parts for my Honda Generator, handheld GPS units (one that I use on my road petal bike and the other is an older model Garmin for hiking), the backup NOCO Genius trickle charger, a Kill A Watt meter, a couple of handheld VHF/UHF radios with extra batteries and charging equipment, and a 10 watt PVC battery charger. Most of parts are packaged in their original cardboard boxes or insulated from the interior walls of the ammo can.
7. Inverter – contains a 2,000 watt modified sine wave inverter, a few meters to monitor input and output, an 80 amp circuit breaker for use between the inverter and battery bank, a PowerPole power strip, extra fuses for the inverter, a 4 gauge wire to connect inverter to the Emergency Battery Bank, and a LED flashlight with spare batteries.
8. Inductive Cooktop – don’t laugh, using one can to hold a 1,200-watt induction cooktop which is powered by the 2,000-watt modified sine wave inverter (peaks at 3,000 watts) in the Inverter Can. The inverter is easily connected to the Emergency Battery Bank with the 4 gauge battery wires (remember, the shorter the better and with the modular can design these cans can be set very close to accommodate shorter cables and power cords). Amazingly, this cooktop draws less than 2,000 watts on startup, and boils a quart of water in less than 7 minutes. Perfect setup to quickly cook food and boil water. We use the Emergency Battery Bank and the induction cooktop for camping and cookouts or picnics but you must have the right pots and pans to cook with induction cooktops.
I keep a emp proof ammo can (or two) for every vehicle that i want to use after the schumer hits. I have one for my 1962 BMW R60/2 with 70’s era 900cc motor and sidecar. In it I keep a diode plate, alternator, ignition coils and points condensors. I am torn about whether or not i should try and keep a lead acid battery (dry of course) as well. Most tell me batteries will survive. It’s big and bulky, but my thought is that i could use a combination of d cells to get the alternator going while i kick start the bike.
Anything else that might burn up, wouldn’t be used anyway, like blinkers and lights. I did throw some bulbs and relays in the can anyway, but only because there was enough space.
I have cans made up for my 50s era massey ferguson tractor, my 60s era mercedes unimog and my mechanical injection vw diesel passat wagon. Right now, all of the miscellaneous pieces are relatively cheap to buy on ebay.
Great article by the way.
Oh yeah, i forgot to mention, i also keep my 12 volt dc electric gas pumps (with all of the hoses and battery terminal cables) in emp protected ammo cans as well, as i think the windings on the pump motors would disentigrate quickly due to the windings. I do forgoe the waterproofing on the ammo cans for these pumps, as i use them occasionally, and the residue from the fuel in the lines makes the GI rubber gaskets melt and leave a black sticky mess everywhere.