
Email a copy of 'Protecting Electronics in Metal Military Surplus Ammunition Cans- Part 3, by J.T.' to a friend
7 Comments
- Ad Discover Off-Grid Connectivity With Signal Nomad.Signal Nomad provides a variety of communications options for preppers: Extremely long-range wi-fi HaLow systems, power banks, power stations, Faraday protection for personal ...
- Ad STRATEGIC RELOCATION REALTYFOR SALE: Self-sustaining Rural Property situated meticulously in serene locales distant from densely populated sanctuary cities. Remember…HISTORY Favors the PREPARED!
Detailed, step by step pictures would be a huge bonus.
Did you do the same testing to an un-modified ammo can? Did it fail? If not, this is a whole bunch of time and effort (probably) better spent at a Red Cross class, at the range, or spending time with family.
If you think it’s worth it, then use what the pros use-
http://www.tech-etch.com/shield/fsgaskets.html in a style that just slips over the edge of the can. Shouldn’t take more than a minute per can.
or
https://www.lairdtech.com/product-categories/emi-shields-gaskets/fingerstock
nick
Would wrapping the stored items in aluminum foil before placing them in the ammo can add an additional layer of protection?
I use anti-static bags both to prevent any condensation / moisture and as a second layer of protection.
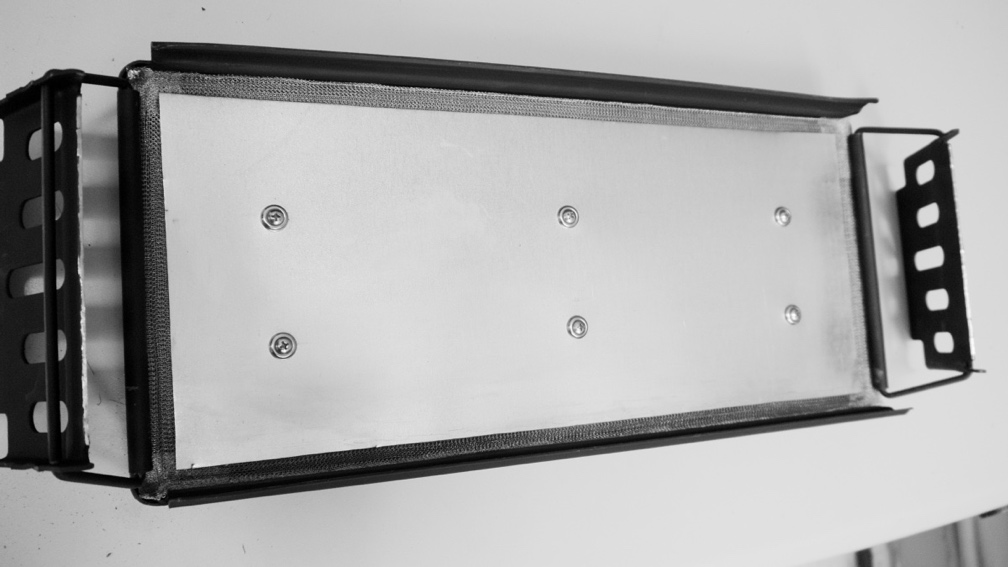
Paul – you can download the a couple of pictures from the blog that may be worth a thousand more words. May do a YouTube to
I’ve used the Laird finger stock – took more time to get it installed using some rivets, but in the end, the gasket seemed to be the better approach. Finger stock will work and with the double mesh layer around the perimeter you get RFI/EFI protection, while keeping the seal.
Just finished making 4 of these – took me about 45 minutes – from start to finish – gave them to a friend who will screw them on the lid.
Nick – didn’t test the cans with just the rubber seals – could work but I’m a “belt-n-suspenders” guy – but will see if there’s a difference. I use the modules described below as the go-gear for our local ARES group – the designated survivor if other gear gets burnt up.
From my research, the key consideration is to keep the exterior of the container (that would carry any of the charged radiation) from touching any conductive surface on the interior of the ammo can.
In one of the cans, I have 4 of the 10 watt Renogy PVC’s and double wrapped them using towel to keep them from touching the interior metal surface – snug fit and should do the job. In a couple of other cans, have the cans lined with polycarbonate sheets – 1/4″ for insulation. Here’s what I’ve got in the other cans:
1. Emergency Local Communication – a 50 Watt Quad Band Yaesu FT-8900R powered by two 7.5 amp hour batteries but with internal PowerPole connectors that may also be connected to the larger 140 amp hour Emergency Battery Bank (see below), plus a rollup j-pole antenna and LED flashlight with rechargeable batteries.
2. Emergency and Regular Use High Frequency Communication – a 100 watt Yaesu FT-896D with SignaLink USB for digital communication, and the can was able to accommodate a LGD tuner. The radio is powered by the 12-volt Emergency Battery Bank, or the power supply if running 120V or while using the inverter.
3. Emergency Battery Bank – four 12 volt 35 amp hour AGM batteries, including a Noco charger to trickle charge and maintain the batteries. Also keep a backup charging unit (sealed in a Mylar bag) in the Solar Power can just in case the charger gets fried while attached to the 120V household wiring. The can is very heavy and requires two people to tote this around since it weighs in at about 110 pounds.
4. Solar Power – contains one solar charge controller, a compact distribution box for six 100 watt solar panels, and the meters to monitor each component plus a some PVC connectors, wire and diodes, and my HF 120V 35-amp power supply. The Solar Power Can is charged by six 100 watt Renogy PVC panels but there are other better and tested solar power products that are worthy of consideration and use. These previously acquired PVC panels are stored in a metal cabinet that is shielded to some degree using Laird shielding products. Likely another good article needed to describe how this product was used to shield these PVC’s in the metal cabinet.
5. Computer, Data and Digital Information – contains an old but reliable 15” Windows 7 laptop with new hard drive, spare battery and power cord; an iPad with lots of documents and books stored in Amazon and iBook applications; backup hard drive; DVD and CD disks to restore operating system and key programs or applications; password protected thumb drives with important personal documentation, including the SurvivalBlog thumb drive with the full blog archive for reference in the future.
6. Electrical Equipment and Backup Parts – contains a couple of volt ohm meters, small weather radio, a rechargeable battery charger, a few backup parts for my Honda Generator, handheld GPS units (one that I use on my road petal bike and the other is an older model Garmin for hiking), the backup NOCO Genius trickle charger, a Kill A Watt meter, a couple of handheld VHF/UHF radios with extra batteries and charging equipment, and a 10 watt PVC battery charger. Most of parts are packaged in their original cardboard boxes or insulated from the interior walls of the ammo can.
7. Inverter – contains a 2,000 watt modified sine wave inverter, a few meters to monitor input and output, an 80 amp circuit breaker for use between the inverter and battery bank, a PowerPole power strip, extra fuses for the inverter, a 4 gauge wire to connect inverter to the Emergency Battery Bank, and a LED flashlight with spare batteries.
8. Inductive Cooktop – don’t laugh, using one can to hold a 1,200-watt induction cooktop which is powered by the 2,000-watt modified sine wave inverter (peaks at 3,000 watts) in the Inverter Can. The inverter is easily connected to the Emergency Battery Bank with the 4 gauge battery wires (remember, the shorter the better and with the modular can design these cans can be set very close to accommodate shorter cables and power cords). Amazingly, this cooktop draws less than 2,000 watts on startup, and boils a quart of water in less than 7 minutes. Perfect setup to quickly cook food and boil water. We use the Emergency Battery Bank and the induction cooktop for camping and cookouts or picnics but you must have the right pots and pans to cook with induction cooktops.
I keep a emp proof ammo can (or two) for every vehicle that i want to use after the schumer hits. I have one for my 1962 BMW R60/2 with 70’s era 900cc motor and sidecar. In it I keep a diode plate, alternator, ignition coils and points condensors. I am torn about whether or not i should try and keep a lead acid battery (dry of course) as well. Most tell me batteries will survive. It’s big and bulky, but my thought is that i could use a combination of d cells to get the alternator going while i kick start the bike.
Anything else that might burn up, wouldn’t be used anyway, like blinkers and lights. I did throw some bulbs and relays in the can anyway, but only because there was enough space.
I have cans made up for my 50s era massey ferguson tractor, my 60s era mercedes unimog and my mechanical injection vw diesel passat wagon. Right now, all of the miscellaneous pieces are relatively cheap to buy on ebay.
Great article by the way.
Oh yeah, i forgot to mention, i also keep my 12 volt dc electric gas pumps (with all of the hoses and battery terminal cables) in emp protected ammo cans as well, as i think the windings on the pump motors would disentigrate quickly due to the windings. I do forgoe the waterproofing on the ammo cans for these pumps, as i use them occasionally, and the residue from the fuel in the lines makes the GI rubber gaskets melt and leave a black sticky mess everywhere.