


First off, let me say that I am very grateful to have SurvivalBlog. Over the years, I have learned so much from the accumulated wisdom of the writers and the administrators. I felt that it was time to give back to this community, so I decided to share what I have learned over many years of reloading my own ammunition for rifle and pistol, while being conscious of both budget and space/OPSEC concerns. Please believe that you don’t need to spend thousands of dollars or have a 1000-square-foot shop dedicated to reloading in order to produce your own high-quality reloads that will serve you as well or better than factory ammunition, which is especially valuable for times when factory ammo may not be available due to another buying frenzy or government action.
Several years ago I purchased my first high powered rifle. One of my first considerations was that it was kind of expensive to feed this rifle, but feed it you must, if you want to become proficient with it. I went for a while buying ammunition and saving my brass until I ultimately decided that it made economic sense to get into reloading. If you look at the economics of reloading, it is certainly less expensive to reload your own ammunition, and in some cases a lot less expensive, if you don’t factor in your time as a “cost”. If I paid myself a “salary” to reload, it wouldn’t make sense, but I reload as a hobby and to get comparatively lower cost and higher quality rounds to shoot. Veteran reloaders will often say, “You don’t save money reloading, but you do shoot more for the same money.” Your mileage may vary.
At its simplest, a round of center fire ammunition has the following components: brass case, primer, propellant, and projectile. The projectile, or bullet, is obviously the part that goes downrange. The propellant, or powder, is what burns to move the projectile, and the primer, or cap, is what is hit by the firing pin and explodes to ignite the propellant. The brass case holds them all together. Reloading is the “art” and “science” of taking these components, replacing what is expended, and combining them into a usable round of ammunition.
Once you have decided to reload your ammunition and are ready to get the equipment, there are a few considerations. First, consider what you primarily shoot (rifle or pistol) and how much you shoot. The type of reloading setup you need, if you shoot 2-3000 9mm rounds a month, is very different from the person who shoots a couple hundred 9mm, a few magazines of .223/5.56, and a couple boxes of .308. I found myself in the latter category. Since my motivation was also partially economic, I decided to go with one of the single stage “kits” from one of the major reloading supply companies. (I went with Lee Precision, but several good-quality manufacturers, including RCBS and Hornady offer similar kits to suit this need.) Typically, these kits contain a reloading press, a scale, a powder measure, and various other odds and ends, depending on the particular kit. Single stage means that since there is only one working point on the press, you can only do one operation at a time.
I decided not to go with one of the progressive presses. These are more or less automatic machines, which make a completed round of ammunition with each pull of the handle, as long as you keep feeding it components (bullets, cases, primers, et cetera). They are a great option for the person above who shoots 2-3000 pistol rounds a month. Progressive presses tend to be fairly costly and can be tricky to set up. I had to be able to move my press around, so I didn’t want to have to set it up again each time I got it out.
Once you have the kit, you also need to purchase caliber-specific reloading dies. These dies de-prime and resize brass and allow the projectile to be seated on the case. There are many companies that make dies, and the dies themselves and the presses are typically universal. That means even if you have a Lee press (as I do), you can still use RCBS or Hornady dies.
When deciding how and where to mount my press, I ran into a problem. I wanted to be able to move my reloading equipment out of the recreation area of my basement whenever my kids had their friends over. There was no sense letting a bunch of teenagers know there were guns and “explosives” in the house. This meant I couldn’t just build a bench and mount the press to it, since it would be difficult and time-consuming to remove, and then I’d still have a workbench in my basement.
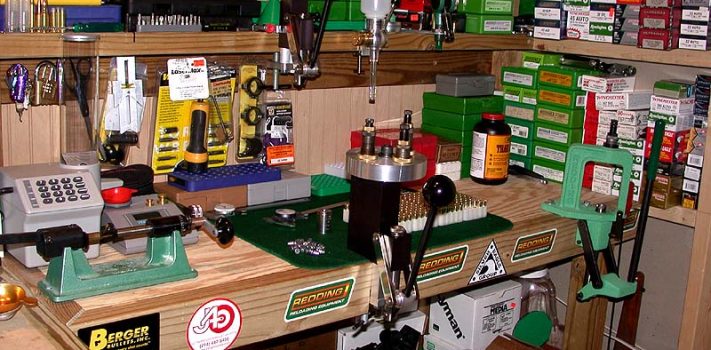
One weekend at a yard sale, I found a well-used Black and Decker collapsible clamping workbench that I ultimately picked up for free, just for agreeing to haul it away. The owner had lost most of the clamping attachments, it had some surface rust, and the wood top was water damaged and de-laminating. None of this mattered to me, because I had just found my solution. I took a piece of counter top left from a kitchen remodel, cut it down to fit the top of the collapsible bench, and bolted the two together. Then I sanded the rust spots and used a can of spray paint (left over from another project) to cover. Now I have a reloading bench that folds to about 10 inches high, and allows me to keep my press mounted, as long as I am careful not to beat it against the wall when I store it away.
When I want to do some reloading, it is simple to get the bench out of the storage/gun room, open it up, level it, and commence. The wide legs make for a stable surface, even when resizing bottle necked rifle brass, which does take a certain amount of force. The counter top is a little small, but I was willing to trade some space for portability. I really didn’t need a great deal of space, since I usually don’t load more than 200 rounds at a time. There is plenty of space for the press to stay on the bench and still have room for either the scale, if I’m weighing powder charges, or the powder drop measure, if I am dropping charges. I’ll talk more on this in a moment.
When you decide to start reloading and you have secured the equipment that you need, the next and perhaps most important item is a reloading manual. Most bullet manufacturers publish a manual with a range of loads for all combinations of bullet, weight, powder, primer, et cetera. It is important to follow these directions in order to have a safe finished product. Reloading, like many tasks that we undertake in our daily lives, can be hazardous if not done correctly. Please avoid distractions while reloading, and never consume alcohol or drugs while reloading. By taking appropriate safety precautions, you can have a high quality reload that will function properly in your firearm.
When you are determining which caliber you want to reload, consult your manual to determine what propellant works best with your chosen bullet style, weight, et cetera. As you can imagine, there are many different bullets for many different applications. The specific propellant will depend on the type of bullet and the exact round you are reloading for. Many propellants will work for a range of different rounds, but you may need several different propellants, if you are reloading for many different rounds. Except in very limited circumstances (300 AAC Blackout comes to mind), propellants that are used for pistol rounds are not appropriate for rifle rounds and vice versa.
My first step when starting to reload is to clean my brass cases. When the brass comes out of the firearm, carbon deposits are left on the case, dirt is picked up off the ground, et cetera. These items must be removed or you risk damaging your reloading dies. I take a minimalist approach to cleaning my brass. There are electric tumblers and vibrating cleaners that do a fine job, but they depend on electricity. What if there was no electricity? Shiny brass is pretty but does not have any advantage over “subdued” brass. All you need to do is get the dirt and carbon off the brass. I use a couple of buckets, some water, and a few teaspoons of Dawn dishwashing liquid. Heat the water, pour it over the brass in one bucket until it is completely covered, add the Dawn, and pour the water/brass mixture between the two buckets a few times to agitate. Then let soak for 15-20 minutes and repeat. You can do this a few times. Then, I change out the water and do not add Dawn. I will repeat again a few times and then change the water as needed until no more soap bubbles appear. Finally, I lay the brass out on an old cookie sheet or two to dry. I have placed them in the sun to speed up the process or, if I was really in a hurry, into a 250-300 degree oven for 20-30 minutes.
Pistol cases are now ready to be de-primed and resized. With rifle cases, I run them through a de-priming die that does not resize before I clean them. I think they dry quicker that way. Your sizing die squeezes the case back into factory specifications and makes sure that the case neck is properly sized to seat the bullet in a future step. Most bottlenecked rifle cases require lubrication before sizing, as do pistol cases if you are not using carbide resizing dies. You set up the dies per the manufacturer’s instructions, place the case into the shell-holder that attaches to your press ram, and pull down the handle. The case goes into the die and is returned to factory size, while a pin pops out the old primer. Repeat as necessary until all cases are resized and de-primed.
There could be other steps inserted at this point as necessary. Occasionally the primer pockets, where the old primer was popped out, will need to be cleaned. Sometimes, especially with rifle brass, you will need to trim the brass to the proper length. This is because resizing the cases actually stretches the brass slightly. This is not usually needed with pistol brass. I typically resize all of the cases I have cleaned and case-prepped before moving on to the next step. I keep ammo cans with prepped cases on my storage shelves ready to move on to the next step, which is priming.