With spring finally here, many a homesteader is turning their thoughts to this year’s vegetable garden. Whether their garden is large or small, experienced gardeners know the successful garden begins well before the seed is planted. Many gardeners diagram on paper where they want to plant what vegetable, how many rows of each, and calculate how many bedding plants or how much seed they will need. Then, it’s off to the seed catalogs or local nursery to stock up.
For many of us who have been raising gardens for a long time, there’s nothing quite like planting seeds in grow boxes to raise our own bedding plants or planting seeds directly into the ground. I confess, I go to the garden everyday to see if the seeds I planted have sprouted. I walk to the end of the row, and even after all these years I still get a thrill when I see a perfect row of tiny plants breaking through the soil. When that happens, I know I’ve been successful at least up to that point.
Being successful as a gardener brings many rewards; you learn and develop a practical skill, provide food for yourself and family, lower grocery bills with home-grown produce, enjoy the freshest of food, and hopefully grow enough to dry, can, or freeze the extra for later non-season use. Yes, the benefits are many, but the disappointments can be there as well. Here, where I live in Tennessee, summers can be extremely hot and dry. In some years, I will not cut my grass for three or four weeks at a time, because we’ve received so little rain. No rain means all the hard work I’ve put into my garden to that point is completely wasted. Nothing, and I mean nothing, is more disappointing than watching your plants wither and die because of no rain.
Mother nature does the best job of watering; it’s far superior to anything I can do with a garden hose and a few hundred gallons of city (read chemicals added) water. But during periods of drought, especially when your plants are setting fruit, regular amounts of water are vital. Enter a rainwater harvesting system. Yes, you still have some work to do to actually water your garden, but with harvesting rainwater your plants will get the best water possible. You’ll also save money on your water bill, and depending on where your garden is located you may be able to significantly reduce the number of hoses you have to buy, maintain, and use to stretch from your home faucet to your garden. Perhaps the best reason of all is that by harvesting rainwater you will never be completely dependent on your municipality’s electric-driven water pumps to obtain water. If we are ever faced with a TEOTWAWKI situation, raising your own food will take on an extremely critical role in your personal long-term survival. With no city water available, your rainwater harvesting system will take on added importance, providing you and your family with precious drinking water as well as water for your garden.
I built my own version of such a rainwater harvesting system several years ago and have used it with great success ever since. It was very easy to build, requires virtually no maintenance, and is 100% efficient in capturing and storing rainwater. I already had four 55-gallon metal barrels I’d picked up a few years ago, but I wanted an additional four barrels to store more water. After making a few neighborhood inquiries, I found the four additional barrels I needed. Eight barrels gave me a total storage capacity of 440 gallons.

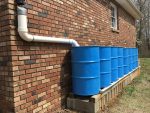
It wasn’t hard in determining where my harvesting system was to be located. My 6,200 square foot garden space is behind a 20′ x 32′ garage. I wanted to capture the rainwater runoff from the garden-facing roof of the garage, so I figured it would be easy enough to set the rain barrels side by side along the garage wall. (Figure 1.) Water is heavy, weighing in at 8.34 pounds per gallon. A full 55-gallon drum is going to weigh nearly 460 pounds; that’s a lot of weight, and a proper foundation is critical for a trouble-free system.
After determining where the barrels would be located, I began leveling the ground with a hoe and a four foot level. Because the ground was on a slight slant, and because I’m basically lazy and didn’t want to do a lot of digging, I used some old brick on a part of the slope to help level the ground. Next, I set twelve standard 8” x 16” concrete blocks end to end directly along the garage wall on the ground or bricks making sure they were reasonably level. That completed the back side of my foundation. Then, I measured 24” out from the wall (the width of a 55-gallon barrel) and put a second row of concrete blocks to finish the foundation. Knowing that each barrel would weigh 460 pounds when full, I decided to lay 4” x 4” posts on the concrete blocks to help more evenly distribute the overall weight. Then, I set the first barrel in place.

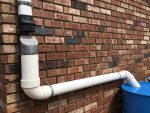
I located the first barrel a few feet away from the downspout, since I wanted to route the water directly into the top of this barrel. I cut the downspout off about 24” above this barrel and ran a short piece of 4” PVC pipe from the downspout to a hole I cut into the lid of the barrel. (Figure 2.) I secured the piping with metal straps screwed into the garage wall. One PVC elbow on each end of the 4” PVC pipe directed the water from the downspout through the pipe and into the first barrel. I wanted to be able to filter out any small twigs, leaves, and other debris, so I cut a slant to the PVC collector and covered it with screen wire. The screen easily filters out what I don’t want in the barrels but lets the water pass through. I cut the PVC collector at a slant so any debris caught by the screen is simply washed off by the flow of water. When the barrels are completely full of water, I cover the PVC collector (a small plastic bag works great) to shed off any more water, letting it simply fall on the splash guard on the ground below. When I want more water, I take the plastic bag off and collect all the water I need.

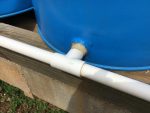
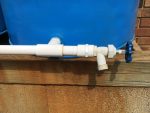
I drilled a 1 1/4” hole on the side of each barrel, 2” up from the bottom, and inserted a 1” x 3/4” PVC adapter (thread & slip) pipe threaded on one side and secured it with a nut. I used a rubber washer on both sides of the barrel to prevent leakage and, just as added insurance, sealed both sides with a waterproof sealant. I then attached 1” PVC elbows, pipes and tees to link each of the barrels together. (Figure 3.) At the end of the piping (the barrel furthest from the downspout), I added a plastic faucet with threads for a hose attachment (Figure 4.) My rain harvesting system was complete. Now for the fun part (Reference Figure 1.) You will notice that only the first barrel has water emptying into it from the top. None of the other barrels has any water emptying into their top. That is because as the first barrel begins to fill with water, the water flows through the 1” PVC piping into the second barrel, then to the third, and so on. Water always seeks its own level, so all of the other barrels fill as the first one does. Essentially, the barrels fill from the bottom up! (I always have fun with that one when I explain it to my neighbors.)

It is fairly easy to calculate the number of gallons you will collect from the amount of rainfall you receive. The size of your roof, the “catchment area,” will determine how much rainwater you will harvest during any one rainfall. To calculate the number of gallons you will collect, you will need to measure the dimensions of the roof from which you will collect water. Convert each measurement into inches (multiply x 12). Multiply the two numbers together and determine the number of square inches of the roof or “catchment area.” Then, multiply this by the number of inches of rain you receive. Divide that number by 231 because one gallon equals 231 cubic inches. The result is the number of gallons you will collect.
The Example of My Roof
I am collecting rainwater from only one side of my garage roof. That roof measures 12′ x 32′ or 144” x 384”; the catchment area is therefore 55,296” square inches. Let’s assume I get 1.5” of rainfall. Multiply the total square inches by the amount of rainfall and divide that amount by 231. In this example, 55,296 x 1.5 = 82,944 / 231 to determine 359.0 gallons of harvested rainwater. I have eight 55-gallon barrels for a total of 440 potential gallons of water storage. With 1.5” of rain, I have already collected 80% of all the water my barrels can hold. That’s not bad!
This is a relatively easy rain harvesting system to construct. I already had the concrete blocks and 4 x 4 posts. The 55-gallon barrels were given to me, so all I was out was some PVC piping, rubber washers, a tube of sealant, and a faucet. The project took me a couple of days working just part-time to construct the foundation, drill holes in the barrels, and cut and tie together all the PVC piping. I worked the entire project by myself. With help, it could have been done in much less time. I’ve used this system to harvest rainwater from early spring through the fall with excellent results. My barrels have never leaked and are nearly always full. After I use them to water my garden, they are always ready to accept every bit of rainwater that falls. In the hot summer, a half inch of rain doesn’t seem like much, but a half inch of rain on my 55,296 square inch catchment area is equal to nearly 120 gallons of free water, which is more than a welcome thing for a thirsty garden.
My biggest question in designing and building this rainwater harvesting system was whether or not I’d actually have enough water pressure coming through the hose to water effectively. I did have one slight advantage. My garden is on a gently sloping hillside, so I had not only the water pressure within the barrels themselves but a slight drop in elevation. I could stand in the center of my garden, which is forty feet from my water barrels, and had enough water pressure that I could hold my thumb over the end of the hose and squirt water a good four feet away. For me, that was acceptable. Of course, if you wanted to add a small water pump, you could do far better. But this was my project, and I’m pleased with the results.
Additional thoughts and hints:
- With the height of the concrete blocks and the 4” x 4” posts, I had a good foot above ground level for the barrels. You cannot go so high that the foundation is unsteady, but some height is an advantage. It allows plenty of room to attach your garden hose and also for filling buckets, watering cans, et cetera, and it provides for better drainage when watering with a hose. In addition it makes for easier weed eating or mowing right next to the concrete blocks without the PVC pipe or barrels being in the way.
- I also covered each barrel with a top. You don’t want all manner of debris settling in the water, not to mention mosquitoes and bugs. The cleaner you are able to keep the stored water, the easier and faster it will flow through your hose.
- I did not cement any of the PVC pipes together. They fit snugly enough that they never leaked. When very cold weather comes, I drain the tanks and take the piping apart to keep any residual water from freezing and bursting them. It’s an easy job, taking only minutes; plus, it gives me a chance to thoroughly inspect and clean any sediment that may have settled in them during the past several months of use. (If you live in a more temperate climate, you’ll be able to leave your system intact.)
- The first time I took the piping apart, I numbered each PVC piece with a permanent marker so reconstructing them next spring would be an easy chore to put them back in exactly the same location. Theoretically, all the pieces should be interchangeable, but with even slight variations in drilling holes and cutting PVC pipe, well, it’s just easier reassembling everything exactly like I originally put it together.
- This design will work with one barrel (you’ll forgo any of the connecting PVC pipe) or with any number of barrels you choose. I used eight because I wanted to have an ample supply of water to use during drought periods, and 440 gallons seemed about right to me. You can start with two or three and add to it as time goes by.
No doubt, there are many designs for rainwater catchment systems. The design I used was easy to construct, required very little time, and was more or less permanent. It also cost me very little, because I had four barrels and was able to scrounge four more. I’ve used harvested rainwater to water my garden for several years now with little maintenance and no trouble. Plus, for much of the year, I rest easy knowing that if for any reason the grid goes down, I’ve plenty of water ready for my Berkey filter.


Great article….thanks! I’ve been thinking about devising this type of water catchment system. Turns out you did the legwork for me on this project. Sounds like your home and garden set-up are identical to mine….even in the same state!
If I may gently point out that the world health organization said the leading cause of lead poisoning in the western world comes from PVC. The lead is used as a stabilizing agent when they manufacture PVC. If I may suggest that you go and do a search on it, I’m not much of an expert and I read that comment from the WHO more than ten years ago. Perhaps you should use galvanized iron, or poly ethelene, or copper pipes.
You didn’t address it but what kind of roof do you have? If it’s asphalt shingles then you should know that they will leach petroleum byproducts, not to mention all the grit, into your crops.
Great article, very informative & detailed. For 30 years I have been using a single 55 gal. barrel under 2 down spouts. It has always been enough water for my garden in between rains. Last summer I ran short. I’m going to add 4 barrels using your plans. I’m also looking into using gray water from my shower and bath tube. Thanks for sharing.