


I consider a home generator to be one of the more important preparedness items for coping with the very steep learning curve we’d all go through while adjusting to a TEOTWAWKI situation. While finite fuel supplies will limit its usability for most of us to just a few months at best, with our own generator the immediate aftermath of a permanent grid-down world would be much more tolerable during the first few days and months of adjusting to the “new normal”.
Based on my own preps test a year ago (My Ten-Day Test-My-Preps Adventure Part 1, Part 2, Part 3, Part 4), if the SHTF we’ll discover we’re not quite as prepared as we had hoped to be. There are too many variables, some of which we couldn’t possibly have thought of and prepared for as I’ll soon demonstrate. The last thing to be worried about while making the transition is the availability of electricity. Based on our current lifestyles, it’ll be very difficult adjustment when it’s gone.
This article relates two major problems I experienced with my portable 5000-watt generator in the past year, one during the aforementioned 10-day preps test, the other this past summer during my monthly generator test. This article also explains how the problems were solved, how to avoid them, and how many people could fix these problems today even without much mechanical aptitude. The end of the article has a list of suggestions for generator owners and how to prepare ourselves for a continuation of electricity if the SHTF while we’re struggling to adjust to our new grid-down life.
The Background
During my preps test which started around 8 PM, all went well the first night but trouble began the next morning when I tried to fire up the generator. It was soon obvious it wasn’t going to run. I was so swamped with other things I wasn’t even able to look at the generator for a few days. Later in the week while investigating the carburetor I discovered that due to my negligence in maintaining the engine and doing monthly tests, the needle valve which controls fuel flow was gummed in place. Worse yet, I managed to ruin it while disassembling the carburetor for cleaning, rendering the generator useless. Since I was simulating a TEOTWAWKI event, there was no way to replace the needle valve or buy a new carburetor. I spent the entire ten days without my generator which proved to be the single biggest wrench in the works. Fortunately, my 500-gallon water tank held 400 gallons or I’d have been in some serious trouble with no way to pump water from the well.
The second problem occurred recently during the monthly test. After completing the test, the engine fell out as I was putting the generator back in storage. It’s not something I could have anticipated so it wasn’t something I had prepared for.
While the needle-valve issue was impossible to fix while simulating a SHTF situation, the engine separating from the frame was fixable by jury-rigging it using tools and parts I luckily had on hand.
Small Engine Repair Book
While learning to repair small engines way back when, I spent $13 on an 8½” x 11” 100-page paperback book on the subject. While YouTube comes in handy, a book in hand is more versatile and easier to refer to during maintenance and repairs. The book is well illustrated and covers all types of small 4-cycle engines found in mowers, tillers, and generators as well as the 2-cycle engines found in chainsaws. Even for non-mechanical people, the book is easy enough to understand that almost anyone with the right attitude can repair many small engines using it. I strongly recommend a book of this type for today as well as a TEOTWAWKI prep.
Carburetors vs. Flush Toilets
To understand how simple a carburetor is, it works a lot the same way as a toilet flush mechanism. They both have only three moving parts and when toilets and carburetors don’t work properly, there are only a few issues which can be causing the problem.
The three moving parts in a toilet are a float, a water valve which opens when the float drops as water flows out of the tank, and a flapper valve at the bottom of the tank which closes to allow the tank to refill with water for the next flush. A carburetor also has a float, a fuel valve (called a needle valve) which opens to allow more gasoline into the carburetor, and a third part called the choke valve.
When a toilet won’t work properly, either the valve letting water into the tank isn’t functioning, or the float which opens and closes the water valve isn’t working, or the flapper valve isn’t closing preventing the tank from refilling. A failing carburetor has the same kinds of problems.
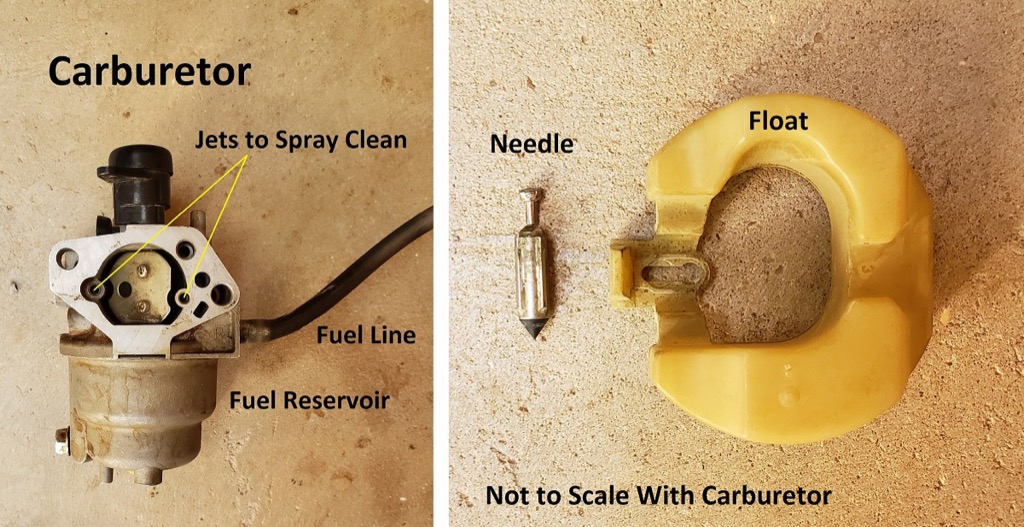
Photo 1 shows what a carburetor on a small engine looks like. At the top is the choke valve, and on either side of it are two of the jets which must be cleaned using a spray can of carburetor cleaner. At the bottom is the fuel reservoir. On the right half of the photo, when the fuel reservoir cap is removed the float can be seen as well as the needle valve which is controlled by the float.
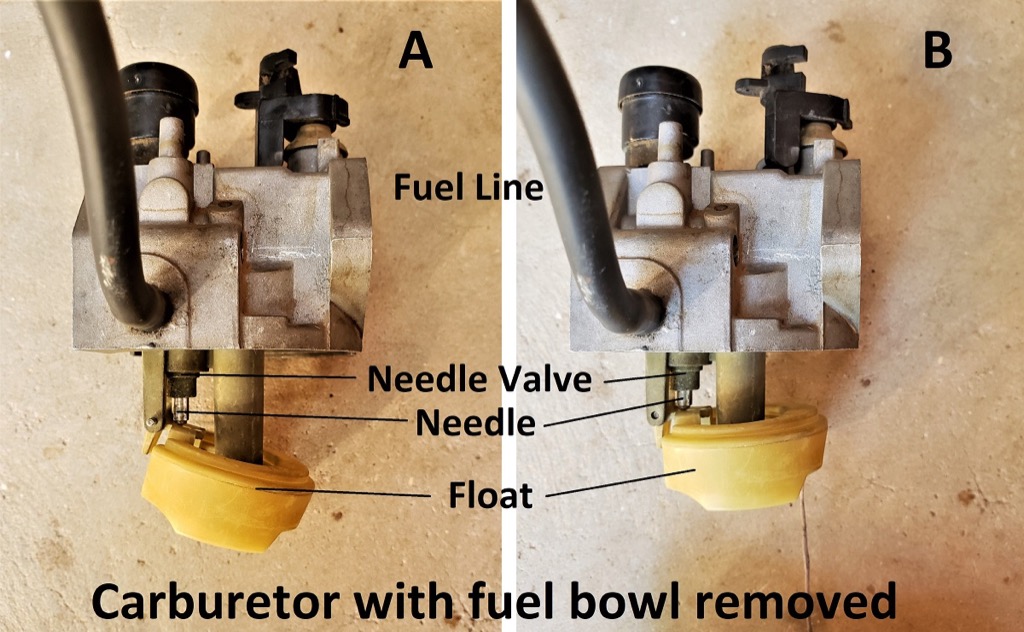
When a small engine won’t start or run properly, 98% of the time it’s due to a carburetor which is clogged and needs cleaning. As the engine burns gasoline, the carburetor float drops and pulls down on the needle valve allowing more gasoline to flow into the carburetor. When full, the float rises causing the needle valve to close again (Photo 2).
If the needle valve or the float which controls it fails, the engine will get either too much or too little fuel. In neither case will the engine run. A carburetor is easily cleaned using a spray can of carburetor cleaner available at Walmart, farm stores, and auto parts stores. By spraying all the small holes called jets (besides the two shown in Photo 1), as well as the needle valve, the carburetor can be unclogged and will function normally again. If you can repair a toilet, you can probably fix a clogged carburetor. It will take a little more time and different tools, but it’s not as difficult as you might imagine.
During a long power outage due to an ice storm, hurricane, or TEOTWAWKI if your carburetor isn’t clean enough your generator will fail and you’ll be as bad off as your neighbors. It pays to know how to clean it.
Fixing My Generator’s Carburetor
On my generator, the carburetor had so much goo in the jets from sitting idle for so long it was easy to see why it wouldn’t work. The needle valve was so clogged in its hole the fuel couldn’t enter into the next chamber of the carburetor. While trying to remove the stuck needle I broke it and that was the end of the story. There was no way to control the amount of gasoline and the engine couldn’t run again until the needle was replaced. I learned the hard lesson for the umpteenth time: Two is one and one is none!
After my 10-day preps test was over I began fixing the carburetor first thing.
Even though it was just the needle valve that went kaput during my preps test, I implemented the two-is-one philosophy and ordered a whole new carburetor for $25 to keep the old one on hand as a backup. I ordered a set of of five needle valves ($8) which will work in either carburetor.
When doing any kind of carburetor work it’s usually best to replace the gaskets which sometimes tear during removal. Five sets of gaskets cost $8, four to serve as backups.
In total, had I been prepared during my 10-day preps test $16 worth of backup parts would have saved the day and made the test easier and more successful. I can’t stress enough the importance of testing our preps in a several-day simulation, especially the more critical ones.
Monthly Tests
After my preps test and carburetor repair, I started testing the generator each month to be sure it would work the next time I needed it. Fresh gasoline flowing through the carburetor each month would help dissolve some of the buildup. I start it and let it run for 30 minutes. Instead of shutting the generator off with the kill switch, I turn the fuel petcock to the off position and let the generator run until the carburetor is out of gas. This helps to keep it from gumming up over time and causing fuel-flow issues. After each monthly half-hour test, I return the generator to its place in the garden shed. The generator is designed so it can be stored either in the normal run position or stood up on one end. I used to store it on end to save space but over time it proved to be a huge error which caused problem number two.
(To be concluded tomorrow, in Part 2.)