


Today’s world climate seems to reinforce more and more the need to be prepared for various situations that might arise. Everything from terrorism to tensions with whatever country it is this week. We all need to do our part to be prepared. This includes the medical side of things.
Knowledge and Practice
Nothing beats knowledge and practice of a particular skill set. Even without the proper tools, if you understand the principle inside and out, you can think of ways to adapt and use what supplies you have on hand. This is the true meaning of survival– making due with what you have on hand. Whether you stockpile thousands of items to make sure you have enough or you just wing it, you have to know the theories and principles behind why you are doing whatever you are doing or what the end goal is. Survival scenarios, whether TEOTWAWKI, or any other type require outside of the box thinking.
Principles Behind and Basic Purpose of Medical Supplies
Specifically, it’s important to understand the principles of use and basic purposes of our medical supplies. Without this understanding, we make poor choices and won’t know when or how to utilize them. Knowledge and practice are necessary.
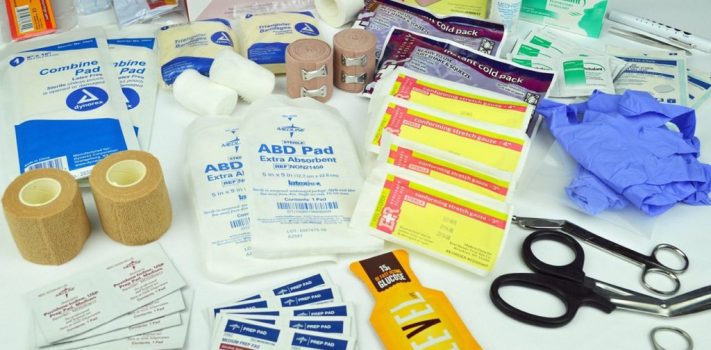
Basic Trauma Kit
A basic trauma kit for TEOTWAWKI scenarios should be able to be self sustained for days and weeks at a time. It should be resilient and able to withstand abuse. It should also be properly stocked to provide for the widest possible scenarios imaginable, all while still being mobile enough for your unique situation. Heavy duty cordura packs work best for these situations, whether military pack, hiking packs, or even a fancy Blackhawk tactical medical pack.
There are numerous house-based medical systems, vehicle based systems, and man portable systems available. All do the job of carrying your supplies for you. It is up to you and your group to evaluate which type works best for your situation. And it might even be all three with them getting progressively more advanced.
Dressings and Bandages
So called Israeli dressings are inexpensive and popular for pressure dressings. They come with directions on the package and are simple to use. Another good idea is to include Kerlix, or rolled gauze in your kit. These can be used for securing a splint to a body part, stuffing inside deep wounds to help control the bleeding, and even as a pressure baggage in a pinch. Triangular bandages or even handkerchiefs can be used to this purpose as well as creating slings and tourniquets.
Making a Tourniquet From a Triangular Bandage
To make a tourniquet from a triangular bandage will require a small stick or rod. A tactical pen can also be used in a pinch. Fold the triangular bandage so that it forms a long rectangle with 1 point on each end, about 1-2 inches thick. Wrap the triangular bandage 2 or so inches above the wound so that the pointed ends of the bandage are on top. (This is what you will tie the knot with.) Tie a square knot as tight as you can over the artery in question. On the second half of the knot, tie in your stick. Now you can twist the stick to tighten the tourniquet. Make sure that once bleeding has stopped to secure the stick so it doesn’t unwind, usually under the tourniquet itself.
Surgical Kit
I have previously discussed the need for a surgical kit in my previous Dirty Medicine articles. Having the means to remove ingrown nails, remove splinters, suture wounds, or even perform an amputation if need be are all valuable skills to have access to. Along with the surgical kit I recommended from Emergency Essentials, make sure to include various clamps or forceps. These can be used to clamp off blood vessels during repair or in emergency situations. You will also find them helpful for any number of smaller medical tasks. A well stocked surgical kit will have a few various scalpels, both curved and straight forceps, needle driver surgical scissors, suture materials of both catgut and Ethicon as previously discussed, and some syringes for wound cleaning.
Intravenous Fluids
I have also previously discussed the need for intravenous fluids. The easiest way to place these in a semi ready state is to take the bag without any of the plastic wrapping on it. (Remove it down to just the i.v. bag.) Then, place everything you need on the outside of the i.v. bag being taped down to it. These are called “footballs”. Also make sure to remove the tubing from its package as well. It will have covers on both the drip chamber end and catheter end that will keep everything clean.
The tape used to secure the catheter and tube to the bag can be reused when securing the i.v. in place. This method gives a tactical advantage in two ways. First, everything is self contained and readily deployable in case it is needed. Second, it cuts down on the amount of trash or artifacts left behind for others to discover.
Tourniquets
Tourniquets, as previously discussed, should be unit standardized and positioned in a unit standardized location on every member of the group. This will speed up their deployment if it is so needed, whether by the injured individual or a fellow team member. Remember that if you are applying a tourniquet to someone else, use theirs first! Don’t use yours and be out of it in case you need it for yourself or someone else down the road.
Other Useful Items
Other useful items might include a stethoscope and blood pressure cuff. These can be useful for determining various ailments and injuries. Anything from a punctured lung, dehydration, and stomach issues can be determined with these items and some reading/practicing.
More Advanced Practitioners
More advanced practitioners might consider chest seals and chest tubes along with some larger syringes. A chest seal is secured on three of the four sides allowing air to escape but not reenter the wound. It must be made or improvised of an airtight material (plastic usually). A chest seal is always your first response to chest injuries. Do not forget to look for and seal any exit wounds as well. If this is ineffective, you can start to treat for a punctured lung. Tension pneumothorax is air trapped in the pleural space causing a lung to deflate.
How to Diagnose Tension Pneumothorax
You can diagnose a tension pneumothorax in the following ways. There will be an elevated heart rate and increased breathing rate as well as a sharp pain that will make the patient feel tight in the chest. There may also be a cough present. Also, there will most likely be obvious signs of trauma, either entry and exit wounds or concussive wounds from explosions or falls from height.
Anatomy of the Ribs
Let us first examine the anatomy of the ribs. Each rib is connected to the next via intercostal tissues. Below each rib is a vein, an artery, and some nerves. This is why it is very important to always go along the top side of a rib when performing any procedures. You don’t want to cause more harm than good.
Addressing the Issue of Tension Pneumothorax
To address this issue you can take your catheter from your in i.v. kit and locate the space between the third and fourth rib in line directly down from the middle of the clavicle (collar bone). This should be in the general area if using the nipple as a frame of reference). Insert needle and catheter here perpendicular to the skin. Remove needle leaving the catheter in place. You should immediately hear air escaping the catheter. Secure the catheter in place and use a piece of tape to cover the end of the catheter. You will have to “burp” the catheter to continue allowing air to escape”. This is done by opening the tape seal on the catheter.
If Fluid Builds Up Around the Lungs
If this has been ineffective, you may have fluid build up around the lungs. This will present with the trachea deviating towards the non affected side. You will also notice diminished or nonexistent breath sounds from the affected side. The chest may also rise unevenly. This fluid will need to be drained to restore adequate breathing to the injured. This is most effectively done with a chest tube and an underwater seal or flutter valve. It can be accomplished, however, with a needle and syringe.
The best position for the needle and syringe method is with the injured sitting down and leaning slightly forward, like elbows in a desk. You would locate the 9th intercostal space (between the 9th and 10th ribs) on the back of the injured. Insert the needle with syringe attached directly over the top of the rib to avoid damaging any veins, arteries, or nerves. Once inserted apply backward pressure on the plunger of the syringe. You should notice a yellow or red fluid entering the syringe. Once all fluid has been removed, dress the puncture site with a bandage and monitor the patient. (Do not remove more than 1 liter in a four hour window.) This procedure can also be performed on a supine (lying down face up) patient by utilizing the same intercostal space on the side of the body below the armpit.
Inserting a Chest Tube
Inserting a chest tube is very similar, except that you must use even more caution, as you will have to cut the skin in the correct intercostal space and then force the pleural space open with forceps prior to inserting the tube. Then the tube must be sutured in place and secured. All of this can lead to vein, artery, or nerve damage, if not properly performed. The NATO War Surgery Manual goes more in depth on this for those interested further.
Knowledge and Practical are Vitally Important
As you can readily see, same as with other aspects of survival, it is not sufficient to just have the tools. Knowledge and practice are also vitally important. One must have achieved both book knowledge and practical knowledge in order to perform some of these procedures effectively.
I will reiterate once again that pigs make good human substitutes in rule of law times for practicing. Many military medical personnel have had to keep a shot and stabbed pig alive for 24 hours or more. This is a way to gain knowledge and experience. It also will allow for a pretty tasty meal or 18 later on!
SurvivalBlog Writing Contest
This has been another entry for Round 76 of the SurvivalBlog non-fiction writing contest. The nearly $11,000 worth of prizes for this round include:
First Prize:
- A $3000 gift certificate towards a Sol-Ark Solar Generator from Veteran owned Portable Solar LLC. The only EMP Hardened Solar Generator System available to the public.
- A Gunsite Academy Three Day Course Certificate. This can be used for any one, two, or three day course (a $1,095 value),
- A course certificate from onPoint Tactical for the prize winner’s choice of three-day civilian courses, excluding those restricted for military or government teams. Three day onPoint courses normally cost $795,
- DRD Tactical is providing a 5.56 NATO QD Billet upper. These have hammer forged, chrome-lined barrels and a hard case, to go with your own AR lower. It will allow any standard AR-type rifle to have a quick change barrel. This can be assembled in less than one minute without the use of any tools. It also provides a compact carry capability in a hard case or in 3-day pack (an $1,100 value),
- Two cases of Mountain House freeze-dried assorted entrees in #10 cans, courtesy of Ready Made Resources (a $350 value),
- A $250 gift certificate good for any product from Sunflower Ammo,
- Two cases of Meals, Ready to Eat (MREs), courtesy of CampingSurvival.com (a $180 value), and
- American Gunsmithing Institute (AGI) is providing a $300 certificate good towards any of their DVD training courses.
Second Prize:
- A Model 175 Series Solar Generator provided by Quantum Harvest LLC (a $439 value),
- A Glock form factor SIRT laser training pistol and a SIRT AR-15/M4 Laser Training Bolt, courtesy of Next Level Training, which have a combined retail value of $589,
- A gift certificate for any two or three-day class from Max Velocity Tactical (a $600 value),
- A transferable certificate for a two-day Ultimate Bug Out Course from Florida Firearms Training (a $400 value),
- A Three-Day Deluxe Emergency Kit from Emergency Essentials (a $190 value),
- A $200 gift certificate good towards any books published by PrepperPress.com,
- RepackBox is providing a $300 gift certificate to their site.
Third Prize:
- A Royal Berkey water filter, courtesy of Directive 21 (a $275 value),
- A large handmade clothes drying rack, a washboard, and a Homesteading for Beginners DVD, all courtesy of The Homestead Store, with a combined value of $206,
- Expanded sets of both washable feminine pads and liners, donated by Naturally Cozy (a $185 retail value),
- Two Super Survival Pack seed collections, a $150 value, courtesy of Seed for Security, LLC,
- Mayflower Trading is donating a $200 gift certificate for homesteading appliances, and
- Two 1,000-foot spools of full mil-spec U.S.-made 750 paracord (in-stock colors only) from www.TOUGHGRID.com (a $240 value).
Round 76 ends on May 31st, so get busy writing and e-mail us your entry. Remember that there is a 1,500-word minimum, and that articles on practical “how to” skills for survival have an advantage in the judging.
One overlooked skill is deploying the SOF-T tourniquet on yourself using only one hand. If you are shot in the arm, you will have to:
– open your first aid kit,
– remove the tourniquet,
– remove the shrink wrap from the tourniquet,
– unroll the tourniquet,
– place as high up as possible on the wounded extremity,
– and then tighten the tourniquet. (you may be dead by the time you get all this done).
What you can do to make it easier on yourself. Remove the wrapping in advance, store the tourniquet on your belt or other external location where it can be easily reached by either hand. Unspool the tourniquet to the maximum diameter and then fold on itself. This way you can quickly prepare it by whipping it out.
The RAT tourniquet is also easily deployed using only one hand.
J.V.:
The pre-prepared kits try hard, but they rarely fulfill your needs….
They can also be expensive when you can buy the same items it contains “over the counter” for far less.
Prior Planning Prevents P*ss-Poor Performance!
A good article but much too advanced for the average layman. Someone untrained in the use of these items could end up doing more harm than the original injury. Would you want your next door neighbor doing any of these procedures on you?
I do agree that you can assemble a really good aid bag OTC for less than the pre-filled commercial bags – but you need to weigh the convenience factor into the mix. Having said that, I will admit my kit contains many advanced items – well beyond my limited skills – not for my use but for a doctor or other medical professional who might be available to render aid.
The problem is; this is like ” A Riddle Wrapped in a Mystery Inside an Enigma”. If you are in a SHTF situation you would have to carry a pharmacy store with you to cover everything you might need. If you and a couple friends are in the wild country for a week or a month you would need a couple backpacks and a Sherpa to carry it all. There is no “right” medical kit, IFAK, etc. that will fill this need that can still be carried where you will need it when the need occurs. Assemble your kits and have them ready but when something bad happens your kit will be at home because it is too big to carry around with you all the time. I have pondered this until I am blue in the face (asphyxia LOL) and there simply is no right answer.
So here is my solution it works, kinda, in normal life but won’t be sufficient when TSHTF or WW III starts. My complete IFAK: Tourniquet, Israeli bandage, quick clot gauze. That’s it, fits in a small bag, easy to carry. Why? Because the most likely thing to kill me or someone around me is a bleeding wound that cannot be stopped easily, Kill you in a minute or two. Everything else falls into the category of you will survive it and either go get help at the clinic/hospital or maybe help comes to you OR it is the worst case and you cannot be saved because the trauma is so great that nothing short of full medical care is going to save you.
Don’t need any bandaids or Tylenol or anything else.
Tylenol and bandaids are small and light and should be part of your carry to ease pain. But to each his own.
Of course you are right. And you could have listed another 10 or 20 things that are also light and should be carried. And then another 10-20 things that would really be good to have with you and then another 10-20 things, ad infinitum. I’ve been there, done that. I have a IFAK in my car, my motor home, my bathroom, my backpack, m y day pack and even one in my fanny pack. I have a really big IFAK in a really big bag in the laundry room. But most likely none of them will be with me when I need it and worse if I’m bleeding to death my tourniquet and trauma dressing will not be there just some tylenol and bandaids. You see it is a problem and everyone glosses over it because we like to make kits and can justify everything in the kit and it fills a need within us. But it is useless either sitting at home or if you have it with you it doesn’t have what you need. THAT is the point. Usually when I have a headache I ignore it and ditto for pain. I get cut a lot working and pretty much ignore that too. Mostly I use the bandaids to appease the grandkids.
Great info…as to the Pneumothorax issue, there will also be a bit of JVD(jugular vein distention) as to the BP cuff and stethoscope, be sure you know how to read them …and PRACTICE!!!