


It finally happened. You knew it would. It took longer than you expected, but the Schumer hits the blades scenario you knew was coming is here. It is now “Your. New. Reality”.
To survive, you are going to have to cook food and heat water daily, for yourself, for your family, and perhaps for your friends but maybe without electricity, propane, or natural gas. All you have available for fuel is wood.
Your New Reality
The Federal Reserve Note, a fiat currency created out of thin air by the multiple trillions over the last 100 years, has been rejected finally by sellers of goods and services. The result has been goods, including propane or charcoal, are no longer available in your local area. Your local utility company can no longer purchase natural gas.
Maybe your area is fortunate and you still have electricity, but for how long? What about brown outs? Black outs?
Even if you can purchase the fuel you need, what is the cost? How dependable is the electricity? Is electricity going to be available when you need it?
Do You Have Third-Party Risk?
When it comes to fuel for cooking food and heating water, do you have third-party risk? That is, do you depend on someone other than yourself for the fuel you will need to cook food and heat water? Keep in mind, you will need to cook food and heat water virtually everyday, and for these things, you will need fuel.
Rocket Stoves Use Wood Fuel
Small amounts of wood fuel in your rocket stove will produce large amounts of heat. In other words, rocket stoves are very fuel efficient heat generators.
Electric, natural gas, propane, charcoal, and white gas may not always be available, even at any price. However, you can almost always find scraps of wood to burn in a rocket stove to cook your food and heat your water for bathing, cleaning, hot drinks, coffee, tea, et cetera.
Rocket Stoves Produce Little Smoke
Rocket stoves, once the fire is started, produce little or no smoke, making it much easier to cook food and heat water with a lower probability of detection. Small of amounts wood in your rocket stove will go a long way, which means you will not need to gather large amounts of wood for cooking. Not having to go out and about searching for fuel means you can stay under the radar for longer periods of time.
Rocket Stove Basics
A rocket stove consists of two major parts– the burn chamber and the burn riser. A horizontal fuel and burn chamber cavity is built perpendicular to the vertical burn riser cavity.
Sticks of wood are placed inside the horizontal burn chamber providing fuel for the fire, which burns in the burn chamber itself and the vertical burn riser.
What Types of Rocket Stoves Are There?
You can build a rocket stove from three basic materials:
- Brick,
- Steel, or
- Tin cans.
All three rocket stove types will produce large amounts of heat from a small amount of wood.
Which one is right for you will depend on use, personal preference, budget, and whether you build in “prep mode” or “survival mode.”
A 13 Brick Rocket Stove
By far, the best option for brick rock stove building is High Temperature Thermal Insulating FireBricks– the 2300 degree Fahrenheit variety with dimensions of 9” x 4.5” x 2.5”. These bricks are ideal as they are not only insulating because they have low thermal conductivity (thus keeping heat within the burn chamber and burn riser, producing a hotter fire sooner and with less fuel), but these brick are also much lighter than regular fire brick. The cost is about $7 per brick with free shipping. You may have to purchase a minimum lot of 24 bricks. Check with the supplier. My source for these High Temperature Thermal Insulating FireBricks is http://skylinecomponents.com/In-Stock_Firebricks.html. Regular firebricks can be had at almost any masonry yard.
Further, these fire brick are easier to form or cut, if forming or cutting is ever needed. They can be easily cut by hand-held saw or any other hand tool like a chisel and can be drilled with non-masonry style drill bits.
These insulating brick are good up to 2300 °F, which is well over the temperature you will achieve in your rocket stove. They also have excellent thermal stability and are resistant to thermal shock and corrosion as well as being durable enough to handle contact with the wood fuel you will be using.
A picture, they say, is worth a thousand words, so take a look at the 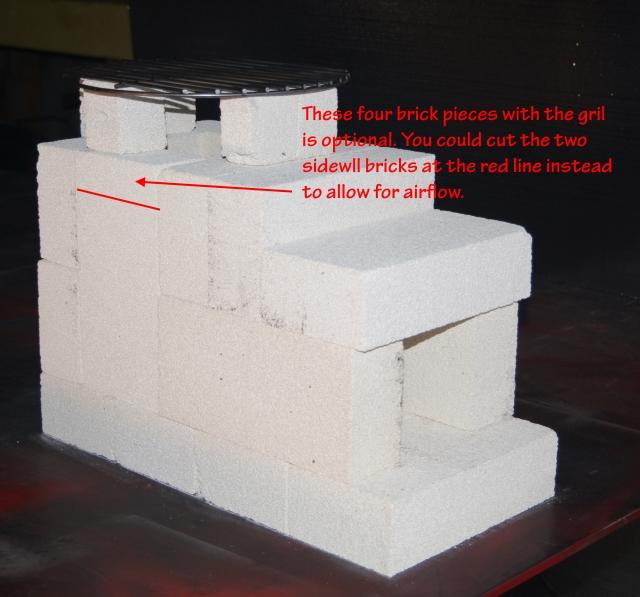 image of the rocket stove I built out of 13 insulating, light-weight firebricks from Skyline Components.
You will need to provide a grill or a grate for the top of the burn riser, elevated off the surface of the bricks. I prefer a grill, upon which to place your pot or to cook meats, such as beef, fish, chicken. You can also use the grill to cook other foods, such as potatoes, that are placed on or wrapped in aluminum foil. Some users find that metal grates off a standard gas stove work well for pots and pans.
One benefit of this light-weight, 13 insulating brick rocket stove is that the bricks are light and durable enough to be put into a container (or even a duffel bag, if you’re careful), making your stove portable.
Gotta move out? Crab your container/bag, which may include tinder, lighter, matches, or other fire starters and even enough fuel for that first fire, and off you go.
Not-So-Portable 13 Regular FireBrick Rocket Stove
You can use regular firebricks to make your stove, as they are the same dimensions. However, they are not lightweight and will make your rocket stove heavier and less portable.
Building a 13 Brick Rocket Stove- In Prep Mode
Please refer to the photo above.
- Place four bricks flat on a stable, level surface with the long side facing you. You should now have a surface 9” wide, 2½” tall, and 16” long. This is the floor of your rocket stove.
- Stack two bricks on edge even with the back and on the top of the last brick of your floor. These two bricks are the back wall of your stove. This back wall is now 9” tall.
- Place two bricks in a vertical position in front of the two horizontal back wall bricks. These two bricks are the side walls of your burn riser. Your side walls are now 9” tall and 4½” wide.
- Lay two bricks horizontally in front of the two side wall bricks, on top of the floor bricks and even with the outside edges of both the side wall and floor bricks, ends facing you. These two bricks are the side walls of the burn chamber. Your burn chamber is now 4½” tall and 9” long.
- Place two bricks on edge and one brick flat, on top of the two burn chamber side walls, spanning the gap between the two horizontal side walls of the burn chamber. These three bricks form the ceiling of the burn chamber of your stove. Your burn chamber is now 4 ½” wide, 4 ½” tall, and 9” long.
At this point you have a couple of options. You can remove the two side wall bricks of your burn riser, cut about 1½” off both bricks and replace to have a finished stove that you can place a pot over the burn riser to cook food or heat water in a pot. Alternatively, you can place spacer bricks on the top surface of the stove over the burn riser to support a grill, as shown in the image.
This grill gives you the option of placing your pot, kettle, or pan on the grill or cooking meats, fish, potatoes, directly on the grill.
Pat yourself on the back. Your 13 brick rocket stove is now ready for its first assignment, and you are a bit more prepared.
Survival Mode
If you did not gather the high temperature thermal insulating firebricks you need for a lightweight stove or the heavier thermal resistant fireclay firebrick, you can always use regular brick. However, these brick are much less resistant to thermal shock, contain moisture, and will breakdown much sooner. Still, they will get you a hot fire for cooking food and heating water for a short period of time before they breakdown.
4” Square Tube Rocket Stove
Building a 4” Square Tube Rock Stove in Prep Mode
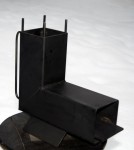
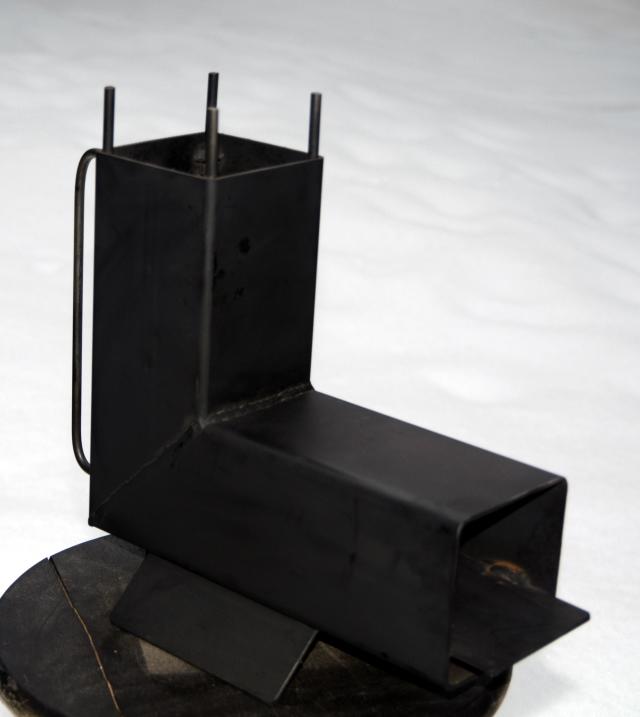
Again, let’s have a look at the finished stove. Like the 3” metal tube paint can stove, which I write about later in this article, this 4” steel stove is a long-term use stove.
Materials Needed
- Burn chamber/burn riser: one piece 4” x 4” x ?” x 20” square steel tubing
- Legs: two pieces 2” x 6” x ?” flat steel
- Fuel shelf: one piece 3¾” x 7” x ?” flat steel
- Handle/pot support: 28” x ¼” solid round stock
- 1 can Rust-oleum High Heat flat paint
- Metal cleaner and a rag
Tools needed:
Build process:
- Cut the 20” piece of 4” x 4” square tubing in half at a 45º angle, giving you two pieces 10” in length.
- Weld the two pieces together at the 45º angles, giving you with an L-shaped burn chamber/burn riser.
- Weld the two legs to the bottom side of one of the two 4” x 4” pieces 2” from the closed end of the tube at a 45º outward angle. This legged piece is now the horizontal burn chamber.
- Weld the 3¾” x 7” fuel shelf inside the burn chamber ¾” up from the bottom, leaving 1” overhang at the front. Grind a small radius on the front two corners.
- Cut four pieces of the ¼” inch round stock into 3” lengths. Weld these four pieces to the top of the burn riser with 1½” inside the riser and 1½” sticking above the riser. Grind the tops of the round stock smooth. These four ¼” posts are your pot/pan/kettle supports.
- Bend the remaining 16” of ¼” round stock into a rectangular C-shaped bend, with two inches at each end, for the handle. Weld the handle to the back of the burn riser.
- Clean the surface of the stove with Prep-All or suitable metal cleaner.
- Paint with two coats of Rust-oleum High Heat paint.
- Pat yourself on the back; you’ve just finished your 4” square tube rocket stove.
And you are a little bit more prepared.
Survival Mode
While in survival mode, you most likely will not be able to acquire the material to build this stove. Refer to prep mode.