


Survival Water Filtration, Purification, and Disinfection Methods (continued)
Without water, survival is impossible, even if you have a storage facility filled with bullets, bandaids, beans, and batteries. My family and I prep in the desert southwest and have taken action so that we won’t find ourselves thirsty in the event of a crisis.
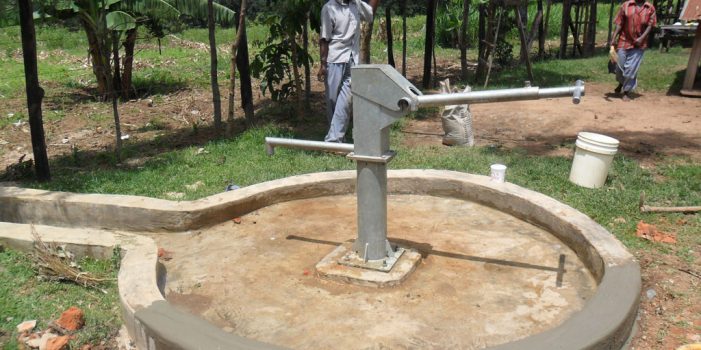
In parts 2 and 3 of this article series, I thoroughly covered both professional drilled and hand dug wells. But once you have access to the water, you need to be sure it is safe to drink. So, in Part 4, we began looking at methods for survival water filtration, purification, and disinfection. We looked at boiling, building your own distillery, and two water filter systems– the Sawyer Mini and Web-Tex in-line filters. Today, we will wrap up this article series with more options for filtering, purifying, and disinfecting water in a survival situation.
LifeStraw
The LifeStraw is perhaps more well known than the Sawyer Mini and Web-Tex. However, it doesn’t necessarily have any more advantageous features over the other two. The LifeStraw is primarily meant to be used to suck water directly from water sources, but some models can be set up to gravity filter water using a water bladder. It weighs two ounces and is almost nine inches long, which is significantly larger than the Sawyer Mini and slightly longer than the Web-Tex.
The LifeStraw is rated to filter roughly 264 gallons and uses a hollow membrane filter to remove bacteria and protozoa. This is the same as the Sawyer Mini filter.
Cleaning the Filter
Much like the Sawyer, it is recommended to blow clean water back through the filter the opposite way of the flow to remove particles that build up along the hollow membranes. Cleaning the filter by blowing clean water back through it is a great way to extend the life of this filter.
Water That is Free of Silt and Mud
It is also recommended, with any of these three filters, to draw water that is free of silt and mud. This can be done by simply filtering the water initially through a handkerchief or rag before using the store-bought filter
Note on the LifeStraw
There is one note on the LifeStraw. This filter will not remove chemicals, herbicides, pesticides, and viruses.
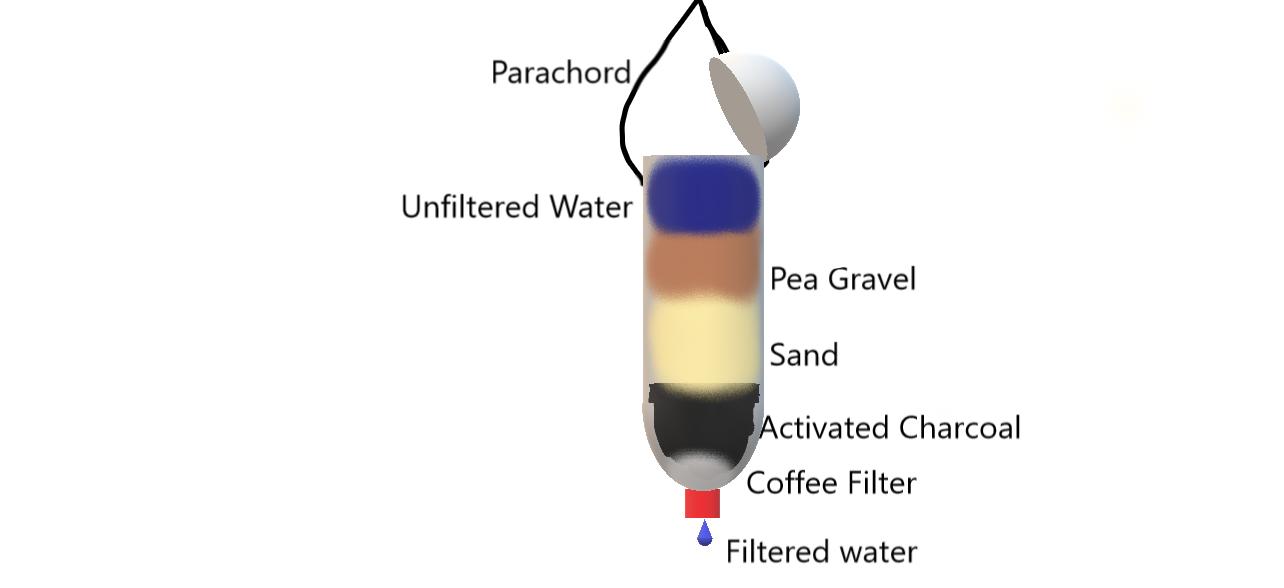
How To Build Your Own Portable Water Filter
Now I will tell you how to build your own portable water filter. Below are the supplies you will need:
- One empty plastic two-liter bottle
- 2 cups of sand
- 2 cups of pea gravel
- 2 cups of activated charcoal
- 1 coffee filter or handkerchief
- 1 pocket knife
- 2 feet of wire, string, or paracord
Steps For Build Your Portable Water Filter
- Using a pocket knife, puncture a small hole or slit in the cap of the 2-liter bottle for the filtered water to escape through.
- Unscrew the lid to the 2-liter bottle of soda and cover the threads and mouth of the lid with the coffee filter or handkerchief. Screw the lid back over the threads to firmly secure the coffee filter or handkerchief over the opening of the bottle.
- Using your knife you can cut around 90% of the base of the soda bottle. The remaining ten percent can act as a hinge to keep the base connected in case you want to use it as a lid for your water filter. This lid can be taped closed to keep the sand, pebbles, and charcoal secure while transporting the filter.
- Pour two cups of activated charcoal into the newly opened base of the soda bottle, so that an inch or two of the charcoal completely covers the handkerchief or coffee filter. You can use charcoal remnants from a regular campfire, if that is all that is available; however, activated charcoal will be much more effective at absorbing toxins in the water. Activated charcoal has been treated to be extremely porous in order to absorb and trap a wide variety of toxins. You can buy activated charcoal online or make it at home. A fellow SurvivalBlog contributor detailed the process of creating high quality charcoal that can be used for water filtration– “Make Your Own Retort Style Charcoal”, by Dan in Alabama.
- After the charcoal has been poured in, level it out by shaking the bottle back and forth slightly so it creates an even layer of charcoal. Then repeat this process with the fine sand and again with the pea gravel.
- Once the layers are even, you can cut two small holes on either side of the bottle near where the base was cut open. Use your string, wire, or paracord to hang this filter off of a tree branch so that the screw top lid is closest to the ground. Dirty water can be poured into the sliced opening and will filter through the layers of rock, sand, activated charcoal, and coffee filter. The water will then drip out of the slit at the bottom of the cap and can be collected in an open sterile container. This method of filtration will greatly increase the chances of removing bacteria and chemicals from your drinking water.
Chemical Purification Tablets
What Chemical Purification Tablets Are and What They Do
If you aren’t able to boil water for logistical or safety reasons, there are a variety of chemical disinfectants that can be used to kill harmful bacteria and viruses in drinking water. Many hikers and outdoors enthusiasts alike appreciate how simple and light water purification tablets are. When used properly, these tablets can last years and can make bacteria ridden water safe to drink. However, it is important to know the conditions and limitations of what these chemicals can and can’t do. In addition, it is important to be aware of some of the health impacts that can stem from using these chemicals in large doses or for long periods of time. Having this skill set can keep your family from making potentially harmful mistakes when using emergency water disinfection methods.
Chlorine Dioxide Tablets
Chlorine dioxide tablets are generally regarded as the most effective of the three main chemical purification methods. They can treat cryptosporidium, viruses, and bacteria. However, they can not remove chemicals and turbidity. Also, it takes these around four hours to properly purify drinking water. They can be stored for roughly five years, if properly kept in packaging, and can be used in place of iodine for those individuals who may have an allergy or thyroid problems.
Chlorine Tablets
Chlorine tablets can treat the Giradia Lamblia parasite. Yet, they can not remove cryptosporidium, chemicals, or turbidity.
Out of the three most common chemical purification tablets, chlorine tends to work the fastest, but be sure to follow the usage instructions on the packaging.
Chlorine treated water can become contaminated again over time, if the treated water is not used because the chemical will eventually evaporate allowing the bacteria to regrow in the stored water. Furthermore, chlorine can be used in place of iodine for those individuals who may have an allergy or thyroid problems.
Iodine Tablets
Iodine tablets can treat the Giradia Lamblia parasite, but they can not treat cryptosporidium, chemicals, turbidity, or viruses.
It takes roughly 30 minutes to purify 75 degree water. Iodine will take longer to purify the colder the water. For example, it takes around a full hour to adequately purify water that is 45 degrees.
Using Iodine will alter the taste of the water you are purifying; however, you can use Iodine Neutralizer tablets to counterbalance the taste. A small amount of table salt and products high in vitamin C, such as Tang, can also be used to drastically improve the taste of iodine in the drinking water. Make sure to add these products after the water has been purified.
Notes on Iodine Tablets
Iodine is necessary for thyroid function. However, iodine tablets should only be taken by those with a healthy, normal functioning thyroid and shouldn’t be taken for over six weeks. Too much iodine can cause complications with the thyroid and cause conditions such as hypothyroidism, which prevents the thyroid gland from producing important hormones the body needs.
Be sure to follow the directions on the packaging indicating how many tablets should be used to purify the desired amount of water. Women who are pregnant or over the age of 50 or persons with an allergy to shellfish should avoid using iodine as a purification method, as it will likely cause complications to the thyroid or stimulate an allergic reaction.
Iodine tablets should be kept in a dark cool container as exposure to sun can damage their effectiveness. Additionally, it is important follow the instructions that explain the effective time frame of the tablets as they tend to expire quickly after opening.
Resources: Ultimate Guide to Water Purification Tablets, Princeton University OA guide to water purification
House Liquid Bleach To Disinfect Water
Although the tablets listed above are the preferred method of chemical disinfection, regular unscented household liquid bleach can be used to help purify water if no other sources are readily available. If the water in question is particularly cloudy or turbid, let the water settle and filter the water.
Directions For Using Liquid Bleach To Disinfect Water
The dosage chart below illustrates the appropriate amount of chlorine drops for creating up to eight gallons of purified drinking water. This dosage chart is intended to be used for room temperature water. However, if the water is cold, double the amount of drops, as chlorine is less effective in lower temperatures.
Using a clean eye dropper or teaspoon, mix in household bleach that has been kept for under a year in a cool, dry place. Stir in the bleach to the clean room temperature water, and let the mixture sit for 30 minutes before use.
The EPA states that four parts per million (PPM) and below is the safe amount of chlorine to consume in drinking water. To test the chlorine (PPM), there are inexpensive and easy to use test strips. The SenSafe test strips have worked well for me.
Purification Dosage Chart (from EPA)
| Volume | Amount of 6% Bleach | Amount of 8.25% Bleach |
| 1 Quart/Liter | 2 drops | 2 drops |
| 1 Gallon | 8 drops | 6 drops |
| 2 Gallons | 16 drops (1/4 tsp) | 12 drops |
| 4 Gallons | 1/3 tsp | 1/4 tsp |
| 8 gallons | 2/3 tsp | 1/2 tsp |
Ultraviolet Germicidal Irradiation
Ultraviolet light or UV light is a form of electromagnetic radiation. It makes up about 10% of all the light generated from the sun. Humans synthesize vitamin D from the UV rays in sunlight, which helps strengthen our bones. However, too much UV light radiation also causes sunburns, which can lead to skin cancer.
There are a number of products on the market that can eliminate bacteria by exposing water to intense UV light. These products come in the form of wand lights. They use UV light with a short wavelength that kills microorganisms by destroying their nucleic acids. This short wavelength UV light can eliminate bacteria, viruses, pathogens, and molds from drinking water. The largest drawback to using these methods in a survival situation is that they require electricity or batteries to operate.
Resource:-Ultraviolet Germicidal Irradiation
The SteriPen For Outdoor Use
The Steripen is a pocket-sized, 3.2 ounce, UV light that can purify a liter of water in 90 seconds. A SteriPen can be used on up to 8,000 liters. However, it will need new batteries after roughly 50 liters.
The SteriPen will kill giardia, bacteria, viruses, and protozoa. It will not remove chemicals, heavy metals, or turbidity from drinking water, and it will not impact the taste of the water.
I have found it lightweight and simple to use. It’s biggest downfall is its reliance on batteries. So, it’s long-term effectiveness in a SHTF situation is limited, but it can act as a great tool in your tool box for patrols or perhaps your initial trek to your bug out location.
See Also:
- 1 – Thirsty Are Those Who Do Not Prep- Part 1, by The Grumpy Gunfighter
- 2 – Thirsty Are Those Who Do Not Prep- Part 2, by The Grumpy Gunfighter
- 3 – Thirsty Are Those Who Do Not Prep- Part 3, by The Grumpy Gunfighter
- 4 – Thirsty Are Those Who Do Not Prep- Part 4, by The Grumpy Gunfighter
SurvivalBlog Writing Contest
This has been another entry for Round 78 of the SurvivalBlog non-fiction writing contest. The nearly $11,000 worth of prizes for this round include:
First Prize:
- A $3000 gift certificate towards a Sol-Ark Solar Generator from Veteran owned Portable Solar LLC. The only EMP Hardened Solar Generator System available to the public.
- A Gunsite Academy Three Day Course Certificate. This can be used for any one, two, or three day course (a $1,095 value),
- A course certificate from onPoint Tactical for the prize winner’s choice of three-day civilian courses, excluding those restricted for military or government teams. Three day onPoint courses normally cost $795,
- DRD Tactical is providing a 5.56 NATO QD Billet upper. These have hammer forged, chrome-lined barrels and a hard case, to go with your own AR lower. It will allow any standard AR-type rifle to have a quick change barrel. This can be assembled in less than one minute without the use of any tools. It also provides a compact carry capability in a hard case or in 3-day pack (an $1,100 value),
- Two cases of Mountain House freeze-dried assorted entrees in #10 cans, courtesy of Ready Made Resources (a $350 value),
- A $250 gift certificate good for any product from Sunflower Ammo,
- American Gunsmithing Institute (AGI) is providing a $300 certificate good towards any of their DVD training courses.
Second Prize:
- A Model 175 Series Solar Generator provided by Quantum Harvest LLC (a $439 value),
- A Glock form factor SIRT laser training pistol and a SIRT AR-15/M4 Laser Training Bolt, courtesy of Next Level Training, which have a combined retail value of $589,
- A gift certificate for any two or three-day class from Max Velocity Tactical (a $600 value),
- A transferable certificate for a two-day Ultimate Bug Out Course from Florida Firearms Training (a $400 value),
- A Three-Day Deluxe Emergency Kit from Emergency Essentials (a $190 value),
- A $200 gift certificate good towards any books published by PrepperPress.com,
- RepackBox is providing a $300 gift certificate to their site.
Third Prize:
- A Royal Berkey water filter, courtesy of Directive 21 (a $275 value),
- A large handmade clothes drying rack, a washboard, and a Homesteading for Beginners DVD, all courtesy of The Homestead Store, with a combined value of $206,
- Expanded sets of both washable feminine pads and liners, donated by Naturally Cozy (a $185 retail value),
- Two Super Survival Pack seed collections, a $150 value, courtesy of Seed for Security, LLC,
- Mayflower Trading is donating a $200 gift certificate for homesteading appliances, and
- Two 1,000-foot spools of full mil-spec U.S.-made 750 paracord (in-stock colors only) from www.TOUGHGRID.com (a $240 value).
Round 78 ends on September 30th, so get busy writing and e-mail us your entry. Remember that there is a 1,500-word minimum, and that articles on practical “how to” skills for survival have an advantage in the judging.
Thanks for the great series! Steripen does offer usb rechargeable purifiers, so they may offer a longer term solution. Reviews are so-so.
https://www.amazon.com/SteriPen-American-Ultralight-Purifier-RCP-MP/dp/B01E0TTPXO/ref=cm_cr_arp_d_product_top?ie=UTF8
https://www.amazon.com/SteriPen-Rechargeable-Backpacking-Emergency-Preparedness/dp/B00NK9948M/ref=cm_cr_arp_d_product_top?ie=UTF8
Is there a chart listing all the water purifiers out there which would include the micron filtration limit, rate of filtration, total amount of filtration life per filter, availability of arsenic or other heavy metal absorption and special features such as gravity feed, direct source only , and most of all, any issues for instance the history of the Berkey Black filter block disassembly. I have been away from prepping for a while, but now sense some rumblings and looking to revisit, starting with food and water. I would think a comprehensive list including replacement components,and any updates, would be a nice addition to any prepper’s notebook.
So far as I recall in no particular order
Katadyn Metal/ Ceramic traditional type
Katadyn Seawater to fresh water converter
LifeSaver
Survivor
Big Berkey
And ones I don’t have or haven’t tried
Life Straw
Sawyer
Steri-pen
Thanks for the great articles! It does bear mention that we must b careful using ceramic style filters in cold temperatures as the filters can crack if left in a pocket or pack after use. Its been suggested that we should store them close to the skin to absorb body heat to prevent that from happening. Keep up the great work!
Wow, this is what I call ‘Good Stuff’!
We do have multiple options (above) for survival water. I just PRINTED a hard copy of this Part 5 it and placed it with our water-related preps. Thank you Grumpy Gunfighter.
Here is an article from several years back ob finding water.
Hidden Groundwater Sources in Urban/Suburban Settings, by ALP
If you are ever find yourself in an urban or suburban setting and need water badly, there is a source of water you probably never thought of as accessible: groundwater. In my day job as an environmental technician, I frequently have to supervise contractors who are drilling observation wells in all sorts of urban and suburban settings. Sometime after drilling, I take samples from the wells and submit them to labs to test if they are contaminated. Basically, almost every transaction of a commercial or industrial property, and many residential properties also, will have several surface groundwater wells; so, you can imagine the number. I’ve taken samples from every sort of property, including gas stations, dry cleaners, factories, malls, strip malls, warehouses, apartment blocks, and more. The wells are frequently left in the ground for years at a time and often forgotten about, instead of decommissioned. There will be countless wells all over the urban and suburban landscape when the SHTF.
Groundwater Observation Wells
The observation wells I am speaking about are 1-2″ (2.5 – 5.0 cm) diameter PVC pipes sunk into the ground around a sand filter, which have slots at the bottom to allow the passage of groundwater. The top of the well is a 6″ (15 cm) diameter metal casing of steel or aluminum that can either be flush with the ground, or raised by about 3 ft (1 m) in a rectangular steel case. The flush wells are usually secured with two 1/2″ or 9/16″ bolts, but there are other variations. The wells can be anywhere from 7 to 60 ft deep (2 to 20 m), although usually around 15-20 ft (3 – 4 m) in the areas I have worked (southern Ontario and around Vancouver, Canada). The wells will be whatever the depth of the surface aquifer is in your area.
The purpose of the wells is to obtain samples for laboratory analysis to find out if the groundwater is contaminated around the well. When the industry picks a spot to drill, they usually don’t know if we are going to find contamination. They usually only know if there could be. So, the industry inadvertently drills a lot of clean observation wells along with the contaminated ones.
Is It Contaminated?
How can you know which are contaminated? Even after six years of testing groundwater on all sorts of sites, I cannot always tell if well water is contaminated simply by looking at it. However, there are many warning signs that indicate that it is unsafe to drink. In a bad situation, you may not have any other choice. Ultimately, the purpose of this article is to give you a sense of when it may be worth the risk to drink, and when it is absolutely not.
First of all, the industry drills wells in clusters around areas that have contaminated groundwater, so you shouldn’t bother opening the wells in the center of clusters. The wells at the periphery are best. Once the industry finds the edge of the contamination, we don’t usually keep drilling more wells, since the “edge” of the contamination is inferred to be somewhere between the center and the periphery. However, just because a well is at the periphery is no guarantee that it will be clean. Contaminants continue to migrate slowly with the flow of groundwater.
Secondly, I wouldn’t drink any wells that had dissolved metals as the potential source of contamination, because your senses may be unable to detect dissolved metals (lead, chromium, et cetera) that are very poisonous. So, I would stay away from wells that were around metalworks, foundries, and especially metal electroplating facilities.
Thirdly, the most likely case where you are going to find these wells is at gas stations. At a gas station, you know that the primary source of contamination is hydrocarbons (gas, diesel), so if your well doesn’t smell like gas or diesel, you’re probably going to be okay. The human sense of smell for these products is very sensitive, so you’re normally going to be able to tell almost immediately if it is bad to drink. That being said, the more protection you have the better. If you have a filter, be it sand, activated carbon, or ceramic, use it. If you have chlorination or UV treatment, use it. Hydrocarbons are immiscible and barely dissolvable in water, so if you pass them through an activated carbon filter it will remove almost all of them. However, you don’t want to try and filter very heavily contaminated water. Not only will you wreck your filter, the water may also contain poisonous dissolved metals that will not filter out. The metals come from soils exposed to reducing conditions (low oxygen environments). These conditions are caused by underground bacteria that consume the hydrocarbons and generate acidic wastes.
To access the groundwater wells, follow these steps:
First of all, open the case, take a look, and take a whiff. It’s best if it looks clean and dry, but sometimes it will be flooded and muddy. This might still be okay, as the mud might be bentonite clay that is used in the construction of the well.
Next take off the yellow or green plastic cap that can be twisted off or pulled off. Safety warning here: it is possible for the contents to be under pressure, so don’t open it right into your face. This is because the plug forms an air-tight seal, and the water table might have moved up since the last time it was open, causing the column of air in the PVC pipe to become pressurized.
Look down the well. If you are lucky, there will be a plastic tube in the well with an inertial valve at the bottom. You might need a piece of wire to pull out the tubing because it is folded.
Next, inspect the tubing for stains and smell. If all good, start jerking the tube up and down, which is how the pumping works. Have a bucket at this point to collect the water. At first it’s going to come out clear and then probably transition to cloudy/muddy. This mud is the sediment at the bottom of the well, and it is composed of fine particles of clay or silt. It won’t hurt you, but it will make the water taste really bad. It may also have bits of sand, depending on the well geology. The sediment will be grey or brown but most will settle down to the bottom of your container in fifteen to twenty minutes of sitting still. When clear, run through your filter and drink.
I usually leave the tubing/inertial pump in the wells, because I don’t want to waste time cutting up the tubing and throwing it away. In my experience opening up wells drilled by other companies, there is often tubing left behind. Once you have some clean tubing, you can coil it up and use it later in another well.
The amount of water extractable from the well will heavily depend on the soils and the amount of penetration of the well into the water table. Sandy soils will allow water to pass easily, and therefore you will get water as fast as you can pump it, while wells sunk into clay soils may offer you just a few litres and then take hours or days to recharge. There may also be wells that have no water, which means the technician made a mistake and/or the groundwater table has fallen below the depth of the well.
Hopefully, you will never have to drink suspect water from an urban/suburban observation well, but maybe a forgotten observation well could save your life, if surface water sources are unavailable or are contaminated with disease vectors (groundwater tends not to have any microbial contamination).
Do not drink groundwater if:
there are bad smells (gasoline, diesel, chemical, basically any)
there are strange colours (purple, yellow, whatever)
there is more than one phase (indicating the presence of hydrocarbons, oils)
there are black stains on the pipe, pipe cap, or plastic tubing
there are wells around the well you are at
there are bad tastes, especially metallic tastes
near foundries, metalworks, or electroplating facilities
Groundwater is less risky to drink if:
there are no stains and smells
the water is clear (not cloudy) and has no colour
the sediment settles in 15-20 minutes
if you can pass it through a ceramic and carbon filter
if you know what the potential source of contamination was and can detect with your senses that it is not present in the water (as in, you are at a gas station with nothing else around, and you smell no hydrocarbons in the water).
Solar cookers will kill pathogens. Check out the “water pastuerization” categories near the end.
http://www.appropedia.org/Category:Solar_cooking
And here is the simplest method of killing pathogens: http://blogs.discovermagazine.com/80beats/2012/05/16/to-disinfect-water-cheaply-just-add-sunlight-and-salt-or-lime-juice/
No need to buy a mechanism or solar cooker. Use what you have available.
Really great series, thanks!