


Without water, survival is impossible, even if you have a storage facility filled with bullets, bandaids, beans, and batteries.. My family and I prep in the desert southwest and have taken action so that we won’t find ourselves thirsty in the event of a crisis.
In parts one and two, I’ve gone over some of the basics of a well and how professionals put one in while machinery is available to do so. However, that may not always be available.
Building Your Own Emergency Well 101
Knowing how to building your own well without access to professional machinery is a skill that could save your life and the lives of your friends and family. Unfortunately, building your own well can be more challenging because the location you do it in is exponentially more important, since your drilling capabilities are severely hampered with the use of strictly hand tools.
Challenges With Building Well By Hand
There are quite a few challenges involved with building your own well by hand. One key thing to note is that you will likely not be able to do this process in extremely dry and arid climates where the water table is deep underground. Additionally, it will be extremely difficult to build a well where there are a lot of buried layers of rock, as it is almost impossible to hand drill and chisel through solid rock several feet down into the earth. I am not saying it can’t be done, but it is extremely difficult.
Materials You Need
Make sure to read all of the instructions below before purchasing materials, as the lengths and sizes of PVC piping you need will vary depending on the size and depth of your well shaft.
You will need:
- One 7-inch diameter hand auger with removable extensions (The number of extensions needed will vary on your water table depth.)
- One 5-gallon plastic bucket
- One 2′ x 4′ board
- Several 10′ or 20′ lengths of four inch PVC pipes (These will serve as the well casing to protect your well pump.)
- Several slip couplings (These are used to secure the lengths of casings together until you have reached the length of your well shaft and depend on the diameter of your PVC pipe.)
- One PVC end cap (This will cover the casing that will be submerged in the well.)
- One PVC hand pump kit or electronic pump
- A hand saw
- A level
- Several bags of pea gravel (The number of bags will depend upon the well’s depth.)
- Two bags of mixable cement and mixing materials
- One sheet of 100 grit sandpaper
- PVC pipe glue and primer
- A brush or dobber (This is to be used to apply the primer and glue.)
- One top PVC cap (This will be exposed above ground.)
- Two physically fit individuals
Steps for Digging Well By Hand
With the materials in your possession, below are the steps for digging your own emergency well by hand:
- Start by finding your optimal well location, preferably in a valley or depression close to where the water will be used and away from contaminates.
- Cut a hole in the bottom of the 5-gallon bucket big enough for the head of the auger to fit through. Place this bucket over the desired well location and begin digging into the earth with your auger. The plastic base of the bucket will assist with keeping dirt from falling back down into the well hole.
- Hammer/place a 2 x 4 wood post vertically into the ground near where you’re going to be digging. You will find that this post allows you to easily knock out the dirt, sediment, and clay that you bring up in the auger head. Trust me, after a while of taking dirt out of the ground, this post will be your best friend.
- Continue pushing the auger through the hole in your bucket and removing chunks of dirt as straight down into the earth as possible. It will take roughly five or six clockwise rotations of the auger to fill it up with dirt and clay.
- Once you have reached about four feet down you will likely need to add another section of pipe.
- You can do this by unscrewing the top handle of the auger and screwing in an additional length of pipe to give you further reach into the hole. It can sometimes be a challenge to unscrew a length of pipe, so have a buddy hold the handle of the auger while you untwist the head using a length of pipe between the two auger shovel heads. The length of pipe between the shovel heads can act as a makeshift pry bar to gain leverage if you are having trouble unscrewing the pieces. As you add more length to the auger, you might find that it is harder to unscrew, so having two people to hold each end of the auger can be extremely helpful.
- The amount of auger pipe sections you will need is completely dependent on the depth of your water table. Keep in mind that no auger is going to be able to hand dig through bedrock and so your best bet is to use this method in an area with minimal bedrock and a high water table.
- It should be readily apparent when you have reached your water table, because you will be able to see that your auger is wet and there should be water pooling at the base of the well shaft. If you are able, continue digging until you have several feet of water depth in the well shaft hole. Many places in the south portion of the United States will have several feet of clay and then another several feet of water bearing sand. This sand is where you want to have the majority of your well casing rest. So, if you notice that after you reach sand and you start taking out sections of clay again, you can likely stop, as you have reached the most water saturated depth.
- The depth of your well will depend entirely on your water table, your water recharge rate, how much water you intend to draw from the well and the mechanism that you intend to draw it with. It may be helpful to know that on average most hand dug wells here in the U.S. are roughly 30 feet deep, but this entirely depends on the conditions present in your region.
- Continue removing material until you have reached a depth where you feel that you have a comfortable water level for your needs. Five to ten feet of water depth is usually a good place to start, but obviously the more water you have available, the better.
- Much like a professional built well, the PVC casing will help keep the well shaft from collapsing. To begin constructing the PVC casing, you will want to prepare the ends of the four-inch PVC pipes that you will be fusing together using your coupling, glue, and primer.
- You will want to first remove any burs or debris shavings from the end of the piping that you will be connecting. This can usually be done by hand or with the help of some 100 grit sandpaper.
- Once your pipe and coupling ends are clean, apply a healthy coat of primer with a brush or dobber to the inside of the coupling and then the outside of the pipe end that you will be attaching. Swab the outside of the pipe and the inside of the coupling a few times and then repeat this process now using the PVC glue.
- Push the end of your PVC pipe into the coupling and rotate it about a half turn while forcibly holding the pieces together for about 30 seconds to a minute. The glue will usually take about 15 minutes to fully cure, but be sure to read the instructions that come on your PVC glue.
- Repeat this process on the other open end of the coupling so the two lengths of PVC pipe are securely fastened together.
- You will need to continue coupling lengths of pipe casings together until you reach your desired well depth. Ideally, the PVC casing will reach the bottom of the well and sit about two or three feet above ground level. Make sure to prime and glue the end cap to the end of the 4-inch casing that will sit at the bottom of your well shaft
- Using your hand saw you can cut gills or slits into the sides of the section of PVC casing that will be submerged below the water line. These narrow slits from a regular hand saw will allow groundwater to recharge and fill the casing while keeping rocks and debris out. These slits are often sawed in groupings six or seven horizontal lines below the waterline and can be done on all sides of the PVC cylinder. You can also buy a pre-made well screen and attach it to the end of your PVC well casing, but they operate in very much the same manner of allowing water to recharge without letting rocks fill the casing.
- Using help from a friend or several friends, you will need to carefully lift your length of PVC casings attached together with the couplings into the well shaft. Be careful not to drop or bend the casing too hard, as it could disrupt the couplings holding the lengths of pipe together.
- Once the length of the casing is seated in the well shaft, it should stick two to three feet above the surface of the ground.
- Use a level to ensure that the casing is standing straight up out of the shaft. Then fill the gap around the casing and well shaft to the water line with bags of pea gravel.
- Once you have filled the casing to the water line in pea gravel, you can fill the rest of the shaft with the remaining dirt and clay that you removed with your auger.
- Before filling in the last foot of the gap between the casing and the well shaft, dig out approximately a square foot deep hole around the pipe casing and fill the hole with cement.
- You can pour dry cement in the hole and mix in water thoroughly around the PVC casing sticking out of the ground. This will not only help hold the casing in place but will also help keep surface contaminants from leaching down the length of the casing and corrupting your water supply.
- Wait until the cement has dried before installing your well cap and hand or electric pumping mechanism, as water poured out of the well could disrupt the cement drying process.
- The great thing about this hand dug well method is that you can use either an electric or manual pump to bring water to the surface.
- The type of well pump you install is completely up to you, as there are many great pump options. Below I have included several links to hand and electric pumps that my friends and family have had success with:
- After your pump is installed, you will likely have to pump out a significant amount of silty water until you get clear water. This is because the water currently in the well will have sediment mixed in from the digging process. You will have to drain the well and let the clean water recharge in the casing.
- Another method for pumping water out of your new well comes directly from another SurvivalBlog writer. He has detailed explicit instructions on how to build an inertial well pump that needs no electricity to draw water from your new well. Here is the link to his article, if you are interested: How to Build an Inertial Well Slow Pump for Grid Down Emergencies, by TruthFirst.

Come back tomorrow. I will have information for you about water filtration, purification, and disinfection methods.
See Also:
- 1 – Thirsty Are Those Who Do Not Prep- Part 1, by The Grumpy Gunfighter
- 2 – Thirsty Are Those Who Do Not Prep- Part 2, by The Grumpy Gunfighter
- 4 – Thirsty Are Those Who Do Not Prep- Part 4, by The Grumpy Gunfighter (Active on 8/31/18)
- 5 – Thirsty Are Those Who Do Not Prep- Part 5, by The Grumpy Gunfighter (Active on 9/1/18)
SurvivalBlog Writing Contest
This has been another entry for Round 78 of the SurvivalBlog non-fiction writing contest. The nearly $11,000 worth of prizes for this round include:
First Prize:
- A $3000 gift certificate towards a Sol-Ark Solar Generator from Veteran owned Portable Solar LLC. The only EMP Hardened Solar Generator System available to the public.
- A Gunsite Academy Three Day Course Certificate. This can be used for any one, two, or three day course (a $1,095 value),
- A course certificate from onPoint Tactical for the prize winner’s choice of three-day civilian courses, excluding those restricted for military or government teams. Three day onPoint courses normally cost $795,
- DRD Tactical is providing a 5.56 NATO QD Billet upper. These have hammer forged, chrome-lined barrels and a hard case, to go with your own AR lower. It will allow any standard AR-type rifle to have a quick change barrel. This can be assembled in less than one minute without the use of any tools. It also provides a compact carry capability in a hard case or in 3-day pack (an $1,100 value),
- Two cases of Mountain House freeze-dried assorted entrees in #10 cans, courtesy of Ready Made Resources (a $350 value),
- A $250 gift certificate good for any product from Sunflower Ammo,
- American Gunsmithing Institute (AGI) is providing a $300 certificate good towards any of their DVD training courses.
Second Prize:
- A Model 175 Series Solar Generator provided by Quantum Harvest LLC (a $439 value),
- A Glock form factor SIRT laser training pistol and a SIRT AR-15/M4 Laser Training Bolt, courtesy of Next Level Training, which have a combined retail value of $589,
- A gift certificate for any two or three-day class from Max Velocity Tactical (a $600 value),
- A transferable certificate for a two-day Ultimate Bug Out Course from Florida Firearms Training (a $400 value),
- A Three-Day Deluxe Emergency Kit from Emergency Essentials (a $190 value),
- A $200 gift certificate good towards any books published by PrepperPress.com,
- RepackBox is providing a $300 gift certificate to their site.
Third Prize:
- A Royal Berkey water filter, courtesy of Directive 21 (a $275 value),
- A large handmade clothes drying rack, a washboard, and a Homesteading for Beginners DVD, all courtesy of The Homestead Store, with a combined value of $206,
- Expanded sets of both washable feminine pads and liners, donated by Naturally Cozy (a $185 retail value),
- Two Super Survival Pack seed collections, a $150 value, courtesy of Seed for Security, LLC,
- Mayflower Trading is donating a $200 gift certificate for homesteading appliances, and
- Two 1,000-foot spools of full mil-spec U.S.-made 750 paracord (in-stock colors only) from www.TOUGHGRID.com (a $240 value).
Round 78 ends on September 30th, so get busy writing and e-mail us your entry. Remember that there is a 1,500-word minimum, and that articles on practical “how to” skills for survival have an advantage in the judging.
Or you can go to YouTube and enter this in the search window:
Drill Your Own Well Series – Part 1
Though I haven’t tried it yet, it seems to be much simpler.
On the links for pumps, the siphon pump link mentioned in the 2006 Survivalblog article doesn t work. The Gould pump link only sells electric pumps and the stainless steel pump is no longer available.
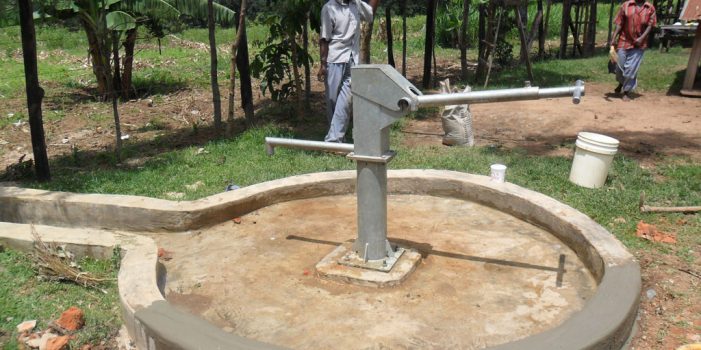
Does anyone have information about the large metal hand pump in the picture at the beginning of the article? I’ve seen pics of it before. It’s installed in what looks like an African village and appears very sturdy.
Here’s another way to dig a shallow well, we used this in Viet Nam. In an area where you know the water table is no more than 20-50 feet deep this will work fine. It is labor intensive but absolutely no special tools are needed. Get a number of sections of standard cement culvert pipe. Maybe 3-4ft diameter. Set the first section vertically on the ground where you wish to establish your well. Climb up and inside the culvert, start digging the dirt from the inside. It is of course helpful to have a couple assistants. Have them stand on the outside of the pipe with ropes attached to a five gallon buckets, placed inside the pipe, that you fill and they will remove. As the dirt is remove from the inside of the pipe it slowly settles. As it settles to slightly below the surface of the earth place the next section. Continue this procedure until you reach the water table. Continue digging until the water is at least waist high….about half a culvert. Of course this is a very crude and rudimentary well, make sure to leave at least six inches to a foot of culvert above your surface level. Make a simple rope bucket winch, like you see in the old western movies. Also it would be good to make a lid to keep out debris between uses. If you have the manpower this can be a very quick and efficient means of obtaining a well. I have heard of a well such as this becoming operational within 6-8 hours.
What about freezing ? Are you going to build a “well house” over the well and keep pipes from freezing ? How do you plan to heat the well house ? What about a “pit-less” adapter ? We all have seen fence posts “heaved” because of frost. Putting concrete as you advise is asking for problems. The well casing should be “grouted-in” (cement and sand) from above the screen to the surface. It has to be pumped in from bottom to up because pouring from top to down will cause “honey-combing” and a lack of seal. A lack of seal sets you up to have a contaminated well from ground water and pollutants . Do you plan on paying full MSRP or higher for your pump , pipe etc? How do you plan on decontaminating the casing, pump, pipe, and wire going down the well ? Are you willing to accept the liability that your well contaminated many wells in your area ? As I was working on an old mans well he (90 years old) ,casually said “someday water will be more expensive than gasoline”. Then gas was very cheap and water was not sold in grocery stores. At the time I could not imagine that. I can now, some 40 years later. I wish I could talk to him again.
Do NOT use cement around the top of the well casing! Use CONCRETE! Cement has almost no structural value but is one of the ingredients in concrete.