News From The American Redoubt:

The Australian press reports: People are flocking to a region of America so they can survive the end of the world.

JWR’s Comments: Although I spent nearly an hour on the phone with Australian journalist Matt Young fully describing the American Redoubt concept and the various threats to modern society, he put together a scattered article with a mish-mash of old and new quotes from me (some of them out of context) and a video link to what was one of the most poorly-prepared and antagonistic interviews that I’ve ever endured, with the late liberal American journalist Alan Colmes. (Colmes, known for his satirical wit, passed away from cancer on February 23, 2017.) In that interview Colmes didn’t even get my given name right—though he had my book right on his desk. And then he plunged into an interrogation on the comma in my name. By the way, the mis-captioned photo that Matt Young chose for the top of the article isn’t of me. It is a photo of a Redoubt real estate agent. The juxtaposition of that photo and that radio interview makes it look as if I gave that interview from an unfinished basement.

o o o

12-year-old Wyoming boy trapped by boulders rescued

o o o

A great Redoubt video: 4,000 elk, 15 tons of hay per day in one cool, time-lapse video

o o o

We’ve mentioned this reputable coin shop in Montana once before in SurvivalBlog: Missoula Gold & Silver Exchange. Reader “Mr. X. from Lolo” sent this note of recommendation: “These are good folks with a broad inventory and low mark-up. They are also very fair about buying back what they sell, and also making fair ratio trades—such as swapping gold for silver.”

o o o

I heard about a family-owned company in Eastern Oregon that has a great inventory of AR-15 parts and other items of interest to shooters, many of which they manufacture themselves: Crosshair Customs. They recently moved their machine shop into a new 5,000 square foot building in Baker City, Oregon. You can often meet them at their tables at gun shows all around The American Redoubt.

o o o

Montana from Above – Three Breathtaking Minutes Montage (Video)


Economics and Investing:

The U.S. Rig Count Is An Over-Rated Indicator Of Future Oil Prices. There are many other forces at play in global oil markets other than how a rising U.S. rig count and allegedly massive advances in rig productivity will suppress oil prices forever.

o o o

Cash Is Dead. Long Live Cash. The push to end hard-currency payments in favor of digital ones keeps hitting speed bumps – P.S.

o o o

U.S. Gold Bullion Exports To Hong Kong Surge, 82% Of Total Shipments

o o o

IMF Plan to Force a Cashless Society On World Unfolding – Here’s How – DSV

o o o

SurvivalBlog and its editors are not paid investment counselors or advisers. Please see our Provisos page for details.


Odds ‘n Sods:

Investing in precious metal – Soviet T54 Armor with installed Gold Bullion: Tank collector shocked to find £2million gold bullion hidden in the fuel compartment of his £30,000 vehicle – T.P.

o o o

Sweeping Iowa Gun Bill Up For Gov. Approval – P.M.

o o o

13 Foods You Can Buy Once & Regrow Forever – Most gardners are aware of these easy to grow plants, but those just starting out may want to take note. – DSV

o o o

More evidence that Islam is not a peaceful religion, but harbors too many fanatics and they are a danger when they travel in mobs. Sydney has no go zones as does much of Europe:

‘F*** Jesus!’ Muslim Gang Beats Couple on Train Excerpt: “…four men of Middle Eastern appearance ripped his cross from his neck, stomped on it, and rained kicks and punches on his face, back, and shoulders. Two women attacked his girlfriend when she tried to protect him.”

Officials Warn Australians: Cover Up Your Crosses in Public

Note this sentence as well in the first article: “Sydney Trains defended the transports officers who stood by as the attack took place, telling the Telegraph their main responsibility is tackling fare evasion and that they are trained to observe from a “safe space” if passengers are assaulted.” – In other words, you are on your own! – H.L.

o o o

Is this really worth not having to pick up your live round from the ground? Let it fall! Watch Your Hands When You Unload And Show Clear – W.W.


S&W Model 15, by Pat Cascio

We are continuing to followup on the many requests for more revolver articles from our readers, and we are more than happy to comply. As I pointed out in previous articles, there are some shooters who believe that the “old” revolver isn’t a viable option for self-defense work, and I couldn’t disagree more. Now, we aren’t necessarily talking about a SWAT team clearing a building of an active shooter or a terrorist. We are talking about everyday people who carry concealed or want a home defense handgun, and for whom the revolver might just be the perfect answer.

In 1980 or 1981, I traded a customer in my gun shop out of a S&W Model 15; it’s also called the K-38 Combat Masterpiece. This was my first exposure to this particular model in a full-sized service revolver, and the gun was for my own personal use. Over the years, I’ve owned quite a few revolvers, from S&W, Colt, Ruger, and other gun makers. Most were snubby revolvers, as I carried those guns doing Private Investigative work. The Model 15 that I traded into didn’t have the skimpy small wood grips that came on most models; instead, it had a nice pair of custom-made, hand-filling grips. I don’t know who made those grips, but they fit my hand perfectly.

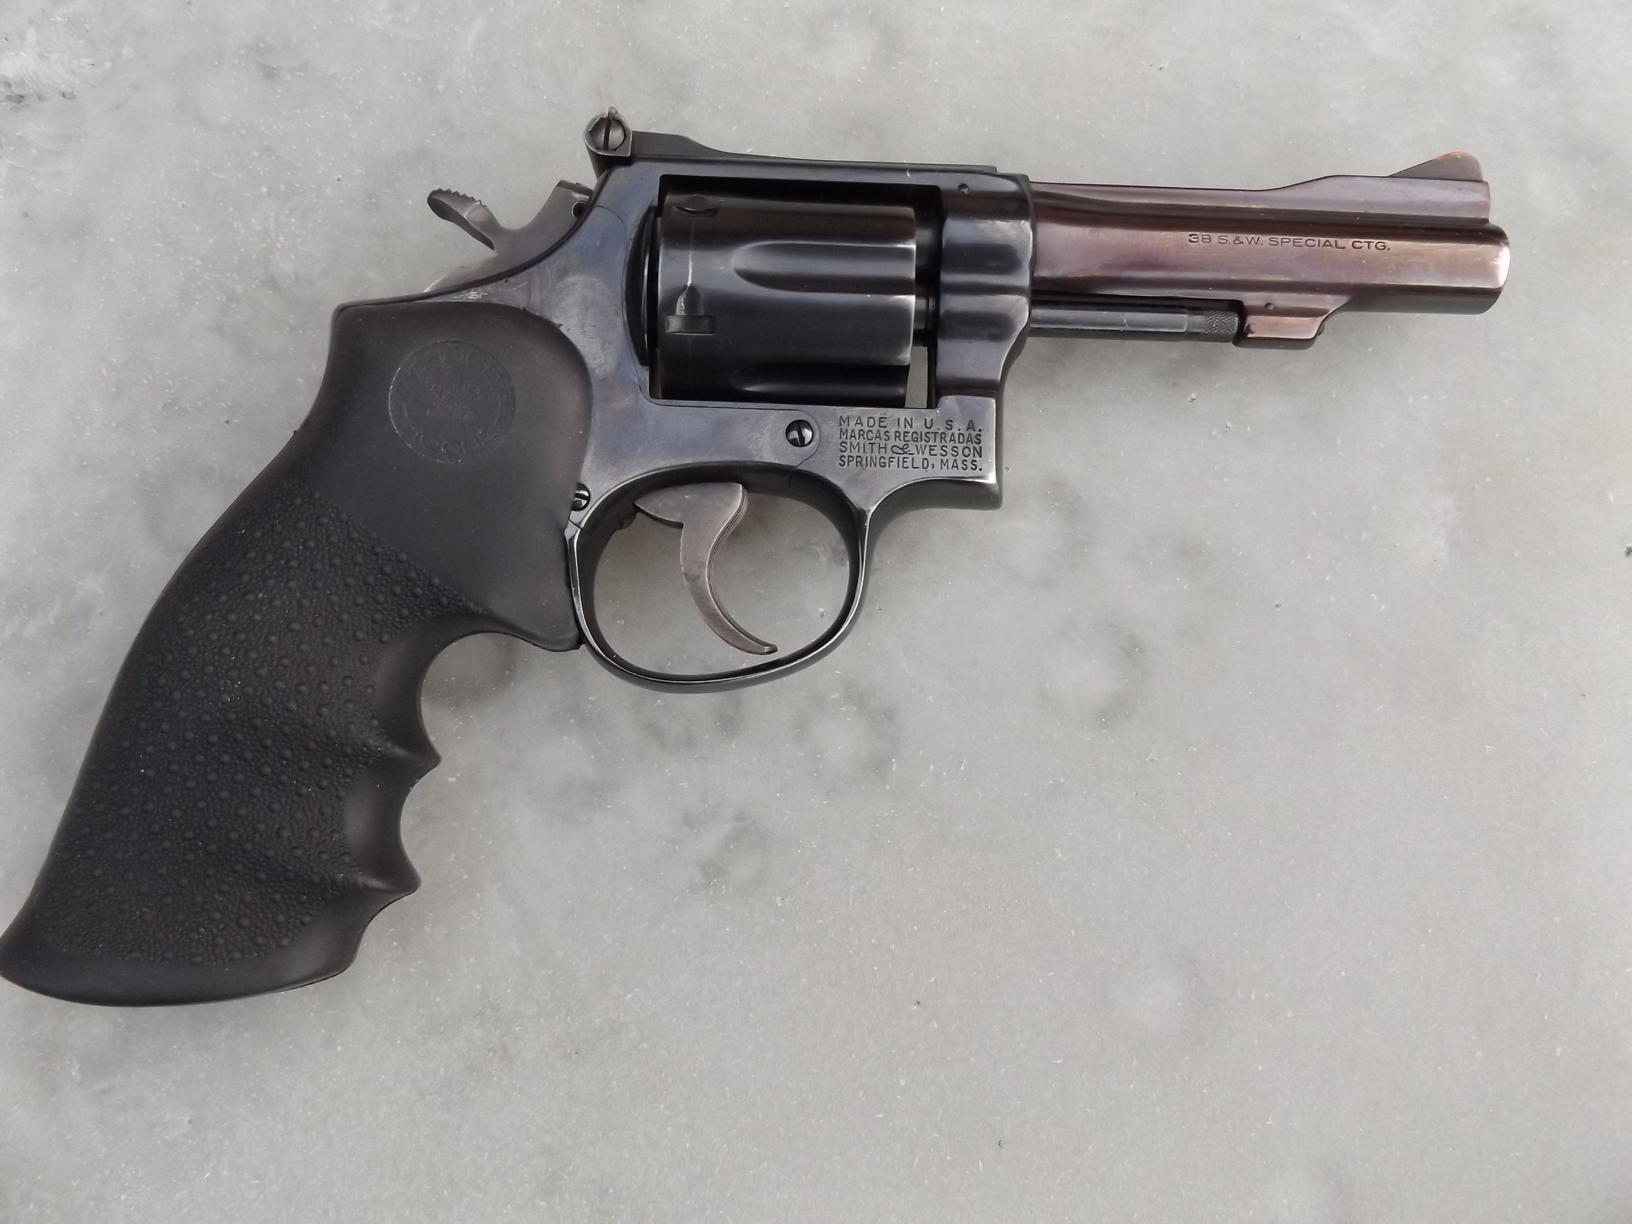
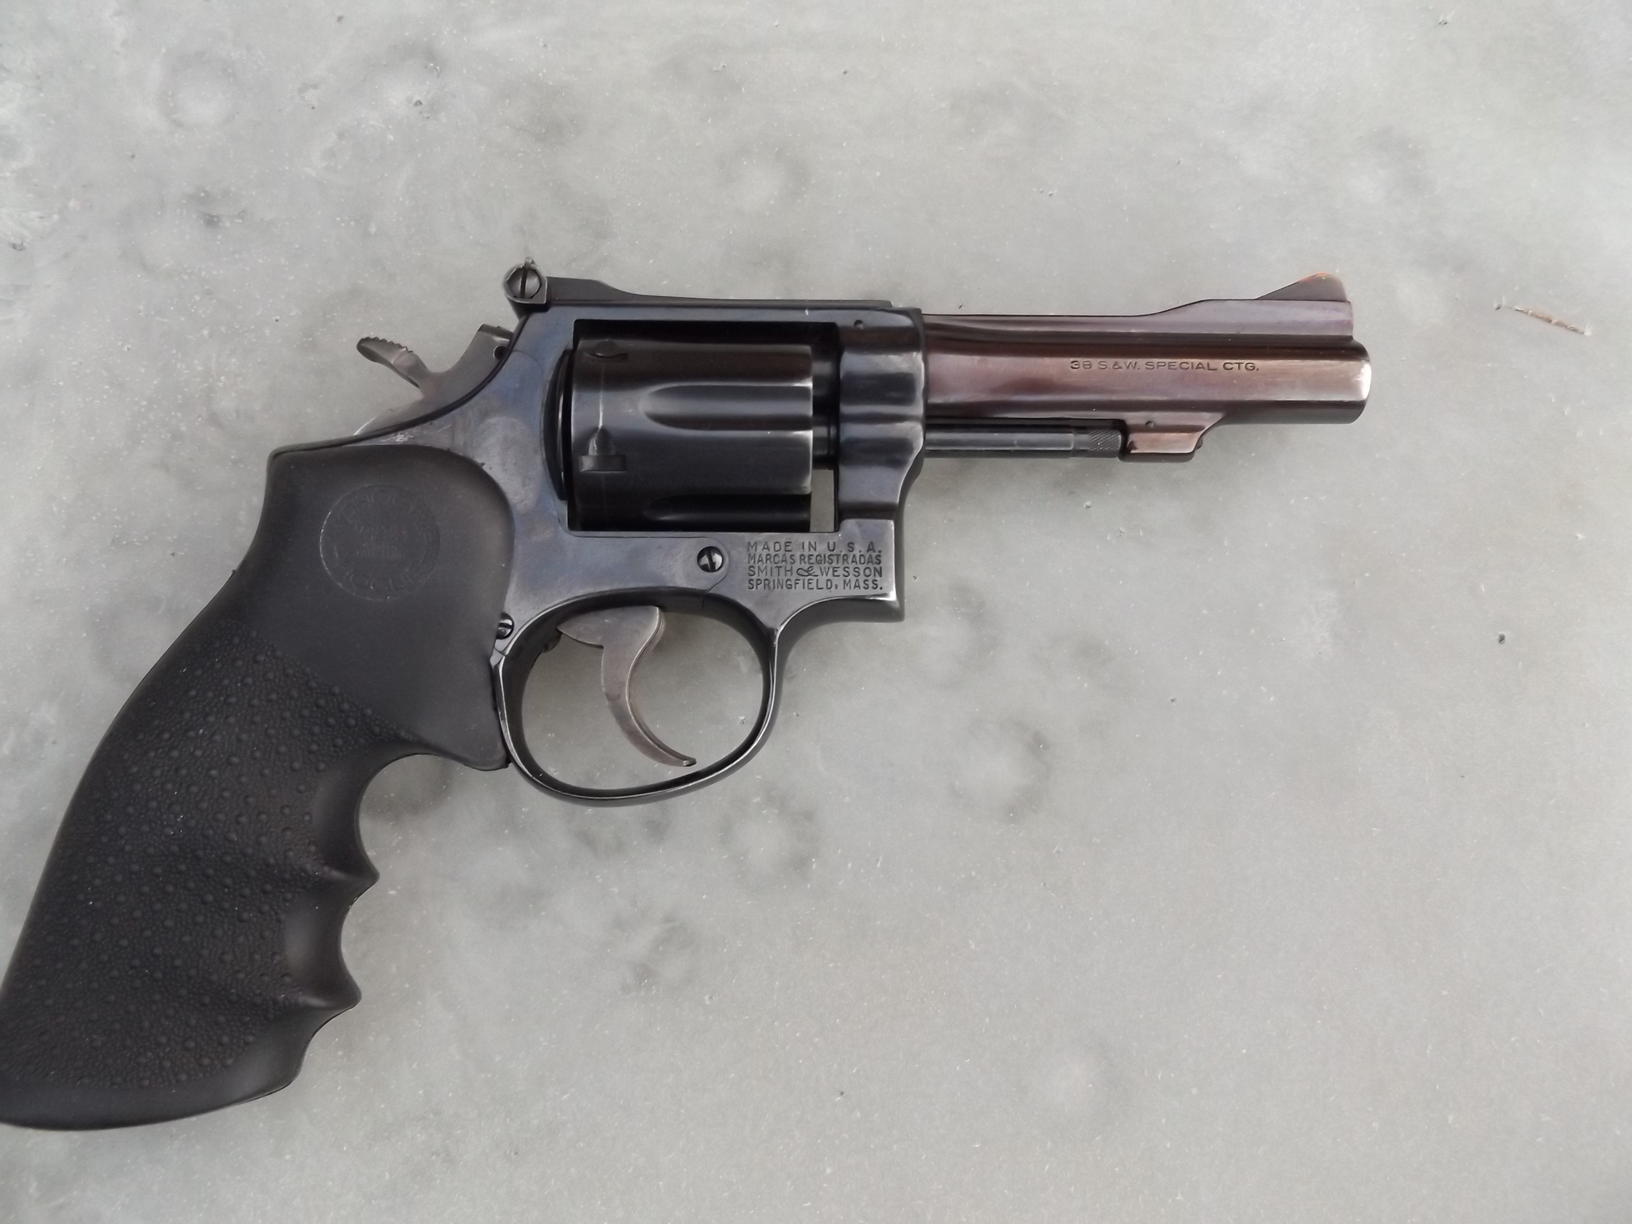
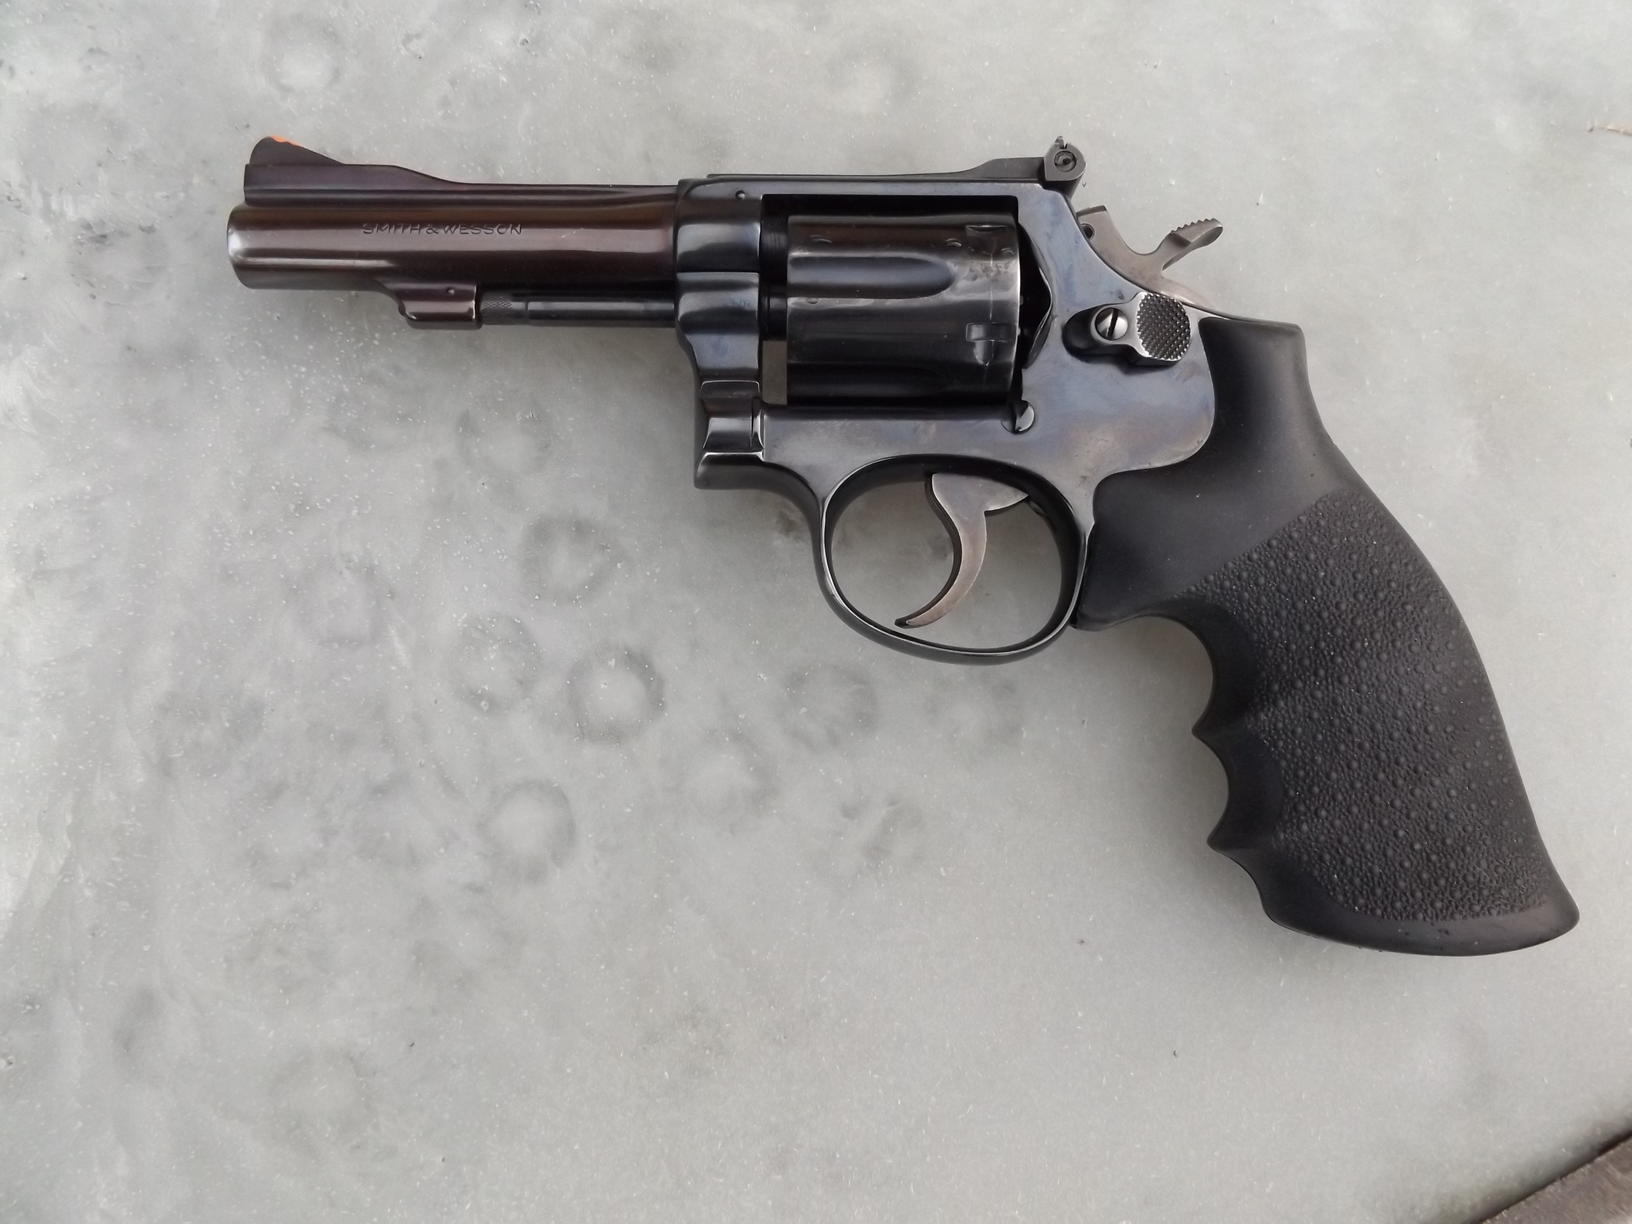
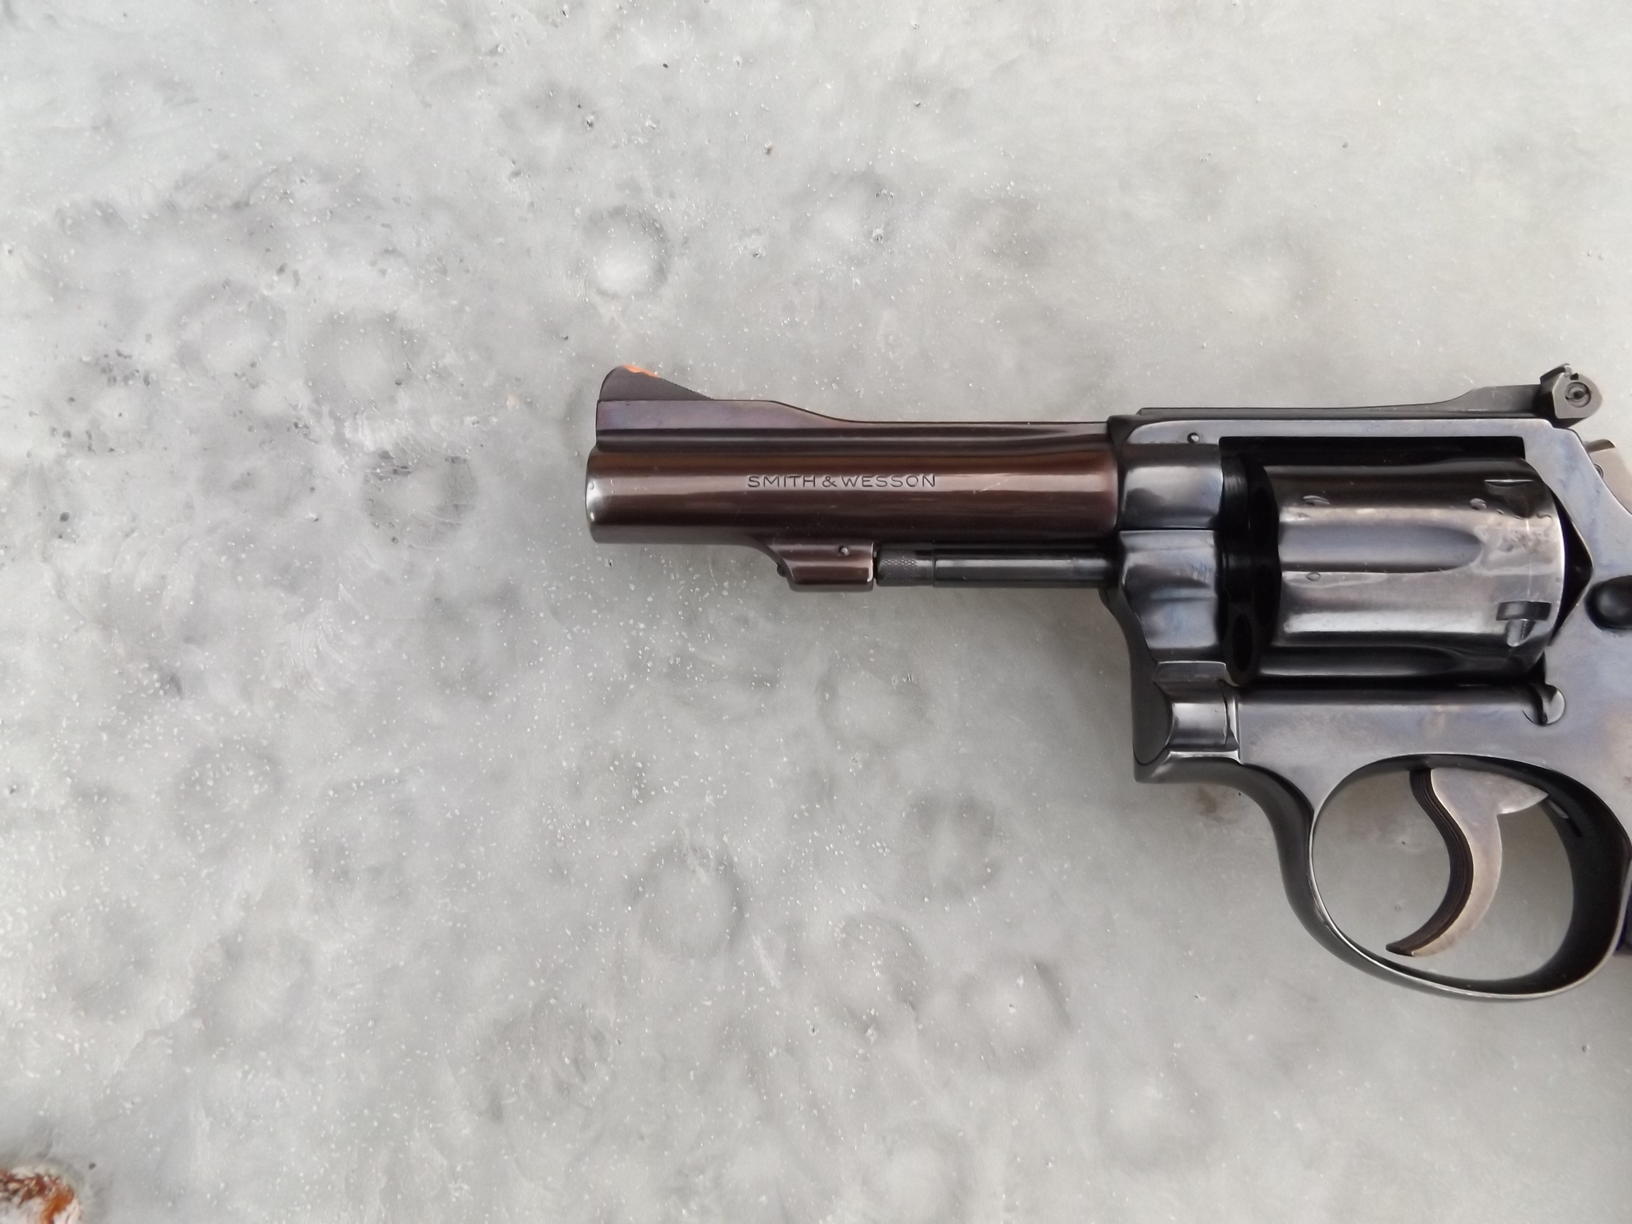
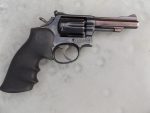
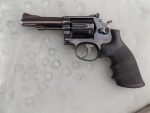
A quick run down on the Model 15 is in order, before reporting any further. This model holds six rounds of .38 Spl in the cylinder, and it is usually found with a 4-inch barrel; however, there were some 2-inch barreled guns. You’ll usually encounter a Model 15 with a 4-inch barrel. Many police departments, back in the 1960s and into the 1970s, carried this model of gun. The gun comes with a fully adjustable rear sight, for windage and elevation, and early models had a plain black, ramped front sight. The frame is called the “K” frame and is a medium-sized frame. The “J” is a small frame, and the “L” and “N” frames are bigger. The Model 15 is a double-action/single-action revolver, and you can fire the gun by simply pulling the trigger or cocking the hammer for a crisp and lighter trigger pull. Many police departments removed the hammer spur, so the guns could only be fire in the double-action mode. There were liability concerns, ya know.

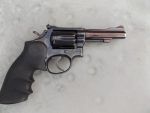
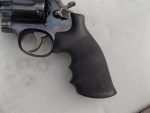
Weight on the Model 15, with the 4-inch barrel, is right around 34 oz, which is just about perfect, if you ask me. It’s not too heavy and not too light. The standard finish was a nice shinny blue, and the gun was right pretty if you ask me. The trigger is grooved, and I prefer a smooth faced trigger. It is easily corrected by any competent gunsmith. I never cared for the checkered walnut service stocks/grips; they were and are too skimpy for a good grip on the gun for the most accuracy you can wring out of it. The barrel is a medium thickness, and the entire gun just is about perfect in many respects.

I know, I know. I can hear the detractors already saying, “It only holds 6-rds.” That’s true; however, you can reload the gun in a few seconds, using speed loaders from HKS, and if you have expended 6-rds and there is still a threat, you should be behind cover and reload from there. We don’t stand toe-to-toe and keep firing. We should always seek cover whenever possible. So, remember to keep a spare speed loader or two on your person if carrying a revolver, or if this is a house gun, have at least one spare speed loader on hand. Let’s get back to my first full-sized Model 15. Hands down, it was without question the most accurate revolver I ever shot. It didn’t matter what kind of ammo I was using, the gun would easily shoot 2-inch groups at 25 yards, if I did my part. The custom-made, grooved wooden stocks really helped in the accuracy department. They were smooth, not checkered; however, it had finger grooves. To this day, I regret no longer having that gun. I must have sold or traded it, and I honestly don’t remember.

In 1974, I ran across a S&W Model 15 with a 2-inch barrel. It was nickel plated, and I carried it for the longest time in a Safariland upside down shoulder holster. It was a super-accurate revolver, considering it was a snubby model. I’m still trying to find one just like it. My local gun shop has standing orders, if they find one at a gun show to buy it for me. I understand that this model, with the 2-inch barrel and nickel finish, is extremely rare these days.

Over the years, I’ve owned and carried many different types of revolvers for duty work, either as a police officer or in private security. I’ve had S&W Model 19s – .357 Mag, Colt Python – .357 Mag, Colt Trooper MK3 – .357 Mag, and several different types of Rugers in .38 Spl and .357 Mag. However, none have proven as consistently accurate as the S&W Model 15 with a 4-inch barrel.

Some time back, my local gun shop had a used S&W Model 15 with a 4-inch barrel, and it was a little bit on the rough side. It had some holster wear and a little bit of pitting, and it was dirty inside and outside. I couldn’t pass on the price, which was $319. The one thing that detracted from the overall appearance of the gun was the barrel, which was plum colored. There were several reasons for this. Either the barrel wasn’t left in the bluing salts long enough or the bluing salts were starting to lose their potency. In any event, I didn’t really care about the plum colored barrel. I have seen it on a number of S&W revolvers over the years. I wanted the gun for a shooter, not a show piece!

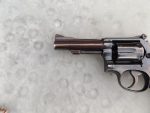
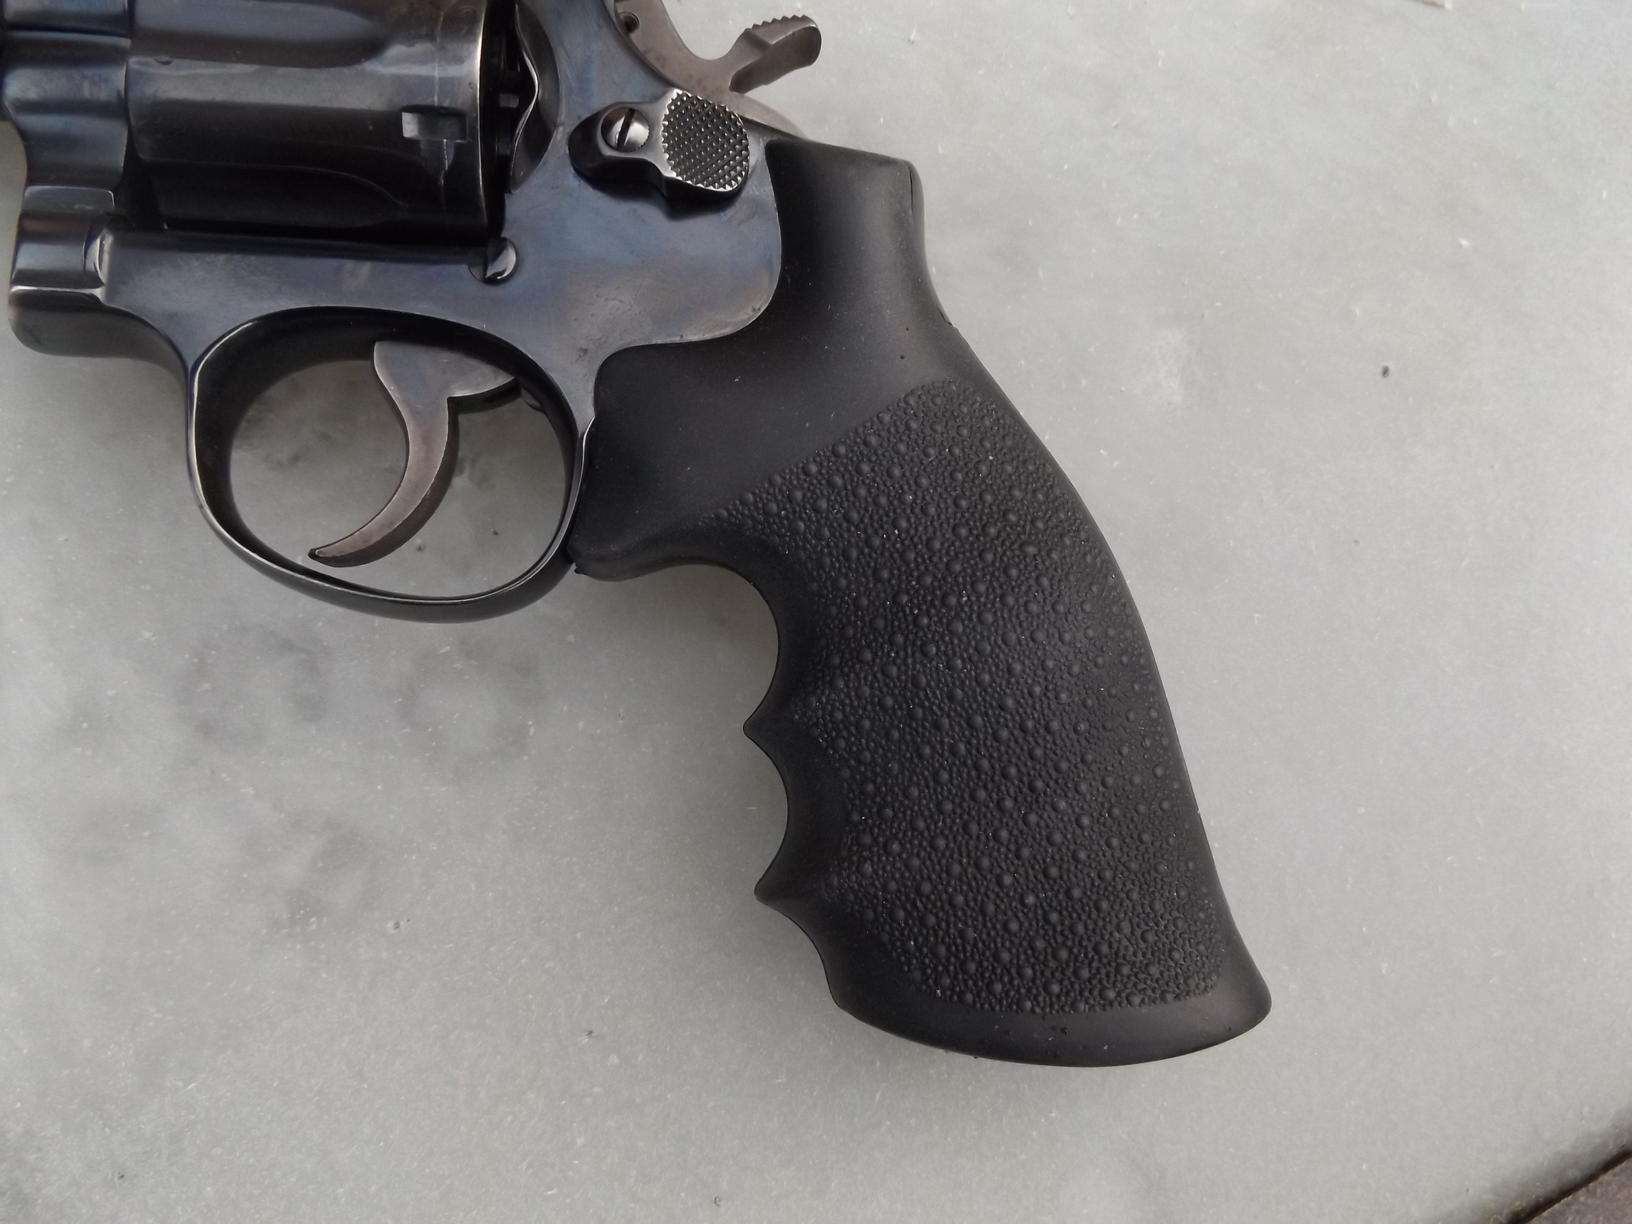
I completely stripped the gun down to the bare frame, removed the inner workings, and gave it all a good cleaning, and lubed it with some Italian Gun Grease , which is my favorite firearms lube bar none. I used some extra-fine steel wool to clean up the minor pitting on the frame and touched-up some of the wear spots on the end of the barrel, where the bluing had worn off. I painted the front sight with some bright orange paint for my aged eyes, and the gun was ready for some shooting. The gun came with a well-used pair of Hogue grips, rubber grips, that didn’t fit the gun any longer, and I swapped them out for a new pair. What a difference in how the gun felt, and it looked much better, too.

I also found some HKS #10 speedloaders in my “everything else” box and an HKS ballistic nylon double speedloader case to carry the speedloaders in. And, in the bottom of one of my holster drawers, there was an old generic ballistic nylon holster that fit the gun nicely. We are talking about a really nice “trail gun” setup, if you are out hiking in the wilderness, just a perfect setup!

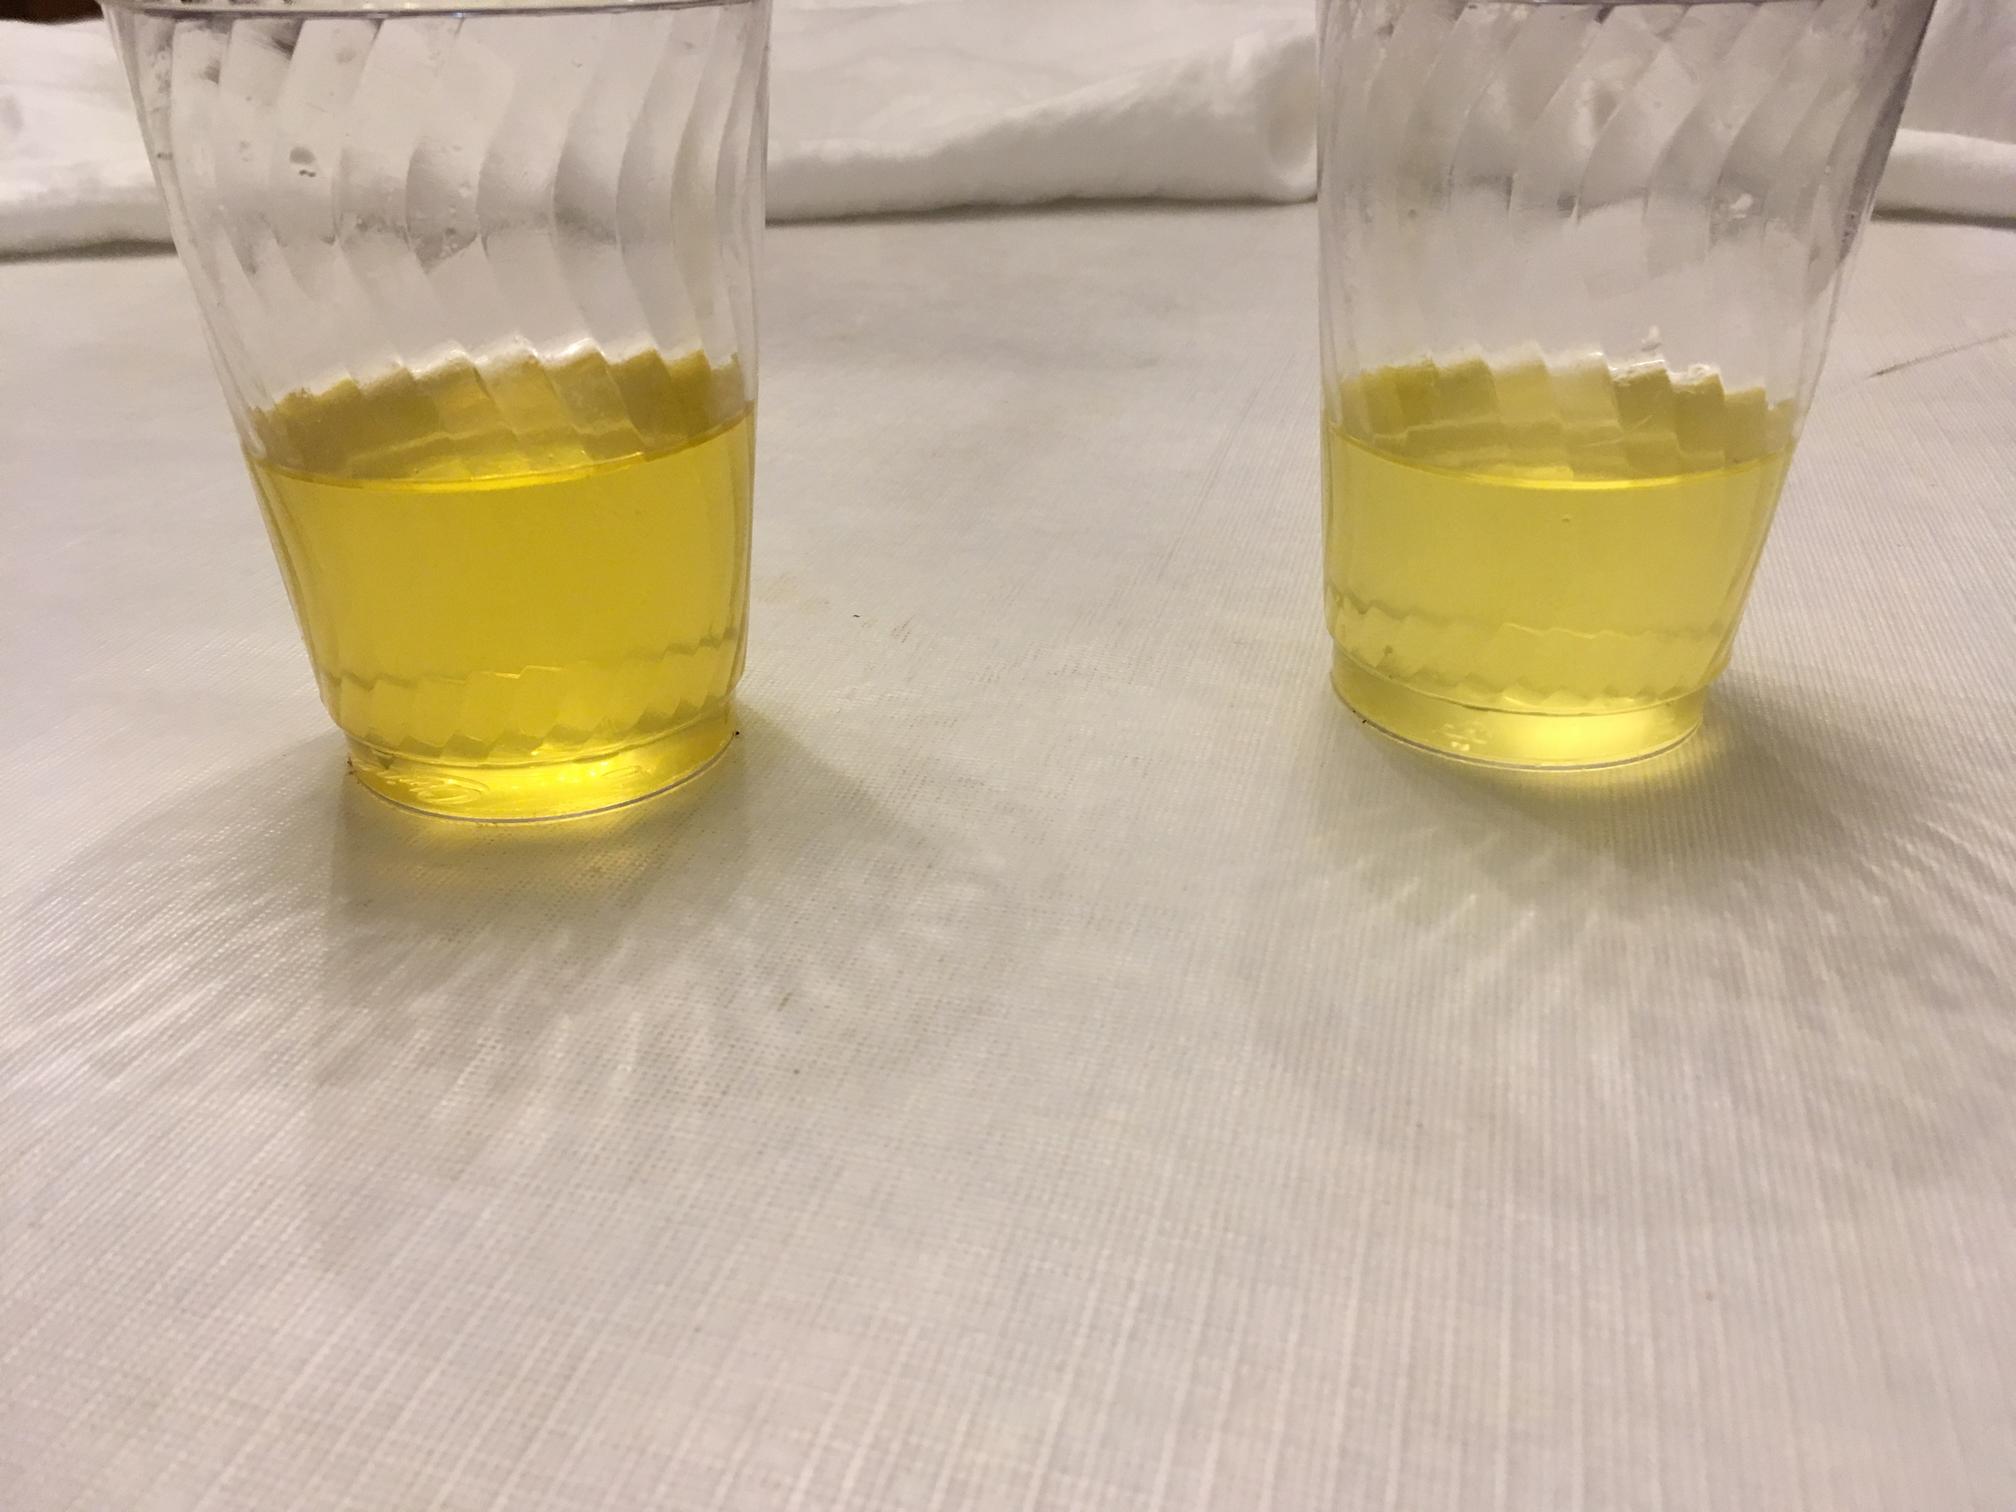
From Buffalo Bore Ammunition, I had their 158-gr Hard Cast +P Outdoorsman load, 158-gr Lead Semi Wad Cutter Hollow Point +P, 125-gr Low Velocity JHP, and their 110-gr Barnes TAC-XP all-copper hollow point +P load, which is designed for short barreled revolvers. From the folks at Black Hills Ammunition, I had their brand new 100-gr Honey Badger +P load (see pic of this one) and their 125-gr JHP +P load. Plus, the guys at the local gun shop gave me a partial box of .38 Spl. Reloads.

All shooting was done at 25 yards, over the hood of my pickup truck, resting the gun on a jacket. In single action, the trigger pull was crisp and right at 3 lbs; in the double-action mode, it was super-slick and about 10-lbs with a very, very smooth trigger pull. In the single action mode, I could keep my groups down to two inches or slightly over with all loads tested. Some loads shot spot on; some a bit lower. The lighter weight bullets shot a little lower. The 158-gr Outdoorsman +P load from Buffalo Bore was stout. Everything else ran just fine. I’d restrict my shooting of the +P loads for self defense against two or four legged critters. While the gun was tight, a steady diet of +P will loosen-up the gun, and we don’t want that. The overall winner in the accuracy department was the Black Hills 125-gr JHP load, and right on the heels was the Buffalo Bore low velocity JHP load. Both loads, when firing from the single action, was dead-on at 2-inches if I was doing my part.

Firing double-action, I could still keep all the groups down there around three inches, and many were well under three inches, which is outstanding accuracy. This particular Model 15 was made in the mid 1960s, too. I don’t know what I didn’t like about this particular used revolver. If I were still doing PI work back in Chicago and we were restricted to using a 4-inch Bbl .38 Spl revolver, this would be a top choice for daily carry. For many years, the law in Illinois read that PIs and security officers could only carry a 4-inch Bbl revolver. If you carried a .357 Mag, you were restricted to loading it with .38 Spl ammo. Everyone ignored this for many years, but the state came down hard and mandated that everyone in security carry only what the state said you could carry. I’m not sure of the regulations these days, but if restricted to a 4-inch Bbl revolver for duty use, I’d have no problem carrying this Model 15 with a good JHP load.

So, if you’re in the market for a really nice .38 Spl revolver with a 4-inch Bbl, check out the S&W Model 15. Just don’t expect to find one as inexpensive as I did.

– Senior Product Review Editor, Pat Cascio


Recipe of the Week: Country Biscuits and Busy Morning Pancakes, by K.R.

This recipe was economical, as the pre-made biscuit mix was not available in many of the countries we sailed to during our 7-year circumnavigation.

Basic Baking Mix

Ingredients:

  • 9 cups flour
  • 4 teaspoons salt
  • 1/3 cup baking powder
  • 1 3/4 cups vegetable shortening

Directions:

  1. Combine first four ingredients; stir to mix well.
  2. Cut in shortening with clean fingers until mixture resembles loose crumbs. Do not pack down when measuring. Use dry measuring cup when measuring, scraping excel off with a knife.
  3. Keeps about four to six months in an airtight container at room temperature.

Country Biscuits

Ingredients:

  • 2 cups Basic Baking Mix
  • 1/2 cup milk or water

Directions:

  1. Preheat oven to 425 degrees F.
  2. Mix biscuit mix and milk until just mixed.
  3. Put on floured board and knead 15 times.
  4. Roll out 1/2-inch thick; cut with 2 1/2-inch wide glass or biscuit cutter.
  5. Bake for 10 minutes on ungreased baking sheet.
  6. Yields: 12 biscuits.

Busy Morning Pancakes

Ingredients:

  • 2 cups Basic Baking Mix
  • 1 teaspoon salt *
  • 1 egg or 1 teaspoon vinegar
  • 1 cup milk * or water

Directions:

  1. Preheat griddle.
  2. Mix biscuit mix and salt. (* For low-salt dieters, I omit this as there is salt in the baking mix and the powdered milk.)
  3. Stir egg or vinegar into the water or milk (* if using buttermilk, instead add 1 teaspoon of baking soda), then into mix; batter will be lumpy.
  4. When a drop of water skips on griddle, it is hot enough. Pour some batter onto griddle.
  5. Bake until edges are dry, then flip to cook other side.

o o o

Useful Recipe and Cooking Links:

Do you have a favorite recipe that would be of interest to SurvivalBlog readers? Please send it via e-mail. Thanks!


Letters Re: My Family Preparedness Plan, by R.S.

R.S.,

Wow. I found this to be a grim and sobering article but one of the most sound that I have read to date. I don’t think anyone could cover all the myriads of possible scenarios, but this gives a great launching point for most I can imagine. Thank you for your time in writing such a good article. – J.W.

o o o

HJL,

Most deaths in a post-EMP or post-solar-flare/grid-down situation will be from the combination of starvation and disease. Starvation can be prevented by storing sufficient food to last until the next crop comes in. Disease can be prevented by practicing good sanitation techniques, primarily using septic tanks for waste disposal and solar or generator powered wells for fresh water. It’s hard to do in the city or suburbs but relatively common in the country. If you have a spring, creek, or river water source, the trick will be your ability to purify the water before consumption. Water filters or boiling will accomplish this. If you have a town upstream, be prepared for the water to become polluted with human excrement, as their waste water treatment plant fails. – Old Paratrooper

o o o

Hugh,

Two things: Where are these “containment camps”? Where do they appear in the federal budget? Are they as real as the dam that “burst “in California? – H.L.

HJL’s Comment: They do exist, and you have seen (or at least heard of) them in operation. They exist in the form of pre-positioned assets in mobile containers known as “Pre-Positioned Disaster Supplies” (PPDS). There is no reason to maintain and keep a fully functional facility up and running all the time. FEMA simply pre-positions supplies and commandeers facilities and manpower (usually through the National Guard) when one needs to be operated. There are at least three locations within 20 miles of my home that have these PPDSs, and most counties and large cities have specifically requested them. The goal of FEMA is to have supplies in any disaster area within 24 to 72 hours, making the response time as short as possible.

I would point to the Louisiana Superdome during hurricane Katrina as a prime example of an operational FEMA camp. This, of course, was before the PPDS program, but the government simply commandeered the appropriate facility and manpower and created the camp within a matter of days. Most people who were residents of the facility were not prepared for the disaster and willingly placed themselves in the custody of the government in hopes of being fed and taken care of. As you know, gangs and crime were rampant, people were not allowed the necessary tools to protect themselves, and the government did little to nothing to stop the abuses. Once you were in, you could not leave until the government decided to let you. In some cases, the government was a willing participant in the abuses, and there were situations of forced relocation and illegal search and seizures. I would also remind our readers that there is precedent for this action on a large scale and point them to the Japanese/American internment camps in WWII.

I’m sure if you check with your city’s and/or county’s emergency preparedness coordinator (or whatever they call the position), you will find an existing plan in place to utilize PPDSs or similar supplies along with the plan to appropriate the manpower, facilities, and equipment to run them. Our local county has at least three high schools and one government compound that are in their plan, as those locations are designed to hold a large number of people and provide fenced security. The PPDSs are stored in other close by locations and the local sheriff, municipal police, fire (paid and volunteer), national guard depots and various other organizations are part of the manpower and equipment plans.


Economics and Investing:

How much is $100 worth in every state? Compare that to a similar report done in 2015: How much $100 is really worth in each state . You can see one of the huge reasons some states are losing population and others are gaining. – H.L.

o o o

Chart of the Day: Advance/Decline Line. The Advance/Decline line is diverging from the market. Odds strongly favor that the market will soon push higher to new all-time highs

o o o

Rent Control Makes for Good Politics and Bad Economics

o o o

Florida ‘Boutique’ Linked To South American Gold Smuggling Plot

o o o

SurvivalBlog and its editors are not paid investment counselors or advisers. Please see our Provisos page for details.


Odds ‘n Sods:

X22 Report Spotlight (podcast interview) When The Disaster Hits You Better Be Prepared: James Wesley Rawles. This discussion covers a lot of topics—mainly economics, geopolitics, and military flashpoints.

o o o

Reader JCC sent in this link to Ferfal’s site with the new SERE manual (Survival Evasion Resistance Escape) in pdf form.

o o o

A couple of weeks ago, we requested someone to advise on using old flash Magicubes as a perimeter security alarm. Our friend Robb Moffett from Robb’s Homemade Life purchased a few off of eBay and created a simple HOWTO video on manually triggering them. By the way, if you have any other ideas like this you would like to see explored, just post them in the comments.

o o o

History is a wonderful teacher! A 1,389 Year-old ‘Phobia’? Why history is one of the best antidotes to Muslim apologetics.

o o o

This is created by the man who brought us the ghillie suit that defeats thermal imaging (FLIR) – Secret Sniper Technique Revealed: Ballistic Loophole Shooting


Household Basics in TEOTWAWKI- Part 10, by Sarah Latimer

We’re continuing this section of the series on household basics, and I’m sharing my research on oil. I didn’t expect it would be a three-part section, but I did spend a lot of time researching and testing it, so you are joining me on this journey and getting the plan.

I’ve shared that we have a Piteba seed/bean/nut oil expeller press that we plan to use as our primary means for oil. I’ve ruled out GMO grains and also lard, though I might use some beef tallow but want to keep it to a minimum for health reasons. Tallow is very useful in the homestead, but we are looking for vegetable oils that we can produce.

Black Oil Sunflower Seeds

Furthermore, whatever we were going to grow for producing vegetable oil needs to be produced in our high elevation climate and harvested without fuel-dependent machinery, as fuel might be unavailable or eventually our supply exhausted. I did research about growing some of these options and concluded that black oil sunflowers to produce sunflower oil was the most attractive solution for us. My research from a variety of people who have grown these black oil sunflowers suggest that we can confidently grow these for making oil. As further reason for encouragement, I recall that when we purchased our property and moved here, there was a patch of sunflowers growing here. An article I found details how to grow black oil sunflowers and suggests adding borax, a mineral, during the midsummer period to boost the size of the seed head. I will likely experiment with borax on some of the plants to see if this makes a difference, and if so what difference it makes. The garden spot is prepared, and as soon as the soil is warm enough the black oil sunflower seeds are going into the garden to be grown for the first/test year. My plan for harvesting is to cut the seed heads along the stem after the petals fall and when the seed head begins to look downward; we’ll put the seed heads in buckets or boxes where they can finish ripening before the seeds begin to fall. I don’t intend to lose many seeds in the garden to birds, and I believe that once the seed heads are dry we can simply shake them to release the seeds, wash them, let them dry, and store them for pressing into oil. There are plenty of other seeds in the garden for the birds in winter, and there will likely will be some sunflower seeds that fall but none intentionally. I have read that cheesecloth bags can be placed over the flower heads to catch any seeds as the flower heads dry, but that seems a little tedious to me. We’ll see if it is required or not.

Pressing Black Oil Sunflower Seed Oil

Though I have a plan for growing black oil sunflowers, before committing precious time, energy, and garden space to growing them, I wanted to be sure that we could successfully and satisfactorily press oil from their seed and enjoy that oil. So, using some of the seed I plan to plant, we ventured into using our Piteba oil press for the very first time, ever. As a general rule, it’s not enough to have equipment if we don’t know how to use it and haven’t practiced with it. Let me say right up front that it was more of a challenge that I had hoped or expected. Yet, this is true of many homesteading activities that I have now mastered, or at least feel I can do proficiently, including gardening, flour milling, bread making, candle making, and more. In the beginning, many of these tasks were tedious and frustrating. We had the basic knowledge required initially; however, though, we had to eventually develop the feel for how these simple processes and machines, with their settings, best worked. Then, they became simple, really. I am confident now that we can express oil, but it did take several attempts and hours to get it to work properly and produce our bit of oil. In hindsight, our main failure was in not letting the press and seeds heat up long enough before pressing and then not cleaning everything out well enough when we started over once it heated up. After we started over from the beginning with everything cleaned out, let the press and initial seeds heat up well, cranked down the end cap all the way, learned not to hold back the press cake too much, and got our crank rhythm going, the oil began to dribble quite nicely. Sometimes the press cake would build up in the press and we would have to clean it out before continuing, but we managed to produce more than a half of a cup of oil from approximately four cups of sunflower seeds (though I cannot be sure of the measurement of seeds because we had a few spills in my fumbling around getting used to our cranking/seed adding team system). I’m not sure about the time it took, because we had so many re-starts, but I am sure that we accomplished the production of this oil in less than one hour, after getting the oil production started. It takes a good deal of effort to crank though! Unless we find a way to power it with a motor (solar, hydro, or wind), we won’t be producing oil by the half gallon to deep fry food during TEOTWAWKI! Yet, we will have what is absolutely necessary for our basic cooking, hygiene, and household needs. We let the oil sit for a few days and then strained it through a coffee filter. It was thick enough that it took a good while to filter through, but it eventually came through looking quite similar to olive oil and tasting nice, too. Additionally, the chickens enjoyed the sunflower paste, after I added a little water. This was a bonus, since I really dislike waste.

Black oil sunflowers are not the same as those you buy at the store to snack on for yourself. For our testing, I purchased organic black oil sunflower seeds. These black oil sunflower seeds are very oily, with almost 50% more oil than those in our snack bags, and are what you most likely see in the bird feed mix you might buy. They truly are black and oily, living up to their name.

Pressing Raw Peanut Oil

We tested pressing hulled, raw peanuts to make peanut oil, too. We were able to do so, but it seemed to take more effort to produce peanut oil than with sunflower seeds. So, this effort combined with our inability to grow peanuts means that this is not a good option for us; however, peanuts may be a good option for you. We found that it was more challenging to feed the hulled, raw peanuts into our Piteba than the sunflower seeds. At times, the peanuts wedged together and got caught in the funnel instead of dropping into the Piteba press, requiring that I shake the funnel to allow a peanut to drop ahead of the other. Once, I had to shake so vigorously that I caused the funnel to release from the Piteba press and drop peanuts onto the floor. (I was not happy about my mess, but I chalked it up to learning.) The initial peanut oil was very murky and creamy looking, but after a few days it settled into a clear oil that closely resembled what we find at the grocery store. Also, I roasted the peanut press cake and fed that to the chickens, too. They gobbled them up. It smelled so good that I almost dug into it myself. I might look into uses for it. I was of thinking candy, maybe something like peanut brittle. Anyone have any experience using your peanut press cake for something tasty?

Sunflower and Peanut Oil

The peanut oil we pressed was later used for frying some of the best homemade oriental orange chicken we’ve ever had. Our peanut oil was a huge success. I’m glad I bought a good supply of raw peanuts so we can give this a whirl again, even if we can’t grow our own. (They are sure expensive though to have shipped!) It’s making me wish I knew of a way to grow them in our cold, high elevation.

Our Other Seed Oil Options and Storage

You might want to research some of the other seeds/beans/nuts that produce oils, listed at the Piteba website and consider your locale to see what best grows where you live and what is practical for you to harvest and utilize. Some seeds and beans and also oils cannot be stored for long, so you will need to take this into consideration. Sunflower seeds store well, but with the amount of energy required and currently doing it manually, we will likely press oil once every week or two for the amount that we need during this time frame. We’ll keep plenty of dry sunflower seed in storage in 5-gallon buckets to prevent mice, birds, and other animals from raiding our supply. In this manner, we won’t have the concern of oil spoilage when there is no refrigeration. Pumpkin seed and even flax seed are both additional options for us to consider, but we have not pressed either as a test yet. It’s good to know we have options though!

I highly recommend the Piteba oil press and that you spend some time watching YouTube demonstrations and working with your own press. It’s my recommendation that, if you buy one, you also buy lamp oil for heating your press and go ahead and get the Piteba spare parts and spare expeller screws, because we know that two is one and one is none. These are the parts that are likely to wear out or break over time. Again, please get some practice in now so that it isn’t a foreign and frustrating learning curve during a stressful TEOTWAWKI scenario!

Ladies, the great news is that we won’t have to live with dry skin, frizzy hair, or squeaky doors. We won’t have to live without sauteed vegetables and salad or sandwich dressings and sauces in TEOTWAWKI either! We can have vegetable oil!

It just takes some planning, resources, and practice with these resources, like many other things. However, after going through this series, I’m feeling much more confident in thinking through some of the basics that aren’t common topics for TEOTWAWKI. Thanks for bearing with me on this pursuit! As always, I look forward to hearing from our SurvivalBlog community, too, on your ideas, resources, and experiences. It has been such a pleasure and a joy to hear from so many of you, and I thank you for your great contribution on the topics we’ve tackled these past few months.

I wish you well, until we meet again next week on SurvivalBlog!


Letter Re: Diabetes Management

Hugh,

I read your recent article on diabetes management with much interest, as I am a 64 year old diabetic myself. The problem with being insulin-dependent is access to insulin after things crash.

Walmart (of all places) sells Relion Diabetes management products, which include insulin over the counter with no prescription needed. Relion makes different insulins that are equal to the same insulins that sell for over $250 per bottle at the pharmacy.

Their insulins are very reasonable at $28.44 per 10ml vial. I went to my local Walmart in Michigan, and sure enough I was able to buy Relion Novolin R (to replace my Humulin R) with no questions asked!

The pharmacist told me I could buy up to four bottles at a time, and the expiration date of the product I purchased on 4/5/2017 is April of 2019! Relion has a full line of diabetes management products that are ridiculously inexpensive with no prescription needed!

A long term prepper could buy four vials of insulin every few weeks or months and build up a very nice supply that would last years.

In some states, like Indiana, a prescription is needed, but in many it is not. Check your local Walmart. – J.C.


Economics and Investing:

The ultimate central bank: IMF De-Cashing: Soft-Selling Financial Enslavement – b.b.

o o o

Reader H.L. sent in this link that may help homesteaders and farmers gain a little extra income: Making Extra Income On Your Farm Or Rural Property

o o o

5 Things to Watch in the March Jobs Report

o o o

Nobody Is Saying Anything About How U.S. Earnings Season Will Go. With such a drastic difference between the real-world and the published economic numbers, is it any wonder?

o o o

SurvivalBlog and its editors are not paid investment counselors or advisers. Please see our Provisos page for details.