

“Historically, the claim of consensus has been the first refuge of scoundrels; it is a way to avoid debate by claiming that the matter is already settled.” – Michael Crichton
- Ad Survival RealtyFind your secure and sustainable home. The leading marketplace for rural, remote, and off-grid properties worldwide. Affordable ads. No commissions are charged!
- Ad USA Berkey Water Filters - Start Drinking Purified Water Today!#1 Trusted Gravity Water Purification System! Start Drinking Purified Water now with a Berkey water filtration system. Find systems, replacement filters, parts and more here.

Preparedness Notes for Sunday — June 27, 2021
Today is the birthday of Leroy James Sullivan (born June 27, 1933), an American firearms inventor. Jim Sullivan has designed several “scaled-down” versions of larger firearms. He also designed the Beta C-MAG double snail drum magazines.
Today is also the birthday of Paul Mauser, (June 27, 1838 – May 29, 1914). He was a German weapon designer and manufacturer. His strong and reliable bolt action design was used by many nations. The U.S. Springfield Model 1903 is based on the Mauser Model 1898, and in fact the U.S. government famously lost in a patent infringement lawsuit. Ironically, the U.S. government continued to pay the Mauser company royalties on each M1903 Springfield produced, even during and after World War I.
June 27th is also the birthday of economist Dr. Ravi Batra. (Born 1943.)
—
SurvivalBlog Writing Contest
Today we present another entry for Round 95 of the SurvivalBlog non-fiction writing contest. The prizes for this round include:
First Prize:
- The photovoltaic power specialists at Quantum Harvest LLC are providing a store-wide 10% off coupon. Depending on the model chosen, this could be worth more than $2000.
- A Gunsite Academy Three Day Course Certificate. This can be used for any of their one, two, or three-day course (a $1,095 value),
- A course certificate from onPoint Tactical for the prize winner’s choice of three-day civilian courses, excluding those restricted for military or government teams. Three-day onPoint courses normally cost $795,
- DRD Tactical is providing a 5.56 NATO QD Billet upper. These have hammer forged, chrome-lined barrels and a hard case, to go with your own AR lower. It will allow any standard AR-type rifle to have a quick change barrel. This can be assembled in less than one minute without the use of any tools. It also provides a compact carry capability in a hard case or in 3-day pack (a $1,100 value),
- Two cases of Mountain House freeze-dried assorted entrees in #10 cans, courtesy of Ready Made Resources (a $350 value),
- A $250 gift certificate good for any product from Sunflower Ammo,
- American Gunsmithing Institute (AGI) is providing a $300 certificate good towards any of their DVD training courses.
Second Prize:
- A Front Sight Lifetime Diamond Membership, providing lifetime free training at any Front Sight Nevada course, with no limit on repeating classes. This prize is courtesy of a SurvivalBlog reader who prefers to be anonymous.
- A Glock form factor SIRT laser training pistol and a SIRT AR-15/M4 Laser Training Bolt, courtesy of Next Level Training, that have a combined retail value of $589,
- Two 1,000-foot spools of full mil-spec U.S.-made 750 paracord (in-stock colors only) from www.TOUGHGRID.com (a $240 value).
- An Israeli CBRN Gas Mask with Hydration Straw and two Extra 40mm NATO Filter s – Manufactured in 2020 (a $229.99 value), courtesy of McGuire Army-Navy.
- Naturally Cozy is donating a “Prepper Pack” Menstrual Kit. This kit contains 18 pads and it comes vacuum-sealed for long term storage or slips easily into a bugout bag. The value of this kit is $220.
- An assortment of products along with a one-hour consultation on health and wellness from Pruitt’s Tree Resin (a $265 value).
Third Prize:
- Three sets each of made-in-USA regular and wide-mouth reusable canning lids. (This is a total of 300 lids and 600 gaskets.) This prize is courtesy of Harvest Guard (a $270 value)
- A Royal Berkey water filter, courtesy of Directive 21 (a $275 value),
- Siege Stoves is generously donating a SIEGE® STOVE kit, including a Titanium Gen 3 Flat-Pack Stove with titanium Cross-Members and a variety of bonus items including a Large Folding Grill, a pair of Side Toasters, a Compact Fire Poker, and an extra set of stainless steel universal Cross-Members. (In all, a $200 value.)
- Two Super Survival Pack seed collections, a $150 value, courtesy of Seed for Security, LLC,
- A transferable $150 purchase credit from Elk Creek Company, toward the purchase of any pre-1899 antique gun. There is no paperwork required for delivery of pre-1899 guns into most states, making them the last bastion of firearms purchasing privacy!
Round 95 ends on July 31st, so get busy writing and e-mail us your entry. Remember that there is a 1,500-word minimum, and that articles on practical “how-to” skills for survival have an advantage in the judging.
- Ad STRATEGIC RELOCATION REALTYFOR SALE: Self-sustaining Rural Property situated meticulously in serene locales distant from densely populated sanctuary cities. Remember…HISTORY Favors the PREPARED!
- Ad USA Berkey Water Filters - Start Drinking Purified Water Today!#1 Trusted Gravity Water Purification System! Start Drinking Purified Water now with a Berkey water filtration system. Find systems, replacement filters, parts and more here.

On Leadership, by Old Bobbert
Editor’s Introductory Note: This is the 30th article written by Old Bobbert that has been posted in SurvivalBlog. In all, he’s written more than 97,000 words for SurvivalBlog, and we are grateful!
—
True leadership is a status conferred by knowledgeable persons whose choices reflect their recognition of ability, experience, integrity, character, and a full commitment to a common cause or endeavor.
Being chosen as a leader generally is a result of a decision that they will be supported and enabled by the leader to be successful and secure in the common group efforts.
Often the new group members have made their choice of membership based on their confidence that the current leader is the person they need to provide access for them to the means and support necessary for their success in a common effort or cause.
This definition of who and what a leader is has come to me through many decades of personal experience starting with my enlistment in the US Army, in Jan 1958, at age seventeen as a smart Alec kid who was a high school dropout with a severe speech impediment, stuttering.
Naturally the army, immediately after basic training, sent me to Fort Sill, Oklahoma to the Signal Corps school for radio communication equipment repair.
I learned a lot about the realities of life and true leadership during two years, July 1958 -1960, in the 25th Infantry Division in the then Territory of Hawaii, not yet a state. In that environment, I was able to earn two promotions in the first year of active duty. I worked within a specific plan to be a success in spite of my then disability. I believed then, and now, that being disabled is not being unable. Plus two more years of stateside duty, all in communications, and a good discharge in March, 1962. I am now old enough to have great-grandkids.
Next was a few wastrel years of what we now know was non-combat PTSD followed by wonderfully beneficial time, 54+years, as Kathy’s husband and being the dad to four terrific kids, three sons plus a fabulous daughter.
As a husband and dad, I was able to correct the stuttering and became a professional communicator and leader in the commercial real estate rehab / resale business. I learned to be a good leader primarily through teaching our children to be dependable and to be fully qualified as both followers and as leaders.Continue reading“On Leadership, by Old Bobbert”
- Ad Click Here --> Civil Defense ManualNOW BACK IN STOCK How to protect, you, your family, friends and neighborhood in coming times of civil unrest… and much more!
- Ad SurvivalRealty.com: Sell Your Remote LandAdvertise your hard-to-sell remote land to eager buters. We specialize in rural, remote, and off-grid properties worldwide. Affordable ads. No commissions are charged!
JWR’s Meme Of The Week:
The latest meme created by JWR:

Photo Credit: AP Photo/Mark Schiefelbein
To share this, you can find it here: https://kapwi.ng/c/3q0XGDQu
Meme Text:
New Zealand is Sending a Wannabe “Woman” To The Olympics. There’s an Acronym to Describe Their Misogynistic Olympic Committee:
— IDIOTS —
Imbecilic
Displays of
Irrational
Olympic
Transgender
Showboating
Related news link:
Does This Look Like a Woman to You? He’s Going to the Olympics to Beat Women in Weightlifting
- Ad Elk Creek Company - Percussion Blackpowder Guns - No FFL Required.Elk Creek Company - Percussion Blackpowder Guns - Pre-1899 Guns - Knives - Bayonets - Magazines - The last bastion of privacy!
- Ad Survival RealtyFind your secure and sustainable home. The leading marketplace for rural, remote, and off-grid properties worldwide. Affordable ads. No commissions are charged!

The Editors’ Quote of the Day:
“Furthermore then we beseech you, brethren, and exhort you by the Lord Jesus, that as ye have received of us how ye ought to walk and to please God, so ye would abound more and more.
For ye know what commandments we gave you by the Lord Jesus.
For this is the will of God, even your sanctification, that ye should abstain from fornication:
That every one of you should know how to possess his vessel in sanctification and honour;
Not in the lust of concupiscence, even as the Gentiles which know not God:
That no man go beyond and defraud his brother in any matter: because that the Lord is the avenger of all such, as we also have forewarned you and testified.
For God hath not called us unto uncleanness, but unto holiness.
He therefore that despiseth, despiseth not man, but God, who hath also given unto us his holy Spirit.
But as touching brotherly love ye need not that I write unto you: for ye yourselves are taught of God to love one another.
And indeed ye do it toward all the brethren which are in all Macedonia: but we beseech you, brethren, that ye increase more and more;
And that ye study to be quiet, and to do your own business, and to work with your own hands, as we commanded you;
That ye may walk honestly toward them that are without, and that ye may have lack of nothing.
But I would not have you to be ignorant, brethren, concerning them which are asleep, that ye sorrow not, even as others which have no hope.
For if we believe that Jesus died and rose again, even so them also which sleep in Jesus will God bring with him.
For this we say unto you by the word of the Lord, that we which are alive and remain unto the coming of the Lord shall not prevent them which are asleep.
For the Lord himself shall descend from heaven with a shout, with the voice of the archangel, and with the trump of God: and the dead in Christ shall rise first:
Then we which are alive and remain shall be caught up together with them in the clouds, to meet the Lord in the air: and so shall we ever be with the Lord.
Wherefore comfort one another with these words.” – 1 Thessalonias 4 (KJV)
- Ad Elk Creek Company - Federally-Exempt No-Paperwork GunsPre-1899 Antique Cartridge Guns -- No FFL Required. Can be mailed to your doorstep with no Federal paperwork!
- Ad Even in permissive states guns are often locked up - a glaring security gap which must be filled with a dependable tool. Pepper sprays & stun guns fail often. Stunning travel-anywhere SIEGE Belts have been a proven life-saver over decades. Made in USASIEGE STOVES: Get ready for summer in the great outdoors with the ultimate portable stove. In a fuel crisis twigs are FREE. Use code "SBLOG" at checkout for $20 off BELTS!
Preparedness Notes for Saturday — June 26, 2021
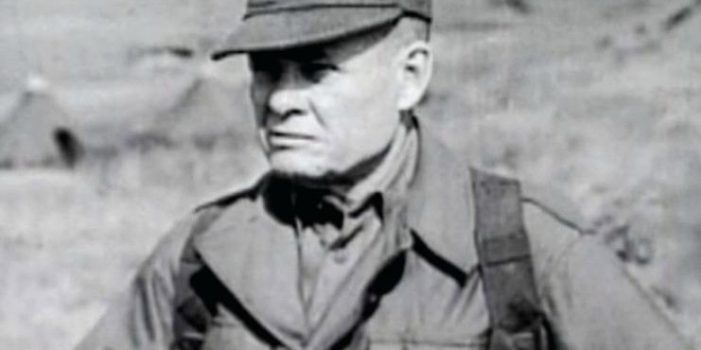
June 26th is the birthday of Marine Corps Lt. General Chesty Puller (born 1898, died October 11, 1971). He was perhaps America’s finest-ever maverick officer.
—
The annual ham radio Field Day begins today (June 26, 2021) at 1800 UTC. Tune in. The ham bands will be very active! Field Day will end at 2100 UTC on Sunday.
SurvivalBlog Writing Contest
Today we present another entry for Round 95 of the SurvivalBlog non-fiction writing contest. The prizes for this round include:
First Prize:
- The photovoltaic power specialists at Quantum Harvest LLC are providing a store-wide 10% off coupon. Depending on the model chosen, this could be worth more than $2000.
- A Gunsite Academy Three Day Course Certificate. This can be used for any of their one, two, or three-day course (a $1,095 value),
- A course certificate from onPoint Tactical for the prize winner’s choice of three-day civilian courses, excluding those restricted for military or government teams. Three-day onPoint courses normally cost $795,
- DRD Tactical is providing a 5.56 NATO QD Billet upper. These have hammer forged, chrome-lined barrels and a hard case, to go with your own AR lower. It will allow any standard AR-type rifle to have a quick change barrel. This can be assembled in less than one minute without the use of any tools. It also provides a compact carry capability in a hard case or in 3-day pack (a $1,100 value),
- Two cases of Mountain House freeze-dried assorted entrees in #10 cans, courtesy of Ready Made Resources (a $350 value),
- A $250 gift certificate good for any product from Sunflower Ammo,
- American Gunsmithing Institute (AGI) is providing a $300 certificate good towards any of their DVD training courses.
Second Prize:
- A Front Sight Lifetime Diamond Membership, providing lifetime free training at any Front Sight Nevada course, with no limit on repeating classes. This prize is courtesy of a SurvivalBlog reader who prefers to be anonymous.
- A Glock form factor SIRT laser training pistol and a SIRT AR-15/M4 Laser Training Bolt, courtesy of Next Level Training, that have a combined retail value of $589,
- Two 1,000-foot spools of full mil-spec U.S.-made 750 paracord (in-stock colors only) from www.TOUGHGRID.com (a $240 value).
- An Israeli CBRN Gas Mask with Hydration Straw and two Extra 40mm NATO Filter s – Manufactured in 2020 (a $229.99 value), courtesy of McGuire Army-Navy.
- Naturally Cozy is donating a “Prepper Pack” Menstrual Kit. This kit contains 18 pads and it comes vacuum-sealed for long term storage or slips easily into a bugout bag. The value of this kit is $220.
- An assortment of products along with a one-hour consultation on health and wellness from Pruitt’s Tree Resin (a $265 value).
Third Prize:
- Three sets each of made-in-USA regular and wide-mouth reusable canning lids. (This is a total of 300 lids and 600 gaskets.) This prize is courtesy of Harvest Guard (a $270 value)
- A Royal Berkey water filter, courtesy of Directive 21 (a $275 value),
- Siege Stoves is generously donating a SIEGE® STOVE kit, including a Titanium Gen 3 Flat-Pack Stove with titanium Cross-Members and a variety of bonus items including a Large Folding Grill, a pair of Side Toasters, a Compact Fire Poker, and an extra set of stainless steel universal Cross-Members. (In all, a $200 value.)
- Two Super Survival Pack seed collections, a $150 value, courtesy of Seed for Security, LLC,
- A transferable $150 purchase credit from Elk Creek Company, toward the purchase of any pre-1899 antique gun. There is no paperwork required for delivery of pre-1899 guns into most states, making them the last bastion of firearms purchasing privacy!
Round 95 ends on July 31st, so get busy writing and e-mail us your entry. Remember that there is a 1,500-word minimum, and that articles on practical “how-to” skills for survival have an advantage in the judging.
- Ad California Legal Rifles & Pistols!WBT makes all popular rifles compliant for your restrictive state. Choose from a wide range of top brands made compliant for your state.
- Ad Most “Healthy” Food Isn’t What It ClaimsMost stored food isn’t meant for daily use. If you’ve ever questioned what you’re eating, this shows a clean option you can rely on every day, and even store for years.

Raising Beef on a Small Homestead – Part 2, by K.R.
(Continued from Part 1. This concludes the article.)
Transportation
We started out not owning a trailer. We bought calves from someone who would deliver, borrowed trailers to purchase hay, and used a mobile butcher who killed and quartered the animals on site. I think it is possible to limp along in this manner for a while until one figures out whether or not beef production is going to be a permanent thing. We have since purchased a new Maverick stock trailer (from Quality Trailer Sales of Boise, Idaho), which seemed the best quality for the price. We bought a new trailer only after looking at used ones, sold at high prices, with various issues–rotten floors, rusted frames, poor bearings or brakes, cracked rooftops, just to name a few issues to be aware of. We can use the trailer when we purchase breeding stock, take them to the vet, purchase hay, and when we take them to the butcher. The trailer is also useful for trips to the dump, obtaining firewood, making large purchases, and a lot of other tasks that we previously avoided.
Feed
During the summer, our cows graze on the field. Daily tasks involve making sure they are on the right pasture and watering them. Also during the summer, we make silage that we feed to the cattle the following winter. Our land produces grass faster than the cows can eat it, so we cut it (low tech here) with a lawn mower and put the grass clippings into a 55 gallon contractor bag, squish the air out of it, and tape it shut. This is about as low-tec as you can get, and no more effort than mowing a suburban lawn. In the ensuing months, the grass in the bag ferments, like cabbage into sour kraut, and gives the cattle nutrients that they would not otherwise get. Year-round, we also provide trace minerals in the form of a block, or granules, that you can purchase at any ag-supply place, such as Cal Ranch or Big R stores.
Then, of course, when the garden is done, the cows love the pea plants, carrot tops, and other garden remains. It all goes into the compost eventually, anyway, so why not; they enjoy it!
During the winter, the cows eat alfalfa hay that we purchased the prior summer, as well as the silage we produce. They eat about 1.5-2 % of their body weight daily of combined hay and silage. Typically, we spend about $600 per year on alfalfa hay. In a pinch, we purchase some grass hay from local folks, when we run out of alfalfa; but the grass hay provides much less nutrition, and it doesn’t sustain the cows as well. Some people will add to the alfalfa hay some barley or wheat straw (the stalks that remain after the grain is harvested.) In doing this, the cows’ digestive systems work harder and less efficiently, but it helps keep them warm–or so we’re told.Continue reading“Raising Beef on a Small Homestead – Part 2, by K.R.”
Editors’ Prepping Progress
To be prepared for a crisis, every Prepper must establish goals and make long-term and short-term plans. In this column, the SurvivalBlog editors review their week’s prep activities and planned prep activities for the coming week. These range from healthcare and gear purchases to gardening, ranch improvements, bug out bag fine-tuning, and food storage. This is something akin to our Retreat Owner Profiles, but written incrementally and in detail, throughout the year. We always welcome you to share your own successes and wisdom in your e-mailed letters. We post many of those –or excerpts thereof — in this column, in the Odds ‘n Sods Column, and in the Snippets column. Let’s keep busy and be ready!
Jim Reports:
I am anxiously counting down the days until my turn to The Rawles Ranch.
Meanwhile, I’m nearly done with revamping the Elk Creek Company web site with pre-1965 silver coin pricing. The initial multiplier that I’ll be using is 23 times silver face value to determine pricing for those opting to pay in Federal Reserve Note (FRN), cash, checks, or USPS PMOs. As you can see from my revised pricing in pre-1965 silver, we have been robbed by our own government through currency debasement and inflation, since 1964. (My gun prices now range from $19.50 to $250 – in silver. That may look absurd, but it illustrates how much spending power the Dollar has lost since the U.S. Treasury robbed us of sound, specie-backed currency.)
My new consulting rate is $5 per hour in pre-1965 silver coinage, or 23 times that = $115 per hour, if paying in FRNs.
The revised web pages and shopping cart should go live on or before July 1st. That will coincide with our week-long Independence Day sale. Thanks for your patience.
Now, over to my lovely and hard-working wife, Lily…

The Editors’ Quote of the Day:
“Hear my voice, O God, in my prayer: preserve my life from fear of the enemy.
Hide me from the secret counsel of the wicked; from the insurrection of the workers of iniquity:
Who whet their tongue like a sword, and bend their bows to shoot their arrows, even bitter words:
That they may shoot in secret at the perfect: suddenly do they shoot at him, and fear not.
They encourage themselves in an evil matter: they commune of laying snares privily; they say, Who shall see them?
They search out iniquities; they accomplish a diligent search: both the inward thought of every one of them, and the heart, is deep.
But God shall shoot at them with an arrow; suddenly shall they be wounded.
So they shall make their own tongue to fall upon themselves: all that see them shall flee away.
And all men shall fear, and shall declare the work of God; for they shall wisely consider of his doing.
The righteous shall be glad in the Lord, and shall trust in him; and all the upright in heart shall glory.” – Psalm 64 (KJV)
Preparedness Notes for Friday — June 25, 2021
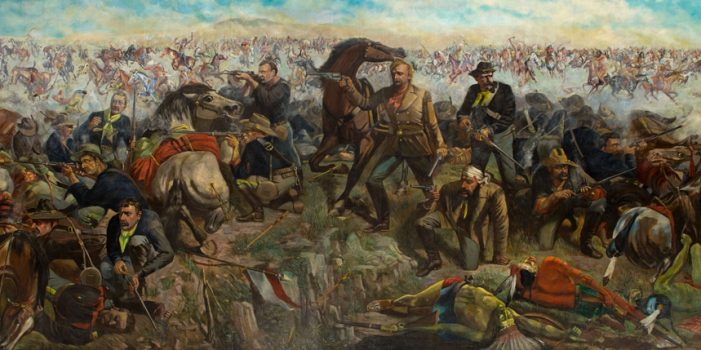
On June 25th, 1876, Native American forces led by Chiefs Crazy Horse and Sitting Bull defeated the U.S. Army troops of Lieutenant Colonel George Armstrong Custer in a bloody battle near southern Montana’s Little Bighorn River. The Battle of Little Bighorn–also called Custer’s Last Stand –marked the most decisive Native American victory and the worst U.S. Army defeat in the long Plains Indian War. While complicated, the generally accepted reason for the battle is that the discovery of gold in South Dakota’s Black Hills in 1875 led to the U.S. government disregarding previous treaty agreements. The gruesome fate of Custer and his men outraged many white Americans and confirmed their image of the Indians as wild and bloodthirsty. Meanwhile, the U.S. government increased its efforts to subdue the tribes. Within five years, almost all of the Sioux and Cheyenne would be confined to reservations.
—
The Korean war began at an hour before dawn on June 25, 1950.
—
SurvivalBlog Writing Contest
Today we present another entry for Round 95 of the SurvivalBlog non-fiction writing contest. The prizes for this round include:
First Prize:
- The photovoltaic power specialists at Quantum Harvest LLC are providing a store-wide 10% off coupon. Depending on the model chosen, this could be worth more than $2000.
- A Gunsite Academy Three Day Course Certificate. This can be used for any of their one, two, or three-day course (a $1,095 value),
- A course certificate from onPoint Tactical for the prize winner’s choice of three-day civilian courses, excluding those restricted for military or government teams. Three-day onPoint courses normally cost $795,
- DRD Tactical is providing a 5.56 NATO QD Billet upper. These have hammer forged, chrome-lined barrels and a hard case, to go with your own AR lower. It will allow any standard AR-type rifle to have a quick change barrel. This can be assembled in less than one minute without the use of any tools. It also provides a compact carry capability in a hard case or in 3-day pack (a $1,100 value),
- Two cases of Mountain House freeze-dried assorted entrees in #10 cans, courtesy of Ready Made Resources (a $350 value),
- A $250 gift certificate good for any product from Sunflower Ammo,
- American Gunsmithing Institute (AGI) is providing a $300 certificate good towards any of their DVD training courses.
Second Prize:
- A Front Sight Lifetime Diamond Membership, providing lifetime free training at any Front Sight Nevada course, with no limit on repeating classes. This prize is courtesy of a SurvivalBlog reader who prefers to be anonymous.
- A Glock form factor SIRT laser training pistol and a SIRT AR-15/M4 Laser Training Bolt, courtesy of Next Level Training, that have a combined retail value of $589,
- Two 1,000-foot spools of full mil-spec U.S.-made 750 paracord (in-stock colors only) from www.TOUGHGRID.com (a $240 value).
- An Israeli CBRN Gas Mask with Hydration Straw and two Extra 40mm NATO Filter s – Manufactured in 2020 (a $229.99 value), courtesy of McGuire Army-Navy.
- Naturally Cozy is donating a “Prepper Pack” Menstrual Kit. This kit contains 18 pads and it comes vacuum-sealed for long term storage or slips easily into a bugout bag. The value of this kit is $220.
- An assortment of products along with a one-hour consultation on health and wellness from Pruitt’s Tree Resin (a $265 value).
Third Prize:
- Three sets each of made-in-USA regular and wide-mouth reusable canning lids. (This is a total of 300 lids and 600 gaskets.) This prize is courtesy of Harvest Guard (a $270 value)
- A Royal Berkey water filter, courtesy of Directive 21 (a $275 value),
- Siege Stoves is generously donating a SIEGE® STOVE kit, including a Titanium Gen 3 Flat-Pack Stove with titanium Cross-Members and a variety of bonus items including a Large Folding Grill, a pair of Side Toasters, a Compact Fire Poker, and an extra set of stainless steel universal Cross-Members. (In all, a $200 value.)
- Two Super Survival Pack seed collections, a $150 value, courtesy of Seed for Security, LLC,
- A transferable $150 purchase credit from Elk Creek Company, toward the purchase of any pre-1899 antique gun. There is no paperwork required for delivery of pre-1899 guns into most states, making them the last bastion of firearms purchasing privacy!
Round 95 ends on July 31st, so get busy writing and e-mail us your entry. Remember that there is a 1,500-word minimum, and that articles on practical “how-to” skills for survival have an advantage in the judging.
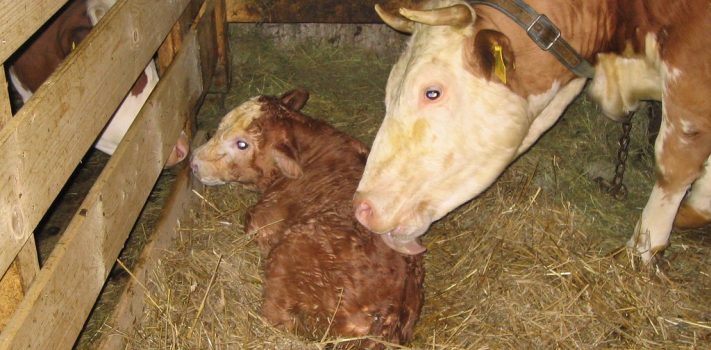
Raising Beef on a Small Homestead – Part 1, by K.R.
Raising beef cattle may be outside the comfort zone of many Survival Blog readers, but it doesn’t need to be. At least that is what my wife and I found out. Doing so on a small, manageable scale has significantly upgraded our level of land management, food preparation, and enjoyment. Now we can’t imaging our high altitude (6,500 feet) American Redoubt retreat without full freezers of steaks, roasts, and burgers, all the nutritious compost we could ever hope for, and our two Highland cows roaming our mountainous 20 acres.
Many might say that, “I’ve never raised livestock and want to start with something small,” or, “I don’t have enough land and equipment,” so they don’t even try to raise cattle. As it turns out, the skills needed to raise beef aren’t any more difficult than growing a garden or deciding which firearms are the best ones for defense of a ranch or homestead. You can do what we describe here with just a few acres and no expensive farming equipment.
Why Beef?
The first question most people ask is, “Why beef? Why not goats or chickens, or something smaller than I am? Good question. Goats and chickens are good ideas in the right setting. We decided against them and made the move to beef for a number of reasons. First, we needed a robust protein source, and we like the taste of beef; and if you raise the right kind, it can be as high in Omega-3 fats and low in the “bad” fats as chicken. Secondly, goats and chickens do not do well where we are because of predators. We have bountiful ermine and foxes that take chickens, and mountain lions that take goats.
The cattle we chose have a positive overall impact on our land by increasing grass density and removing weeds, and they produce a high enough volume of manure that meets our garden needs. Finally, having large livestock roam most of our land qualifies us for a property tax break in our state that effectively pays for purchasing and feeding our cattle. We chose beef because it was the option that met our land, garden, taste, and financial needs.Continue reading“Raising Beef on a Small Homestead – Part 1, by K.R.”

Economics & Investing For Preppers
Here are the latest news items and commentary on current economics news, market trends, stocks, investing opportunities, and the precious metals markets. We also cover hedges, derivatives, and obscura. Most of these items are from the “tangibles heavy” contrarian perspective of SurvivalBlog’s Founder and Senior Editor, JWR. Today, we look at industry perspectives on the ongoing ammunition shortage. (See the Tangibles Investing section.)
Precious Metals:
Fed Musings About Distant Interest Rate Hikes Spook Metals Markets
o o o
Inflation And Gold In The 1970s Vs. Today’s Situation.
o o o
A good primer: Coins vs Bars – Expert Tips on Gold and Silver Coins and Bars.
Economy & Finance:
Bank of England to look through temporary inflation rise, says Poll.
o o o
From the leftist CBS News: Unemployment applications rise from a pandemic low, even as economy strengthens.
o o o
And at Zero Hedge: Powell Just Launched $2 Trillion In “Heat-Seeking Missiles”: Zoltan Explains How The Fed Started The Next Repo Crisis. A quote:
“Needless to say, flooding the Fed’s RRP facility and sterilizing reserves is hardly what the Fed had intended, and as Credit Suisse’s own repo guru (and former NY Fed staffer) Zoltan Pozsar wrote in his post-mortem, ‘…the re-priced RRP facility will become a problem for the banking system fast: the banking system is going from being asset constrained (deposits flooding in, but nowhere to lend them but to the Fed), to being liability constrained (deposits slipping away and nowhere to replace them but in the money market).'”
The Editors’ Quote of the Day:
“The primary argument the past year among leftist governments in foreign nations as well as in blue states here in the US has been that they do not necessarily intend to “force” vaccine passports on their respective populations. Rather, they will leave it up to individuals to “choose” vaccination or no vaccination. This might sound surprising to many in the alternative media because we know that the lockdowns were viciously enforced by many states and numerous businesses were threatened or attacked by their local health authorities. Suddenly these same bureaucrats and politicians care about your personal freedoms?
What they don’t mention is that the ‘choice’ they are offering is not much choice at all. Sure, you can refuse to get the vaccine, but if most businesses in your community demand proof of vaccination before you can work or shop with them, your refusal comes with the promise of poverty and possibly starvation. You would be completely cut out of the mainstream economy.
This is a bait and switch, an attempt to make you think you are free but then punishing you for pursuing free decisions. In order for this con game to work, though, the government needs businesses to act as their taskmasters. Make no mistake, major corporate retailers will join with government to enforce vaccine passports. It is only a matter of time.” – Brandon Smith

Preparedness Notes for Thursday — June 24, 2021
June 24th the birthday of rifle-toting abolitionist pastor Henry Ward Beecher. (Born 1813, died March 8, 1887.) He and his adherents from his church smuggled so many Sharps rifles to Bleeding Kansas that the Sharps rifles picked up the nickname Beecher’s Bibles. Wikipedia states: “Several of his brothers and sisters became well-known educators and activists, most notably Harriet Beecher Stowe, who achieved worldwide fame with her abolitionist novel Uncle Tom’s Cabin.”
—
SurvivalBlog Writing Contest
Today we present another entry for Round 95 of the SurvivalBlog non-fiction writing contest. The prizes for this round include:
First Prize:
- The photovoltaic power specialists at Quantum Harvest LLC are providing a store-wide 10% off coupon. Depending on the model chosen, this could be worth more than $2000.
- A Gunsite Academy Three Day Course Certificate. This can be used for any of their one, two, or three-day course (a $1,095 value),
- A course certificate from onPoint Tactical for the prize winner’s choice of three-day civilian courses, excluding those restricted for military or government teams. Three-day onPoint courses normally cost $795,
- DRD Tactical is providing a 5.56 NATO QD Billet upper. These have hammer forged, chrome-lined barrels and a hard case, to go with your own AR lower. It will allow any standard AR-type rifle to have a quick change barrel. This can be assembled in less than one minute without the use of any tools. It also provides a compact carry capability in a hard case or in 3-day pack (a $1,100 value),
- Two cases of Mountain House freeze-dried assorted entrees in #10 cans, courtesy of Ready Made Resources (a $350 value),
- A $250 gift certificate good for any product from Sunflower Ammo,
- American Gunsmithing Institute (AGI) is providing a $300 certificate good towards any of their DVD training courses.
Second Prize:
- A Front Sight Lifetime Diamond Membership, providing lifetime free training at any Front Sight Nevada course, with no limit on repeating classes. This prize is courtesy of a SurvivalBlog reader who prefers to be anonymous.
- A Glock form factor SIRT laser training pistol and a SIRT AR-15/M4 Laser Training Bolt, courtesy of Next Level Training, that have a combined retail value of $589,
- Two 1,000-foot spools of full mil-spec U.S.-made 750 paracord (in-stock colors only) from www.TOUGHGRID.com (a $240 value).
- An Israeli CBRN Gas Mask with Hydration Straw and two Extra 40mm NATO Filter s – Manufactured in 2020 (a $229.99 value), courtesy of McGuire Army-Navy.
- Naturally Cozy is donating a “Prepper Pack” Menstrual Kit. This kit contains 18 pads and it comes vacuum-sealed for long term storage or slips easily into a bugout bag. The value of this kit is $220.
- An assortment of products along with a one-hour consultation on health and wellness from Pruitt’s Tree Resin (a $265 value).
Third Prize:
- Three sets each of made-in-USA regular and wide-mouth reusable canning lids. (This is a total of 300 lids and 600 gaskets.) This prize is courtesy of Harvest Guard (a $270 value)
- A Royal Berkey water filter, courtesy of Directive 21 (a $275 value),
- Siege Stoves is generously donating a SIEGE® STOVE kit, including a Titanium Gen 3 Flat-Pack Stove with titanium Cross-Members and a variety of bonus items including a Large Folding Grill, a pair of Side Toasters, a Compact Fire Poker, and an extra set of stainless steel universal Cross-Members. (In all, a $200 value.)
- Two Super Survival Pack seed collections, a $150 value, courtesy of Seed for Security, LLC,
- A transferable $150 purchase credit from Elk Creek Company, toward the purchase of any pre-1899 antique gun. There is no paperwork required for delivery of pre-1899 guns into most states, making them the last bastion of firearms purchasing privacy!
Round 95 ends on July 31st, so get busy writing and e-mail us your entry. Remember that there is a 1,500-word minimum, and that articles on practical “how-to” skills for survival have an advantage in the judging.

Survival Gardening: The Most Vital Prep – Part 3, by T.J. Dixon
(Continued from Part 2. This concludes the article.)
Your crops should be started indoors 4 to 6 weeks before you’re ready to put them out. Since your space is small to start, you will only need one or two 72 cell starter trays; you can also use egg trays or make pots from rolled up paper. When you are selecting your seeds look for heirloom or “open-pollinated” seeds; they will be labeled on the seed packet. Since you will be harvesting next year’s seeds from your little garden, you do not want hybrid seeds. Heirloom and open-pollinated seeds will reproduce true every generation. Hybrid seeds will grow, but you cannot be certain what characteristics will pass on. Put two seeds in each pot or cell. You can prune one out if they both sprout, but you double your chances of success that way. Sometimes you only get a 75% sprouting rate, so doubling up is the best way to compensate. You can use a shop light for germination and early growth, but if you can afford it get a small led grow light system. These have better light spectrum properties and are cheaper to operate. Light intensity decreases exponentially, meaning you want the light as close to the top of the plants as you can without letting them touch the bulbs. You can even sprout them in a window if you need to – it will take a bit longer, but it will work.
A week or two before you want to transplant them, they need to be hardened off. This can be done by making a small tent from PVC piping and shade cloth, or just putting them in a shady location. You can also watch the weather and look for a cloudy day – but you risk a sudden break in the clouds which can make things dicey. Keep them watered, remember those trays are small and do not hold much moisture. You should water daily unless it has rained. If the temperature is going to drop into the 30’s, bring them in at night. Remember that bunnies, groundhogs and other critters love tasty little sprouts, so protect them.Continue reading“Survival Gardening: The Most Vital Prep – Part 3, by T.J. Dixon”