
June 29th, 1868 is the birthday of astronomer Dr. George E. Hale. Dr. Hale was credited with founding the Yerkes Observatory in Chicago and the Mount Wilson and Palomar Mountain Observatories in Southern California. He also invented the spectroheliograph and first learned that the sun’s outer shell is made of gas. He photographed colossal hurricanes of incandescent vapor and discovered that the flaming whirlpools of hydrogen leaped 300,000 miles from the surface of the sun and were large enough to engulf the earth like a cinder in a furnace.
- Ad Ready Made Resources, Trijicon Hunter Mk2$2000 off MSRP, Brand New in the case
- Ad LifeSaver 20K JerryCan Water PurifierThe best water jerrycan you can buy on the market! Mention Survivalblog for a Free Filter ($130 Value)
Scot’s Product Review: Blue Force Gear Vickers Combat Application Sling and More
I’m not sure who first coined the phrase, but whoever it was suggested that we think of a sling as a holster for a long gun, and I’ve always rather liked that analogy. Some slings also help the shooter be more accurate by providing support in shooting positions. By and large, however, the main use of the sling is to carry a long arm while keeping one or both hands free for other purposes.
There are a number of types of slings and ways to attach them to a rifle or shotgun. The most common is a simple carry strap that attaches at the butt of the weapon and near the tip of the forend. To use it, we simply hang the rifle over our shoulder with the muzzle up or down. Muzzle up with the rifle over the dominant shoulder is called American carry, while muzzle down over the support shoulder is called African carry. Both styles have their proponents, and both have their uses. Knowing how to use the long arm from both positions is a good idea, if for no other reason than varying the shoulder that the rifle is carried on lessens fatigue. One generally should keep a hand on a slung weapon to keep it stable, but when you need to, you should be able to use both for brief tasks.
Moving a step up, we get to the loop sling, which has a loop through which we thrust the support arm. Once we have it adjusted properly, it can greatly enhance our steadiness by locking the rifle to our body. I only recently figured out how to use the U.S. GI web slings that have a clip on one end as a support sling. The loop sling can be used just as you would use a simple carry strap with the advantages of support when you need it. The only disadvantages are some extra cost, the learning curve, and the time it takes to get into them.
Some variants of the loop sling are the Ching and Rhodesian slings, and I’ve written about the ones made by Andy Langlois. The huge advantage of these slings is the speed at which they can be deployed into the support position while providing almost as much steadiness as a regular loop sling. Again, they can be used to carry the long arm just as you would with a carry strap.
In recent years, however, we’ve seen the arrival of new slings– the so-called tactical one point, two point, and three point slings. The one point sling is a simple loop that attaches to the mid-point of the weapon. You can slip it over their head to carry the rifle much as one would carry a camera or binoculars on a neck strap or put the support arm through as well to take some of the weight off the neck. Many people like this sling as it makes it very easy to shoulder the weapon to the right or left shoulder for shooting around obstacles. When carrying the weapon, it dangles with the muzzle down, which is why some hate it as the muzzle is often aimed at the shooter’s feet. You also have to take care should you wish to kneel or crouch to keep the muzzle from digging into the dirt. While seeing the advantages of being able to get your rifle to either shoulder easily, I am one of those bothered by muzzling my feet.
I’m going to skip to the three point sling next. These have a long strap that runs between the forend and the butt of the rifle. One end of the sling itself is fastened to the butt, while the forward end has some latitude to slide up and down the strap on the side of the rifle. Some really like this style sling, but I quickly rejected it as I am left-handed. The strap that runs along the side of the rifle interferes with the ejection port and other controls when set up for a lefty. There is generally a means to adjust the slings’ length on the fly so you can keep the weapon close or give it slack to allow you to shoulder the arm. To use it, you put it over your head and slip your support arm through so the weapon rides across the front of your body at something like a 45-degree angle with the muzzle pointing down to the support side. You can just let go of it if you need both hands for some other task, though it is best to always keep a hand on it for purposes of control. To use the rifle, set the length properly, lift the rifle to your shoulder, and fire. To switch shoulders, you have to pull the slider to lengthen the sling, then weave your support hand out of the sling and swap sides. It is more trouble than the single point to switch shoulders, but with practice it can still be done quickly.
The two point sling is my favorite variant of the tactical sling. It looks much like a carry strap but is longer so you can carry the rifle diagonally across your body as you would with the three point sling. It also has a quick adjust feature to lengthen or shorten it by pulling on a tab, straps, or loop. While a normal carry strap or loop sling is attached to the bottom of the weapon, a two point should be attached to the side or top so that it doesn’t flip over and present your rifle upside down. You should be able to adjust it so you can also use it as you would a carry strap for American or African carry. This is the style sling I have chosen for my needs, feeling that the only down side is that it doesn’t provide a loop that can be used to enhance steadiness.
While both three point and two point slings largely avoid the issue of pointing the rifle at your feet, you have to remember it is still pointing somewhere, and if you are around others it is possibly pointing at THEIR feet. In the last class I took, I noticed a lot of subtle dancing as people maneuvered to avoid this issue. It would have been amusing, except for the photos I’ve seen of shot feet.
One other point on the need to adjust the length of these slings is that you may or may not have armor. Armor makes you bigger, so the sling has to get longer to compensate.
You have options about where to attach the ends of the two point sling. I generally put them near the tip of the forend and at the butt, but you can move both ends closer to the middle of the rifle. The midpoint attachment offers some advantages; if one needs to swap shoulders, you can probably do it without having to pull the support arm out of the sling, as seen in this video. You have to have the midpoint sockets, alas, to make this work, which I don’t on most of my weapons.
I tried very hard to avoid tactical slings as I regarded them as a bit of an affectation, and I just kept using carry straps on my AR for many years. After a class, though, I realized I was handicapping myself. It was simply faster and easier to deploy a rifle using a tactical sling than a strap from African or American carry. I am sure there are those who can do it better than I can, but the class opened my eyes to what would work best for me. The other issue is transitioning to a handgun in case of a malfunction or running dry. With a tactical sling, you can just drop the dead carbine and go to the pistol. With a strap, you have to re-sling the rifle to your shoulder, which is definitely slower and clumsier. True, you could just drop the carbine, but that feels a lot like throwing away a gun to me.
When I asked instructor Bill Jeans, whose video I reviewed and who has sadly retired, what sling he recommended, he immediately pointed me to the $45 Blue Force Gear Vickers Combat Applications Sling. I got one and liked it so much that I bought more.
The sling, designed by Army special ops veteran Larry Vickers, is made of two lengths of 1.25-inch wide Cordura webbing with five pieces of hardware. You also need to have some way to attach it to your rifle, which will probably be sling swivels, though there are other options, like snaps and hooks. While many weapons have integral loops for attaching a sling, I strongly suggest that you use a method that allows you to easily detach it. This makes maintenance and storage easier as well as enables you to get out of it quickly in the event you get hung up on something. Friends have related stories of military personnel losing their lives when they got tangled up trying to get out of crashed aircraft. I really like push-button, quick detachable (QD) swivels and use them everywhere I can, but I’ll mention an enhanced version for emergencies later.
You have a choice of metal or Acetal hardware with the Vickers sling. I chose the more economical Acetal, which is a high strength thermoplastic, though I note that the loop that holds the two sections of the sling together appears to be steel, since it attracts a magnet. In theory, I would prefer metal, but the $20 cost savings and the fact that I know Acetal to be incredibly strong won me over.
The webbing can be ordered in multicam, coyote brown, black, wolf, foliage green, OD, kryptek highlander, kryptek typhoon, and orange. Wolf is a grey color, as one might guess. I have them in multicam, coyote, and foliage green, but I rather wish they were all in OD, since that color works quite well in my environment. I wound up with the hodgepodge by getting what was available at the moment or taking advantage of sales.
Something I really like about the webbing they use is that it has little or no sheen. I have purchased slings from other companies that were shiny and reflective. Shiny is bad if you want to remain unobserved. I spent a fair amount of time and energy spraying them with paint to make them dull. (Yes, you can paint webbing.) The Blue Forces slings aren’t slippery, either, so your rifle won’t slide off the shoulder as badly as some slings I’ve used.
The slider that adjusts the length of the sling has a web tab about 3.25 inches long and is made of a contrasting color of cordura, which makes it easy for the user to visually find the slider. It operates smoothly and easily yet somehow always holds its adjustment.
All three of the slings I purchased show excellent workmanship, and the materials are very high quality.
One thing you find when you use this sort of sling on an AR is that it works better if you attach it to the side of the weapon rather than the bottom. On an AR, assuming you have the usual military style front sight, my favorite method for the front end is the $38.95 GG&G Sling Thing that bolts into the open triangle in the front sight base. It has a socket for a push button QD swivel, which can be attached to either side, keeping lefties and righties happy. One very cool feature is that the swivel rotation is limited, which means you can’t twist the sling up into a tangled mess. The Sling Thing was another tip from Bill Jeans.
Another method to attach the sling is to use a Blue Force Gear Universal Wire Loop (UWL). There are several variants, but the one I like best is the $19 Molded UWL. This has a loop to which one can attach a sling as well as a socket for a push button QD sling swivel. The idea is that the stainless steel wire that forms the loop is threaded through the front sight base and then the loop is pushed through and the sling attached. The wire is coated with nylon to protect the finish on your weapon. It will work with any weapon, not just an AR, and I found it great for attaching a sling to the Century Arms AK I recently reviewed. The nice thing is that I can push it between the barrel and gas tube and get it to the right side of the AK so that the sling works properly for poor lefties like me.
I should point out that the Molded UWL is made of nylon with a metal insert for the QD swivel. It seems incredibly tough to me, but if you want metal, the Universal Wire Loop w/ Push Button Socket is available for $35.
Should you want to use it on something that requires a longer wire loop, they also have the plain old $26.00 Universal Wire Loop https://www.blueforcegear.com/universal-wire-loop-uwl-3-25.html without the QD socket with a three inch longer loop. I really like the idea of the QD socket, though, so I would stick with one of those unless I really needed the extra length.
Attaching the sling to the butt of an AR carbine is pretty easy as most have collapsible stocks and these invariably have slots for slings. I’m not crazy about using those slots, however, as I like to be able to completely remove the sling at times. Again, GG&G to the rescue with their $36.95 rear Sling Thing . Many aftermarket stocks, like the B5 SOPMOD I like, also feature built-in sockets for pushbutton QD swivels, which is a good feature in my view. The B5 also limits swivel rotation so klutzes like me don’t tangle up the sling.
If you have an AR with a non-collapsible buttstock, Blue Force Gear offers $14 adapters for them. I haven’t tried them on other weapons, but they would probably work if the stock dimensions are similar and there is a sling loop in the right spot to hold the adapter in place.
For an emergency when you need to get out of your sling, Blue Force Gear sells the $30 Rapid Emergency Detachment Swivel (RED Swivel) https://www.blueforcegear.com/rapid-emergency-detachment-swivel-red-swivel.html. The RED Swivel is a QD swivel with a different means of detaching it from the mount. Instead of pushing in a small button that might be hard to find in a bad moment, there is a knob on a short piece of wire that you pull. If you have to get out of your sling, grab it and yank. Because the knob is round, it isn’t likely to catch on things and dump your rifle when you were planning on keeping it. Since it sticks out a bit and is larger than the push button, it is much easier to find by feel; you just slide your hand down the sling toward the muzzle and there it is.
I’ve talked about the difference between one point and two point slings. What if you want both? Blue Force Gear sells a way to get that. It’s the $14.75 to $22.00 Burnsed Socket. Again, you get a choice between nylon or metal with metal costing more. This small gadget threads onto your two point sling and allows you to remove the front of your sling from the forend of your rifle and attach it to the sling near the rear swivel, which needs to be attached to the mid-point of the weapon. This gives you a sling that can be a one point or two point one, depending on circumstances. I personally prefer the two point sling, but if I were in a circumstance where I thought I would need to frequently operate the rifle from my support shoulder, this is an attractive option to have available.
If you need a way to attach a sling to the midpoint of your weapon, wander around the GG&G site. They offer a number of solutions to that problem, some requiring no gunsmithing, just the knowledge of how to get the stock off.
Many of us have rifles and shotguns stored in racks or safes, and their slings frequently get tangled up with stuff as we try to extract a weapon. The Blue Force $6 Sling Sleeve https://www.blueforcegear.com/sling-sleeve.html is an effort to get that situation under control. The idea is to slip the elastic sleeve onto a sling and then loop the sling up and stuff it in the sleeve. This shortens the sling so there is less dangling webbing to get caught on things. To free the sling, give it a tug; voila, you are in business. There are other, more economical ways to do this; rubber bands and bungee cords come to mind, but this works well and looks better than the other options.
The best deal from Blue Force Gear is probably the Vickers 221 Sling. You get the sling, a Burnsed Socket, a RED Swivel, and a regular QD swivel all for $80. If you bought all of that separately, you would pay over $100. Knowing what I know now, I’m really sorry I didn’t do it this way when I bought my slings.
The one bit of gear from Blue Force that doesn’t work well for me is the $49 Ten-Speed Triple M4 Mag Pouch. Please note that I said “doesn’t work well for me”. It is actually a pretty amazing magazine pouch in that it essentially isn’t there. It attaches to a carrier or belt via the ubiquitous MOLLE/PALS straps and is composed of a tough elastic material. As the name implies, it holds three AR magazines, each in its own pocket and requires no flaps or other retention devices to securely hold the magazines. It weighs almost nothing, and when the magazines are withdrawn, it might as well not be there since it collapses on itself. It comes in multicam, black, coyote, OD, and wolf.
My difficulty with it is twofold. Since the magazines are in separate pockets, it takes up some width on a belt or carrier. The way I have my gear setup, there isn’t room for it. What’s probably more important for me is how hard it is to stuff magazines in it. The pouches offer tremendous security for your magazines, but that makes it hard to get them in. Ribbed polymer magazines are tougher than GI metal ones. My problems may not be deal breakers for your use, so they are worth a look if you want a minimalist approach to carrying magazines. They are extremely well made and should survive hard use without problems.
I make no promises, but every time I’ve ordered something from Blue Force Gear there has been a small but nice bonus gift in the package. One year, a December order came with a tactical Christmas stocking. That is now my son’s favorite place to get gifts.
– SurvivalBlog Field Gear Editor, Scot Frank Eire
- Ad USA Berkey Water Filters - Start Drinking Purified Water Today!#1 Trusted Gravity Water Purification System! Start Drinking Purified Water now with a Berkey water filtration system. Find systems, replacement filters, parts and more here.
- Ad USA Berkey Water Filters - Start Drinking Purified Water Today!#1 Trusted Gravity Water Purification System! Start Drinking Purified Water now with a Berkey water filtration system. Find systems, replacement filters, parts and more here.
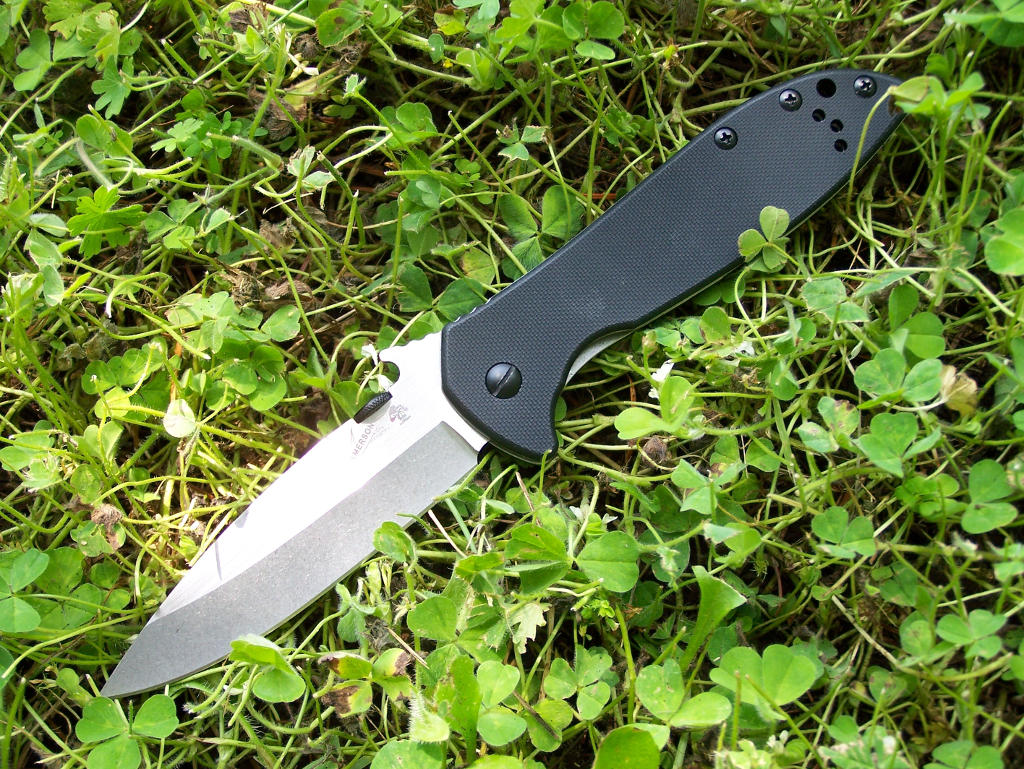
Pat Cascio’s Product Review: Kershaw’s Emerson CQC-4KXL
I still remember the first time I toured the Kershaw Knives plant, some 20+ years ago. It was for an article in Knives Illustrated. I wrote for Knives Illustrated for many years, probably longer than any other writer at that time, and I was promoted to their West Coast Field Editor position, where I mostly covered knives made in the Pacific Northwest area. To be sure, Oregon alone houses numerous knife companies itself. It might just be the cutlery capitol of the USA.
Back during my first Kershaw tour, if I recall, they only had, at best, a couple dozen employees, who actually made and assembled the knives. During my last tour of Kershaw, they had just moved into a new building, and they were already making plans on expanding the building, because they were growing so fast. I didn’t count all the heads, but I’m guesstimating, Kershaw had a couple hundred employees producing the knives, not to mention all the administrative personnel in the front offices. I was given free-reign to walk around any place in the plant, talk to any employees I wanted to talk to, and take pictures of anything, with a few exceptions of some of their hi-tech computerized machines that I can’t even discuss. I don’t want to give away some of the Kershaw “secrets”. I’ve never been afforded that kind of freedom to tour a plant on my own. Yep, I was given a tour by Thomas Welk, who is their PR guy. However, after that, I was told to just tour everything and anything I wanted to.

About a year or so back, Kershaw teamed up with Ernest Emerson– the father of tactical folders, in my humble opinion. They started producing some of Ernie’s designs, both in the Kershaw line-up as well as the Zero Tolerance line– their professional-grade, extra-heavy duty knives. I received samples of the Kershaw and ZT lineup and tested them for articles. Some of these have appeared on the SurvivalBlog.com website. I’m always anxious to receive new products from Kershaw and ZT, especially the Emerson-designed folders of late. I was cruising the Kershaw website a month or so back and noticed some of the newest Emerson designs. The CQC-4KXL folder caught my attention. It’s the biggest Emerson folder that Kershaw is producing, in terms of blade length. I had to have one, so I sent a quick e-mail to Thomas Welk, and the reply back saying “It’s on the way” was greatly appreciated. If Welk tells me something is on the way, it’s on the way, then!
The CQC-4KXL has a blade that is just shy of four inches in length. Many states or locales have restrictions on folding knife blade lengths. Many mandate you can’t have a folding knife with a blade longer than four inches. Go figure. The blade is made out of 8Cr14MoV stainless steel, and I don’t have a clue as to what this steel is, nor does it really matter to me. The blade came shaving-sharp and remained that way throughout my testing. The one handle scale is made out of textured black, G10 laminate, with a stainless steel liner, and the other side has a stainless steel handle, that also incorporates the frame lock, which is perfectly fitted, and it is also a bit thicker than many frame locks are, too. The blade locked up tight, very tight, to the blade. The blade is manually opened in one of two ways. One is via the disk thumb stud, and the other is the Emerson patented “wave” feature, which I will write more about shortly. There is also a reversible pocket/clothing clip for right or left front pocket carry. The stainless steel blade has a nice satin finish to it, and it has the Emerson design logo on it. The shape of the handle itself is just perfect for my hand, and I honestly don’t know how Emerson can come up with so many different handle designs that all feel great in my hand. Yet each is slightly different from another design. The top front portion of the blade has some friction grooves that match perfectly with the friction grooves on the wave; this is nice! For those who wonder or care about such things, this Emerson-designed folder is manufactured in China. As I have said before, you get as good of a knife as you want from China. You want a 50-cent knife? You’ll get one. You want a thousand dollar knife? You can get one of those, too. I have no love for the Chinese government, however, this knife is produced in a factory that is NOT owned by them.

The blade comes in right at 3.9 inches, so it is just under that four inch regulation that so many states or locales have regarding blade length on folding knives. Closed, the knife is five inches long, and opened it is nine inches in length. Weight is a bit hefty– right at 6.1-oz. The knife feels good in the hand, yet doesn’t feel heavy in the pocket. The thumb disk is black as is the pocket clip. The pocket clip also has the Emerson broken skull logo on it, which is cool!
Now, let’s discuss the wave feature that Emerson designed and patented. It is quite unique and one of those “why didn’t I think of that” designs. The wave feature actually looks like a wave on the ocean, which is something surfers can appreciate. The wave makes this folder the fastest-opening folding knife I’ve ever used, bar none. When the knife is clipped inside your pocket, you simple start to draw the knife out of your pocket, adding a little bit of rearward pressure (don’t pull the knife straight up), and with that little bit of rearward pressure and a steady pull upwards, when the knife leaves your pocket the blade will automatically open-up. No, it’s not an automatic folder; you are still opening it manually as you pull it out of your pocket. It takes all of five minutes of practice to master this simple skill. Check out the video on the Kershaw website, and you’ll see how fast and simple this technique is. It just blows me away how such a simple addition to a folding knife blade can rapidly open a folder. Also, if you want, you can open the knife using the thumb disk, but I honestly don’t see any need for it.

The blade shape itself is almost dagger-esque in shape, and it holds the thickness of the blade out front as long as it can before coming to a point. This type of blade is extremely useful for all kinds of cutting chores. I used the Emerson around the kitchen quite a bit, slicing a lot of veggies for my new smarter eating plan, after I suffered a mini stroke. I don’t especially like fresh fruits and veggies, but I’ll do whatever it takes to drop some weight, plus it afforded me the opportunity to really put the CQC-4KXL to work many times per day. The blade made quick and easy work around the kitchen fast. As is the usual routine, many UPS, FedEx, and USPS boxes were opened. Plus, the knife was “stabbed” into stacked cardboard, and it easily stabbed up to the handle. The blade design isn’t the best for slashing moves, but it worked, once again, on stacked cardboard boxes. One test I always do is cutting down blackberry vines, which are super tough to cut. Many lesser knife blades can’t cut them with a single slashing move, but the CQC-4KXL had no trouble cutting through the vines. I also cut poly rope, and if you’ve ever tried to cut this stuff, you know how slick it is. Many knife blade simply slip right off the slick material. The Emerson easily cut through the poly rope.

Many of the people I associate with weren’t familiar with the wave feature, and they had to watch me draw the knife from my pocket numerous times and watch how fast I could do it. They couldn’t figure out the wave feature until I placed the knife in their pockets and showed them how easy it was to do. Everyone, to a person, loved the way it worked. Again, it’s so simple and so easy to master, and so super fast!
If you go to the Emerson Knives website, you’ll see quite a few of Ernie’s designs, and one thing you will also see is that many of his knives are out of stock. It’s an ongoing thing for Emerson. No matter how fast they turn out his knives, they can’t keep up with supply and demand, ever! So, you could end up waiting months for a particular Emerson folder. I applaud Emerson for teaming up with Kershaw and ZT Knives on numerous collaborations of his designs. If you look over both websites, you’ll see quite a few Emerson designs, and I’m betting good money you’ll find more than a few of Emerson’s folders that you’ll want. Best of all, they are priced right. The CQC-4KXL has a full-retail price of only $64.99, and I’m here to tell you that I believe Kershaw priced this one too low. If I saw this knife in a catalog or a knife shop and it was priced at $150, I would still buy it. It looks for all the world just like a Emerson Knives (factory) folder. It is “that” well made and finished to perfection.
As an aside, I had to get a replacement CQC-4KXL. When my oldest daughter was doing the photography on this knife for this article, she decided to “steal” the knife. She has an early Emerson CQC folder that she’s had for at least 2 years. She has good taste in knives and guns. So, I had to get a replacement for my own use. How much do I like this CQC-4KXL? Well, I’ve been carrying it in my right front pocket for three weeks now, where my Zero Tolerance Model 0630 used to be, and I have no desire to put the 0630 back in my pocket at this time.
The Kershaw CQC-4KXL Emerson-designed folder would make a fantastic city survival knife, used for all kinds of daily cutting chores at work, or at home, as well as a last-ditch self-defense weapon, if that’s all you have on you at the time. The speed you can draw the knife from your pocket will have a bad guy scratching his head thinking perhaps you pulled a switchblade knife on him, and for some strange reason many folks believe that a switchblade is more deadly or dangerous than some other type of folding knife. The CQC-4KXL might just give a bad guy time to pause and rethink his criminal actions with the speed at which you can draw the knife and have it in hand with which to defend yourself.
Better get your CQC-4KXL, before Kershaw realizes that they priced this folder too low.
– Senior Product Review Editor, Pat Cascio
- Ad California Legal Rifles & Pistols!WBT makes all popular rifles compliant for your restrictive state. Choose from a wide range of top brands made compliant for your state.
- Ad Click Here --> Civil Defense ManualNOW BACK IN STOCK How to protect, you, your family, friends and neighborhood in coming times of civil unrest… and much more!
Recipe of the Week: Baked Pineapple, by BanjoNinja
At our house, people would fight over the pineapple on an Easter or Christmas ham, until a friend suggested this recipe. It’s a favorite recipe, for the holidays or anytime, that is good tasting and relatively inexpensive to make:
Ingredients:
- one can of crushed pineapple
- one can of chunked pineapple
- one can of pineapple rings
- 1 cup flour
- 3/4 cup brown sugar (packed), plus about 4 tablespoons for later
- 1/2 stick butter, chilled
- 1 tsp. cinnamon, plus more to taste
Directions:
- Preheat oven to 350 degrees.
- Spray a 9 x 13 baking dish with non-stick spray.
- Drain and reserve the juice from the crushed and chunk pineapple.
- Mix the crushed and chunk pineapple with the flour and brown sugar in large bowl. This mixture will be somewhat dry, so add the reserved juice a little at a time until it resembles a thick, lumpy milkshake.
- Add the cinnamon and mix thoroughly.
- Pour into the sprayed baking dish.
- Layer the pineapple rings on top of the mixture.
- Sprinkle the remaining brown sugar on top of the rings.
- Slice the chilled butter into slices, and arrange them on the pineapple rings.
- Season with cinnamon on top.
- Add more of the reserved pineapple juice until it is barely up to the level of the pineapple rings.
- Bake for 45 minutes, or until the top is nicely browned.
You may need to add or subtract some of the pineapple juice depending on how juicy the fruit is. You can add more flour to get a more “cake-like” consistency, but you will probably need a deeper or larger baking dish. This is great to transport to family events and can be served cold or hot. I warmed it up on the grill once and it was awesome. Good luck!
o o o
Do you have a favorite recipe that would be of interest to SurvivalBlogreaders? Please send it via e-mail. Thanks!
- Ad Survival RealtyFind your secure and sustainable home. The leading marketplace for rural, remote, and off-grid properties worldwide. Affordable ads. No commissions are charged!
- Ad Don't wait - get the ultimate US-made ultra-high performance US-made SIEGE Stoves and stunning hand-crafted SIEGE belts for Christmas. For stocking-stuffers see our amazing fire-starters. Gifts that can save lives. Big Sale!Every bespoke SIEGE buckle goes through an hours-long artisanal process resulting in a belt unlike anything else, with blazing fast performance and looks and comfort to match.
Letter Re: Illusive Self-Sufficiency
HJL,
I have a question for you and the SB readers. This is our third year living on our rural retreat and fifth year prepping in earnest. We have animals, a large garden, stored food, and other essentials. We’ve come a long way, but I can’t help but think when I survey everything how far we still have to go to become truly self-sufficient. Our garden wouldn’t come close to feeding our family year-round, but I’m already stretched to capacity with the current size, not to mention the animals and general farm chores (like cutting and splitting wood for the winter). Of course, I still have a day job, but it is flexible as I am self-employed. In a TEOTWAWKI scenario, all my time would be freed up for manual labor, but still, true self-sufficiency seems like an illusive dream.
I’m curious how others are doing on their quest towards self-sufficiency and if they have any sage advice to share. Thanks – RG
HJL Replies: True, complete self-sufficiency is tough to achieve and generally results in compromises and lifestyle choices that we wouldn’t normally choose. When you have no one else to depend on, you have to produce everything yourself. In 1978, Soviet geologists prospecting in remote Siberia found a family doing just such a thing. The story is quite moving but has a practical side to it. Sans contact with other people, communications skills suffered as did their living conditions. The name of the game was bare minimalist survival, as that was all they could do. Certainly, survival in Siberia is much tougher than independent survival on a tropical island where things grow of their own accord. Locations such as Siberia, or semi-arid deserts, like much of the southwest, mean that much more of your time is taken up with simply providing enough calories to survive.
This is the reason we believe you should surround yourself with like-minded individuals. You can still maintain a relative amount of individuality, yet have the greater strength of the group when it comes to tasks requiring specialization or protection. It’s hard to find the time to shoe your own horse when you are tending a garden tasked with all of your food needs, but one man can certain shoe a village of horses and barter that service for garden produce from those who farm.
Total self-sufficiency can be achieved, but it’s not a lifestyle that I would choose to live when other options are available.
- Ad Trekker Water Station 1Gal Per MinuteCall us if you have Questions 800-627-3809
- Ad Civil Defense ManualClick Here --> The Civil Defense Manual... The A to Z of survival. Looks what's in it... https://civildefensemanual.com/whats-in-the-civil-defense-manual/
Economics and Investing:
Nature Provides Novel Solution To Energy Storage Problem
o o o
A Wary Athens Awaits the Referendum on Austerity. – JBG
o o o
Puerto Rico Debt Crisis Mounts With Key Deadline Just Week Away. – G.G.
o o o
Greece Update: Run On Banks Risks Leaving Them Cashless – JBG
o o o
The world is defenseless against the next financial crisis, warns BIS. – G.G.
o o o
Items from Mr. Econocobas:
Greek Capital Controls Begin: Greek Banks, Stock Market Will Not Open On Monday
- Ad STRATEGIC RELOCATION REALTYFOR SALE: Self-sustaining Rural Property situated meticulously in serene locales distant from densely populated sanctuary cities. Remember…HISTORY Favors the PREPARED!
- Add Your Link Here
Odds ‘n Sods:
A consulting client asked about sources for military surplus vehicles. One auction firm that is reputable is GovPlanet.com. But as with buying any used vehicle, caveat emptor! – JWR
o o o
Slave or Rebel? Ten Principles for Escaping the Matrix and Standing Up to Tyranny Some Americans are beginning to realize that they are slaves, and that if they don’t act soon they will find themselves imprisoned in the electronic. – H.L.
o o o
Tom Hammond’s Soldering Tips. – T.P.
o o o
‘Sneak & peek’ warrants allow police to secretly enter homes without notice. – H.L.
o o o
Orthodox Christians Must Now Learn To Live as Exiles in Our Own Country. – GJL
Hugh’s Quote of the Day:
“There comes a time when a moral man can’t obey a law which his conscience tells him is unjust.” – Martin Luther King
Notes for Sunday – June 28, 2015
28 June 1703 was the birthday of John Wesley, who died 2 March 1791.
Amazing Affordable Force Multipliers – Part 1, by Tupreco
Night Vision, Thermal Vision, Wireless Video, EMP Protection
I decided now is the time to put this together because the consistent theme in every prepper blog and financial publication today is that TIME.IS.RUNNING.OUT. Even non-preppers know something is up because it is starting to pop up now and then in random conversations. Many average people are finally realizing that something is different this time. However, they mostly still want to complain and do nothing, but at least it’s a start. In the meantime, the more motivated among us are making ready for the pending disruptions we know are coming. This remains an excellent strategy to provide for loved ones and do what we can to help put the pieces back together. Having a plan and working it is critical, and priorities should be reviewed frequently. Yet, even up to the end, we will all have loose ends and things we wish we could have gotten done, realized, learned, or bought sooner. That is why Survivalblog is such a valuable resource; it’s a sort of knowledge base multiplier, if you will. I am very thankful to JWR and company for the invaluable tips and skills I have received here. To do my part, I have compiled this affordable force multiplier rundown to help us all stay sharp. The big takeaway here is that the price points and features for important preps, like night vision, thermal vision, and similar tech, have finally become affordable for the masses. I own and use most of the items discussed here, and I have no financial stake in any of them. If I own it, it’s because I bought it.
Force Multiplier Defined
Let’s start with a good paraphrase of the DOD definition of a force multiplier: an item or capability that a combat force can use to significantly increase its combat potential and increase the likelihood of a successful mission. That’s a little general perhaps, but by that definition anything that can extend your reach for information, communication, planning, and force projection would be considered a force multiplier. What follows are the pertinent details on four affordable and very functional solutions that are available today. Best of all, you can add them to your kit at a cost far less than you expected. The cost of these items makes it relatively easy to overlook their limitations yet still benefit from what they do offer. If you find you want the full-price full-featured version later, you will then be making a more informed decision and can start saving your money now. This progressive approach makes sense when operating on a budget. It is the rationale that gives credence to my choice to carry a $100 Hi-Point 9mm pistol until I could afford the Glock 17 I wanted. Having the inexpensive but functional Hi-Point still allowed me to project plenty of force until help arrived in the form of the Glock.
Night Vision
I asked myself if I should invest in Budget Night Vision from $50-Kids toy or something more? I will be the first to admit I have dreamed about having decent night vision since Prep Day One. My inner grown-up kept saying that I had to wait until the other important stuff was done. When I finally bought a Gen 1 scope that could double as a rifle sight, I tried it out and instantly sent it back to recover my $350. Then I stumbled across a little CMOS monocular IR camera setup for kids that really can see in complete darkness for a paltry sum. Read on before you blow this idea off completely. I bought the Jakks Pacific Spynet Night Vision goggles on Woot.com for $25 about two years ago. I figured I’d give it a try, and what I got amazed me.
It’s sure no PVS14-Gen3, but it’s not $3000 either. The link here to Amazon shows it as discontinued but available from third party Amazon retailers. I included the Amazon listing because it has hundreds of reviews worth looking at.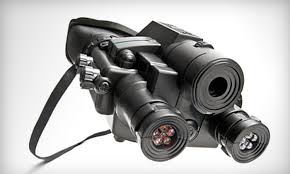 You can also purchase this model on eBay for about $50 in new and/or good used condition. What looks like a set of binocular lenses are really two IR illuminators. The center aperture is a single-lens CMOS chip that outputs to a 320×240 res color display that’s about 2 x 1.5 in. It displays on a tiny screen set out at viewable distance inside the viewfinder. You ask, “Does it work?” Linked below is a video recording that suffers some loss of clarity from the secondary recording with a handheld video camera. It still shows good detail, and this is what you see. Below is an actual frame from the USB stick and is more like what you will see through the viewfinder. This was a dark night with the single IR illuminator from about 15 feet away.

There’s no depth perception, but it is quite usable. To operate the Spynet unit, turn it on, and the camera and display screen power up in about two seconds. The first of the IR diode sets also comes on. The red LEDs are not bright enough to be easily visible to the naked eye, but you now own the amazing ability to see in a pitch black room clearly to about 25 feet. I was able to read a paperback book in a pitch black room (yep, the bathroom) with it. Turn on the switchable 2nd Illuminator and you can see on a very dark night out to about 75 feet with good discernment. Those LEDs are slightly visible to the naked eye but really make a difference. The unit does not magnify light, but on a starlit night with the IR covered I still got a decent image. Also, if you can believe it, you can record what you see on a USB stick for later playback. The record function has a dedicated on/off switch. So pony up your fifty bucks, and invite your friends over to your basement for some Pitch Black Airsoft fun, and record it for bragging rights. Want to use it hands-free? There is a second version called the Eyeclops that works exactly the same, but it has straps for head mounting, freeing up both hands. It ranges from $70-$100, and there are plenty listed on eBay. Both units use four AA batteries and provide hours of use from one set. My Sanyo eneloops worked great in mine.
A few final things to remember: To someone else with night vision, you stand out like a road flare. So, if you under assault, it might be time to pass it to your brother-in-law for a sitrep. Also, these are priced like a kid’s toy because that’s what they are. They are surprisingly rugged and of reasonable quality, but they are not waterproof and are definitely consumer level rather than commercial. That said, I’ve used mine weekly with no issues.
Thermal Vision for Your Android Device and iPhone/iPad
Do you want thermal vision but hate the $1500+ price tag? How would you like to have it for a price of less than $300? I knew it had to happen eventually, and it finally did. Functional, color, thermal vision is now available to the masses for under $300. In fact, there are actually two companies with credible solutions competing for our hearts, minds, cell phone ports, and credit card numbers. These two products stand alone in a new market segment called Personal Thermal Vision with a very attractive price/performance class. Both are small and easy to use with the smart phone you supply. Both require a free app download. Both are relatively inexpensive, and they both work.
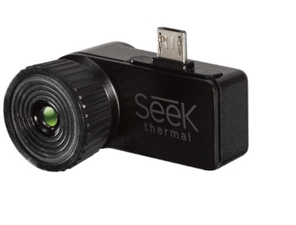
SEEK Thermal makes a very small plug-in camera available as either the standard version or extended range version called the XR with 2x magnification. Both connect through the charge port to an Android or iPhone 5/5s. Shown here is my standard Android version.
I shot this image at my desktop with me holding the SEEK Android attached to my 1st gen MotoX in one hand and my Olympus camera in the other. 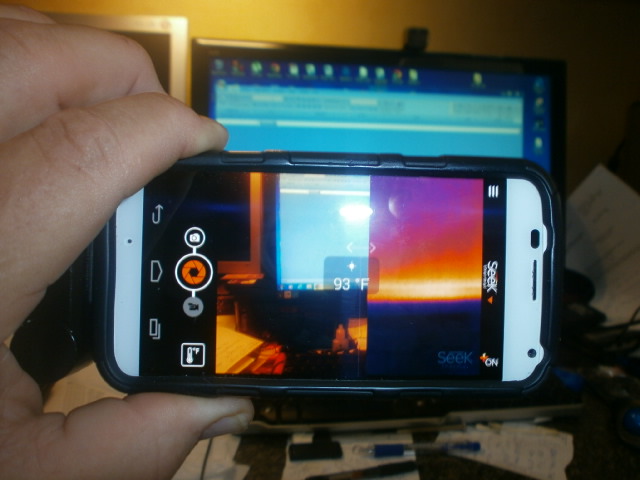 You can see the hot spots on the monitor and the split video/thermal that I swiped to about 50% each.
SEEK Thermal’s competitor is FLIR Systems, a company with a long history of thermal imaging innovation that has recently entered the personal thermal market. Their unit is larger, adding a full-coverage back with a built-in thermal lens.
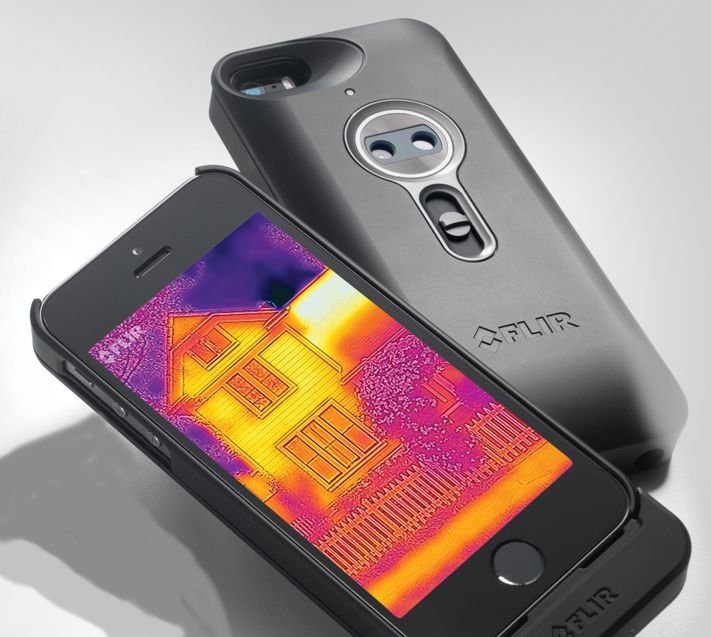
They only offer an iPhone 5/5s or higher version at this time. There is an Android version promised sometime in late 2015. In addition, they also offer a stand-alone unit about the same size as a FLIR-equipped iPhone. It is dubbed the C2, and at $699 it is one order of magnitude above the budget devices listed here. Unfortunately not having an iPhone 5 means no FLIR One comparison from me, but there are a number of comparison reviews with photos out there, like this one from Wired magazine.
Here is a quick rundown of my experience and some links for more detail, so you can make your own choice. First, here is the quick side-by-side comparison of the specs from the manufacturer’s websites.
|
Feature |
FLIR One |
SEEK Thermal |
|
iPhone |
iOS 8+ |
iOS 8+ |
|
$199 |
$299 |
|
|
Android |
Soon 4.3+ |
v4.3+ |
|
$NA |
$249 |
|
|
Resolution |
80 x 60 |
206 x 156 |
|
Image |
Thermal |
Thermal |
|
Upgrades |
None |
|
|
Temp range |
-0 to 100C |
-40 to 300C |
|
Battery reqd |
Yes |
No |
|
Calibration |
Manual |
Auto |
Image note: The FLIR One enhances its low-res thermal image using an overlay of grayed-out video for a pretty useful image. The SEEK version displays either thermal or video but does not overlay like the FLIR One. Both units allow you to finger swipe to split the screen 0-100% between the video image and the thermal image. SEEK also offers a wide array of color schemes to display the thermal images that are helpful, depending on what you are looking at.
To say it is “way cool” doesn’t even begin to describe how much fun and how practical this is. I’ve used it to see the rabbits in the desert at night from about 50 yards and I found the hot spot where my car’s cooling system was restricted and the hot breaker in my panel box from a loose connection (yikes!). Best of all, I can find my kids within seconds while playing hide and seek in the back yard at dusk. It’s not called a force multiplier for nothing. Bwah-ha-ha!
Letter Re: A Dark Day for America, by HJL
Dear Survival Blog,
Thank you for such a great service as Survival Blog. I am writing to comment on the above captioned article the Blog posted on June 27, 2015.
The problem we have is 501c3 tax exempt status, that is, a tax exempt certification issued by the IRS to the Church in exchange for surrendering certain freedoms. The freedoms surrendered are listed in IRS Publication 1828 on page five. This publication is freely available to anyone with an Internet connection. Everyone should read it and understand it for themselves. The publication title is “Rules for Churches.” Rule five on page five states that the Church cannot “violate fundamental public policy”. After yesterday’s Supreme Court decision, do I need to point out whether homosexual marriage is now a “fundamental public policy” of the United States? Do I need to spell out what the future holds for all “government registered” churches?
So why have very nearly ALL churches in America registered with the IRS (see IRS Pub 78) and surrendered their freedom to preach the Gospel? I can tell you why. It’s to get that last little bit of tax exemption, that last little bit of money, namely the ability of the attendees to deduct their church contributions. That’s it. We gave it ALL away for a little bit more money. The Church itself was never taxed, and can never be taxed so long as the First Amendment of the Constitution still stands.
Let me state it this way; if the Church at large was not registered and therefore beholden to the government, would we be having a vigorous debate in this nation about God’s laws regarding sexual deviancy and the utter corruption of the family through government mandates? I think we would because the Church would be FREE to do so, and in keeping with its duty under the Great Commission, it would do so vigorously. Instead, we have the Supreme Court and politicians for gods.
Okay. So how to fix it? UNREGISTER. Throw off the chains, stand up in freedom, and speak the truth to power. It would cost us though. Standing with the Maker of all things always does.
We need to face this. This is us. We did this, or at least allowed it. We need to get ourselves free again and then fight this evil from a position of strength, not beholden to any government except God’s.
That’s my piece. Thanks for providing your email address, and keep up the good work of the Survival Blog. – D.F.
Economics and Investing:
Video: Queues form outside Greek banks after referendum announcement – JBG
o o o
Greeks Line Up – Drain ATMs of Cash – T.P.
o o o
Lines form at Greek banks as PM Tsipras calls historic bailout vote
o o o
Items from Mr. Econocobas:
What Electricity Consumption Tells Us About The State Of The US Economy – An Update: This is an interesting concept. This is a little geeky and probably hard to really gauge, but interesting.
18 Years Ago This Country Collapsed Overnight——Could It Happen Again?
Odds ‘n Sods:
The End Of Constitutional Government. – B.B.
o o o
The Real Reason for the Anti-Confederate Flag Hysteria. – D.S.
o o o
IRS Employees Can Use ‘Password’ As A Password? No Wonder We Get Hacked. – PLC
o o o
Congress can halt same-sex ‘marriage’ in tracks. – D.S.
o o o
With knife murders spiking after gun ban, UK urges “Save a life-surrender your knife”. – H.L.
Hugh’s Quote of the Day:
“But woe unto you, scribes and Pharisees, hypocrites! for ye shut up the kingdom of heaven against men: for ye neither go in yourselves, neither suffer ye them that are entering to go in. Woe unto you, scribes and Pharisees, hypocrites! for ye devour widows’ houses, and for a pretence make long prayer: therefore ye shall receive the greater damnation. Woe unto you, scribes and Pharisees, hypocrites! for ye compass sea and land to make one proselyte, and when he is made, ye make him twofold more the child of hell than yourselves.” Matthew 23:13-15 (KJV)
Notes for Saturday – June 27, 2015
June 27th is the 72nd birthday of economist Dr. Ravi Batra. (Born 1943.)