SurvivalBlog reader A.D. sent in this online web search of short-wave radio stations. Now would be a good time to get hard copy printouts of stations you might be interested in.
The Oregonian has released this: Slow-motion video of gunshot FBI allegedly lied about in LaVoy Finicum confrontation. As you can see, Finicum had emerged with his hands up when the “highly trained” FBI HRT rifleman (men?) took those two shots. This was well before he allegedly lowered his hands to his waist. The FBI agents should be fired, criminally prosecuted, and sued in civil court. – JWR
Click Here --> The Civil Defense Manual... The A to Z of survival. Looks what's in it... https://civildefensemanual.com/whats-in-the-civil-defense-manual/
FOR SALE: Self-sustaining Rural Property situated meticulously in serene locales distant from densely populated sanctuary cities. Remember…HISTORY Favors the PREPARED!
March 17th is the birthday of Józef Franczak (born 1917, died 21 October 1963), who was a Polish Army Corporal fighting in the World War II resistance against the invading Germans. He then carried on after the war, fighting against the occupying Soviets and their Polish communist stooges. Eventually, he was one of the last of the Cursed Soldiers resistance in Poland. His nom de guerre was Lalek.
A Tactical Self-Contained 2-Series Solar Power Generator system from Always Empowered. This compact starter power system is packaged in a wheeled O.D. green EMP-shielded Pelican hard case (a $1,700 value),
A Gunsite Academy Three Day Course Certificate that is good for any one, two, or three day course (a $1,195 value),
A course certificate from onPoint Tactical for the prize winner’s choice of three-day civilian courses, excluding those restricted for military or government teams. Three day onPoint courses normally cost $795,
DRD Tactical is providing a 5.56 NATO QD Billet upper with a hammer forged, chrome-lined barrel and a hard case to go with your own AR lower. It will allow any standard AR-type rifle to have a quick change barrel, which can be assembled in less than one minute without the use of any tools and a compact carry capability in a hard case or 3-day pack (an $1,100 value),
Gun Mag Warehouse is providing 20 Magpul PMAG 30-rd Magazines (a value of $300) and a Gun Mag Warehouse T-Shirt; (an equivalent prize will be awarded for residents in states with magazine restrictions),
The Ark Institute is donating a non-GMO, non-hybrid vegetable seed package (enough for two families of four) plus seed storage materials, a CD-ROM of Geri Guidetti’s book “Build Your Ark! How to Prepare for Self Reliance in Uncertain Times”, and two bottles of Potassium Iodate (a $325 retail value),
A $245 gift certificate from custom knife-maker Jon Kelly Designs, of Eureka, Montana,
A large handmade clothes drying rack, a washboard, and a Homesteading for Beginners DVD, all courtesy of The Homestead Store, with a combined value of $206,
Expanded sets of both washable feminine pads and liners, donated by Naturally Cozy (a $185 retail value),
Round 63 ends on March 31st, so get busy writing and e-mail us your entry. Remember that there is a 1,500-word minimum, and that articles on practical “how to” skills for survival have an advantage in the judging.
Find your secure and sustainable home. The leading marketplace for rural, remote, and off-grid properties worldwide. Affordable ads. No commissions are charged!
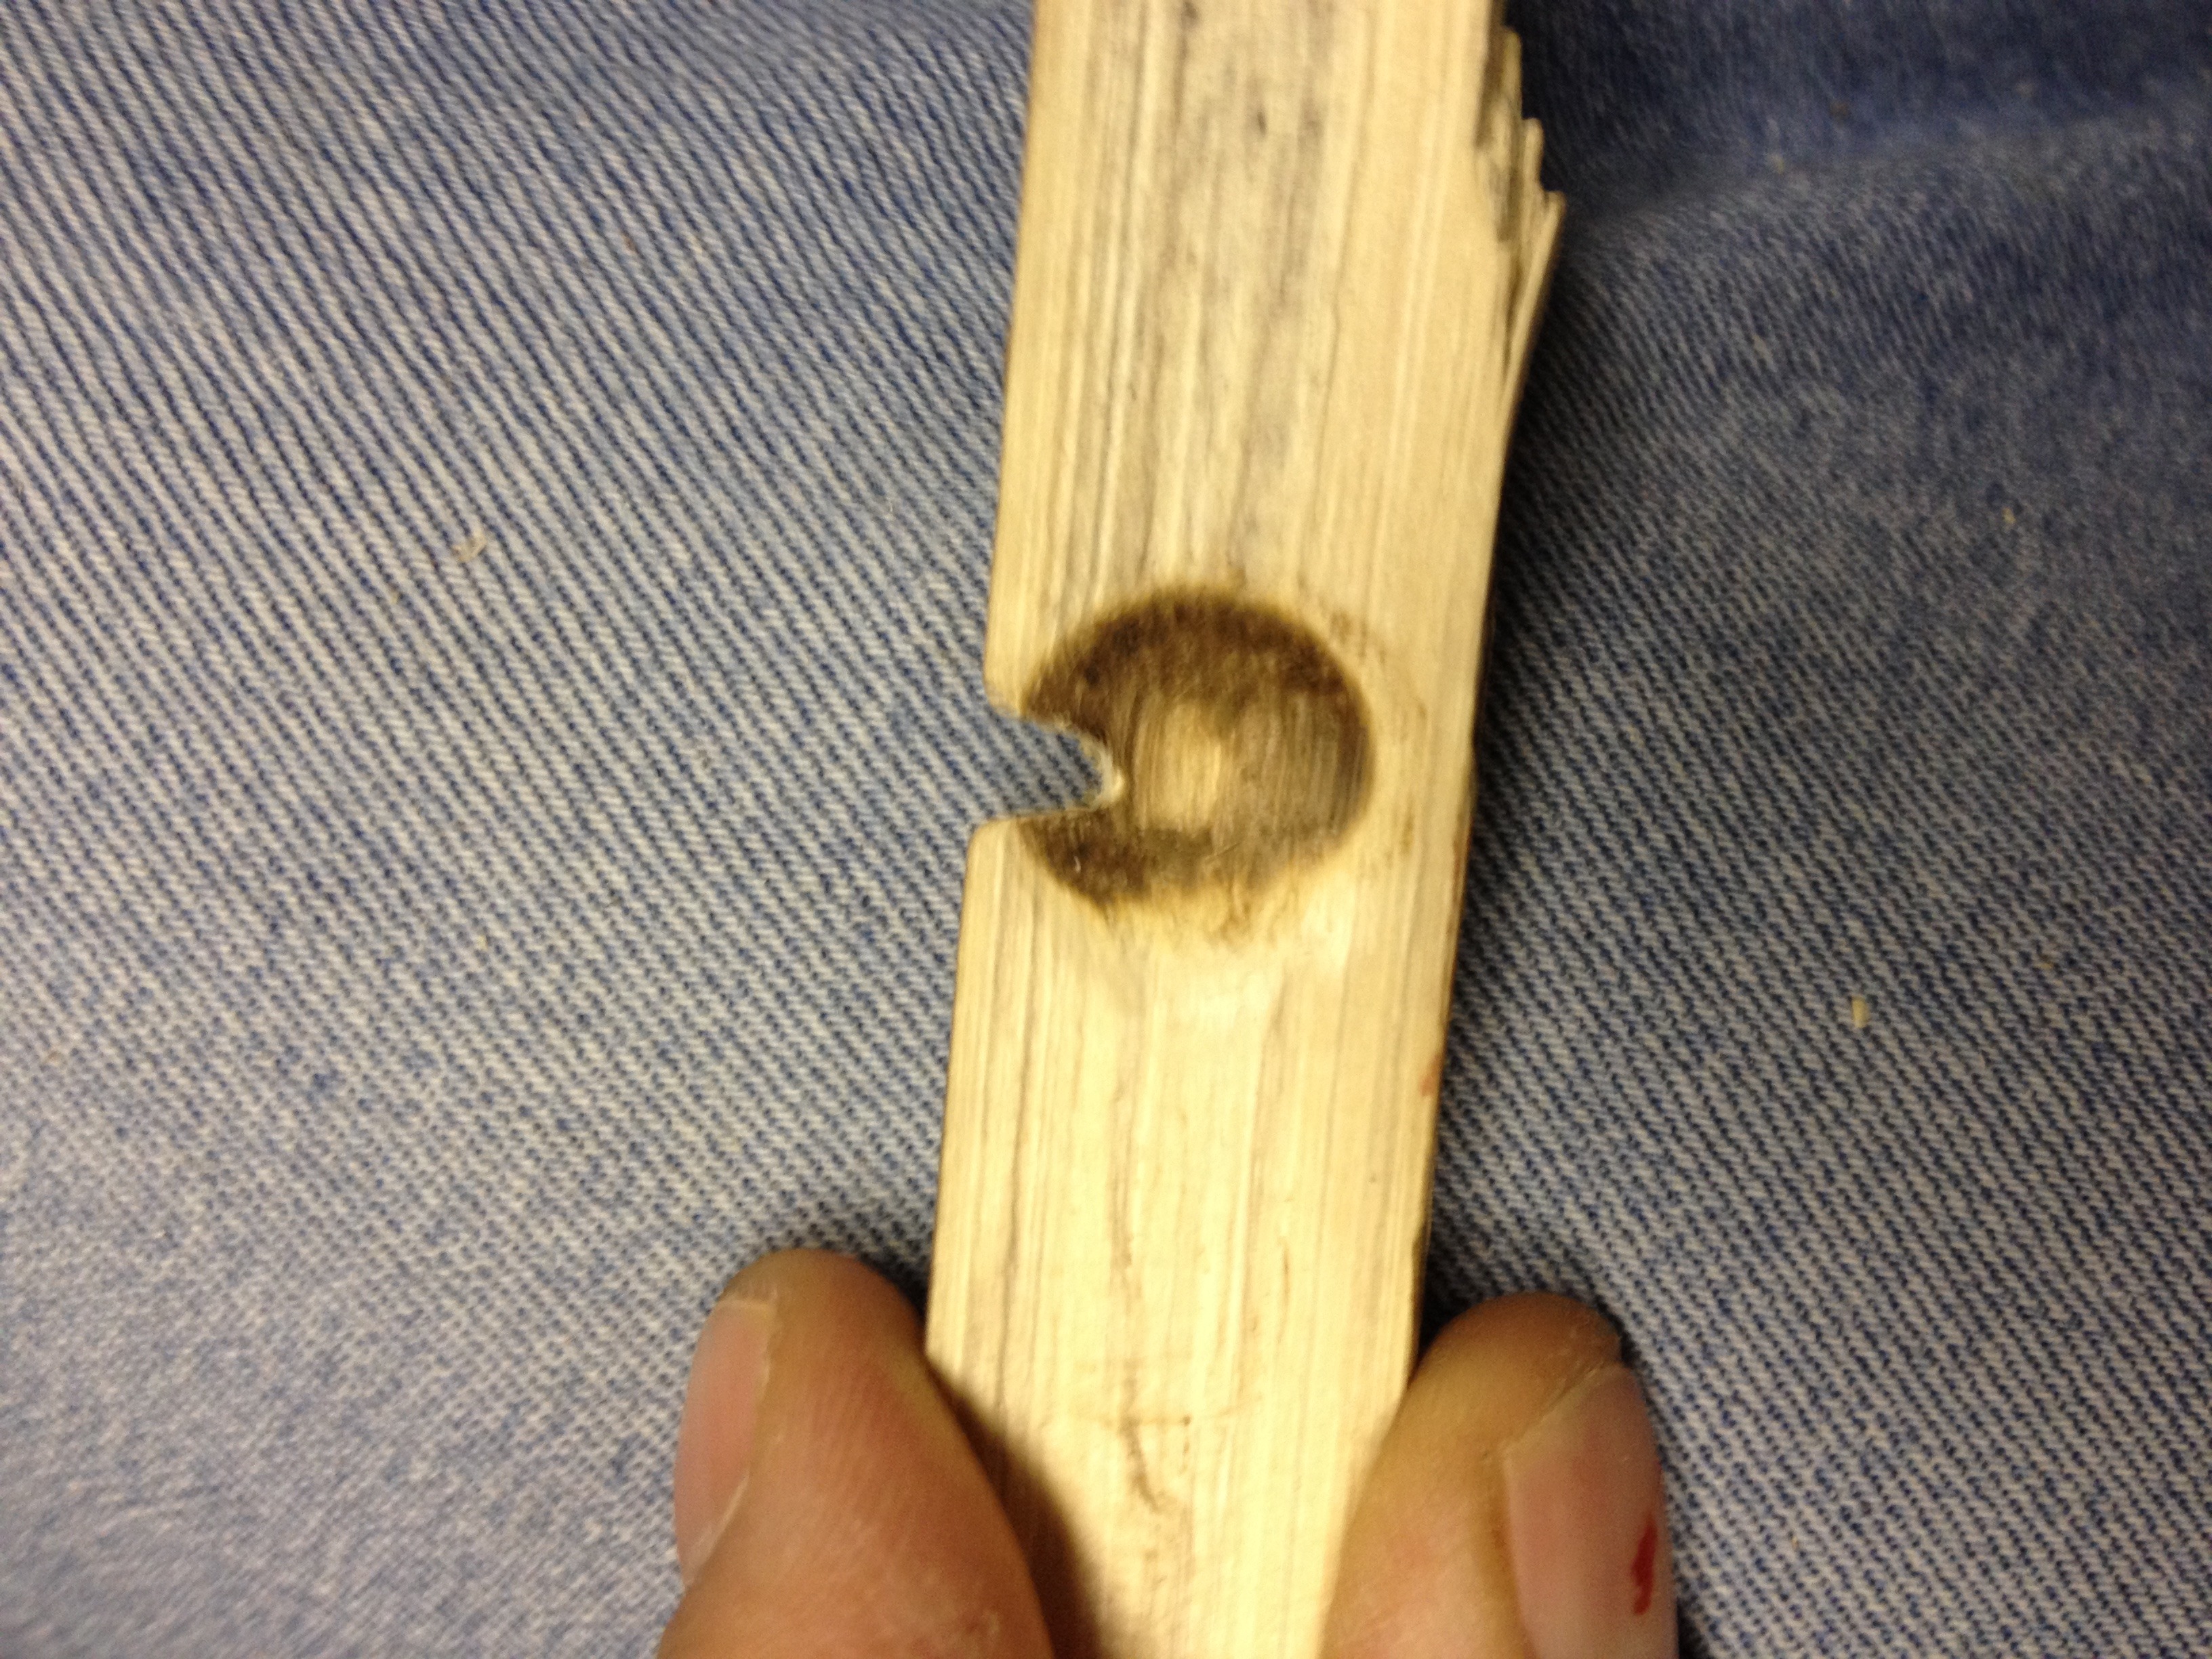
Some people like to carve this ember notch before the hearth and drill have mated. I do not. The reason I do not carve this ember notch earlier in the process is that you can ruin the ember notch before the drill and hearth have mated. This can happen from applying too much pressure too soon, causing the drill to kick out of the mate and then splitting the hearth or ruining the ember notch. Also, where the mate actually takes place may not be aligned perfectly with the ember notch, which means more carving. If you ruin the ember notch, then you just wasted a bunch of time and need to do it again. So instead, we carve the ember notch after the mate, which increases efficiency and makes the process much easier.
Your ember notch should be a “V” shape toward the middle of where the hearth mate happened (see figure 9). You want to make sure this notch allows the embers to fall out of the bottom of the hearth, but be careful to not make the notch too wide as the drill can kick out and ruin the notch. Pay attention to the pictures as they demonstrate different angles of how a working notch should look.
Up to this point in the article, the process may sound complex. However, I promise you that within a short amount of time and practice you will have this process down to the point that you can easily do it correctly. Remember, there is no “failure”. There is only learning, and I find this process of learning to be absolutely worth the reward we experience after creating our first friction fire. So, try, try again. You can do it.
Now it is time to make fire.
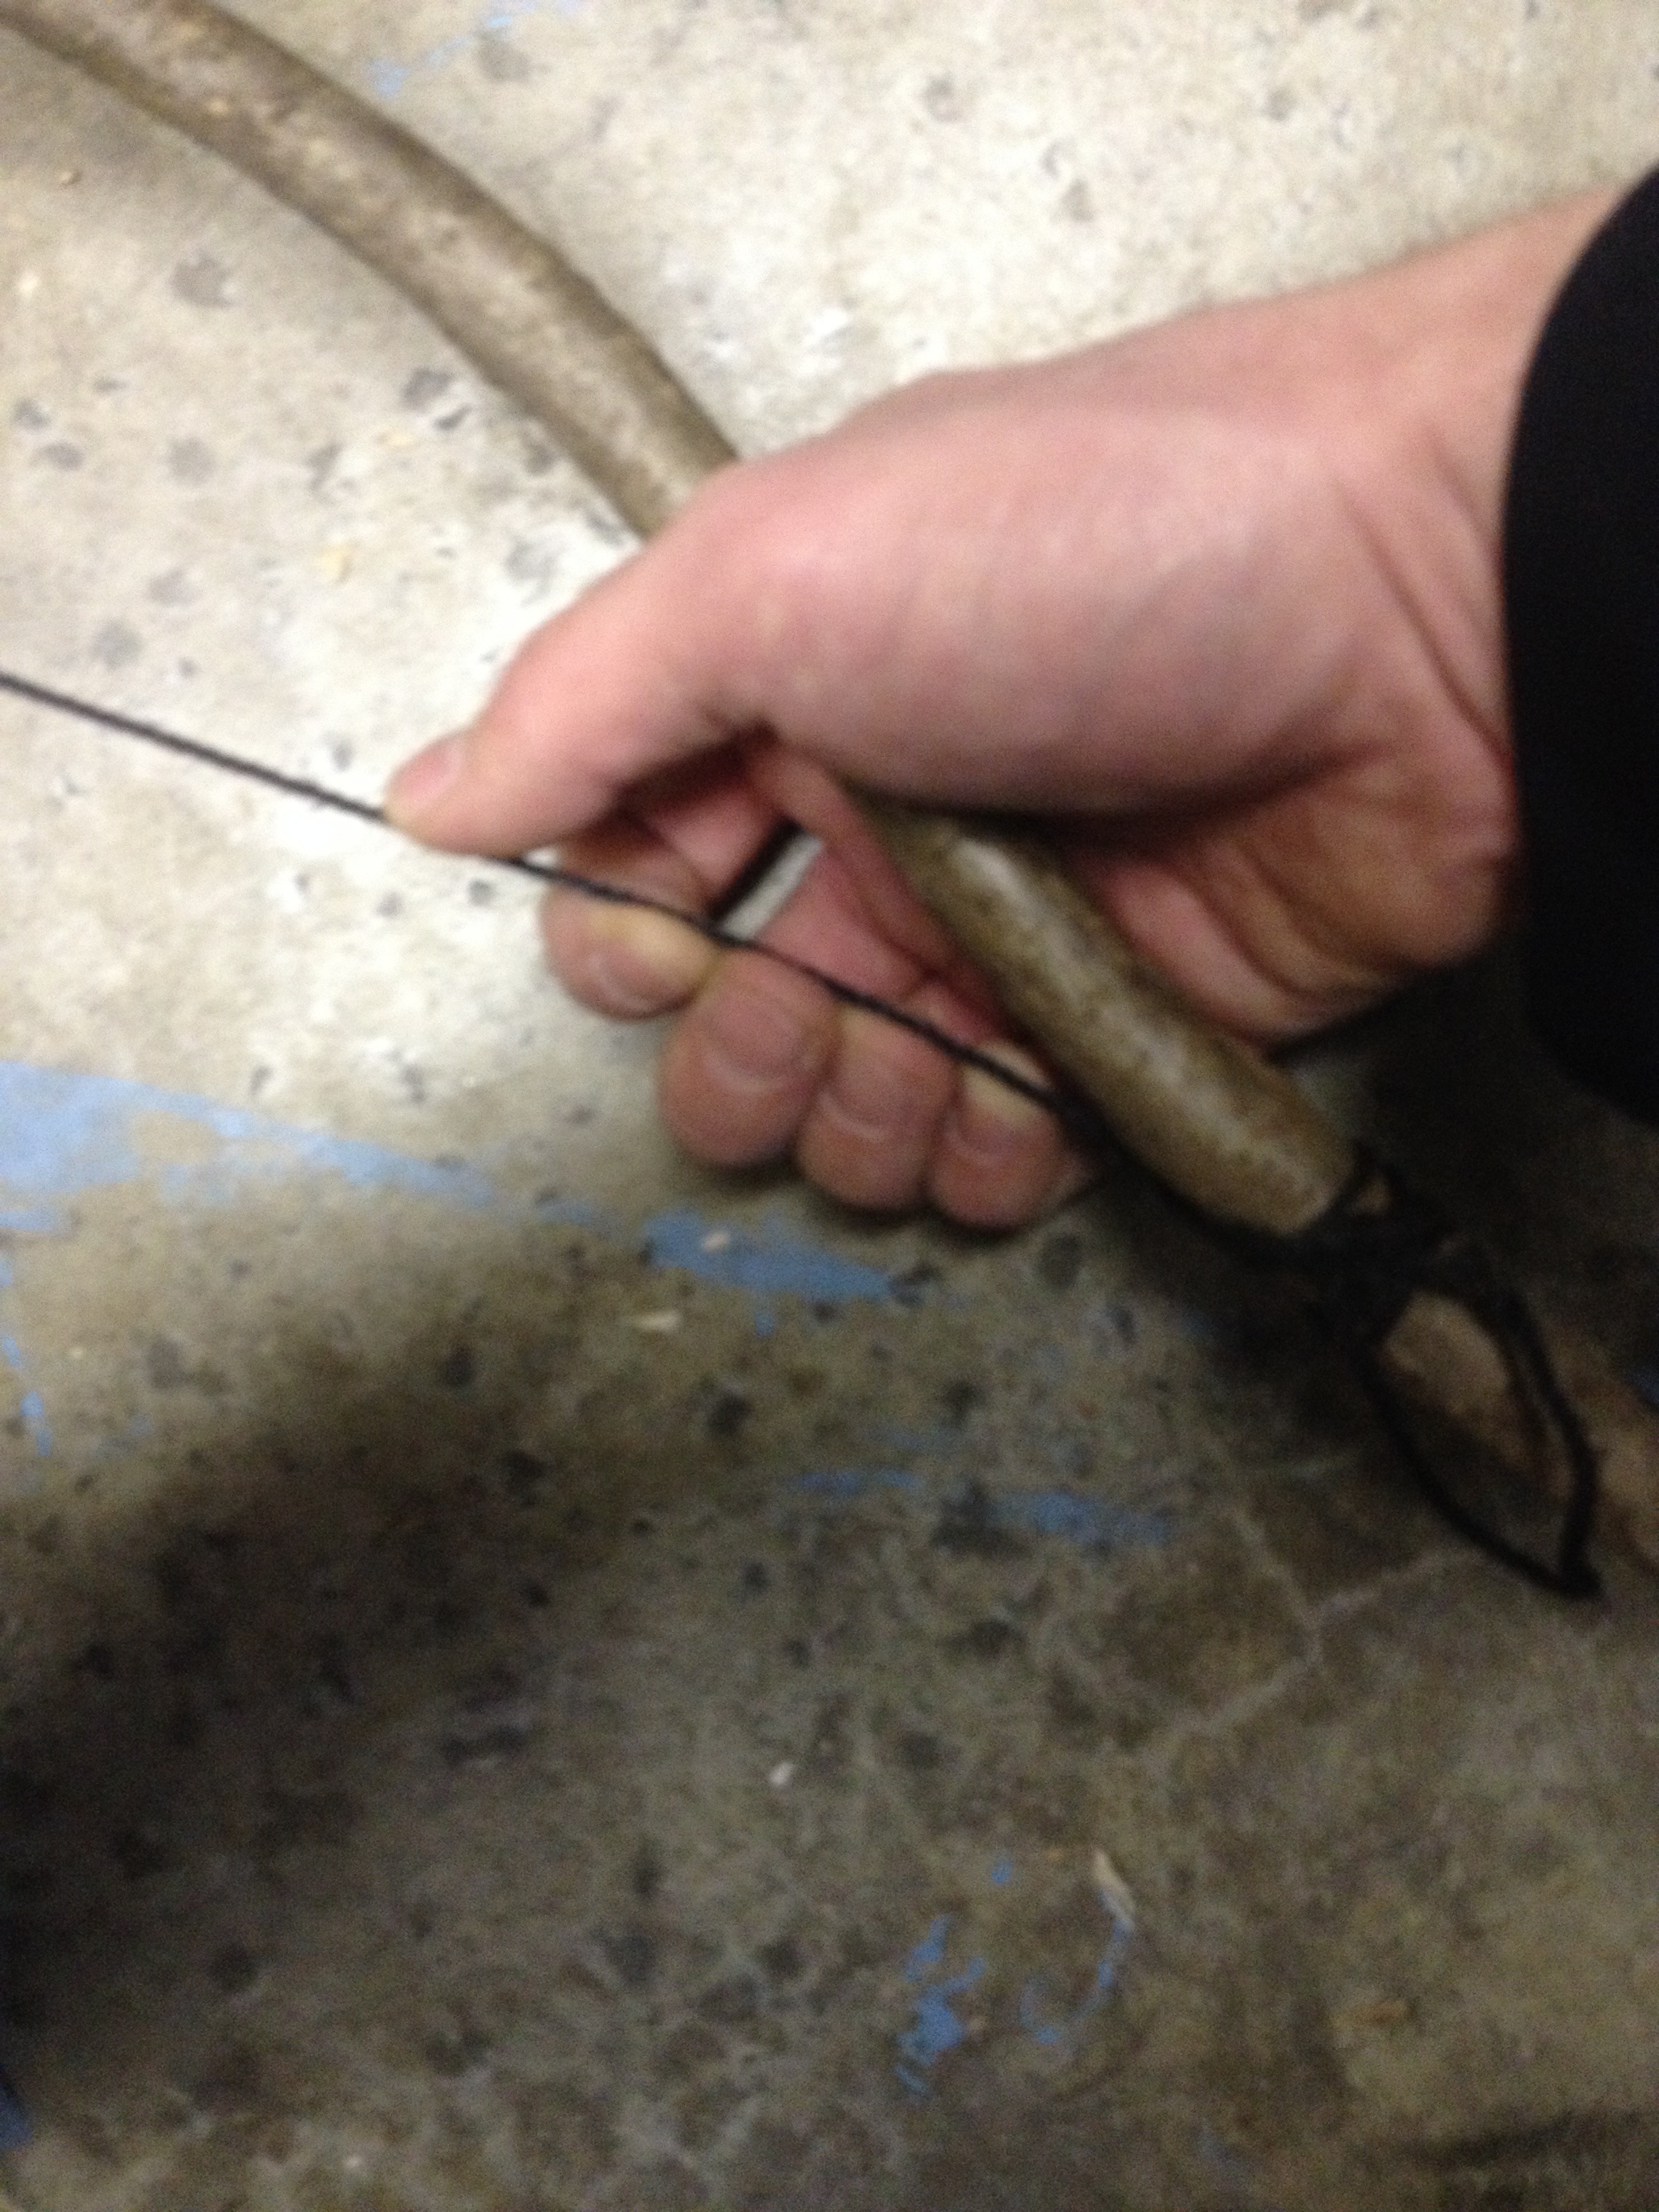
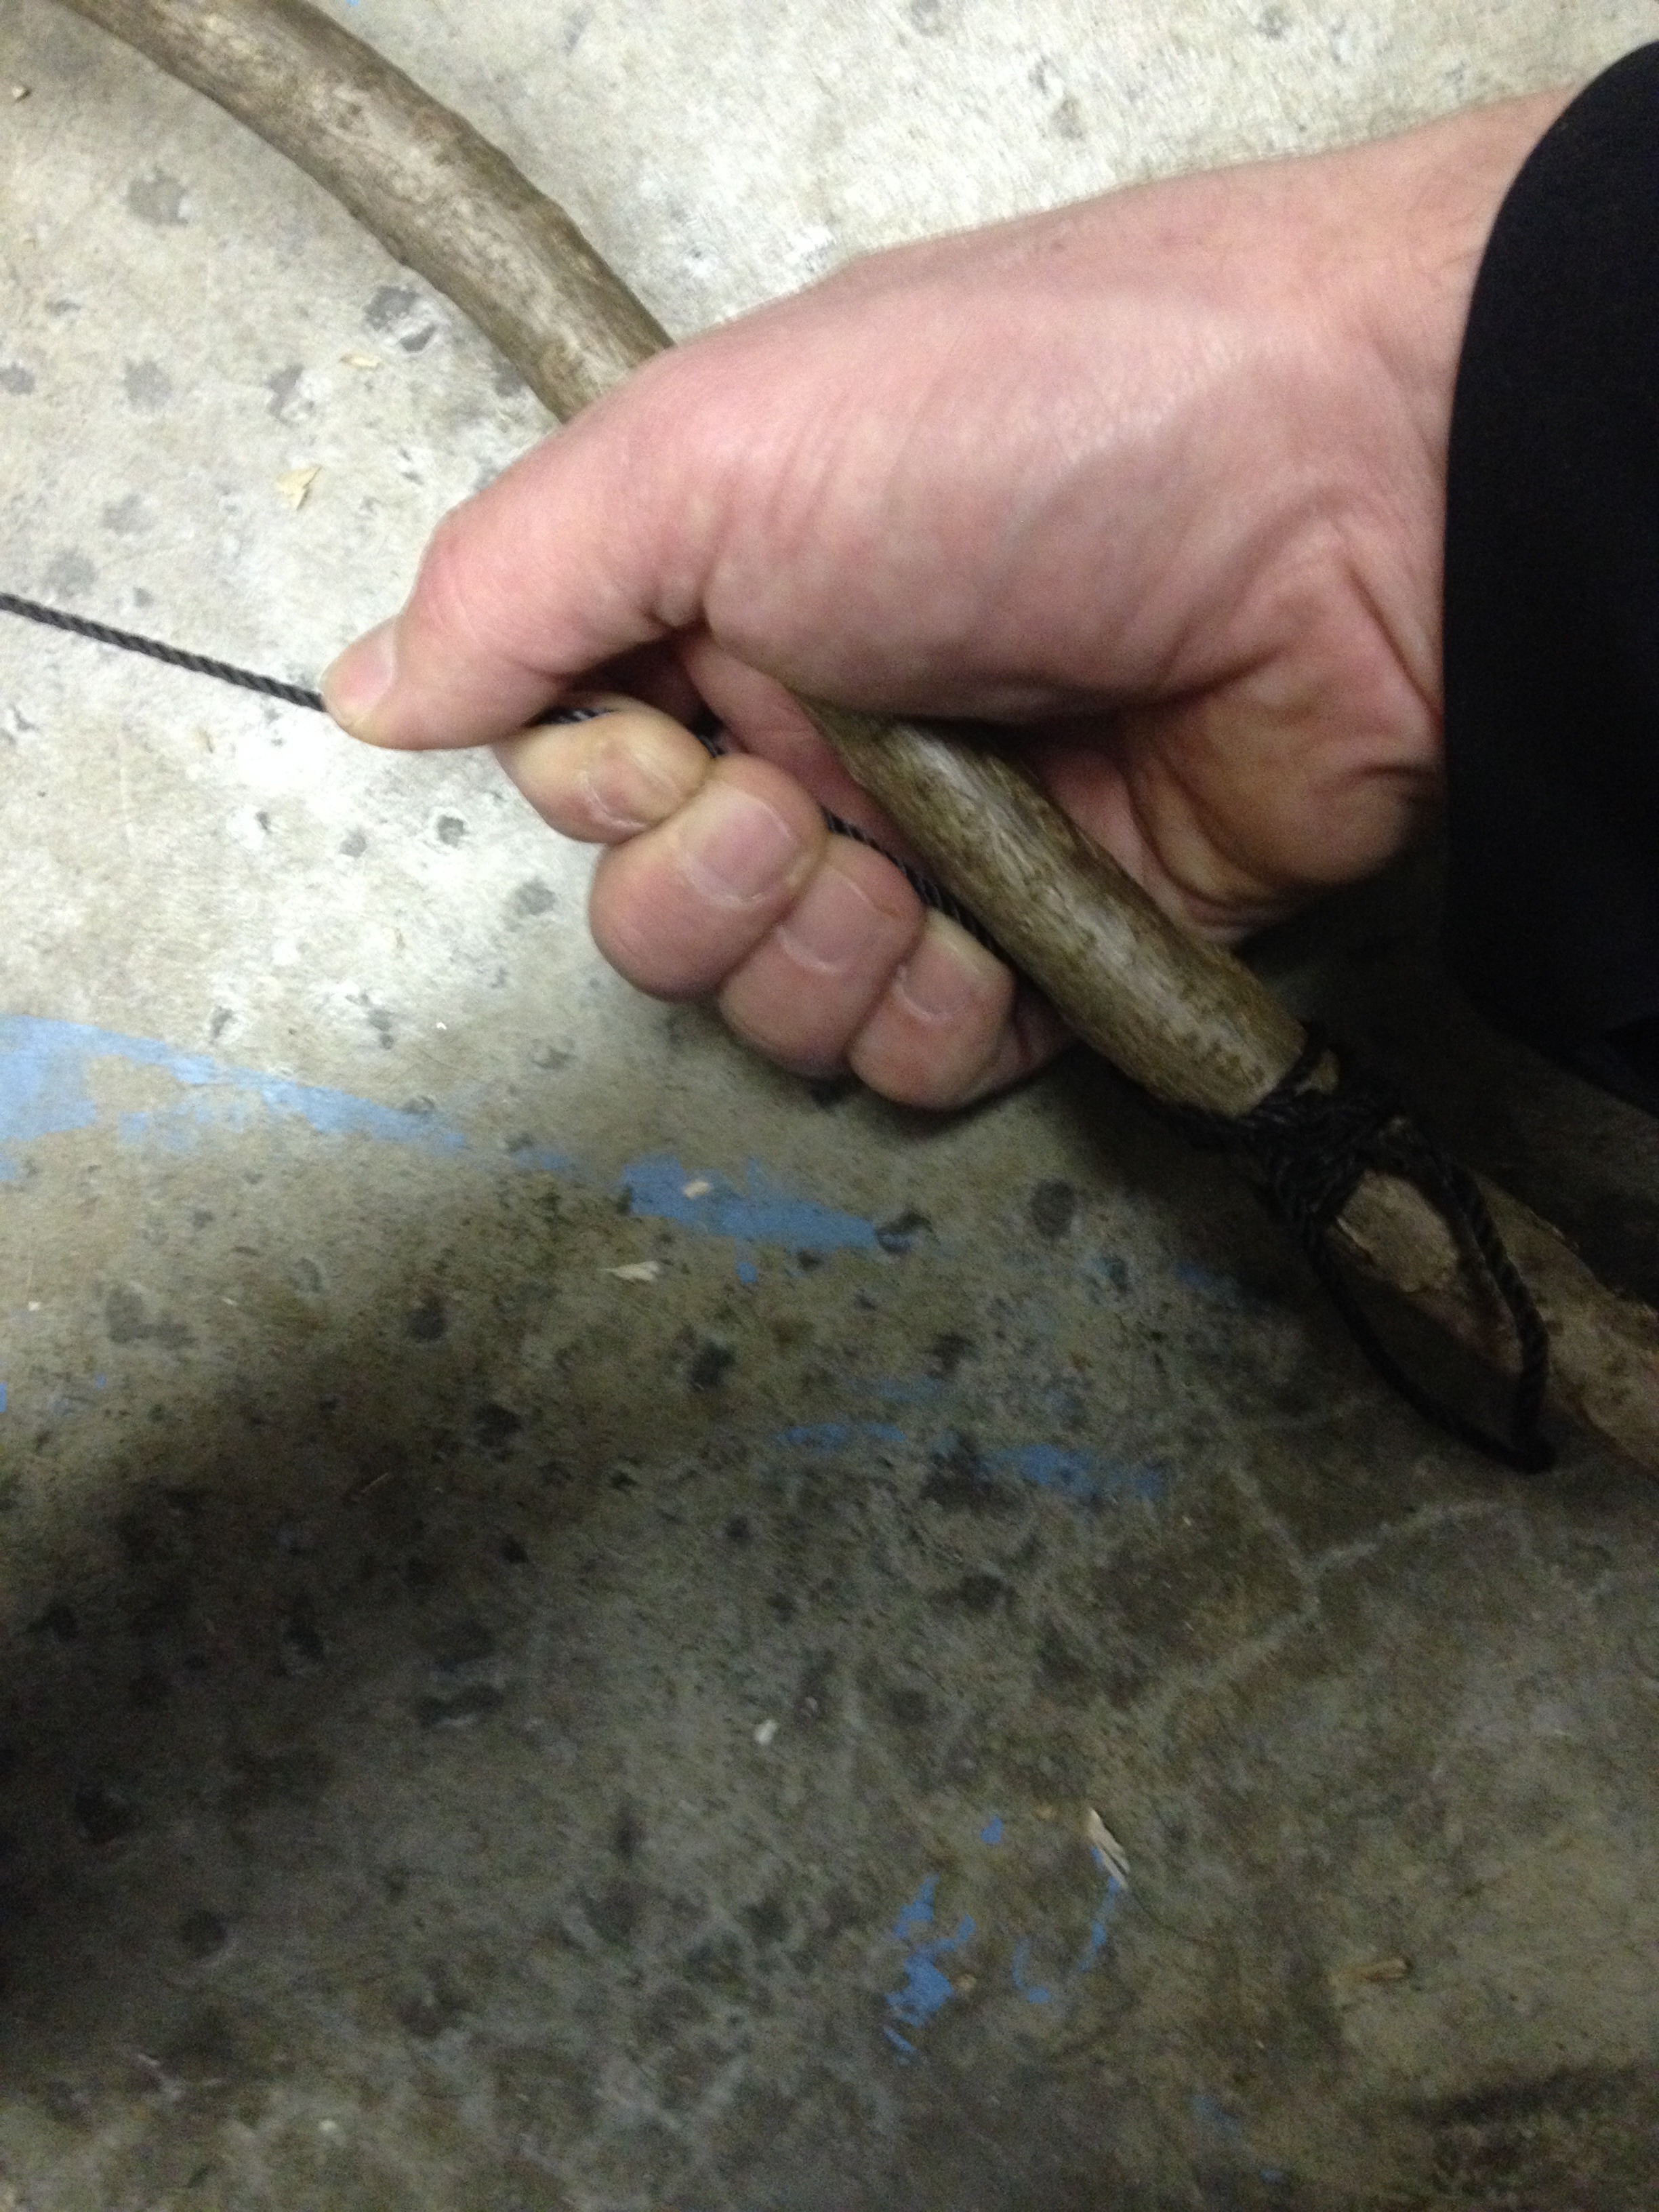
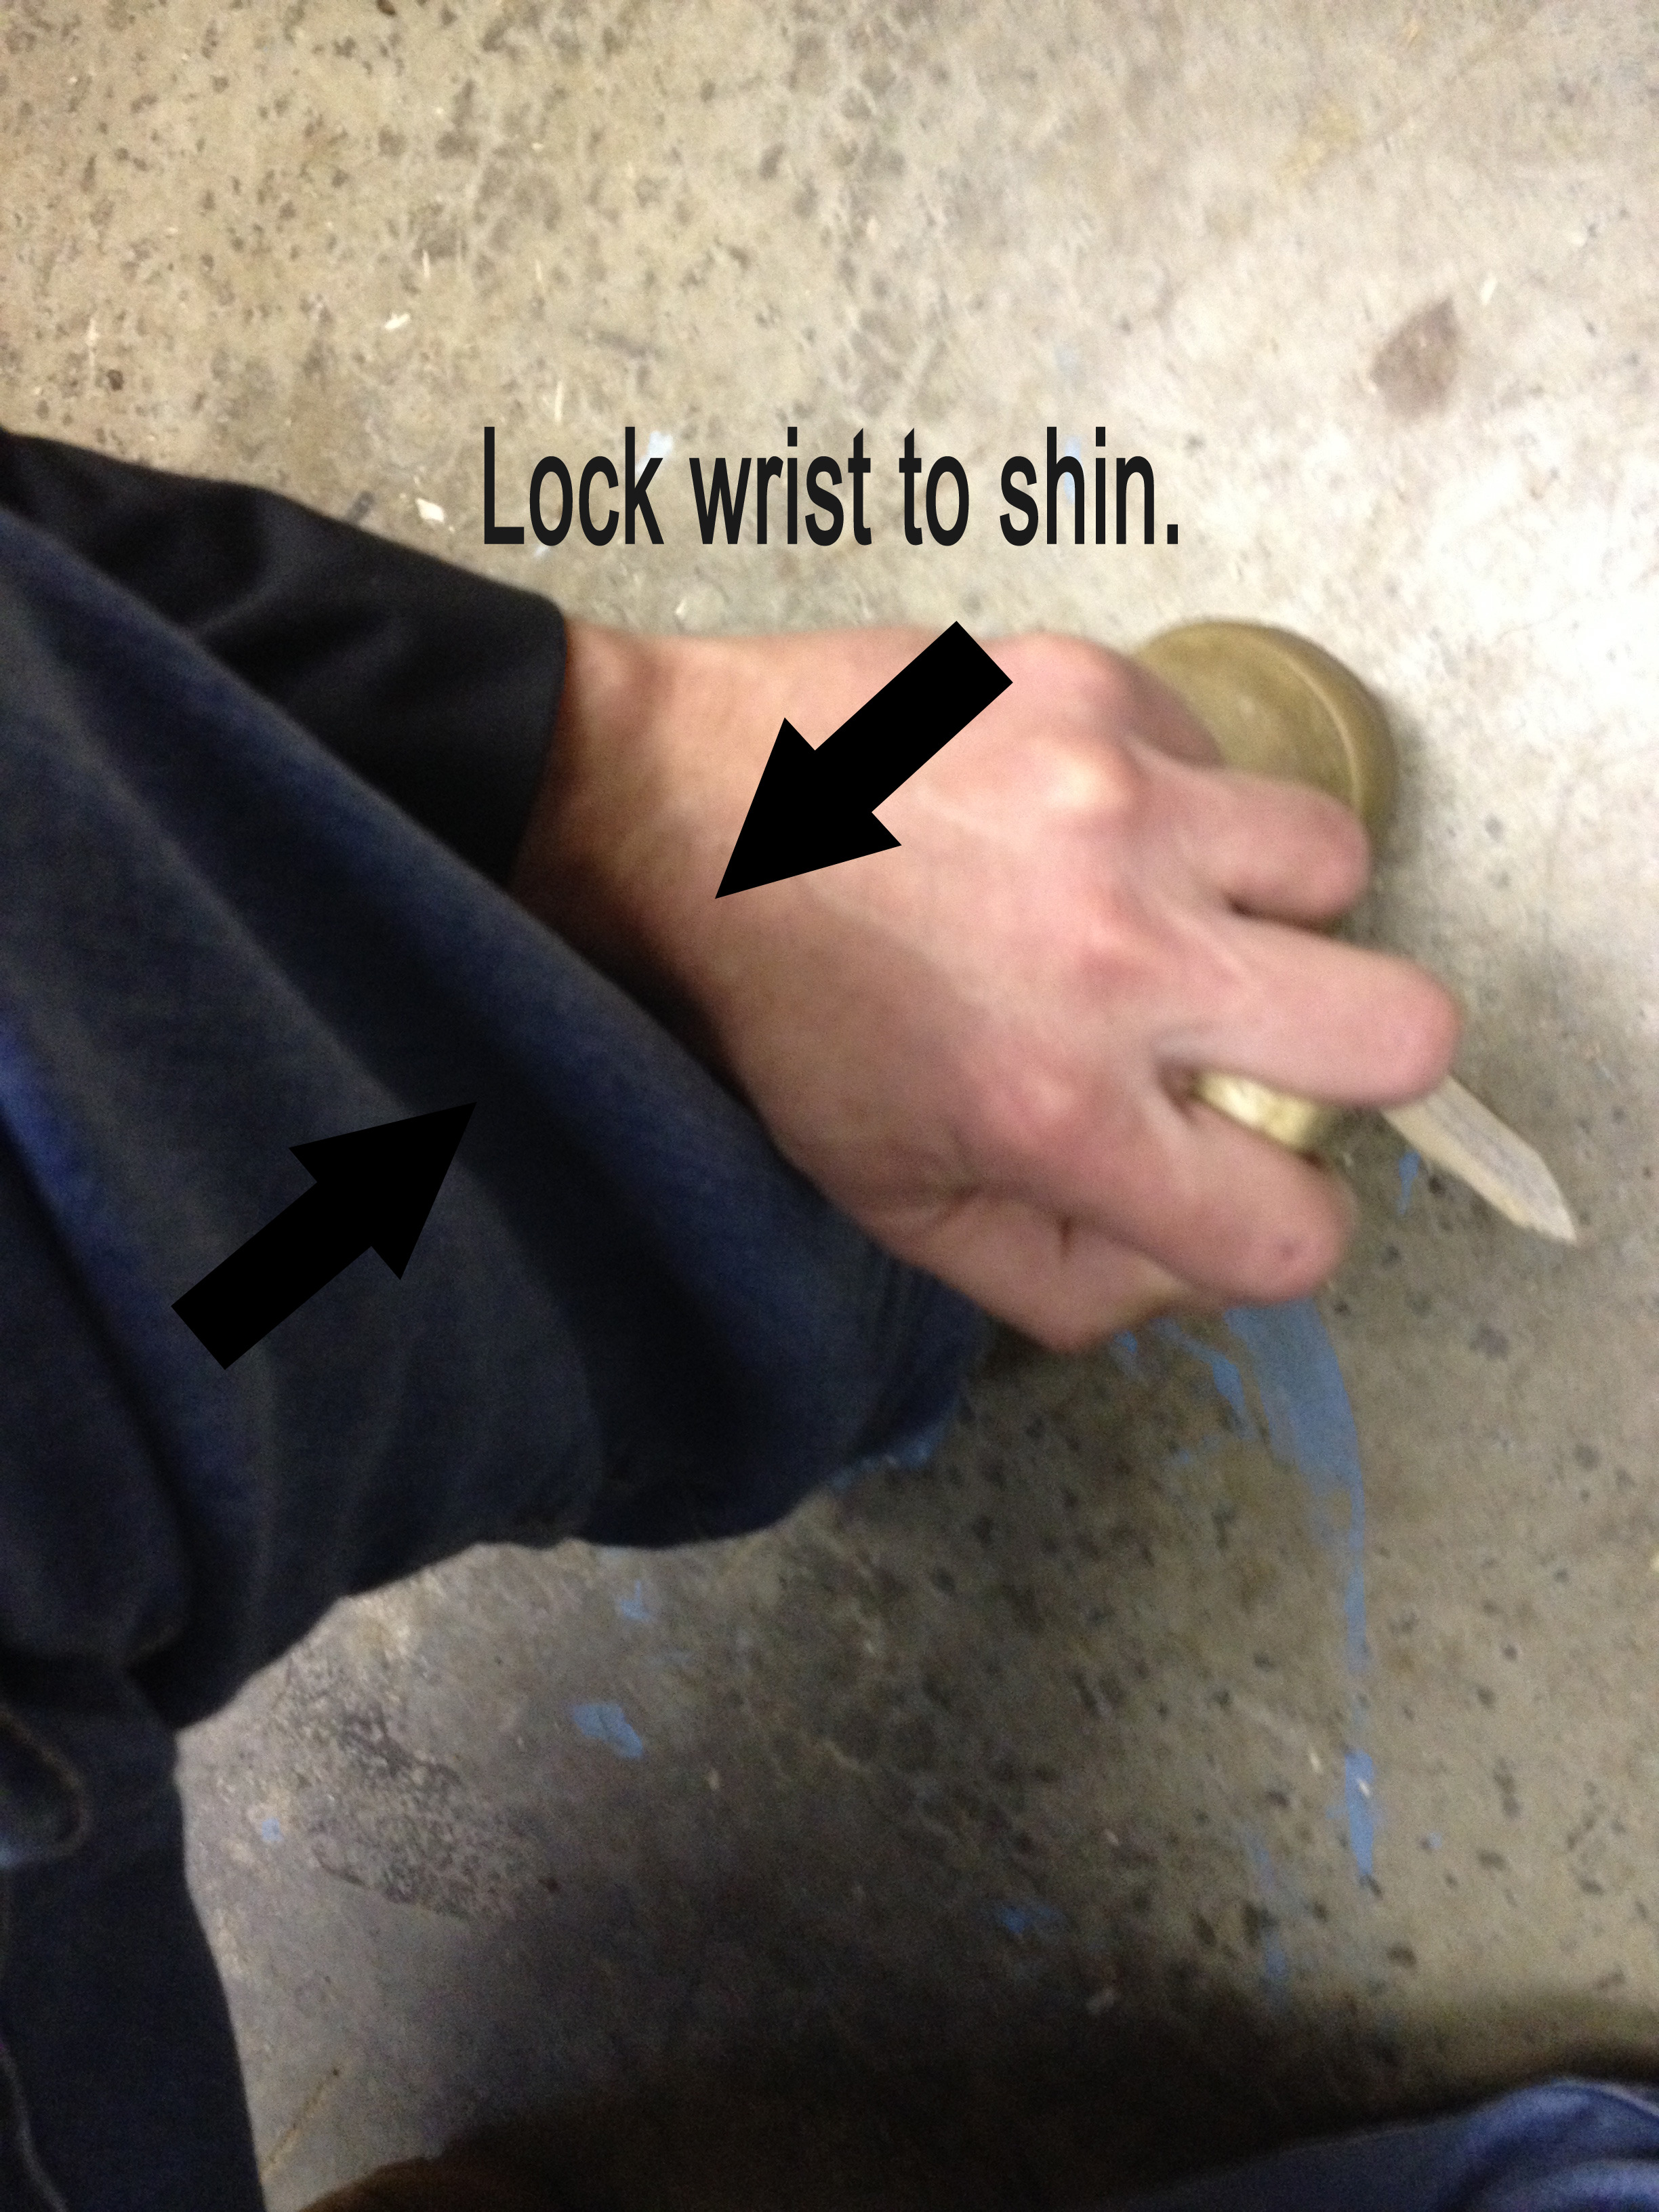
Start by finding a dry leaf or a flat piece of dry bark that will serve as a plate that our hearth will rest upon. This is to ensure that, once an ember is created, it will fall below onto something dry and portable that allows us to place the ember in the bird’s nest. Just like we did when mating the drill to the hearth, string up your bow with your drill, take a knee, place your opposite foot on the hearth, take your socket in hand and attach it to the top of the drill, lock your wrist in to your shin, take a good posture, and we are ready. Your hand position on the bow is important to maintain efficiency. You will want to choke up a little higher on the end of the bow so the tips of your fingers and thumb are resting on the bowstring. This is done so that once we begin applying pressure while also applying speed, we can apply increased tension on the string of the bow by clinching our fingers and thumb together (see figure 10).
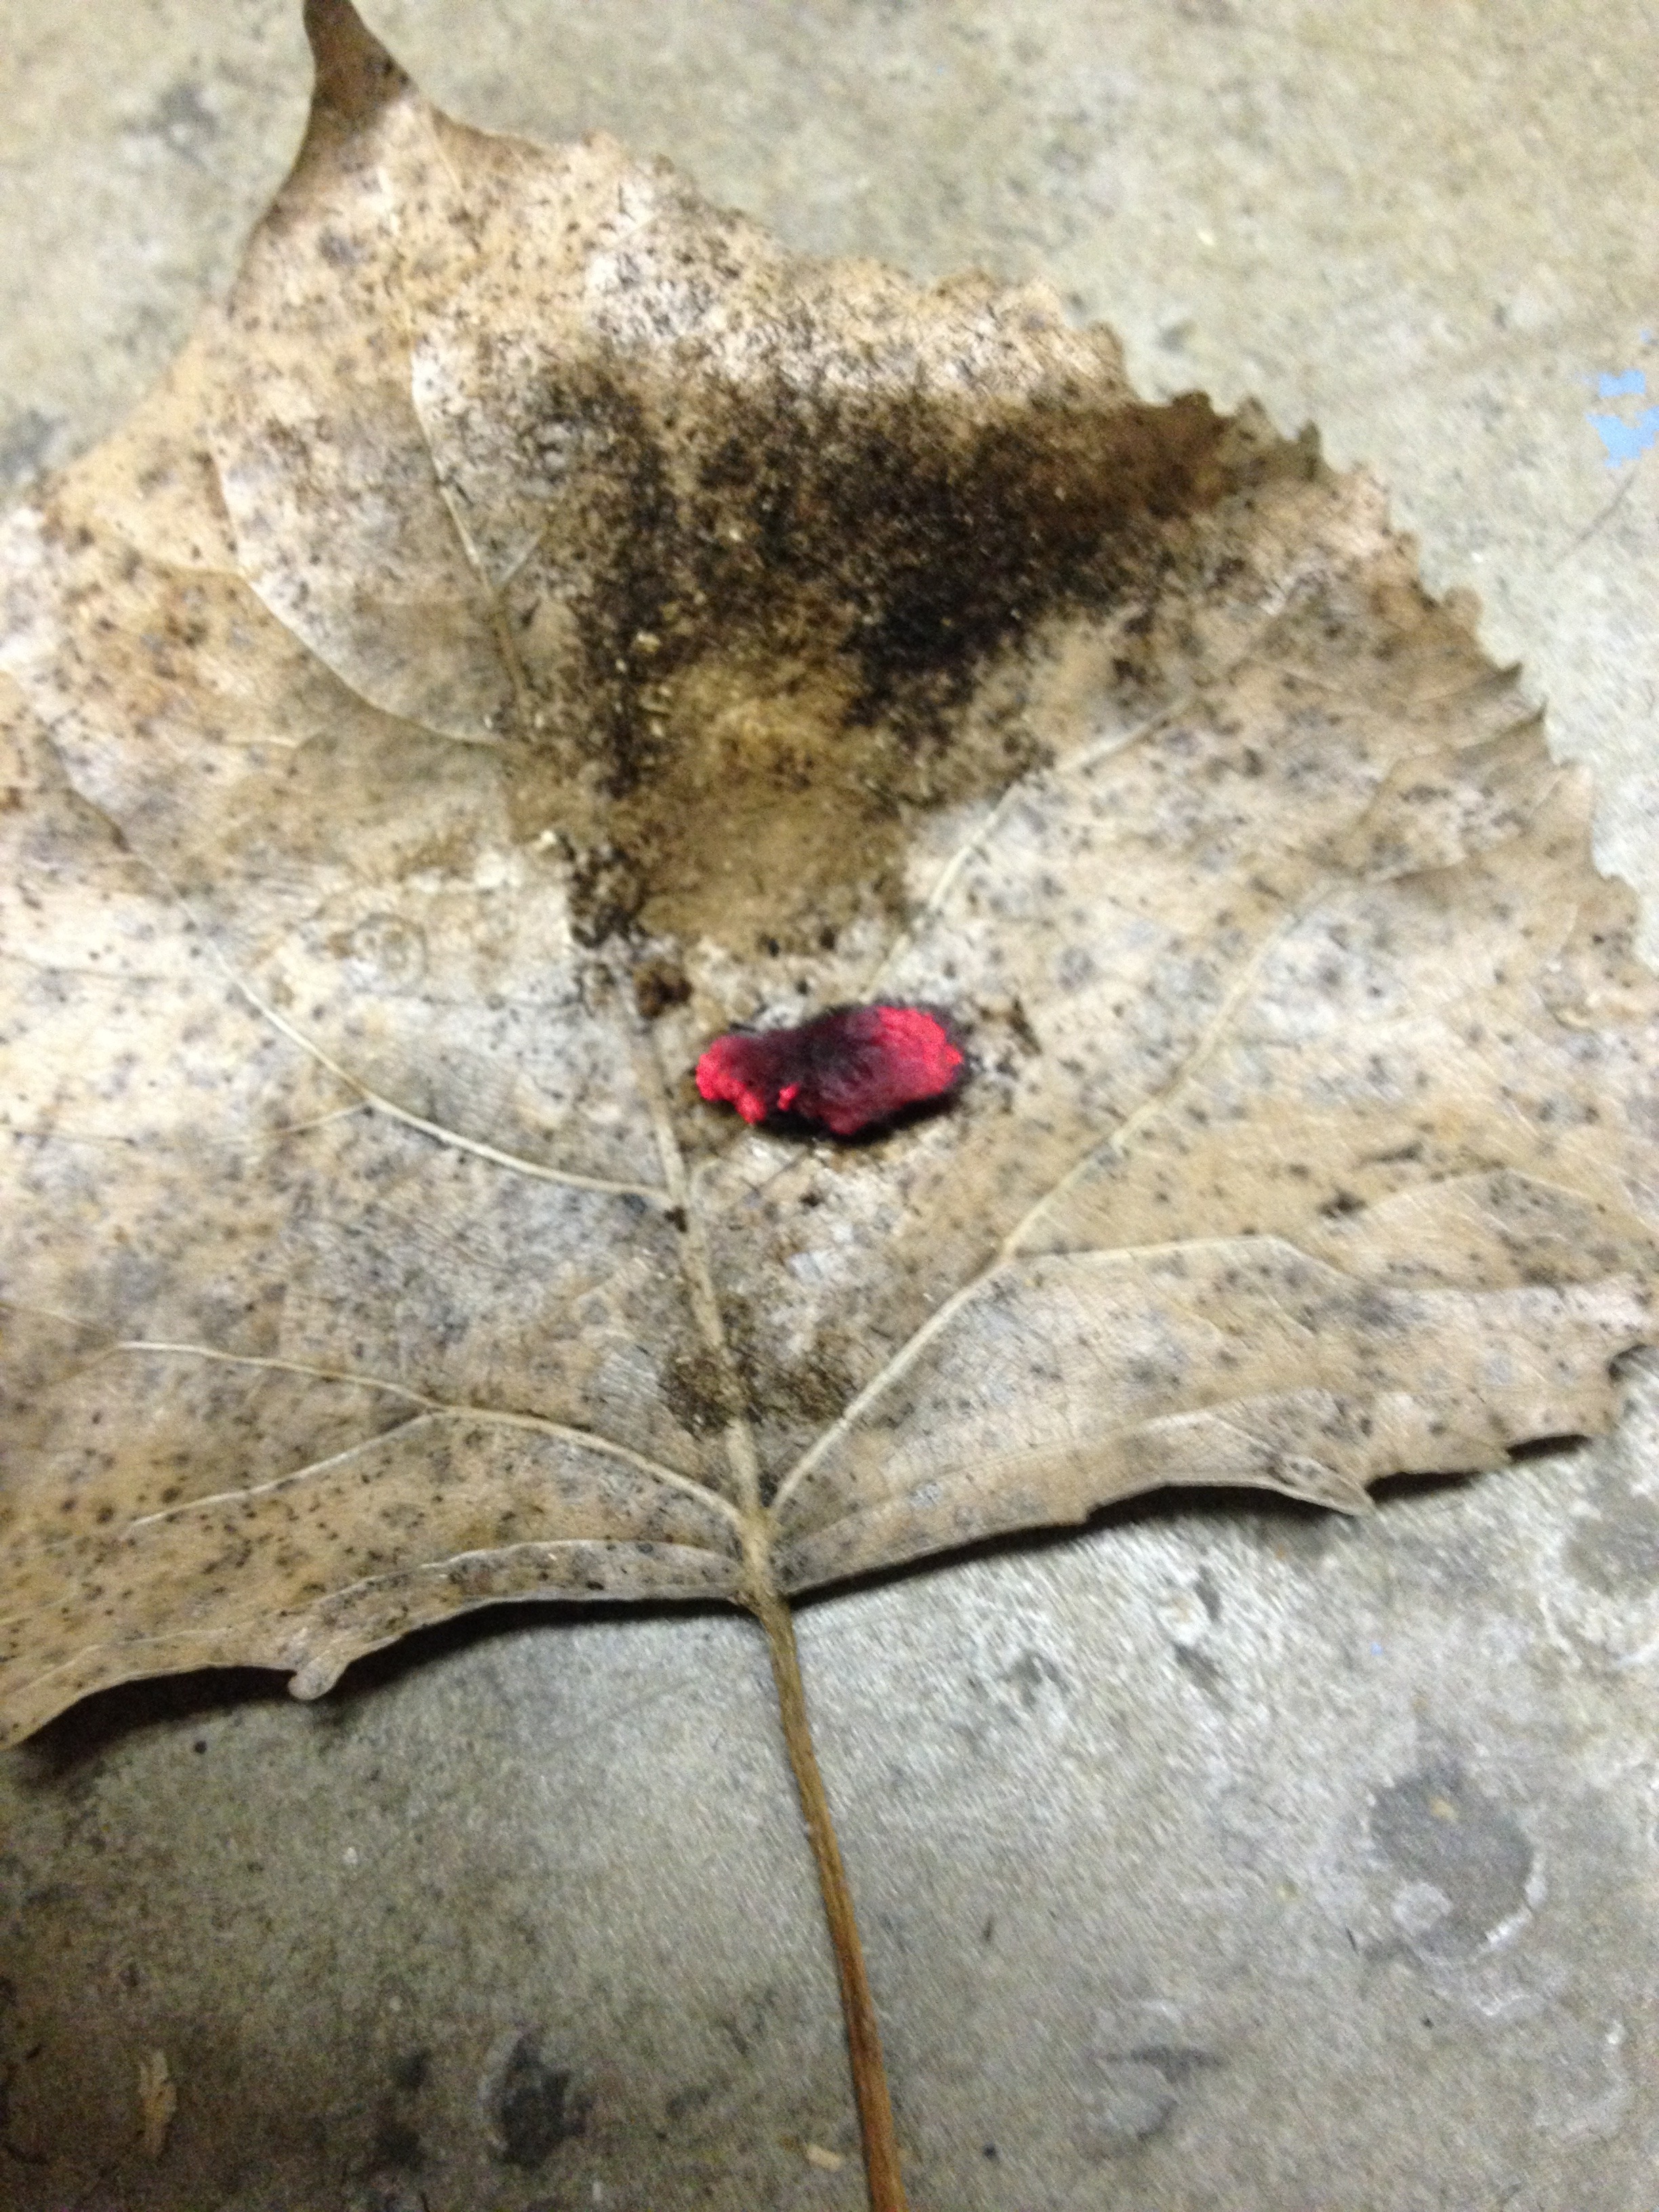
Begin moving the bow slowly and increase the speed over time. This is not a race, so going zero to sixty is not going to help you. Think of this speed acceleration as simply getting a green light at an intersection and you are in no hurry. As you increase the speed, slowly apply downward pressure with the socket hand. The goal is to maintain, as much as possible, an even increase of speed and an increased downward pressure of the drill. Make sure you use long strokes and use all of the string. Very important: Once you see some smoke, keep going while again increasing speed and pressure. Once a decent amount of smoking starts rising (use your best judgment, and the more smoke the better), you may have created an ember. To check if you have created an ember, stop moving the bow. Slowly, pick up the drill from the hearth while leaving your foot attached to the hearth. Place the drill, socket, and bow to your side, again while keeping your foot upon the hearth. If you are confident there is an ember, then maintain your balance and be careful when finally removing your foot from the hearth. This is important, because if you have created an ember then moving your foot from the hearth in a rapid fashion can very easily destroy the ember. Get on both knees and lean down to slowly peel away the hearth from the ember. You will know if you have an ember, because a little pile of dust will be smoking. Softly blow on the ember and it should put out a nice glow (see figure 11). We are in no real hurry here, as that ember will smolder for a little while on its own. Relax, and try not to get too excited.
Make sure your birds nest is very close. Pick up the dry bark or leaf that your ember is resting on and very carefully tap the ember into your bird’s nest. Taking the bird’s nest in to your hand, begin blowing on the ember. A trick I have found that helps during this process is to take a deep breath and blow softly, increasing the pressure of your blowing as the glowing intensifies. As you run out of breath, very quickly move the birds nest away from your face to full arms extension while you take another deep breath. This trick does two things for us. 1) If you are having success, the birds nest will be smoking pretty good and by moving the birds nest away from your face you are able to take a deep breath without inhaling the smoke. 2) The movement also provides more oxygen to the ember.
As the glowing of the ember increases, carefully fold the bird’s nest over the ember, without smothering the ember. This will increase the ember’s contact with dry tinder, helping to make a flame. Repeat this process with care and a flame will appear. Once a flame appears, you may feel compelled to scream “FREEDOM!” Try not to squeal or wiggle about. Also, put the bird’s nest down so you don’t burn yourself. Start applying more tinder and small sticks to allow your fire to mature.
Congratulations, you have just completed a friction fire! For demonstration purposes, I am using a yucca stalk. A yucca stalk is widely regarded as the easiest specimen to use for creating friction fire. As I am certified in permaculture design, which can be characterized as a sustainable form of agriculture that mimics nature with editable foods, I have also incorporated yucca plants in to my permaculture gardens. I believe this is a prudent idea as many of us understand the importance of growing our own food. And, by including yucca plants, we can also grow our own material for friction fire and utilize the leaves of the yucca plants for cordage. Cordage and fire are considered some of the cornerstones of a survival situation and growing them on your homestead is just as smart as growing your food, but it is often overlooked.
Keep in mind that once you have made your bow drill set, you can use it time and again until you have exhausted the hearth. Keep your hearth and drill dry and you can make many fires. Some key takeaways to help with your success are as follows:
Moisture is our enemy
Soft woods, fingernail test
Use sweat and oils from your nose/face as lubrication between the socket and drill (but do not lubricate the drill and hearth mate!)
Lock wrist to your shin
Good posture
Make long strokes with the bow, using all of the string
Take your time; go slow
Friction fire will work with most woods. However, the required pressure, speed, and length of time will increase with harder woods. Again, I suggest for practice purposes using a dried yucca stalk, if possible. As you perfect your technique, you can obtain an ember in around sixty seconds with a yucca stalk. Another tip: You may be better served to practice your technique on a surface other than concrete. Speaking from experience, your knuckles dragging along the concrete can get bloody when you are close to obtaining an ember.
In closing, when I first sat down to learn friction fire, I was intimidated and I rationalized that flint steel or a lighter is all I needed. Honestly, friction fire is not very hard. It can seem overwhelming during the learning process, but I promise you that this skill is invaluable. I now rank this skill as my second most important skill/item, second only to a proper fixed blade. With fire we can boil our water, make fire burned bowls to hold and transport our water, cook our food, along with many other necessities and comforts. Practice makes improvement, and also serves as a reason to get out in the woods to practice other skills. I find primitive skills to be the best survival skill set we can have—far more valuable than any store-bought item. Importantly, the more knowledge we obtain, the less stuff we need.
Every bespoke SIEGE buckle goes through an hours-long artisanal process resulting in a belt unlike anything else, with blazing fast performance and looks and comfort to match.
#1 Trusted Gravity Water Purification System! Start Drinking Purified Water now with a Berkey water filtration system. Find systems, replacement filters, parts and more here.
We, as a country, have run our financial cycle; reference KB’s timely article. I have one addition: the reference to $19 plus trillion is for funded U.S. debt. In addition, folks, there is over $200 trillion in unfunded debt, which the current POTUS has added almost 50% to that portion since his time on the golf course. We are led to believe that $19 trillion is the true bottom line total debt number. Like Mark Twain once said, “Politicians like diapers should be changed often…and for the same reason”. I have only heard Trump and Carson address the true numbers. God help us, we can no longer even pay the interest on the 19 trillion. The unfunded portion, 200 plus trillion, is the hand grenade that keeps being kicked down the road by both parties. Check out the real time National debt clock to verify for yourself and your own education how we are being taken for the long ride over the financial cliff. So do your own research, our 2-party system is both corrupt and scheming for even more power; do not give up your freedoms. After all, that is what they work for, not us. – John in Nv
House GOP Conference Chair Unveils Bill to Fight Government “Zombies” (Washington Free Beacon) Excerpt: “The legislation would pressure Congress to reexamine government programs whose authorizations have expired by subjecting such programs to a rolling sequester, which would take place over three years and end with a complete elimination of funding if lawmakers have not acted to reauthorize the program. Currently, the federal government funds 256 unauthorized programs costing $310.4 billion, including entire agencies such as the State Department….”
Congress Faces Prolonged Spending Fight (Washington Examiner) Excerpt: “…once again, Congress is facing a prolonged spending fight that results in the last-minute passage of an unpopular ‘omnibus’ bill.”
Global Recession Risk Rises to 30pc this Year, Warns Morgan Stanley (The Telegraph) Excerpt: “The US investment bank said a ‘low growth environment’ had made the world vulnerable to a litany of shocks, including fears that central banks have lost control over domestic financial conditions, while rising political risks from Europe to the Middle East threaten to overwhelm governments.”
Personal Economics and Household Finance
Fraud Prevention (Looks Too Good To Be True) Excerpt: “An interesting point about fraud is that it is a crime in which you decide on whether to participate. Hanging up the phone or not responding to shady mailings or emails makes it difficult for the scammer to commit fraud. But con artists are very persuasive, using all types of excuses, explanations, and offers to lead you — and your money — away from common sense.”
o o o
SurvivalBlog and its editors are not paid investment counselors or advisers. Please see our Provisos page for details.
#1 Trusted Gravity Water Purification System! Start Drinking Purified Water now with a Berkey water filtration system. Find systems, replacement filters, parts and more here.
A bit of reading required here, but well worth it. Much of it can be considered “Problem Two”– what to do AFTER your physical preps are in place.
Okay, you’ve already got the nine B’s– Berkey (i.e. water), beans, bullets, bandaids, batteries, bullion, books, barter, beliefs. Then it’s time to think about the tenth B– “buddies”. Lone wolves, no matter how well equipped, will get picked off early in the upcoming festivities.
MobileSec is offering a $5 discount (good until 3/20/16) exclusively for SurvivalBlog readers for purchases of the Cell Phone Blocker through their website. Just email them using the online form and state that you saw the offer on SurvivalBlog. (Note: The Laptop EMP shield is not available at this time though.)
A Tactical Self-Contained 2-Series Solar Power Generator system from Always Empowered. This compact starter power system is packaged in a wheeled O.D. green EMP-shielded Pelican hard case (a $1,700 value),
A Gunsite Academy Three Day Course Certificate that is good for any one, two, or three day course (a $1,195 value),
A course certificate from onPoint Tactical for the prize winner’s choice of three-day civilian courses, excluding those restricted for military or government teams. Three day onPoint courses normally cost $795,
DRD Tactical is providing a 5.56 NATO QD Billet upper with a hammer forged, chrome-lined barrel and a hard case to go with your own AR lower. It will allow any standard AR-type rifle to have a quick change barrel, which can be assembled in less than one minute without the use of any tools and a compact carry capability in a hard case or 3-day pack (an $1,100 value),
Gun Mag Warehouse is providing 20 Magpul PMAG 30-rd Magazines (a value of $300) and a Gun Mag Warehouse T-Shirt; (an equivalent prize will be awarded for residents in states with magazine restrictions),
The Ark Institute is donating a non-GMO, non-hybrid vegetable seed package (enough for two families of four) plus seed storage materials, a CD-ROM of Geri Guidetti’s book “Build Your Ark! How to Prepare for Self Reliance in Uncertain Times”, and two bottles of Potassium Iodate (a $325 retail value),
A $245 gift certificate from custom knife-maker Jon Kelly Designs, of Eureka, Montana,
A large handmade clothes drying rack, a washboard, and a Homesteading for Beginners DVD, all courtesy of The Homestead Store, with a combined value of $206,
Expanded sets of both washable feminine pads and liners, donated by Naturally Cozy (a $185 retail value),
Round 63 ends on March 31st, so get busy writing and e-mail us your entry. Remember that there is a 1,500-word minimum, and that articles on practical “how to” skills for survival have an advantage in the judging.
I believe fire by friction is one of the most valuable skills we can have in our bag of tricks. Beyond “simply” making fire, the process provides a sense of freedom that people interested in prepping, survival, and outdoor skills no doubt highly value. It also provides important insight into human ingenuity. It can enhance appreciation for those who came before us and exposes how dependent we have become on the modern, consumer-based system. In this post I will demonstrate how to successfully create a bow drill set. To demonstrate fire by friction, I have made a bow drill set from scratch in my garage, accompanied by pictures of the process. It is winter here, and it is pretty cold out. As such, the garage will have to do.
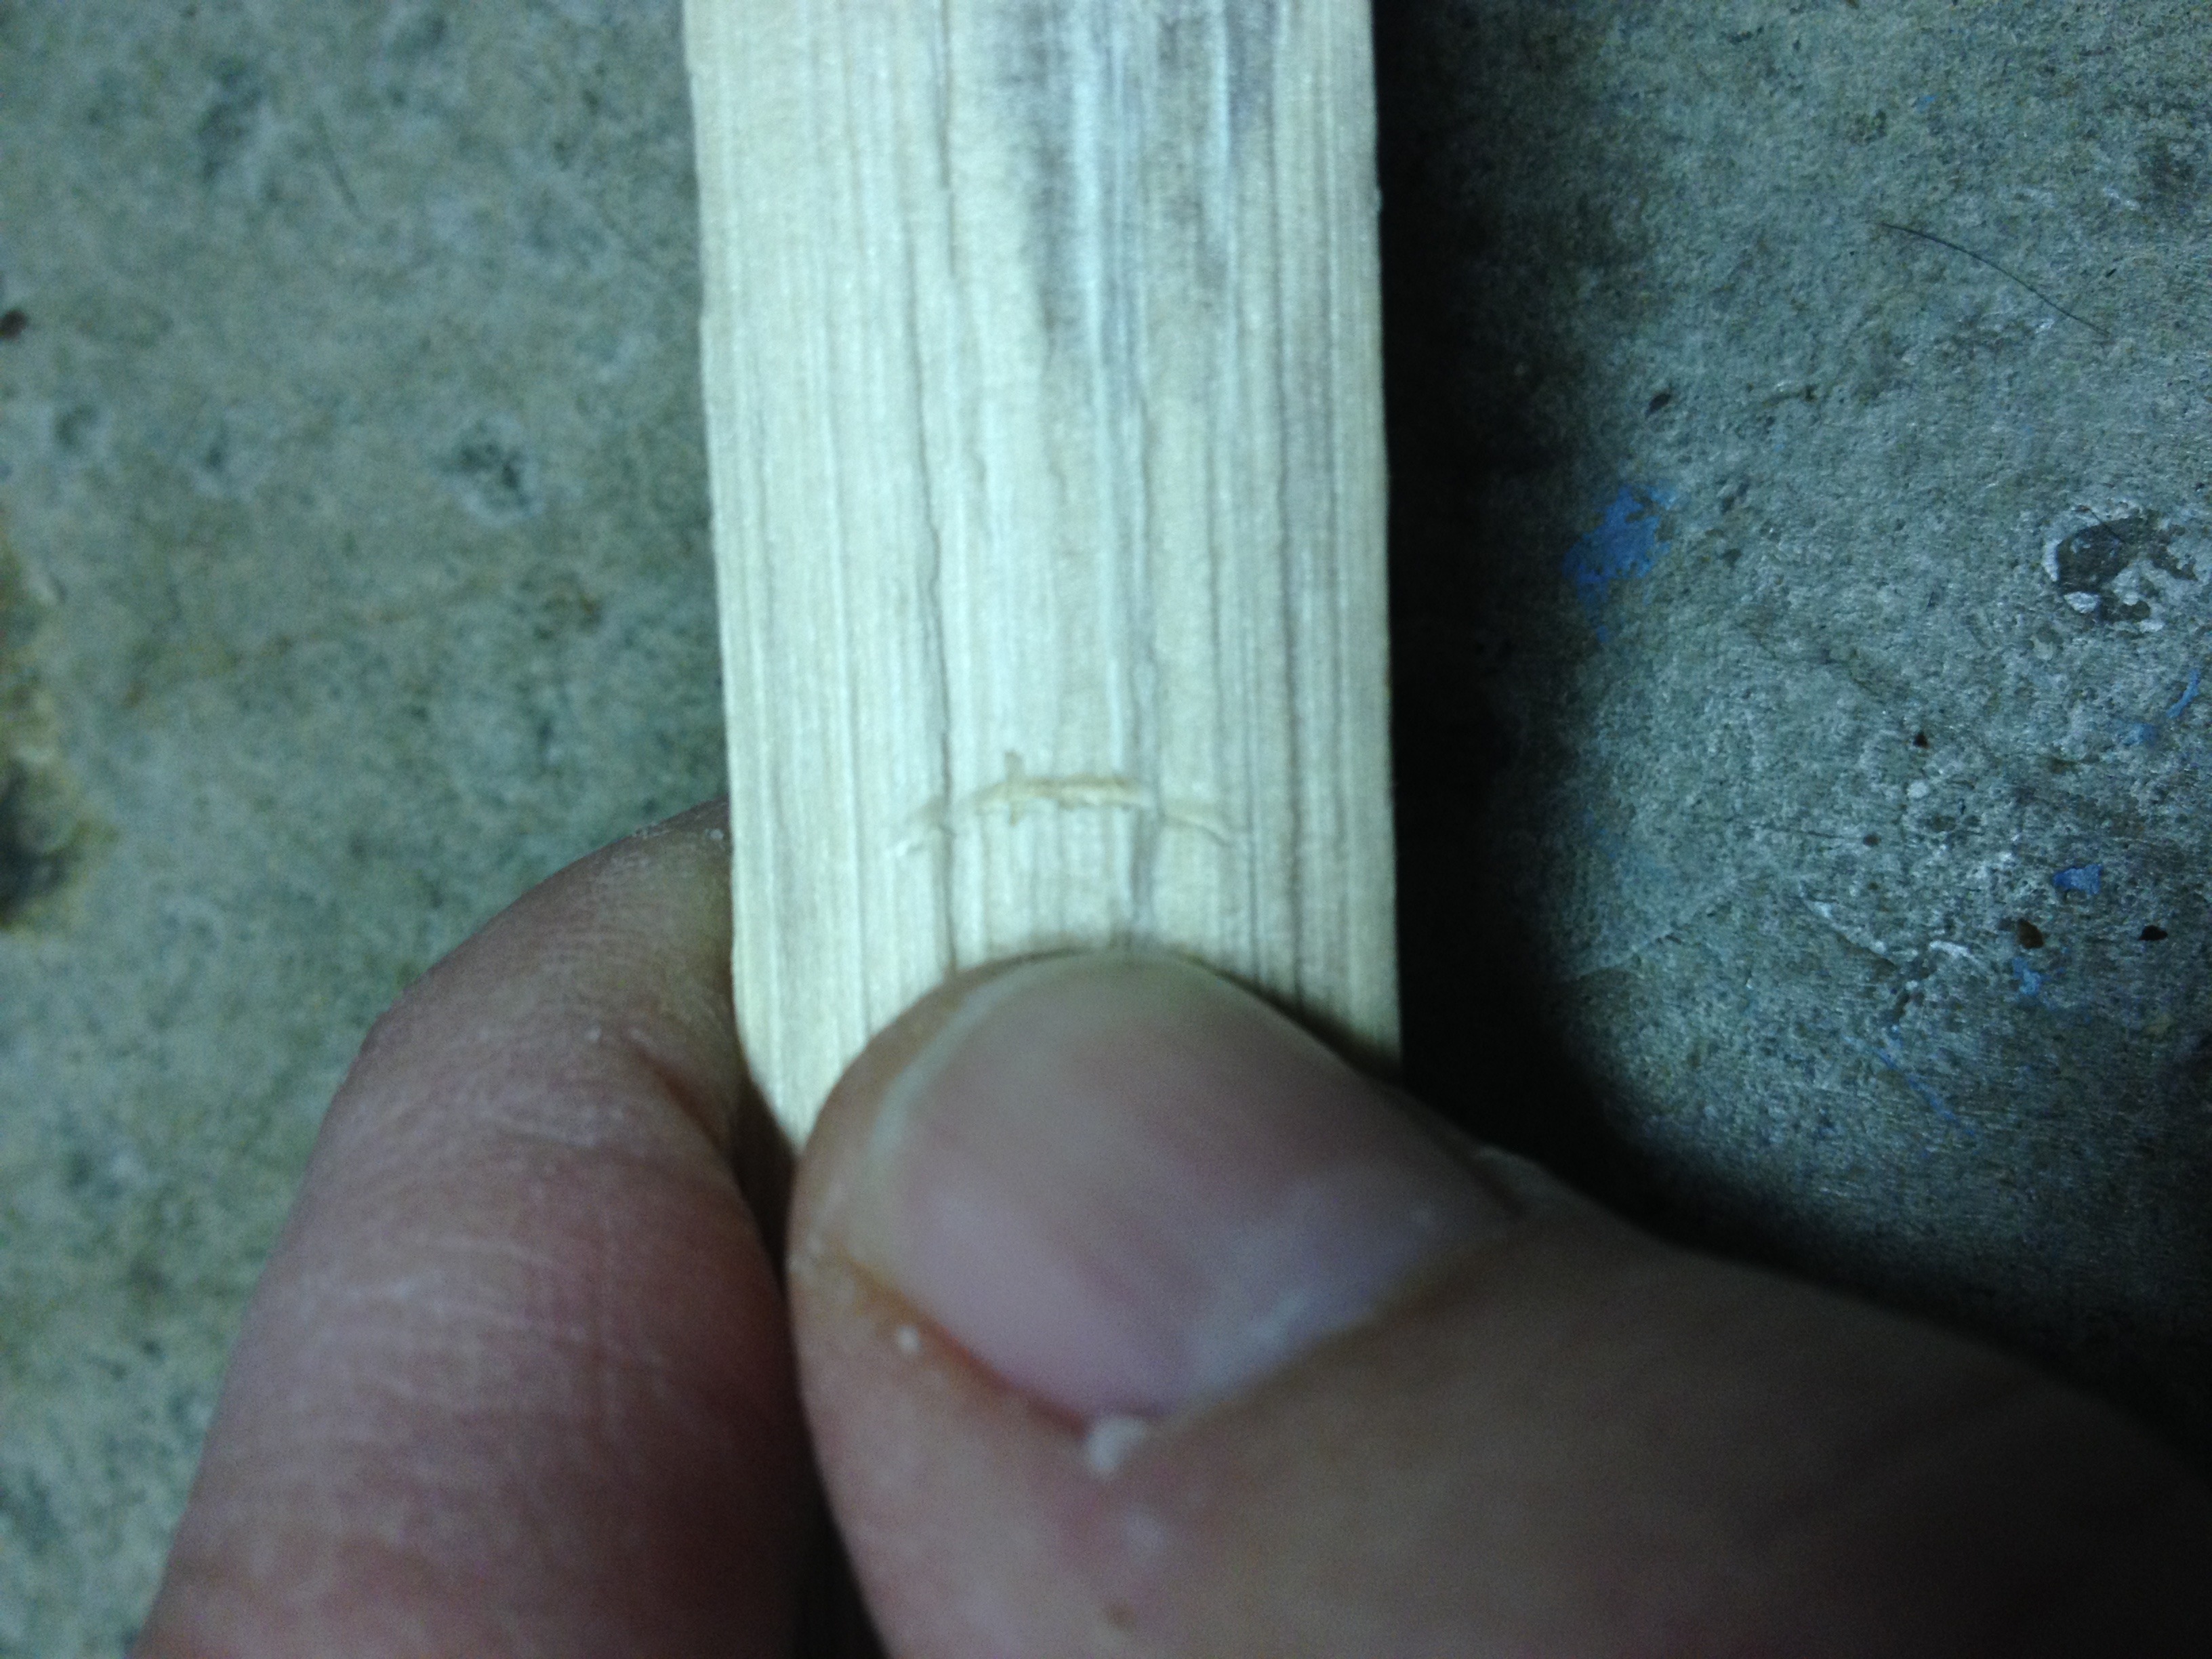
It can be overwhelming attempting to memorize all the different species of plants that are useful for edibles, medicinal purposes, and fire making. However, the fingernail test has proven to work time and again when selecting woods ideal for use in a successful bow drill set. When we are searching for wood to make our set, we are looking for what is called “hanging dead.” Hanging dead are dead tree limbs that are not touching the ground, collecting moisture. Moisture is our enemy when creating fire. Once you find a dry sample, you then want to baton (split) a section of the wood to perform the fingernail test. We are looking for a soft wood that, when you press your fingernail into the inner portion of the wood, your fingernail leaves an impression. If your fingernail leaves an impression in the wood then you have found a piece that should work for your bow drill set (see figure 1).
The Fingernail Test
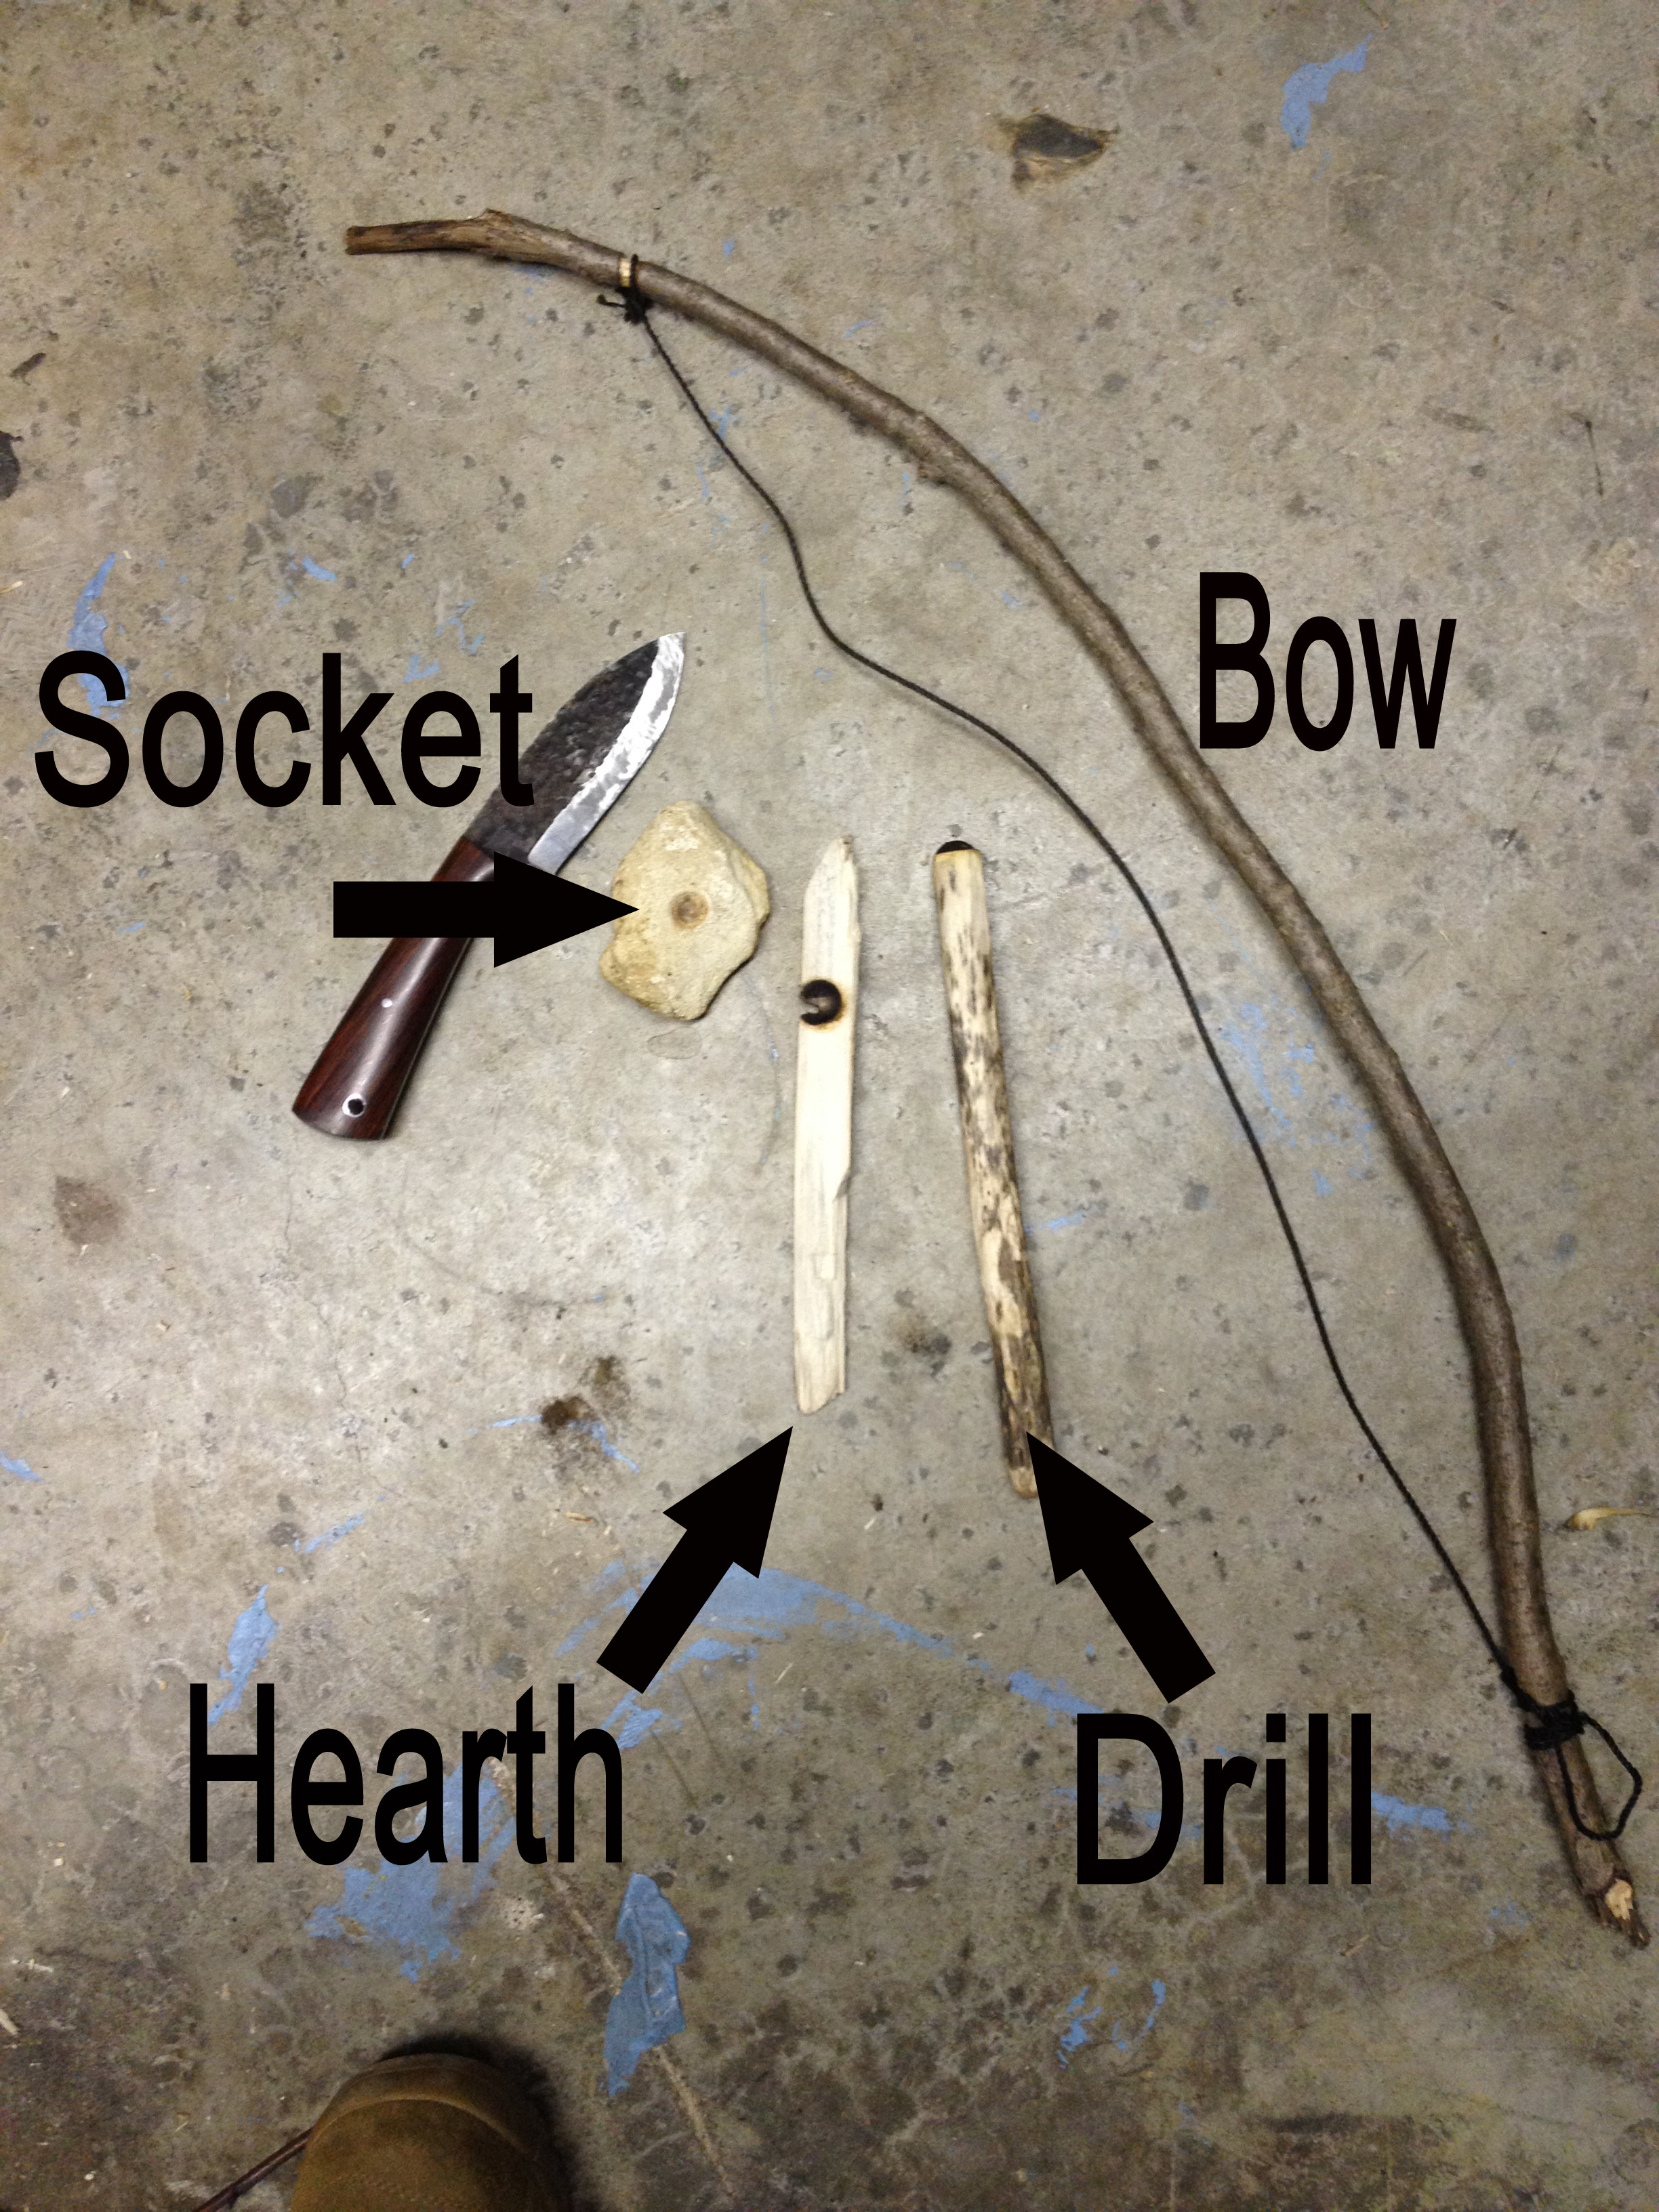
The components of a bow drill set are a bow, drill, hearth, cord, and socket (see figure 2). You want you make your drill and hearth from the same piece of wood that passed the fingernail test. Once we have found that sample, we use it to make our drill and hearth.
Bow Drill Set
A brief but important note: When you initially start out searching for your hanging dead soft wood, you should also collect tinder and lots of it. Soon our bow drill will be complete and we will make an ember. Once you obtain that ember, you want to make sure that ember becomes a flame. For this, we need tinder. So, collect dead, dry grasses, cedar bark, or similar material in your region that you can use to make a “bird’s nest”. The cedar bark and grass you want to roll around in your hands in a balling motion to allow the fibers to break down a bit. This will assist with the ember catching fire. Once we get an ember, we are going to carefully dump that ember into the bird’s nest and blow on the ember to obtain a flame. So, to be clear, when you think you have enough tinder, get some more. You can never have enough. Pro tip: If you collect dryer lint for tinder to keep in your BOB, lint that is derived from cotton can smother your ember and may significantly hinder making a flame. To be clear, cotton will burn well with a flame, but it can smother an ember. Now, back to the bow drill…
Ideally, we would like the wood for the drill to be as straight as possible. Finding a perfectly straight piece means you were very lucky. For the rest of us, we may need to carve on our drill in order to straighten it up. For the drill, I like the length to be approximately the size of my forearm (wrist to inner elbow; see figure 3). The width of the drill can vary, but I try to work with a piece that is close to the width of my thumb or index finger. This is nature, so approximates will make do. Cut off the desired length from the hanging dead, and begin shaving off any burrs or knots to smooth up the drill. Should your drill have some slight curves, you will want to eyeball a straight line through the drill and began shaving the wood with the goal of minimizing any curves.
Drill Length
Once you have knocked off the burrs and attempted to straighten the drill as much as possible, you will then want to shave a dull point at both ends of the drill. Note: Your ends do not need to be, and indeed should not be, like a spear point. Just shave off enough so that the ends taper, such that they are narrower than the shaft.
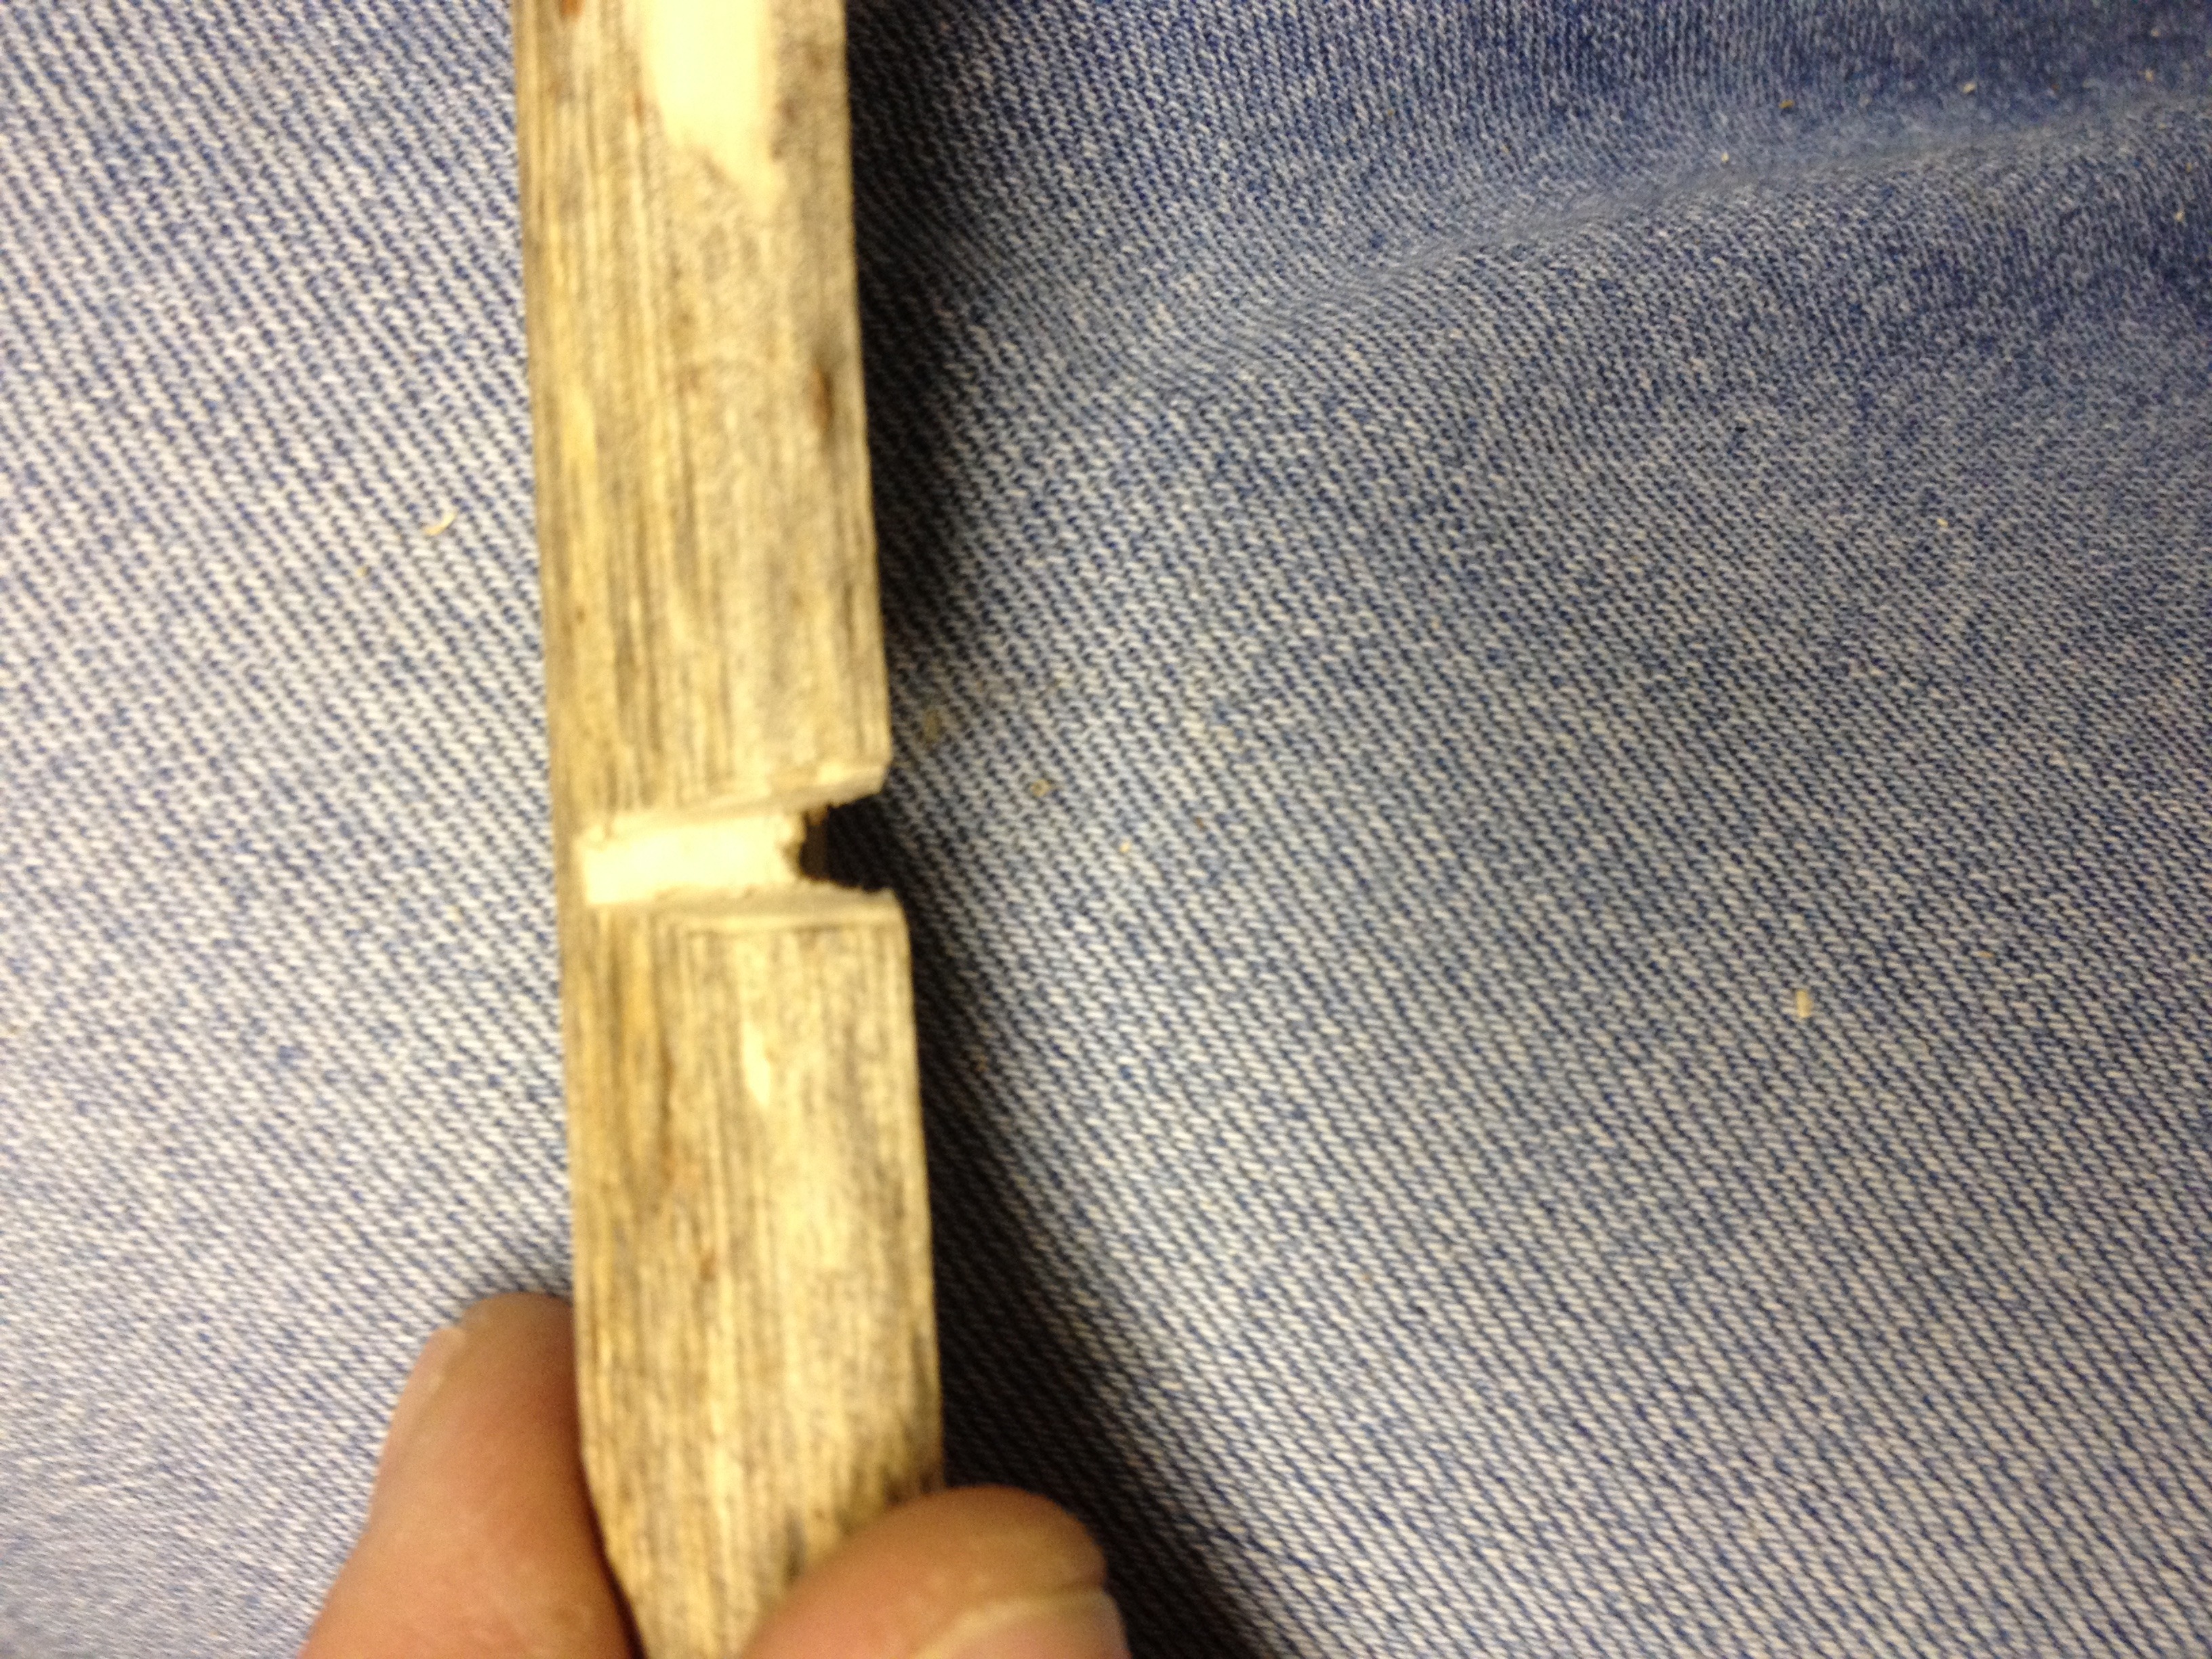
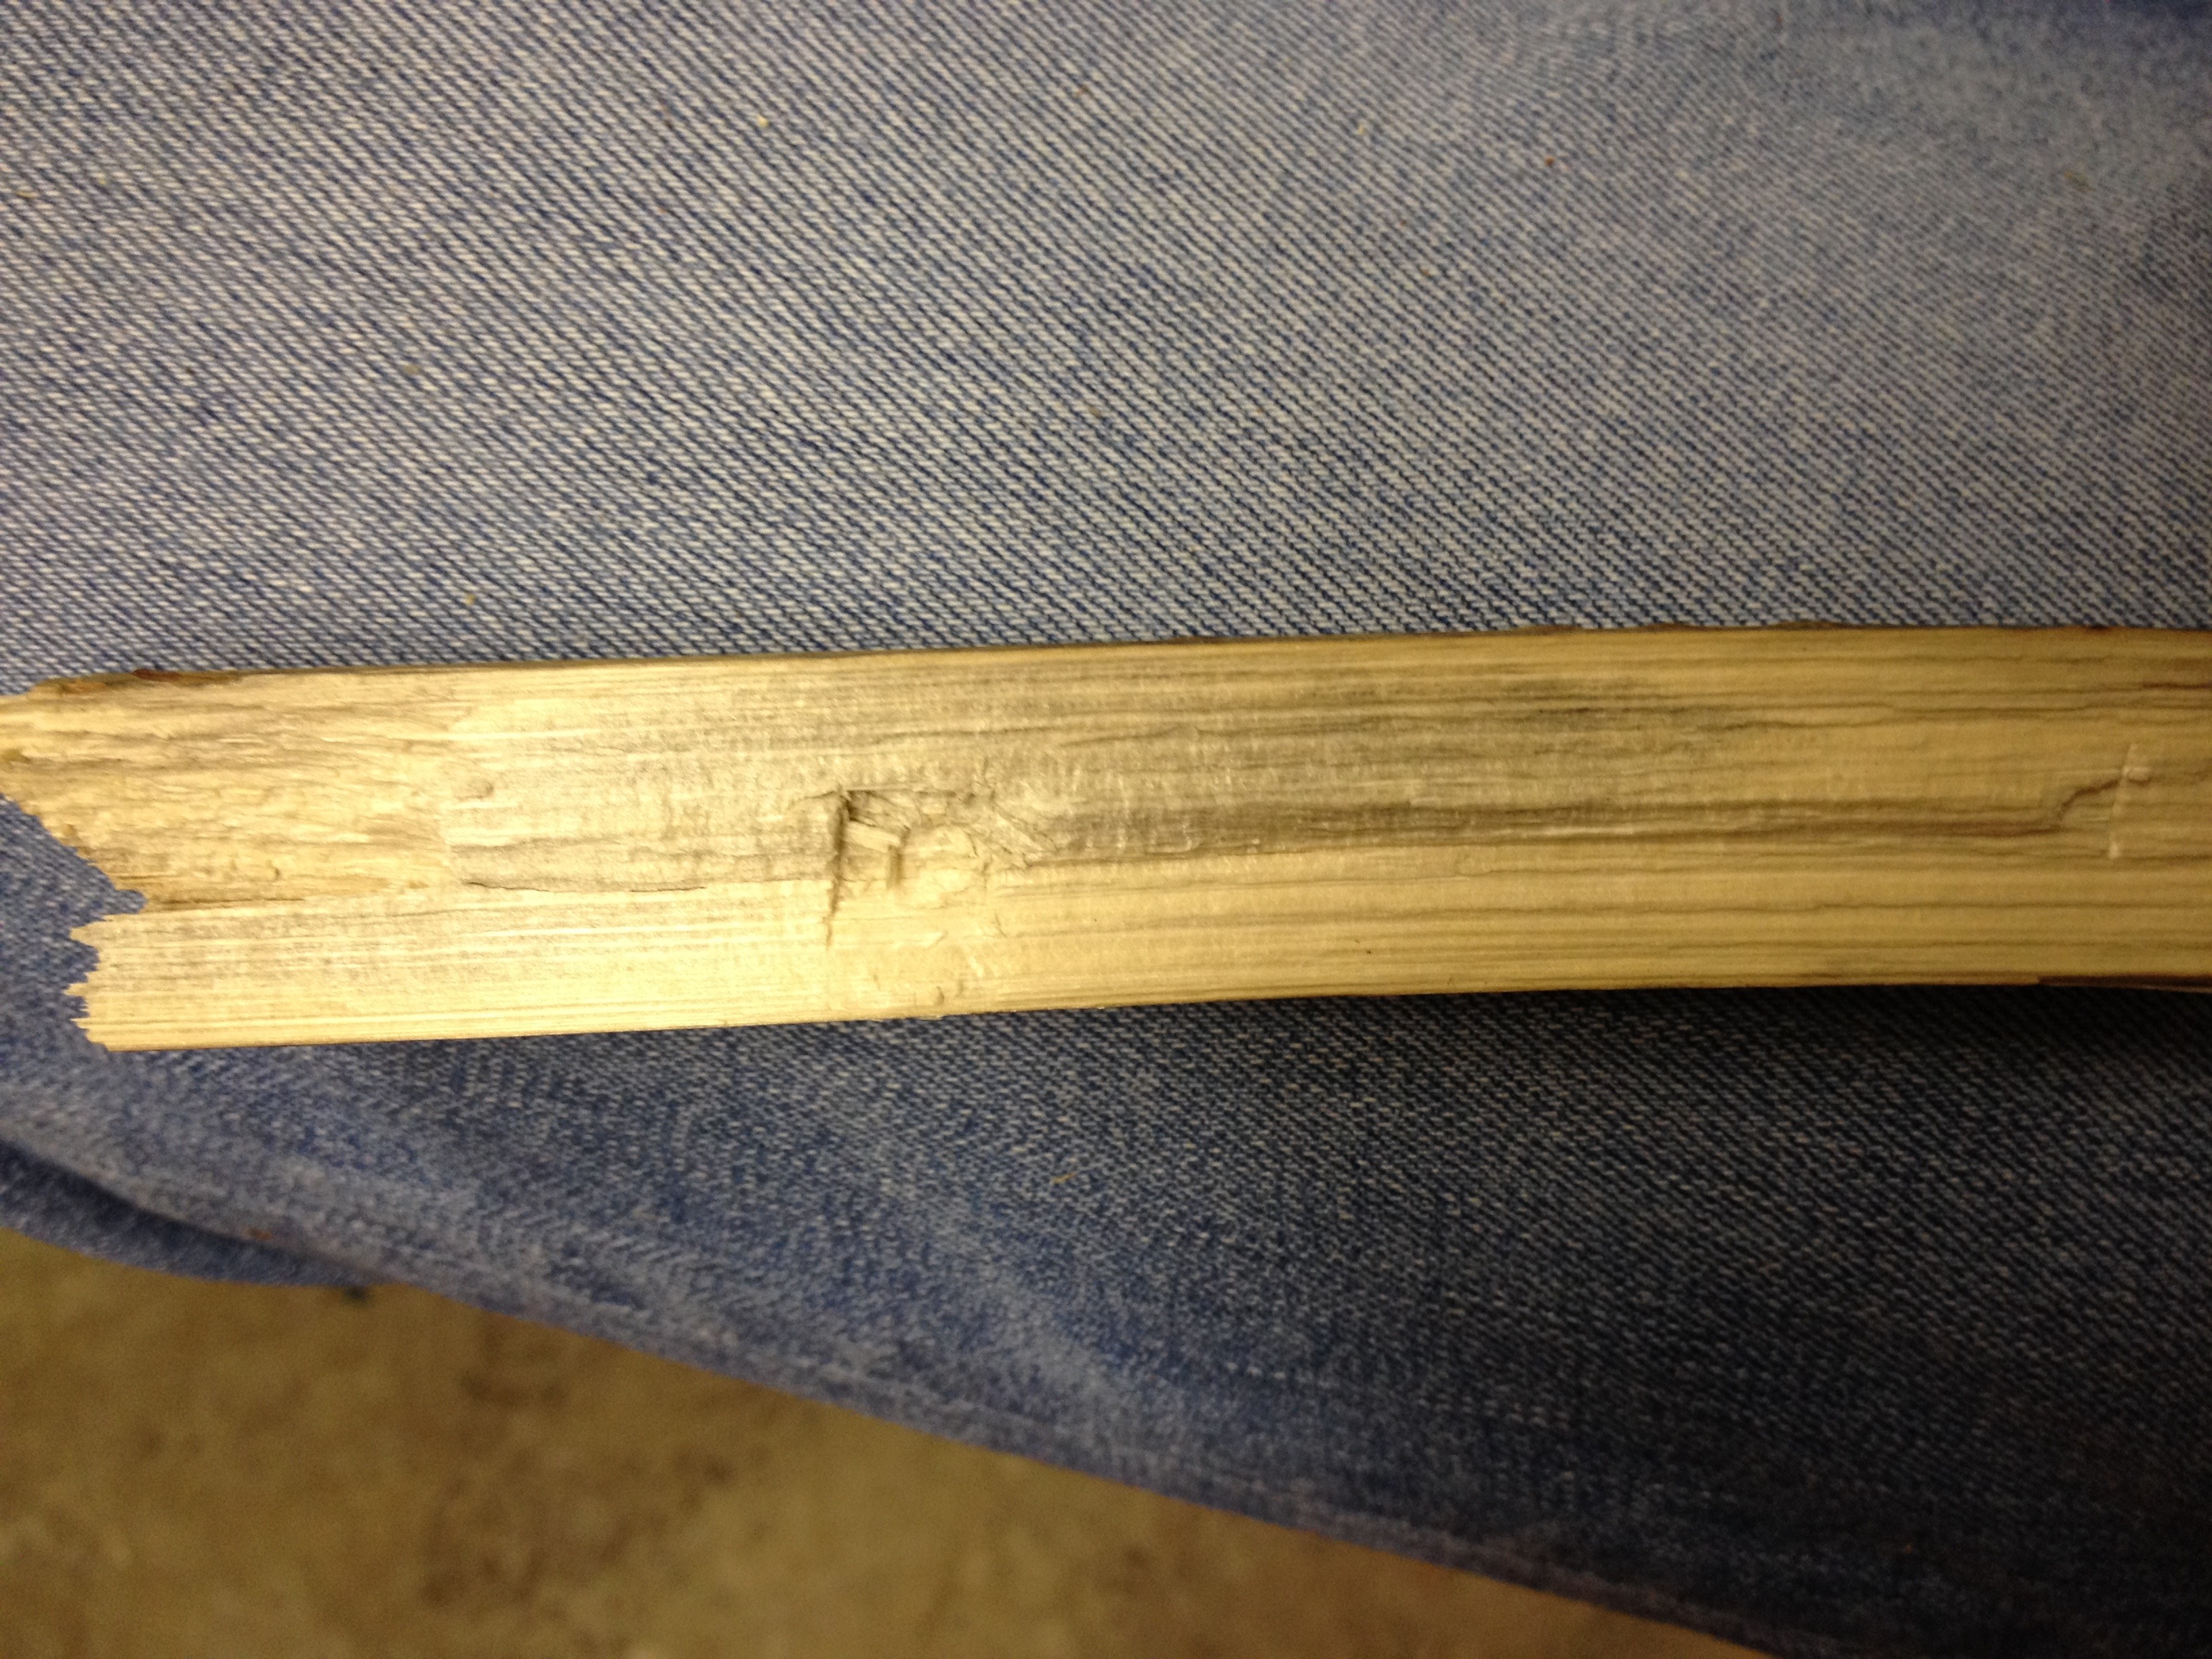
For the hearth, you want to take a section of your hanging dead (obviously not the drill) and split the piece in two down the middle. Take one section and carve a square into it and begin lightly carving out the square. This lightly carved out square is where your drill will begin to mate with the hearth (see figure 4). Without this square indentation, you may experience the drill slipping off the hearth during mating, which is very frustrating.
Hearth Square Notch
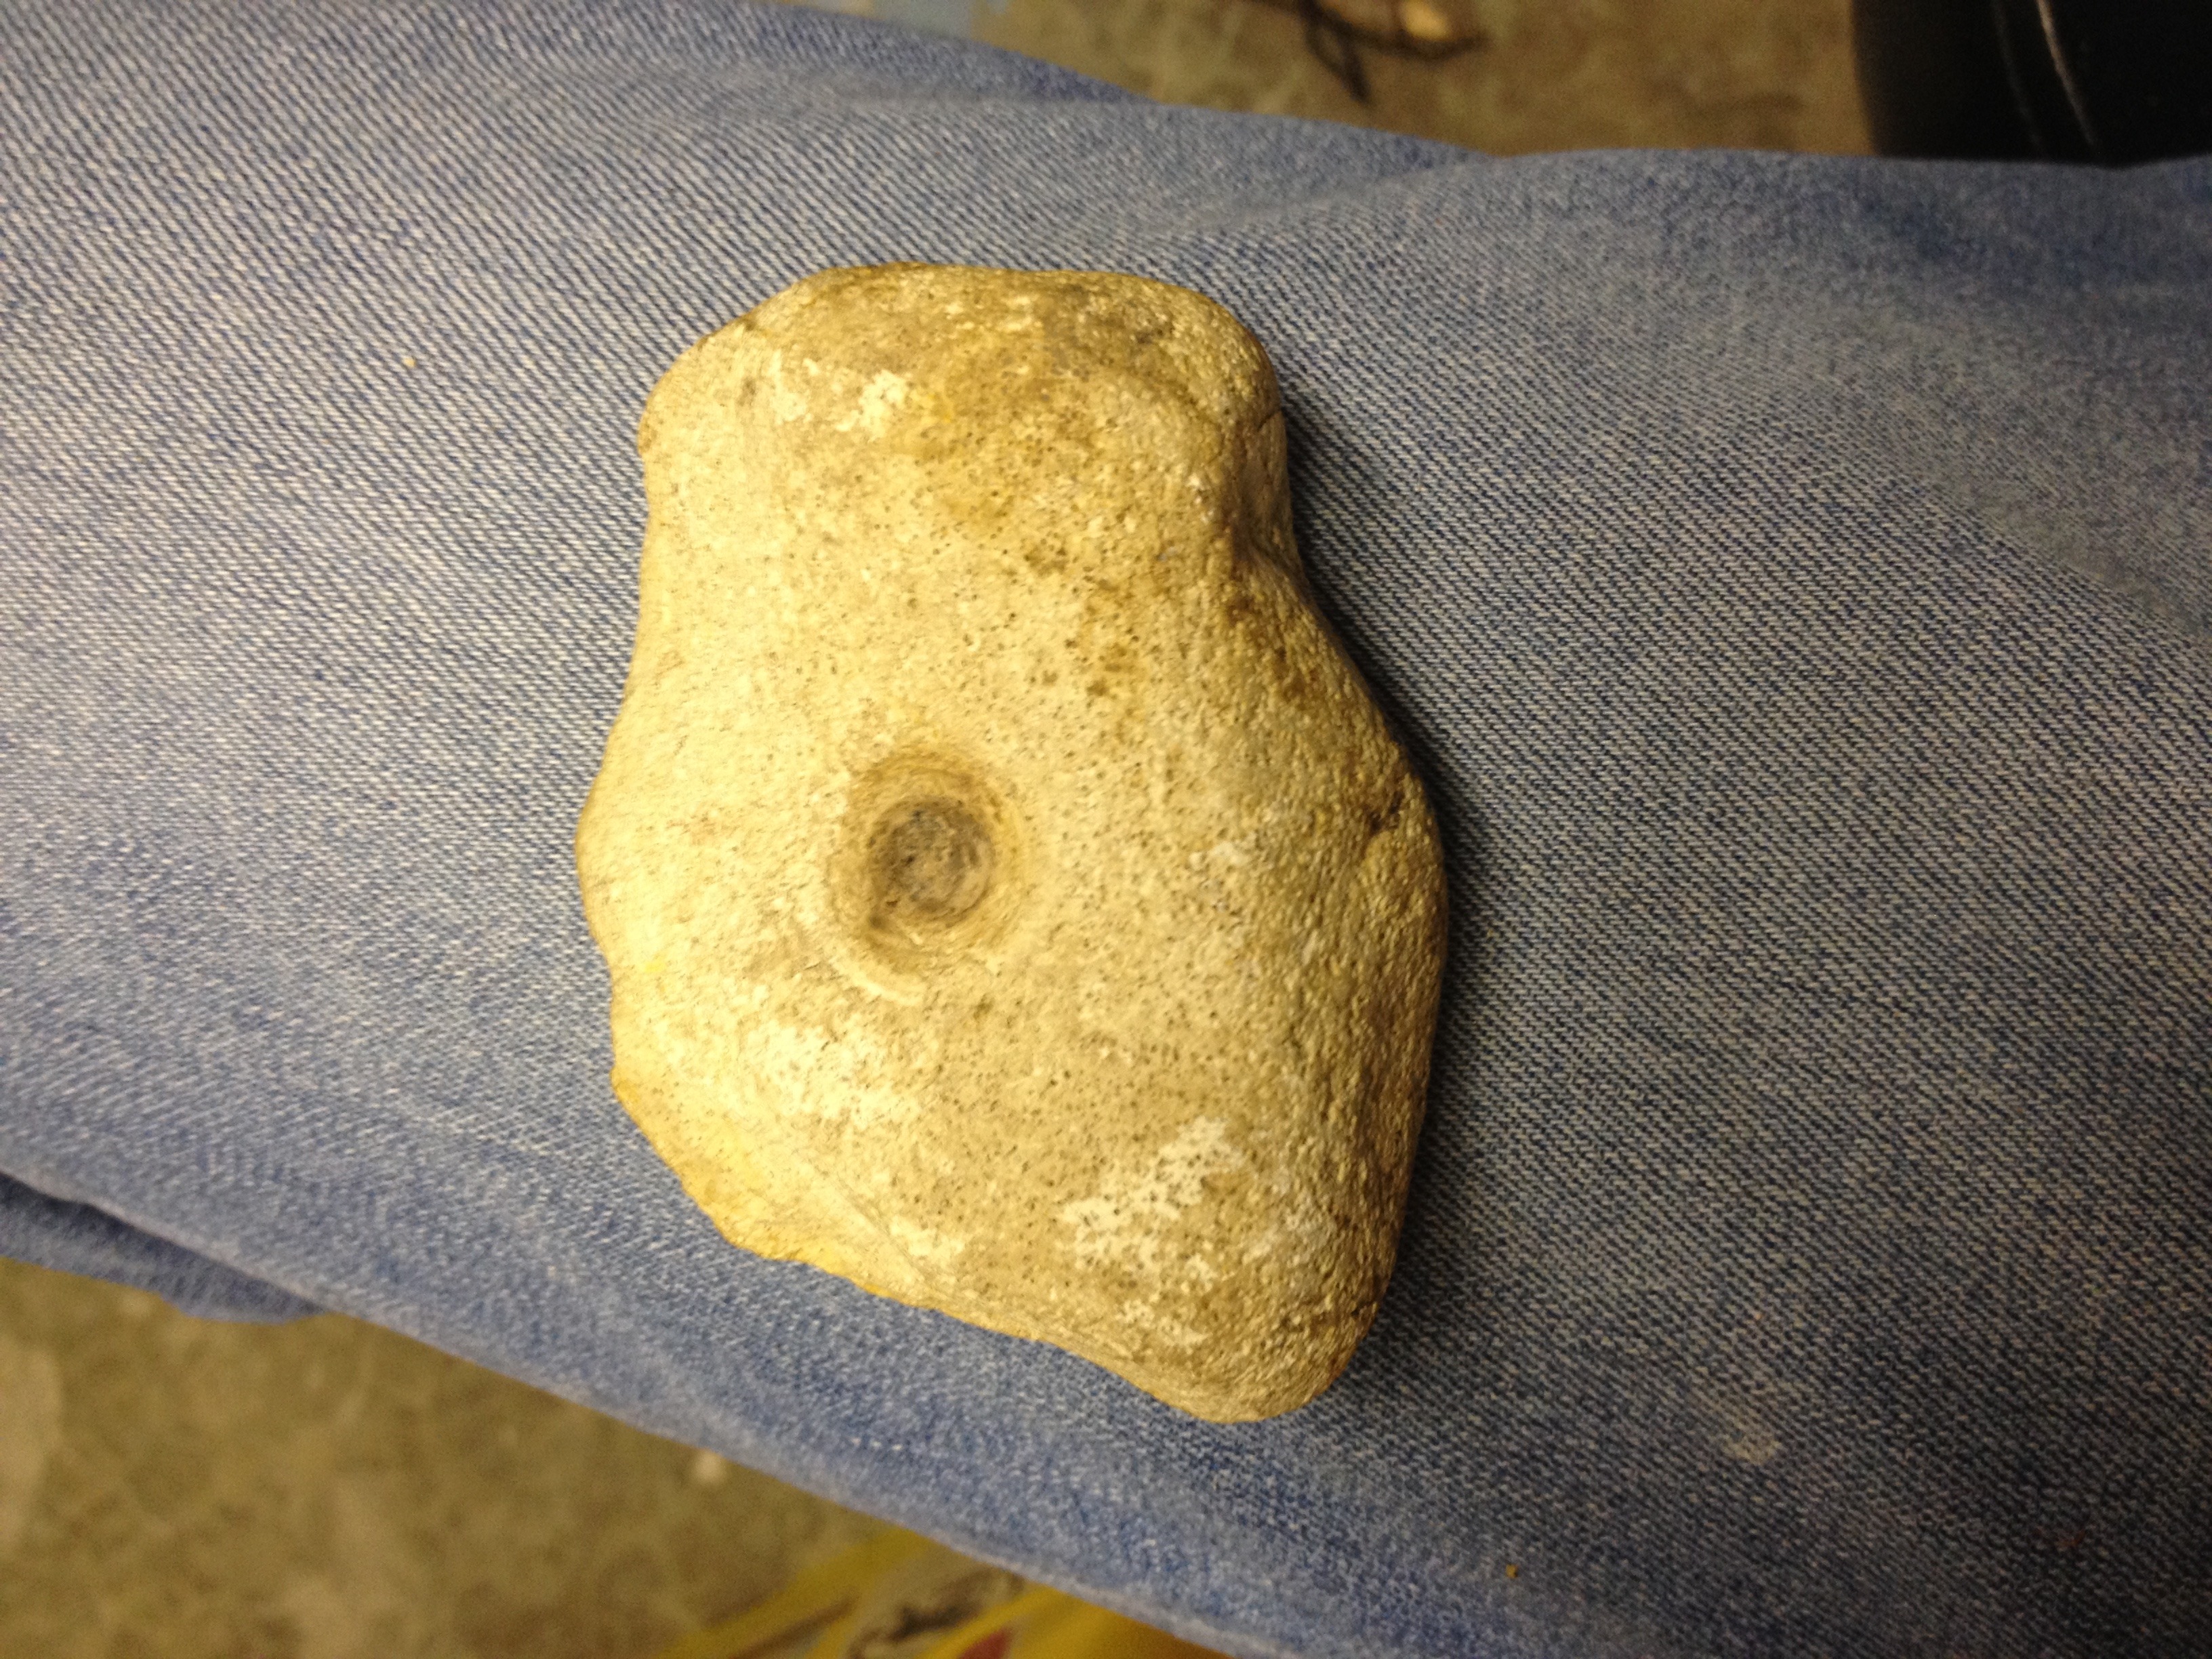
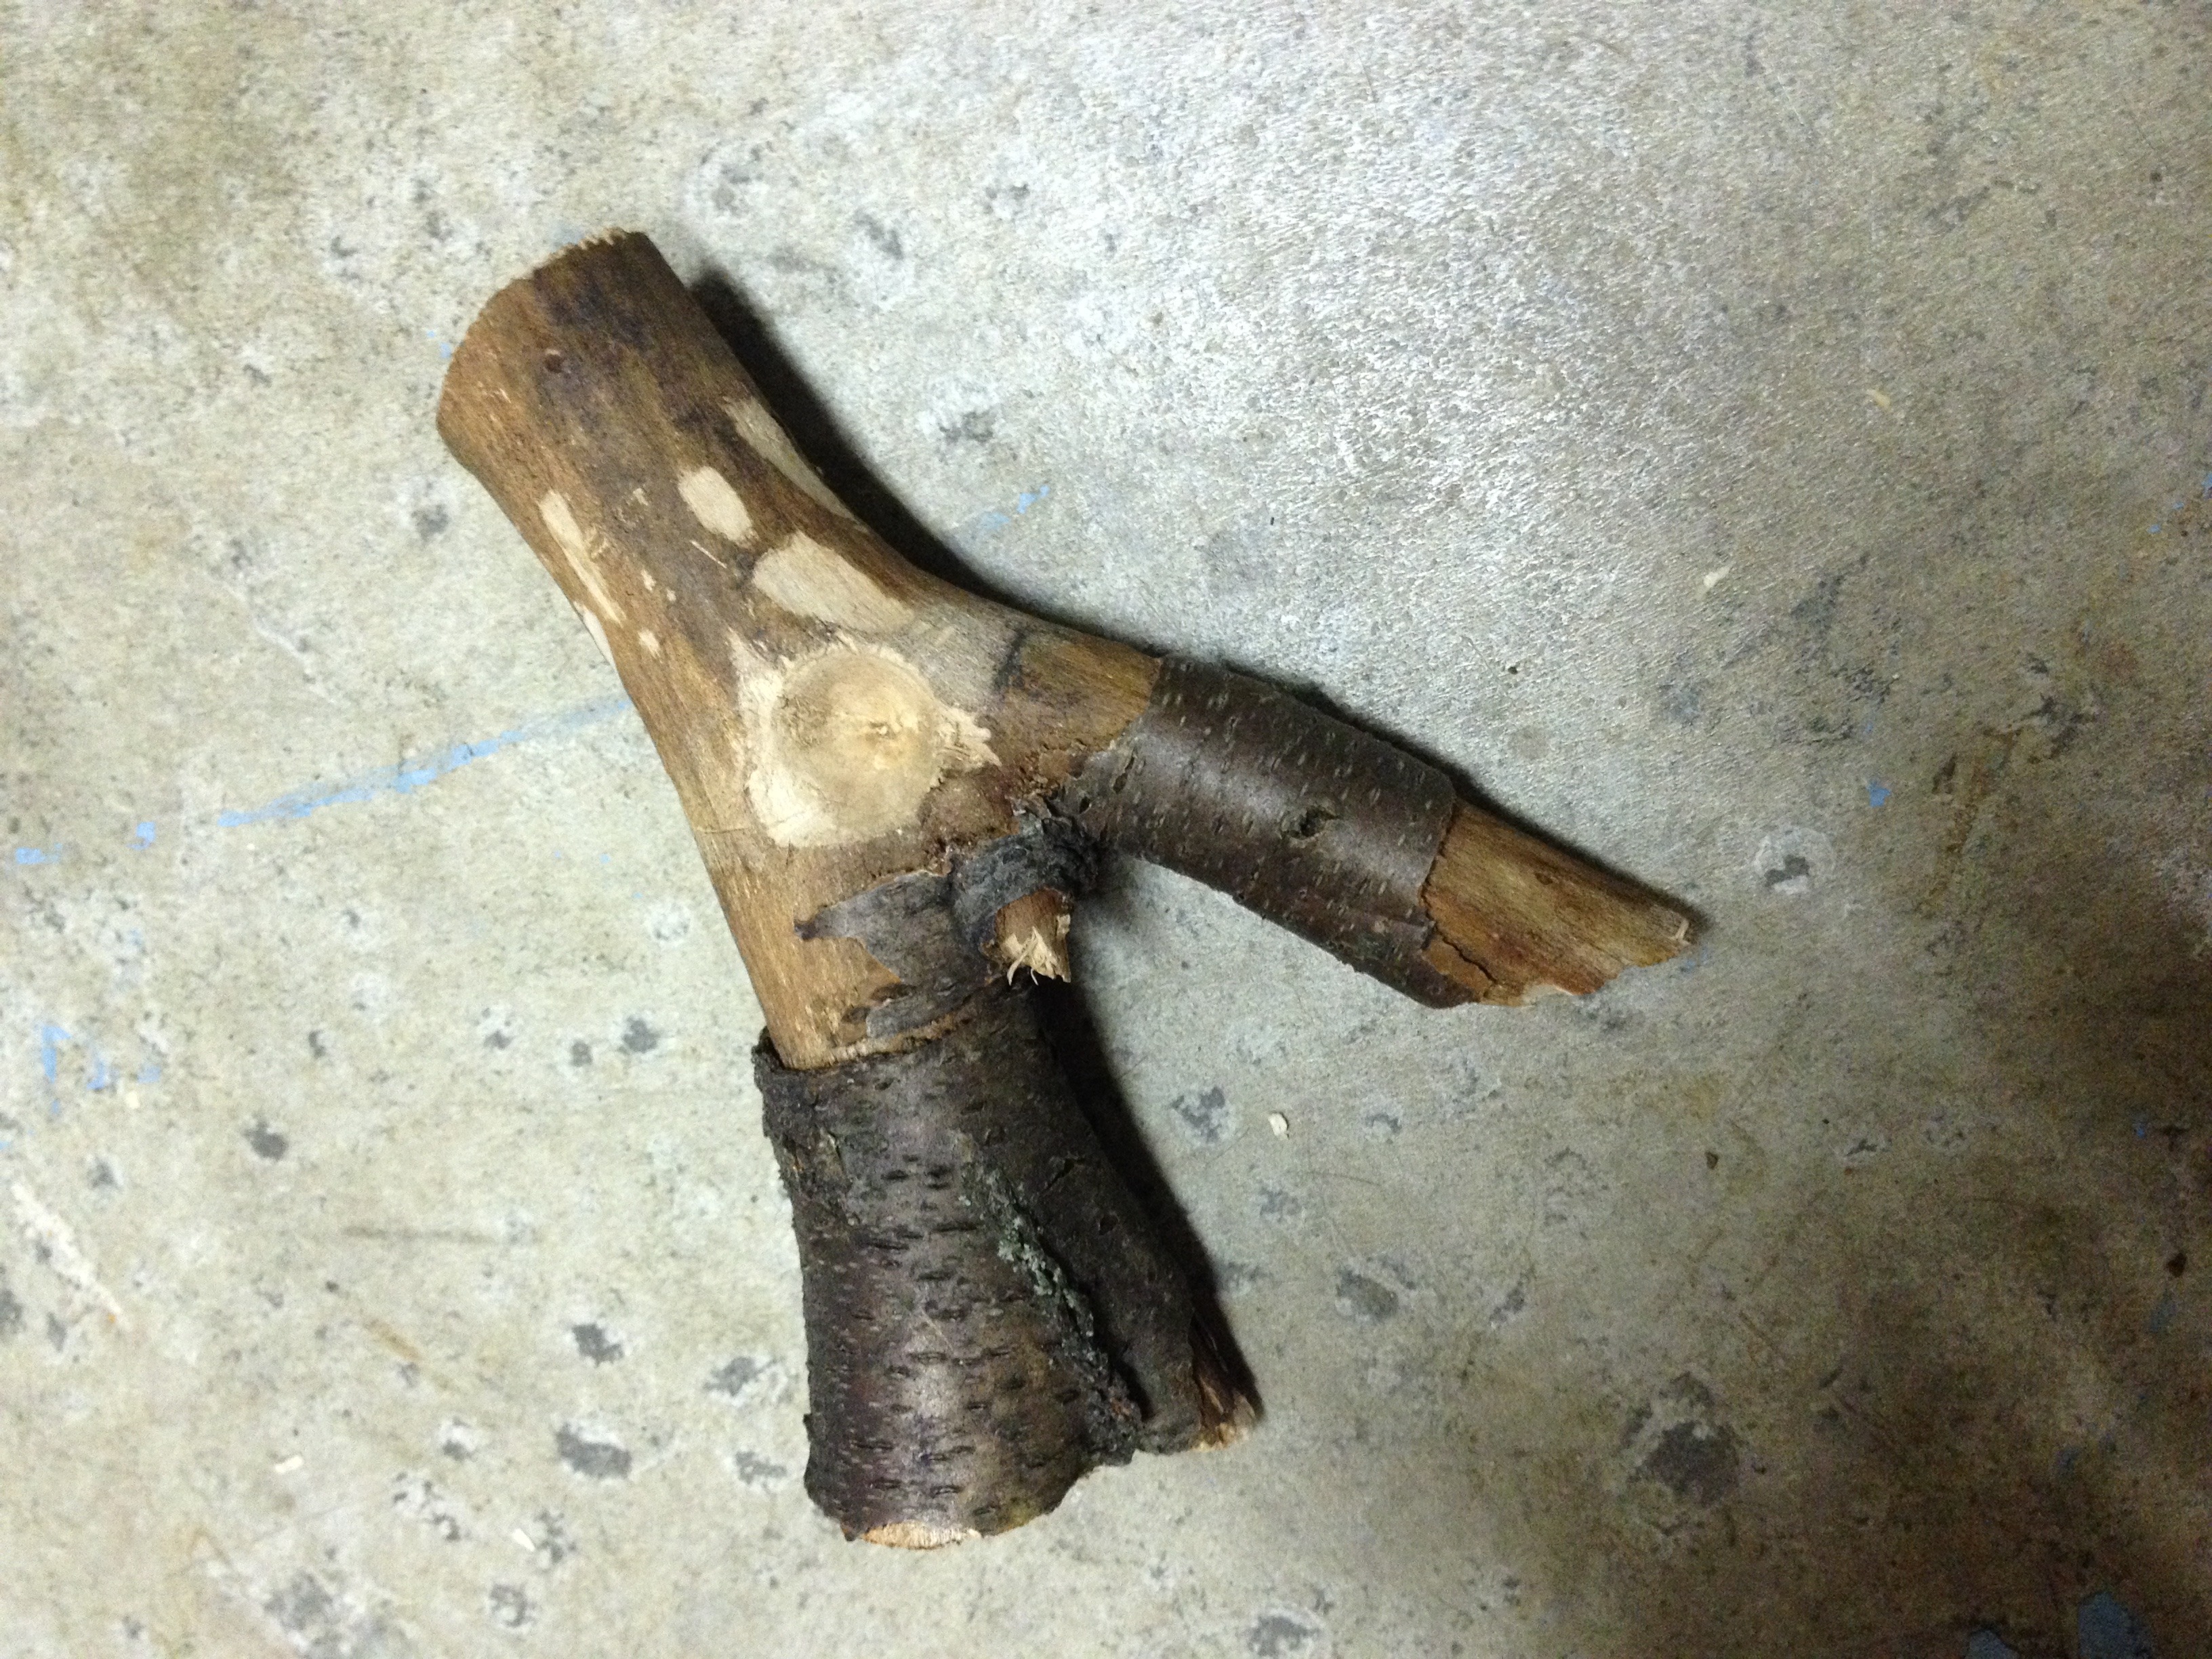
Next, we need to create our bow and socket. I prefer to use a sandstone rock for my socket, in which I carve out a little pocket for one end of my drill to mate to. However, if you are in a region that does not have sandstone, you can use a section of hard wood by using the “Y” of a branch. Carve out a little pocket for one end of the drill to mate to (see figure 5).
Sandstone Socket“Y” Branch Socket
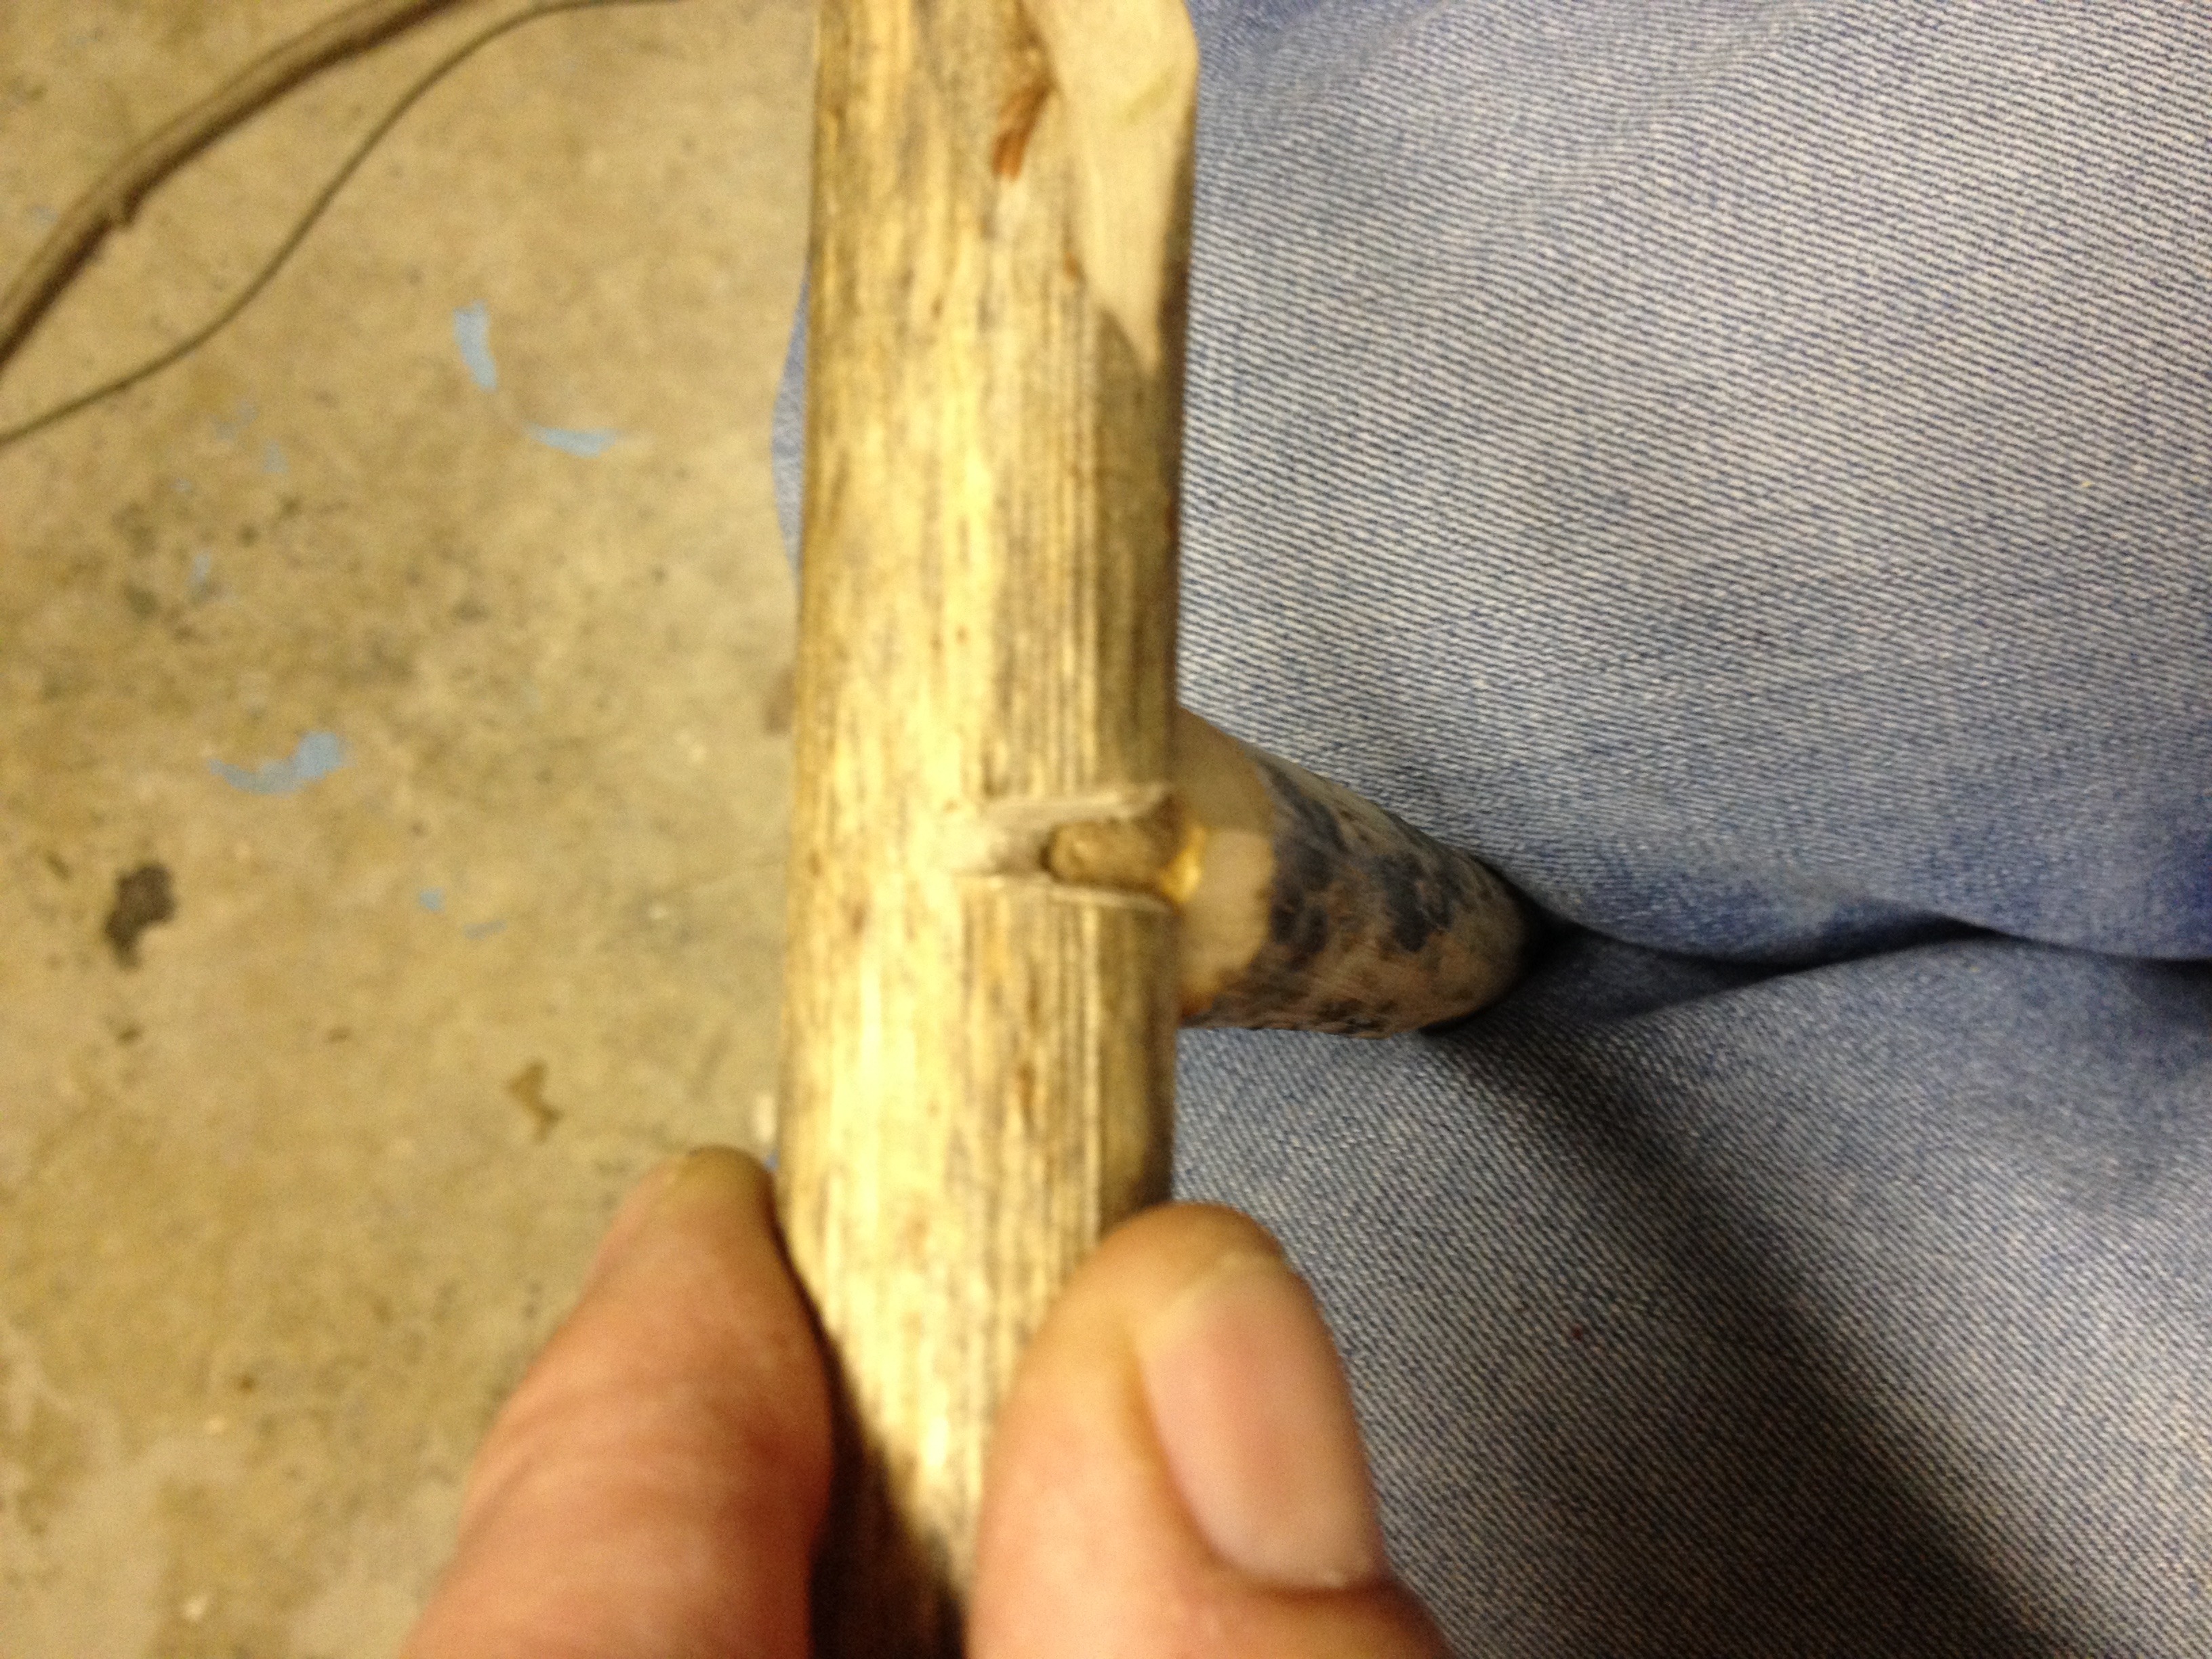
To make our bow, we are looking for a piece of wood that has a natural curve to it. This piece needs to be fairly strong, as weak wood will collapse under stress. To string our bow, you can use natural cordage, 550 cord, bank line, et cetera. Just about any cordage we can find will do. However, I have found 550 cord to be a bit too smooth. It begins to slip once you start applying speed and pressure to your drill. As such, bank line or similar cordage that is a bit rougher will contribute to your success. To string your cordage to your bow, you will want to carve out a small notch in the bow for the string to attach to (see figure 6).
Bow Notch
String your bow with a little slack in the line. You do not want the line to be too tight or too loose. If the line is too tight, once you thread the drill in the line, the drill will want to kick out of the hearth. This will create problems later in the process. If the line is too loose, you will not be able to get enough tension on the drill to spin it as we apply downward pressure. Play around to find the happy medium. Now we should have all the parts we need to make our fire, and it is likely you will have worked up a light sweat. Take the end of your drill that you plan to mate to your socket and rub it lightly on your nose, or rub your finger on your nose and wipe the oils on the end of the drill that will mate to your socket. The light sweat we have worked up will double as lubrication between your drill and socket. Do not lubricate the end of the drill that mates to the hearth. Remember, moisture is our enemy!
The correct posture is very important when working your bow drill set. As you place the hearth under your foot, you may need to lightly rotate your foot forward or backward, with the goal of making the hearth as level as possible. String your drill in the bow and place the drill in the square we carved in the hearth earlier. Take the socket in your hand and place it on top of the drill. You want to make sure that you lock your wrist in to your shin as you begin working your bow (see figure 7). Locking your wrist in to your shin really makes the difference between success and failure.
Locking Wrist to Shin
Take a knee on one leg and place your opposite foot on the hearth. Again, good posture is critical. Make sure that the knee you are resting on is out of the way of your bow hand movement. This is why we initially cut our drill to the length of our forearm, so as not to hunch over and get in the way of our bow hand movement.
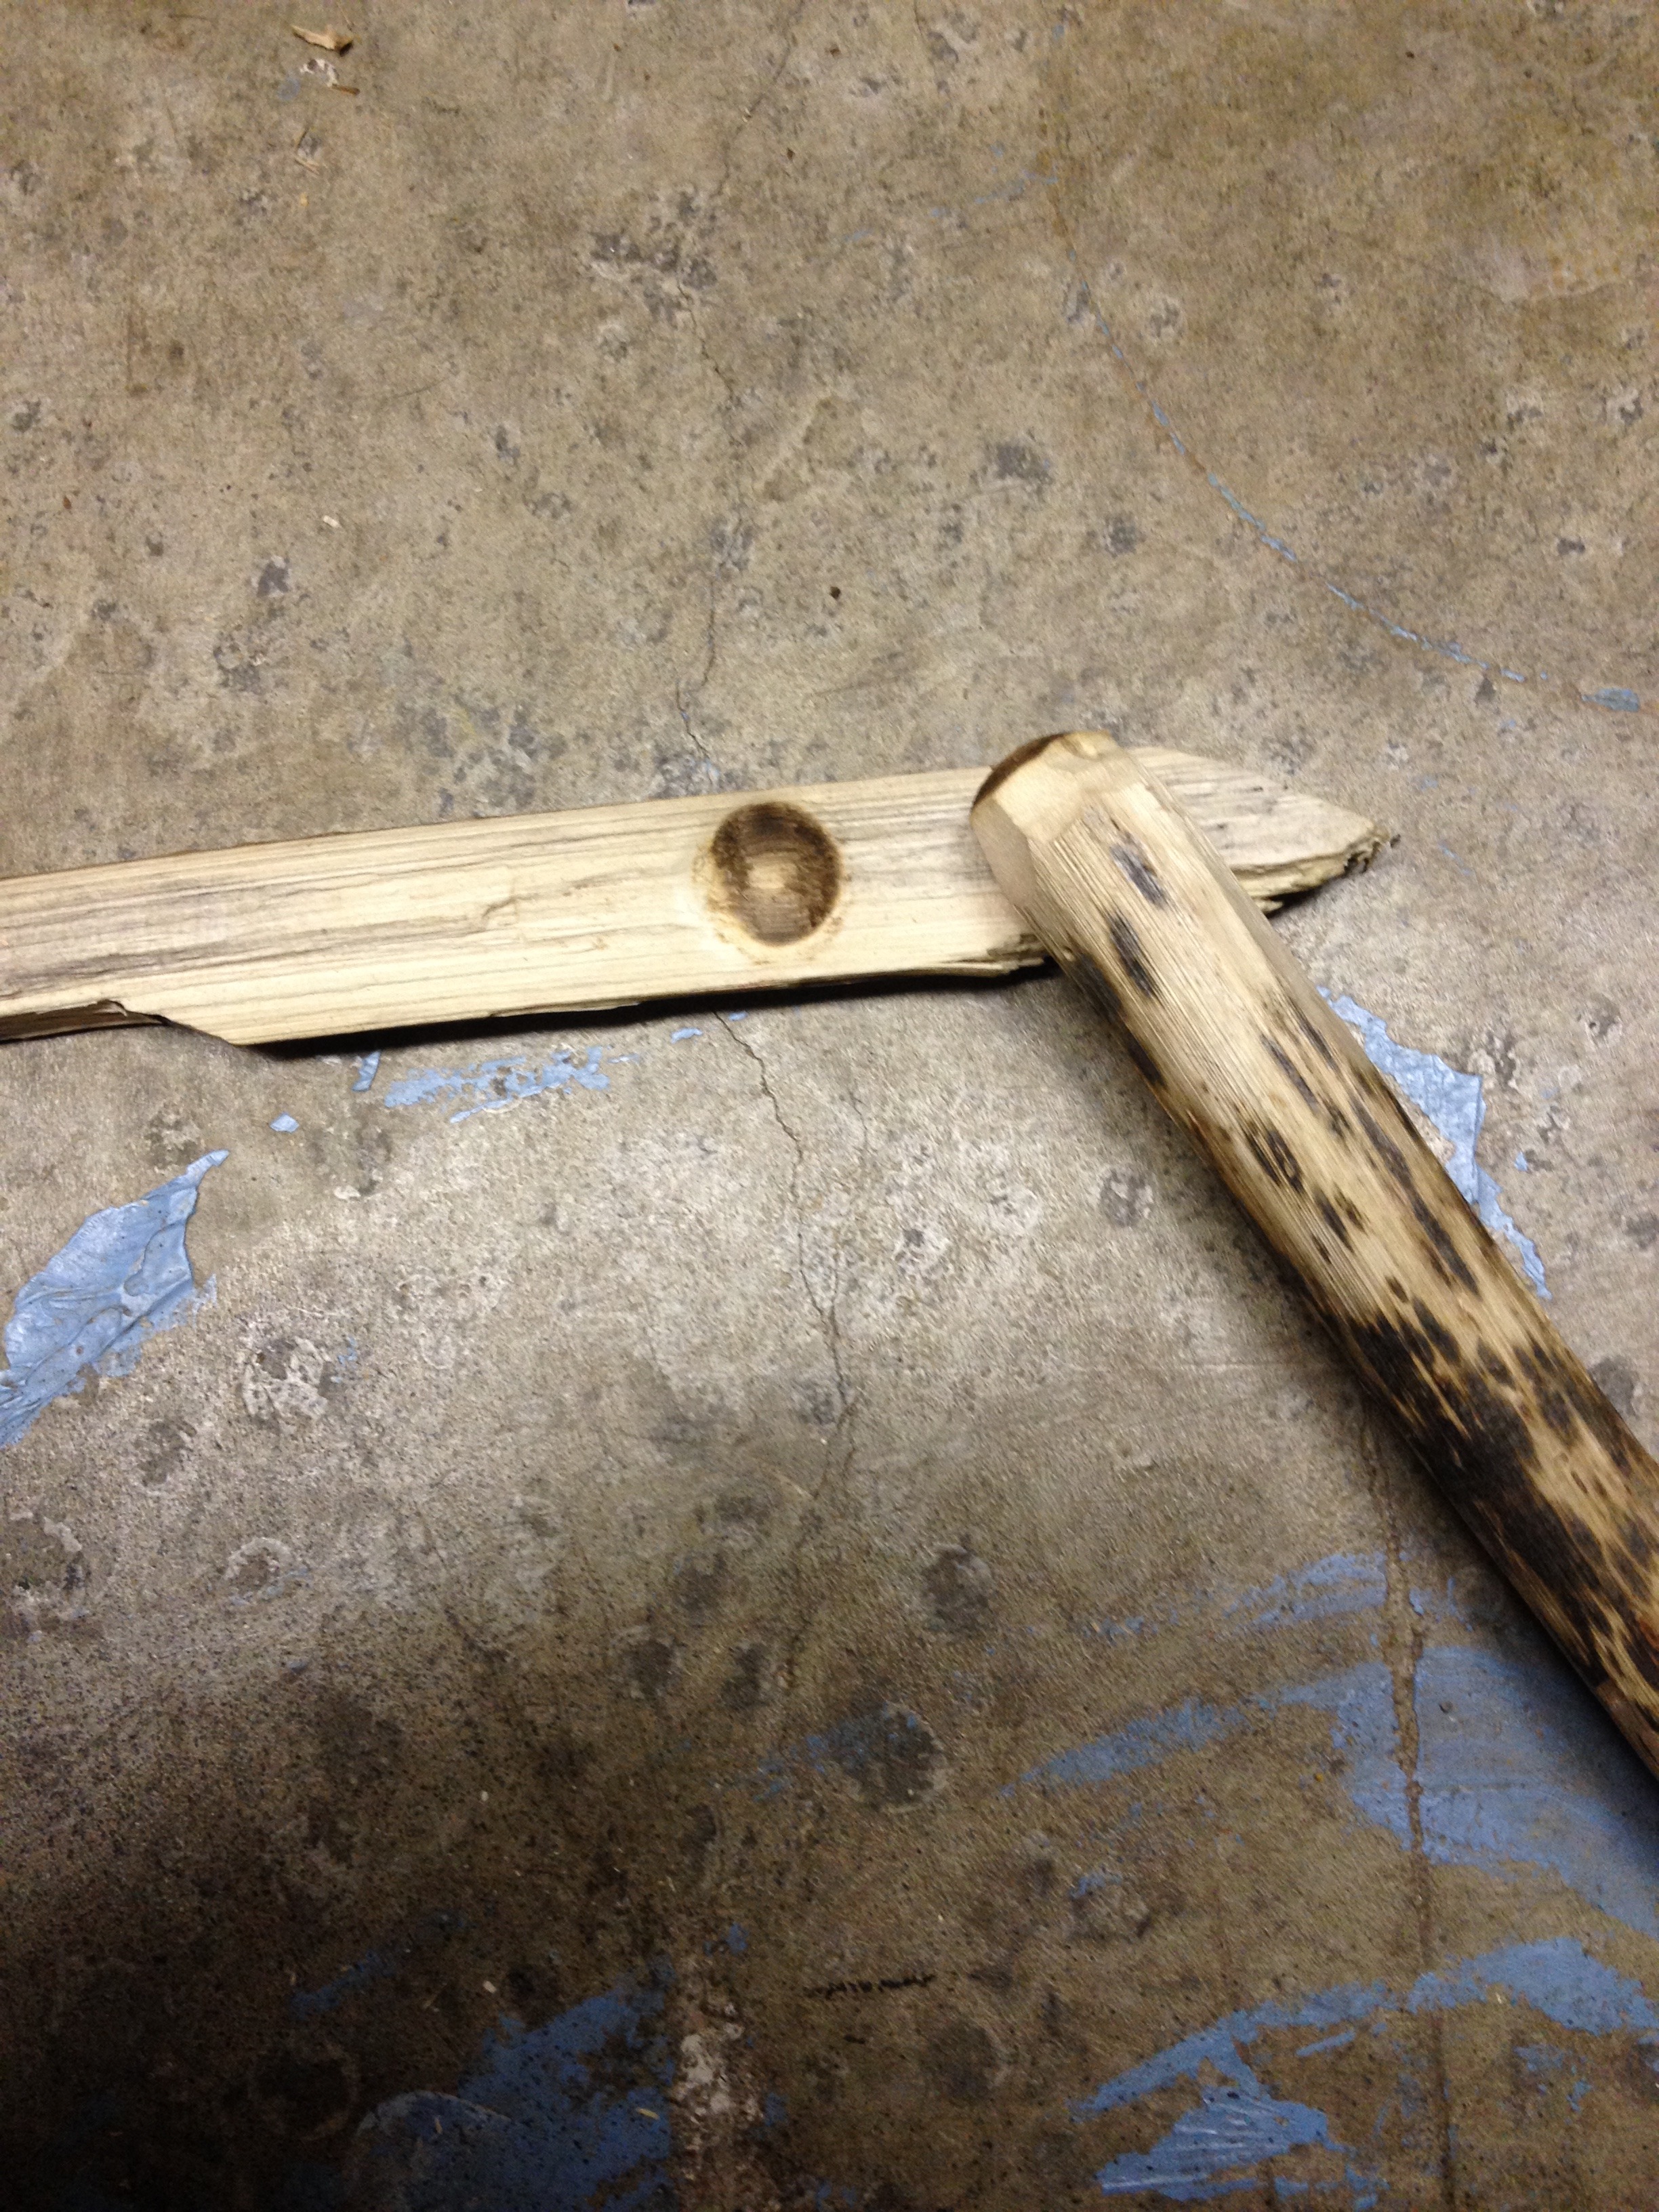
Once you are stringed up and in the proper posture, begin moving your bow slowly back and forth in a straight, horizontal line. You want to make long strokes and use all of the string. Moving your bow in a straight line is important, as that motion is what keeps the contact point of the string and drill from walking up and down your drill. You want to avoid the string walking up and down the drill as much as possible. The amount of pressure you apply with your socket hand is very minimal at this point. You only want to apply enough pressure to make sure the drill and hearth stay together. Slowly increase the rate of your bow movement. Again, use long strokes and all of the string that you can. Try not to use short, fast movements. Depending on your wood, a few seconds of applying the proper technique will have mated the drill and hearth (see figure 8). Once you achieve this mate, stop! Pick up the hearth and sit down because you are now going to carve our notch for the embers to fall out.
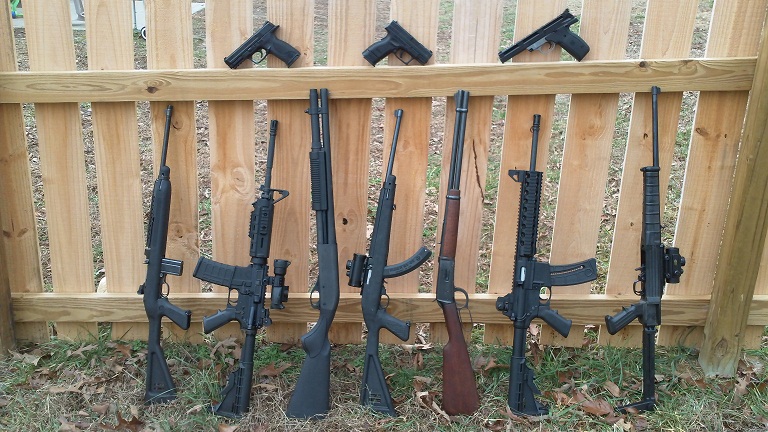
‘The Survival Battery’ is an entertaining read, but the writer has overlooked several vital concerns. For one thing, even the budget plan requires stocking nine different calibers. I also don’t agree with the mix of operating systems. It includes a mix of single-action and double-action revolvers, DAO and/or single-action semi-auto pistols, pump shotguns, bolt-action rifles, air guns, and modern semi-auto rifles.
Maintaining proficiency with all these systems will be very difficult. In a SHTF situation, every-day and “social” firearms should be the same. Just don’t expect a handgun to do a long-gun’s job. Shoot the bear with your rifle/shotgun. You did bring it, didn’t you? Or do you always drive screws with a hammer?
A 4” DA service revolver in .357 Magnum is an excellent entry-level handgun. It shoots .38s for training and heavy loads when needed. Revolvers are more tolerant of variations in ammo and may be less intimidating for new shooters. Glocks are reliable and readily available on the used-gun market. Government agencies are selling off their .40s at good prices, but 9mm and .45 ammunition may be easier to come by. Find a holster you can wear all day, every day with comfort, whatever you are doing. Stock up on speedloaders and magazines.
Skip the air guns and the .22 pistol and go right to a rifle. The Ruger 10-22 is hard to beat. Magazines are rugged and affordable. Buy lots, both 10- and 25-round. It’s also hard to fault the Remington 870 unless some of your people are left-handed. Then the Mossberg 500, with its tang safety, comes to the fore. It’s cheap and looks it, but it works and accessories abound. If cheapness bothers you but you need ambidexterity, look at the Browning BPS. All long-guns need slings.
The Remington 700 in .308 is a capable platform. No argument there, but it might be well to have an M1A in the mix. I also like what I hear about the Ruger Precision Rifle. M1A magazines work in it. Buy quality mags, like Checkmate. Good AR-15s are accurate and easy to handle. They accept an unmatched array of parts and accessories. Just remember, .223s are not .308s. If you can’t have both, go with the .308. Leupold and Burris scopes are excellent, but don’t skimp on mounts and rings. Buy all-steel, the best you can. Look into Trijicon scopes and sights. Consider NV instead of, or in addition to, suppressors.
On that note, don’t over-buy. Just because you can afford a Barrett doesn’t mean you need or can use the extra range and power. Can you shoot well enough to justify a $2500 Les Baer, or would a $700 Springfield Range Officer do? Invest in extra parts, magazines, and ammunition for guns that match your situation and ability. Invest in professional training. Shoot often. Confidence is part of your weapons system!
So: .38/.357, 9mm or .45 ACP for handguns, 12 gauge shotguns, 22 LR and .308, which is four calibers instead of nine. Add .223 if you must. Standardize on revolvers, DAOs or 1911s, but standardize. I sold the best handgun I’ll ever own, an HK P7M8, because I have Colt/Browning reflexes. Remington 700s for the bare-bones budget, maybe M1As and a Ruger PR if your wallet allows. – Randy in Maine
Zika, ZIRP, and NIRP Viruses “What if we think of ZIRP as a financial virus, created and distributed by the central banks, that infects pools of savings?”
Time to Ditch Retirement? Global Leaders Confront an Aging Population (The Fiscal Times) Commentary: Although this article focuses on changing norms,, which are an important part of the overall picture, much less attention is paid to the “expense” of longer, healthier lives beyond a stream of income.
IMF: Demographic Catastophe Undermines World’s Economy (The Strategist) Commentary: Demographics have extraordinary implications for economic conditions around the globe including resource allocation, which is central to the study of economics.
Animation: Japan’s Aging Population (Visual Capitalist) Excerpt: “In the background, and even more important, is Japan’s lingering demographic crisis. The country’s population is projected to fall from 127 million to 87 million by 2060, at which point more than 40% of the population will be older than 65.”
Personal Economics and Household Finance
Economics in a Box: A 16-Week Economics Course (Economics in a Box) Although I have not had the opportunity to review the product content, this program is intriguing. For all homeschooling families, I highly recommend a significant emphasis on economics across all ages, and I encourage you to explore this program in addition to others that may be of interest in your lesson planning. The Cato Institute also offers a brief commentary on one of the titles included in the core reading materials: Money, Greed and God: Why Capitalism is the Solution and Not the Problem by Jay W. Richards
o o o
SurvivalBlog and its editors are not paid investment counselors or advisers. Please see our Provisos page for details.