


Outdoor ovens have a very long history of use, compared to the modern gas and electric indoor ovens of today. The fuel for outdoor ovens is practically endless (depending upon where you live) so for those preparing to survive the end of the world as we know it (TEOTWAWKI), an outdoor oven is a perfect addition to the retreat or homestead.
In England in the early 1600s, wealthy landlords would have ovens built and would sometimes charge the peasants to use the ovens. It was common in history for bread ovens to be shared by a community. We need to consider that bread and ale were the major sources of food/calories through much of history for many people. It would probably not be a stretch of the imagination to think that, at some point after TEOTWAWKI, ale and bread could once again become the staples that feed people. An outdoor oven is not just a resource to help you and your family survive but also a possible source of “revenue” by renting out its use.
The first time I saw a wood-fired oven in action were the clay ovens at Williamsburg, Virginia behind one of the functioning restaurants. I noticed one of the period-clothed reenactors tending to the oven and I stopped to chat. They use these clay ovens to actually bake the bread for the restaurants. My family was not as enthusiastic as I was about learning about a “pile of dirt”, but perhaps talking about an outdoor oven for an hour may have been a little extreme. That one-hour chat kindled a fire inside me to learn more about outdoor ovens.
I started watching videos on YouTube and the most memorable was one at the J. Townsend and Son channel about making a clay oven.
I considered making a clay oven at first but I had concerns about its longevity. I would probably have to build a shelter over it to protect it from the elements. At that point I started to consider a brick oven, but there was one problem, I am not a mason by any stretch of the imagination. Laying a brick horizontally did not seem too challenging but the arches I was seeing in most designs was putting me off on the idea. I also saw a few videos of arched brick ovens fails so I really did not want to go down that route for my first try as a bricklayer.
Many of the oven designs I saw had sand used as a form. I decided to use a stainless steel form that would support the brick. My reasoning why was that regardless of my job laying bricks the oven would not collapse in on itself. I drew up a drawing with dimensions making sure that the opening would allow me to put in and take out good-sized pizza and cast iron pans. The second problem is that I’m not a welder.
I found a very local fabricator who enthusiastically took on the job. With the box being fabricated, I needed to start to build the base. I did some rough calculations to try and determine what the weight the oven would be. I was shocked at the weight (or perhaps I’m just not good at math). Either way I came up with a weight of over 1,000 pounds. The base would need to be very stout. I sunk four 6×6 Timbers into the ground. Then I built a form for the cement to sit onto of the 6x6s. The cement slab is about 5” thick with wire mesh to help reinforce the strength. The slab is 53” by 53” by about 5” thick. I centered the stainless steel “burn box” on the cement slab and the started to add my first course of bricks.
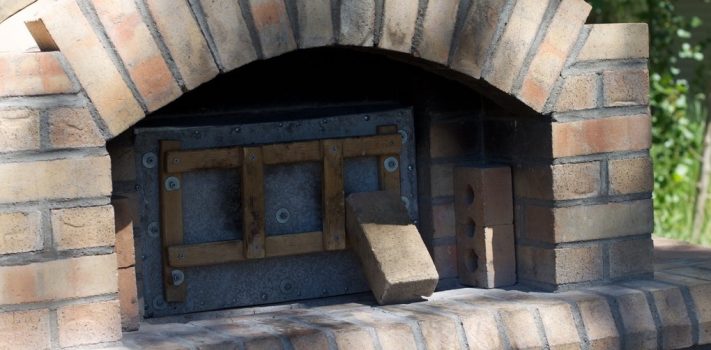
For my first course of bricks, I used firebrick since this layer would be subjected to the highest temperatures. The fire brick can withstand temperature of up to 2,400 degrees Fahrenheit. I also used refractory cement that is also designed to withstand high temperatures. After the first course of firebrick I then used regular clay bricks. I almost used a different brick (cement) until I started to do some research and found that the cement bricks, made for landscaping, can hold water and expand violently when heated up quickly. The standard clay brick can withstand temperature of around 1,600 degrees Fahrenheit. I laid three courses of brick around the main firebox and two courses around the entrance.
On the inside, I laid the the thinner (4.5” x 9” x 1.25”) fire brick on what would be the bottom of the oven and one course of brick around the inside bottom (I did not line the whole inside with brick). For a door I cut a piece of slab wood to fit inside the entrance. I also added a chimney to the oven using 3” diameter stainless steel exhaust pipe which was bolted to the stainless steel firebox. I was not sure if the chimney was a good idea or not, and I think the jury is still out on that. My thought was it would be easier to cut the chimney off and plug or modify than it would be to try to add it after all the brick was laid.
Unlike the reenactor at Williamsburg, I wanted a better way of determining the temperature inside the oven. The reenactor told me if you put your unclothed arm inside the oven and the heat was so hot that you could not keep your arm inside for a count of 10, the temperature was too hot to bake bread. If you could keep your arm inside for the count of ten the oven was ready. I decided to buy 2 stainless steel oven thermometer to get a better idea of the temperature inside.
I had several outdoor oven experts, who between them all, built a total of zero ovens, tell me that my oven was going to “explode”. I asked these “experts” about the materials used and they did not know but did convey that these exploding ovens were built by “professionals”. Glad I didn’t go with a professional. My initial firing of the oven was done by building a small fire inside the firebox. I used hemlock slab wood I got free from a local Amish sawmill. I sold the Amish owner 3 piglets and for a better price he agreed to give me slab wood whenever I wanted it. On most of the slab wood I tried to remove the bark which normally fell off when I was splitting the wood into smaller pieces.
I chose hemlock for two reasons, one the price was right and two it would not burn as hot as hardwoods like ash, oak or beech. I noticed some steam coming off the oven which means I needed to seal the top and side with sodium silicate (aka water glass) to help keep the water out of the structure. I started the first fire at about 8:30 pm and fed the fire for one hour. At 9:30pm I stuffed the firebox full and went to bed. When I work up the next morning to feed and water the livestock the outside layer of clay bricks was still hot to the touch. Unfortunately, I had not yet put the thermometer inside so no idea what the temperature inside was. The next time I use the oven, I plan on monitoring the heat levels of the bricks with a laser thermometer.
The first bake was on July 1st for our annual Independence Day celebration. I started the fire at noon. I made two pizzas. I placed the dough on a Lodge cast iron pizza pan, added the sauce, cheese, and pepperoni/ I placed the first pizza in the oven at about 6pm with the temperature inside the box reading 430 degrees F. I set my timer for 9 minutes and pulled the pizza out with the pizza paddle that I had the foresight to purchase so I was not burning myself. The crust on the side opposite of the entrance was well done (some rude people claimed burnt). But the cheese looked fine so the wife cut away the well-done crust and it was gone almost instantaneously.
The Lodge pizza pan was great but getting it out was challenging. I used some silicone oven mitts to grab it out of the oven so I could start making pizza number two. Of course, I managed to touch the metal but nothing more than a first-degree burn. I assembled the second pizza and put it back inside the oven. Unfortunately, when I took the first pizza out I never replaced the door and the temperature had already fallen to about 250 degrees. This time, I turned the pizza around about every three minutes to avoid any ridicule from my rude guests. Even with the thermometer reading 250, the pizza was done in about 9 minutes and I took it out using the pizza paddle and served this spectacular specimen of Italian cuisine. This time I managed to even get a piece.
Overall the project is a success. As with anything, practice will just make the end result even better. I am thinking about shortening the chimney and then putting a “flapper” cap that can be opened when the fire is burning and then closed when baking to help retain the heat better. The true gage of success was the wife asking when we were going to bake pizza again. Besides pizza, we will be trying our hand at baking bread. I have four Lodge cast iron bread/meatloaf pans that will be used for that experiment. Another experiment that we need to carry out is using the oven in the January to see how it works then.
Who says preps don’t have practical everyday uses!