


Composting: Microbes, Black Gold, and Growing the Best Food
A search of the SurvivalBlog archives will uncover pages and pages of articles mentioning compost and its value in gardening. However, if there was a startup composting guide I missed it. If you are an experienced composter hopefully you can still learn from this article, but everything here will be geared toward someone just starting out. Be warned I don’t use a sophisticated “fast” method. I work with God’s design, and let the microbes do the work. Well-balanced compost takes time–8-to-12 months with this method. This means you need to start a pile now, in order to have it when you need it to grow food. I’ve been running a variety of composting experiments over the past five years and am very happy with my results.
Here is what we are going to cover:
- Nature’s Fertilizer: What compost is, how compost mimics nature, and why it is so good for plants.
- Building Your Bin: How I built my bins, and suggestions for low cost bin systems.
- Managing the Pile: How to build your pile, manage your pile efficiently, and source materials for your pile.
- Using Compost: Recommendations for using compost in your garden for best results.
Nature’s Fertilizer
Most of you probably already know what compost is, or even if you don’t you’ve already experienced it first hand. Compost is simply organic matter that has decayed. If you have ever dug into the leaves during a hike in the woods and turned up the rich dark layer of earth underneath, that is compost and plants LOVE it! In nature compost is formed through 2 main natural processes: the aerobic process (no exercise required) in which oxygen is present and microbes break down the materials producing heat as a byproduct, and the anaerobic process which takes place in low oxygen environments and the material is broken down by fungal colonies. This article will focus on the aerobic method, which is the faster of the two and more common in gardening use.
The two main components of fertile soil are humus (dead organic matter), and rock particles. In the natural world leaves and dead plants accumulate on the surface of the soil and are slowly broken down by the bacteria, fungi, and soil organisms. This creates an upper layer of organic matter (humus) that has many benefits for the soil. The biological life in the soil is supported by this organic matter and a myriad of biological and chemical processes are triggered by this diversity of life and unlocking the nutrients in the soil. Just as bacteria play an important role in our own digestive processes, they also makes nutrients available for plants. Dumping fertilizer may work short term, but it will not improve the biology of the soil and may harm it long term. This means many of the micronutrients plants need to thrive will be absent because you have not cultivated the life of the soil. The result is weaker plants, and more disease and pest pressure (not to mention where will you get fertilizer if the supply chain breaks down?)
When you become a composting gardener, you have switched from being a plant grower, to a microbe farmer with the side job of harvesting delicious and nutritious produce. The reason compost is so good for your plants is because of all the organic matter you add to the soil. This organic matter is teeming with biological life that will promote the natural processes in the soil that unlock nutrients for your plants. Well made compost adds so much more than the bare nutritional value contained within the organic material. Compost also adds the microorganisms that fuel the engine of your soil, extracting the nutrients already present in the soil, and making them bioavailable to your plants. Also, adding micronutrients via rock powders can be a great way to ensure a full spectrum of nutrients for your plants, and by extensions, you! Think of rock powders like rock phosphate, greensand, azomite and others as multivitamins for your soil.
Composting is our way of partnering with God’s original design for plants, and working with the natural system. It is less costly in money, healthier in terms of chemicals and nutrients, and more sustainable than modern large scale farming techniques. I am becoming convinced it is also less labor-intensive when considered within the big picture. The more I use compost the fewer weeds I battle, my garden barely needs watering, I have fewer pests, and less plant disease.
Eliott Coleman puts it well in his book, The New Organic Grower:
“My own position on these issues is that I simply do not know enough to tamper with the natural system, and I have no desire to do so. I am an admirer of the intricate cyclical systems of the natural world, and I prefer to study them in order to make less work for myself, not more. Even if I thought I knew everything, I would rather let it be done for me by the real experts. The real experts in this case are all the processes that take place in a fertile soil-the interrelated activities of bacteria, fungi, dilute soil acids, chemical reactions, rhizosphere effects, and countless others we are unaware of.”
I recommend this book in general for a home grower looking to grow sustainably and naturally. The chapter on soil fertility especially pertains to this article.
Building Your Bin
Building a bin is not complicated, and there are many ways to build one that will work well. I have also built several bins over the years that worked “poorly” but still made pretty decent compost. I’ll give you a few suggestions of what not to do, and some guidelines on what might work well.
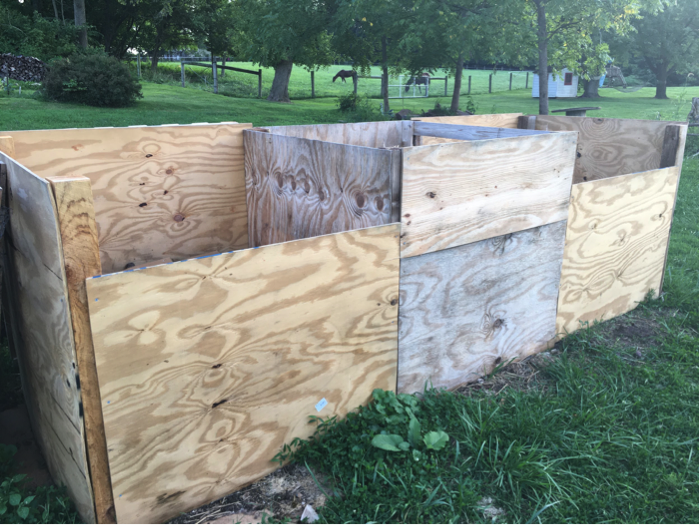 Here is a photo of my current three-bin setup. It is about as simple as can be. I used 4×4 cedar posts for rot resistance. The sides are untreated ⅜” plywood fastened on with exterior screws. The front has a removable top panel so I have easier access to the pile while it is being built, and as the pile fills up I add the top piece back on. I expect to get a couple piles out of each before having to replace the sides. For the process I am outlining you will need 2 piles minimum but can scale up to however many bins you need.
A good size for your pile is roughly 4’ or 5’ square and about 4’ high. This is small enough to be manageable, and allow enough oxygen and moisture into the pile, but large enough to get some good heat going. I do not recommend open sides. I have built piles in the past using mesh wire and had issues with pest infiltration, scattered debris outside the pile, and weeds growing out of the sides of the pile. Switching to solid sides has eliminated those problems and the pile still has enough oxygen to get quite hot. Solid sides also allow the materials to get hot and decay all the way out to the edge of the pile. My wire mesh piles were well composted in the center but not on the edges. I had to throw a lot of material back into another pile because it wasn’t ready to use.
Since plywood prices are presently skyrocketing, here are some other ideas for bin building materials:
-Untreated pallets are just about the right size to fasten 4 pallets in a square and call it done. You can also break down some additional pallets for spare boards to fill in the gaps to make solid sides.
-Straw bales can be stacked in a square to make a bin. When the bales start breaking down in a year or so, they can then be added to your next pile as brown material. No waste!
Managing the Pile
Managing your compost pile is not overly complex. There is a bit of a learning curve, but the good news is that if you screw it up, it will probably still work but just take a little longer. The key to composting aerobically is to build your pile in layers. These layers will be made of two ingredients usually referred to in composting as “brown” organic matter, and “green” organic matter. The terms brown and green can be a little confusing to someone new to composting. “Brown” matter refers to dry, woody, or stalky matter that is usually high in carbon (examples: dry grass, straw or hay, wood shavings/sawdust, dead leaves, soil). “Green” matter refers to relatively fresh, moist, and nitrogen-rich plant matter (examples: grass clippings, kitchen scraps, coffee grounds, non-woody yard waste, weeds, manures). Notice that many of these materials do not match their category color and most materials actually contain a little bit of each.
The key takeaway is finding balance. Too much brown material makes for a dry pile with very little for microbes to eat. The materials will also take much longer to break down. Too much green material makes the pile too wet, and the material will compress into a slimy mat with very little oxygen. The excess of moisture and lack of oxygen will inhibit microbe growth and make the pile go anaerobic, and it will take longer to decompose.
Natural compost is a mix of these two ingredients. We’ll follow the natural pattern in our pile. I typically start off with a thicker than average brown layer on the bottom of the pile, maybe 4-6 inches thick if I’m using straw or hay. Then I add my first green layer. Green layers are 2-3 inches if the material is fine and will pack tightly (ex: grass clippings, kitchen scraps), or 4-6 inches thick if the materials are thicker and loose (ex: tomato vines, old garden plants). I then add a 2-3 inch layer of loose brown materials (less if it is dense material like aged wood chips, or soil). I then alternate green and brown layers until the pile is built.
When starting a new pile I like to be able to add several layers at once to get the temperature up quicker, but it doesn’t really matter. Whenever I add a green layer I like to immediately add a brown layer on top. This helps prevent the green matter from drying out in the sun, and helps reduce the number of pests that are attracted to the pile. If you have some compost on hand from a finished pile you can throw a few shovel fulls in your new pile. The finished compost already has established bacteria colonies in it that will act as a “seed” to kickstart the biological processes in your new pile.
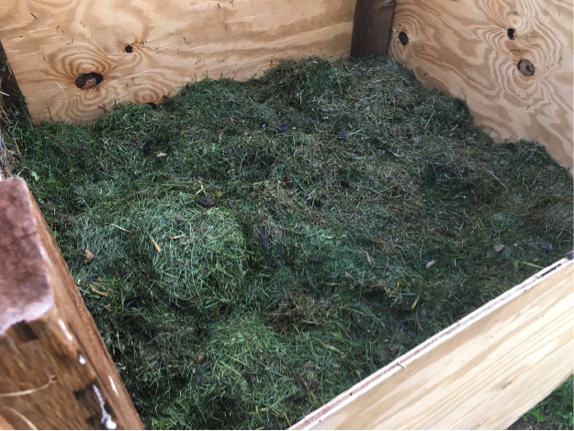
A layer of grass clippings as a green layer:
A layer of straw as a brown layer:
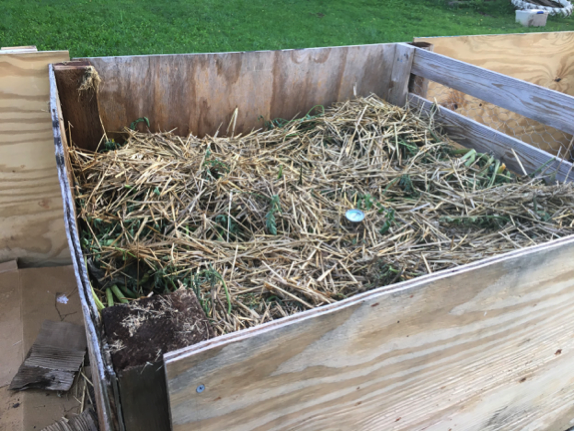
As you build your pile it will compress and shrink under the added weight, and you will keep building it back up. The pile in the photo immediately above was about 18” taller a couple weeks ago. I will continue to fill this pile and let it settle a few more times and then move on to start the next pile.
(To be concluded tomorrow, in Part 2.)
Good morning
Spectacular! I’m new to this and I really appreciate you breaking down all the steps to get this going.
Looking forward to the next part.
Have a Rockin great day
I recently read an article in an old Mother Earth News “Making cow manure without a cow”. One fills a plastic garbage bag with the materials Hobbit recommends and lets it sit. Good for those who lack land.
Here it is: https://www.motherearthnews.com/organic-gardening/homemade-fertilizer-zmaz78jazbur
Carry on
If you plan to make compost in bear country you will have to build a small fortress around it. That’s my experience.
Eee gads! Even compost?
What type of fortress fencing/walls are bear proof, excluding electric?
Thank you for the heads up.
Krissy,
Nothing is really bear proof. They laugh at electric fence wire. Setting 4×4 posts in concrete and using hog fencing helps but more for keeping out deer and moose. The bears just climb over, under, around and through everything. A sealed steel container is almost foolproof but I don’t think that makes for good compost.
What’s amazing is that I would chop up the kitchen scraps fairly small …… yet the bears would daintily paw through stuff and pick out the smallest pieces of whatever. Big bears, long “fingernails” = hilarious.
TominAlaska!
You are so right… In our part of the country, we get bear visitors to the bee boxes. One year a bear lifted our enclosure to access the boxes, toppled those, took off with the honey, and we lost our bees in the process.
Since that time we’ve been developing supports for wild pollinator colonies (especially given our concerns about the magnetic reversal and coming solar minimum), and we haven’t resolved our honey bee “issue” (although this is in our active thinking and planning presently). We’re doing really well with leaf cutter bees and mason bees among other members of the insect world.
I do digress… How does that expression go? If you build it, they will come!
Yes, in bear country you will not be able to compost kitchen scraps. I would think you could still composite yard and garden waste (grass clippings, plant debris, weeds). Anyone from bear country feel free to chime in if you have successfully composted.
Our local NH bears are trainable. Electric fencing will not affect them EXCEPT through the nose and mouth. Bears are territorial so once you train your bear most issues stop.
How do you train a bear? Place a bit of bacon on a very strong electric wire (I like the 30 mile chargers around my chicken house) around the area you want protected. My neighbors do this every spring because the Bear seems to forget after hibernation :-). It’s a local thing to show off the FIRST Training session MARKED by a Pile of Bear Scat.
So far our chicken houses, bee hives and such have been kept safe from our local bear. It’s been almost 20 years since a Training Wire protected item has been bear visited.
Shooting the bear just means a NEW Bear will take over your area.
Hobbit Farmer!
What an outstanding article… Such an enjoyable read. Thank you!
From your article: “The biological life in the soil is supported by this organic matter and a myriad of biological and chemical processes are triggered by this diversity of life and unlocking the nutrients in the soil.”
This statement resonated with me given my own interest in plant bioaccessibility of nutrients. Well said!
A question, Hobbit Farmer!
From your article: “I do not recommend open sides.”
In reading through this section, I wondered about a few small “holes” rather than open (wire mesh) sides or entirely enclosed sides. In your experience… Any benefit to this, or better just to stay with the enclosed sides?
Thank you for the nice comments Telesilla! I think small holes in the sides would not be a problem. It would allow some additional oxygen in the pile, but with a small 4×4 bin I do not think it would be necessary. If your pile is getting up to temperature you don’t need the additional airflow. My oldest pile has been holding at over 120 for about 5 months now as I’ve built it over the summer without anyholes. I’ve also been using straw for the brown layers and that traps a lot of air in the pile as it is built.
Thank you, Hobbit Farmer! Your follow up is greatly appreciated! In fact, the idea that gave rise to the question of small holes in the compost box siding was the air flow created by growing plants in containers like Walmart bags! I remember that from years ago, and it came to my thinking again in reading about your compost box design and experiences with various options.
Really looking forward to Part 2!
With the smaller volumes of material I typically have for composting, I have found compost tumblers to be very handy. After trying several, have found the “Hot Frog” two bin tumbler to be the longest lasting and most effective. I have no connection to the company. Just passing along info.
As a novice, I’ve come to appreciate the value of of producing compost, especially in these parts of the Rocky Mountains. Turning the pile every 5 days, or so, prevents the the pile from becoming (for a lack of a better term) ‘anaerobic’. If one cannot feel a slight increase in temperature from the outside of the pile after 5 days, it is probably a good idea to turn it and get more oxygen into it, and add more nitrogen contain materials if the pile does not produce heat over and beyond ambient temperatures during the following week… Cover the pile with black plastic and dark colored tarp assists the process. One can even add pine needles without increasing the acidity of the compost product significantly. I would only use saw dust and wood chip sparingly as these materials have the highest carbon to nitrogen ration of 500 to 1, verses straw that is 150 to 1. It is all too easy to add too much carbon (brown) and difficult to add too much green (nitrogen). Weeds will be my primary source of compost material next year as weeds are every where and naturally contain a carbon to nitrogen ratio close to the ideal, or better than, 30 to 1 ratio.
Wish I had more time to pitch in what I’ve learned this summer, but got to go finish painting a house so I can buy more ammo, specifically 7.62×39, as this ammo is the best stock to buy at this time. It has the lowest risk to reward. Producing compost is critical for the long term production of food. Thus, this is a mucho importanto topic. Thanks…
Good stuff
I always compost my leaves , grass clippings, and misc. plant matter but have never added rock powder to it . Would ag lime qualify ?
Not the same and depending on your local soil conditions, may not be of any benefit. It can help on your high acid soils found in the corn belt when applied in the fall or winter. Out here in the western states it actual may be harmful.
Really like this article so far, thank you very much! I have a couple of questions but I will wait for part 2 to ask them in case they are answered there. Thank you again 😀
Hobbit Farmer a question for you about straw and hay.
I have tried putting starter plants in straw bales sweetened with cow manure as a form of raised bed gardening. None of my plants thrived in the bales. The wife says its because of the herbicides used by the wheat farmer. Hay would be a convenient “brown” for my compost. Have you had any problems with using commercially grown straw or hay. I know all the hay farmers around here (Florida) use broad leaf herbicides (2,4-D) on their hay fields. They tell me not to worry that it (2,4-D & Round-up) dissipates quickly and will not affect my garden plants. I am not so sure. Your thoughts?
Mark,
The half life of 2,4-D is 6.2 days, which means that in a weeks time at normal temperatures and moisture only half of the active ingredient will still remain. Round-up is a whole new story all by itself as it can be 60-90 days to the half way point or under some circumstances it can be as long as 22 years. Much of the commercial wheat that is grown in the USA is sprayed with Round-up so when the farmer harvests the crop it is at a low moisture percentage. This final spray is NOT to kill weeds, but only to provide a low moisture condition in the grain. This saves the farmer the time and expense of having to dry the grain. If the crop is certified organic then it will be free (or is supposed to be) of any herbicide. There is a pretty good chance that the wheat straw you mention has traces of unreacted herbicide in it. I have a personal friend that killed some plants in a greenhouse with tree leaves that he thought were safe. One small spot from a single bag of tree leaves was contaminated and it killed some tomatoes in a small area in the middle of his greenhouse.
About twenty five years ago a local county extension agent told me that after three days (yep only three) that Round-up would be inert in the soil. Unfortunately that is NOT true as I’ve proved over and over by comparative chemical analysis of soil samples. Dr. Don Huber has also done a lot of research in this area. There are quite a number of YouTube videos of him available. Round-up is the enemy you have to watch out for.
David
Hay is closer to a green layer. Need to reread the straw bale start up.
Mark,
I’ve mostly been fortunate using straw. Don’t use hay because it imports whatever seeds were growing in someone’s pasture. I have had some problems with herbicide residues I have a stunted raspberry patch to this day from two hay bales a couple years back.
Read David the Good’s Compost Everthing for the worst case possibility.
I have read there is a herbicide called Grazon (sp?) that can cause problems.