


Back to building cabinets. A cabinet is only a box built from materials the same width having smooth parallel sides. For wall hung units, the depth is usually around 12 inches. If you subtract for the thickness of face frame material (approximately ¾ inch) then the plywood panels can all be cut at 11-1/4 inches. You can make them which ever width you want, but an advantage of this size is that each full sheet of plywood can yield four sections eight feet long. If you are brand new to woodworking, keep in mind that a saw blade eats somewhere around an eighth of an inch with each cut. This width is referred to as the “blade’s kerf”. Some table saw blades, miter saw blades, and specialty blades can have kerf widths closer to a quarter of an inch. Although it sounds as though a kerf isn’t much, in sequential rip cuts on a piece of plywood your yield would be three 12” strips and a fourth around 11-5/8 inches. Failing to account for kerf loss is more embarrassing than limiting but I wanted to pass along the experience in hope of saving someone else my embarrassment.
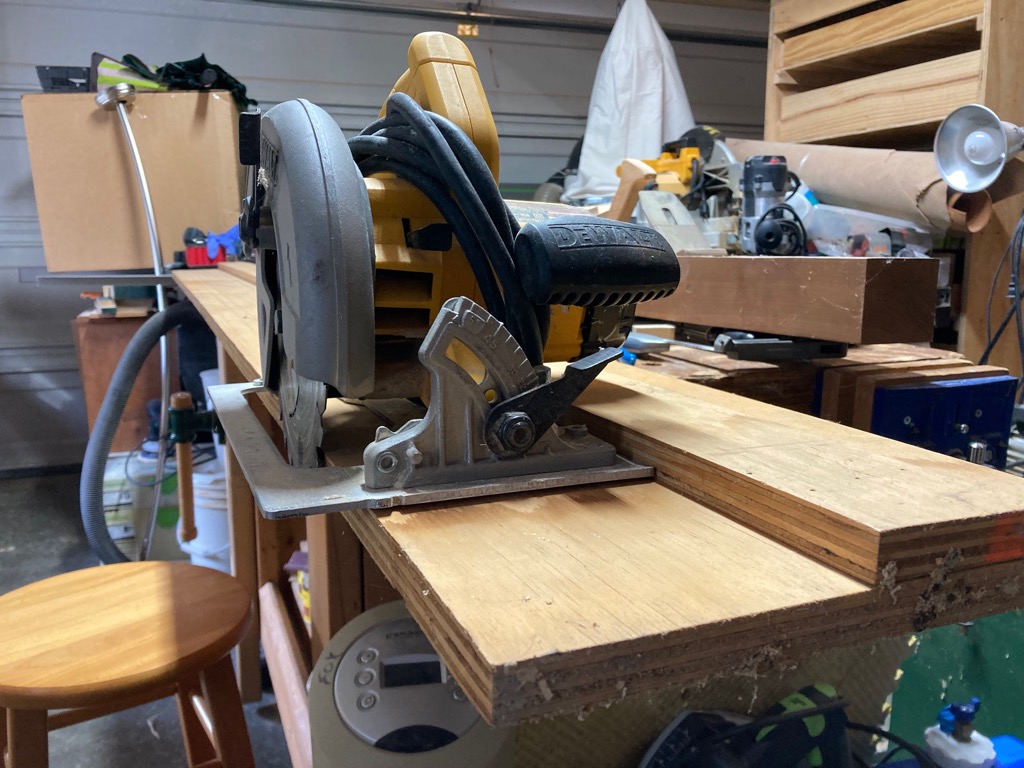 A table saw is the primary tool for making long rip cuts. When I made my first set of garage cabinets I didn’t have a table saw, I had a circular saw and a homemade ripping jig. (See photo.) Versions of this jig are common on the Internet so a YouTube search for “ply-wood circular saw track saw guide” or variations of this phrase should allow you to find instructions. In essence, this type of jig is made by ripping off about three inches along the factory edge of a sheet, attaching this strip to another 12-inch-wide piece of plywood at a distance slightly greater than the width of your saw base to the inside of its blade and then cutting the excess width off of the wide piece by holding the saw plate tightly to the factory edge from the narrow strip of plywood you cut initially. I promise the fabrication is easier than my description of the process. After making this jig, you can combine it with either measurements from an edge or a framing square to cut square and parallel pieces. Always align the jig such that it is covering your measured piece fully otherwise you end up losing material to the kerf again.
To keep your cabinet assembly simple, use wood glue and 1.5-to-2-inch wood screws to connect the case. Check your assembly for square using the corner diagonals method or by installing an inset back panel. On smaller units, I skip the full back and install a 2-3-inch-tall plywood cleat both under the top panel and above the bottom panel. Tie these cleats on each of the three cabinet sides they adjoin for maximum benefit. These cleats not only provide strength and rigidity, they also serve as the mounting supports for attaching the cabinet to the wall. Predrilling for screws using a twist or brad point drill bit slightly smaller than the diameter of your wood screw is recommended. For strength, running the side panels to the outside of the top and bottom panels will allow you to put your fasteners in shear position instead of under tension. For ¾” plywood, I use two-inch long wood screws. Your final step of construction is to install a 1-1/2” or so wide face frame for shelf retention. Don’t try to get fancy, use butt joints and nails to keep it simple. Although you can use plywood for the face frame, off-the-shelf pine or hardwood does class-up the project some.
 About your cabinet shelf spacing: I’m a fan of shelf pins and adjustable shelves. Kreg Company sells a shelf pin drilling set and I have used the daylights out of mine but you can make your own drilling guide using a piece of scrap and a ¼” drill bit. If you make your own shelf pin jig, then you get to set the spacing. Also, be sure to mark a reference face so you can position the jig the same in each corner. (Guess who learned that lesson the hard way?) Be aware that both ¼” shelf pins and 5mm pins will be sold by some stores so verify your package selections before you drive home. You will also have a choice between the straight pins and offset/angled pins. We are fans of the offset pins since you can turn them up or down and have about an inch and a half of shelf-to-shelf spacing adjustment. A side note on using the offset pins is that in the “low” setting where your shelf is nestled between the left and right pins, the shelf will need to be around 3/16” shorter than the full inside width of the unit to accommodate the thickness of the pins.
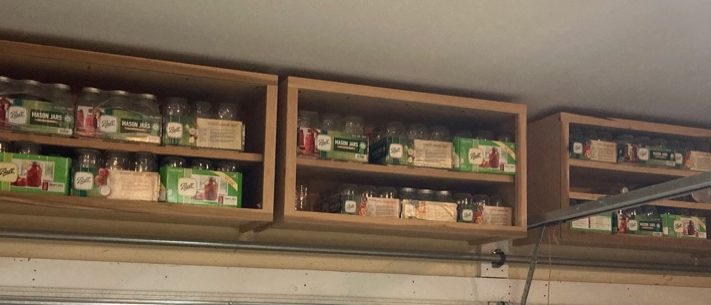
![]() Our garage currently has cabinets from our prior house, cabinets I built for the garage of a home we rented for two years as well as a new set of over the garage door open cabinets. A former neighbor who had been a professional cabinet maker turned me on using the space over the garage door. These new shelves were sized for mason jars and in the decade we have lived here, using the garage door opener daily, a jar has never fallen off.
Our garage currently has cabinets from our prior house, cabinets I built for the garage of a home we rented for two years as well as a new set of over the garage door open cabinets. A former neighbor who had been a professional cabinet maker turned me on using the space over the garage door. These new shelves were sized for mason jars and in the decade we have lived here, using the garage door opener daily, a jar has never fallen off.
Someone is probably still thinking they can’t build their own cabinets because they don’t have a vehicle to haul wood in, don’t have a space to make sawdust in or don’t have a circular saw to cut with nor a drill to install screws with. There is still a workaround. Make a sketch of the cabinet you would like to build. Next, determine the dimensions of each piece of lumber your cabinet contains, this becomes your cut list. As I have described a wall-hung unit it would be two sides of the same size, a top and bottom of the same size, one or two shelves that are the same width as the case boards but 3/16” shorter to accommodate shelf pins, two full width cleats that are 2-3 inches wide and the same length as the top/bottom and lastly two pieces of face frame stock the full width of the cabinet and two pieces that are the full height of the cabinet minus twice the width of the face frame stock. If drilling shelf pins holes is out, decide what spacing you want for your shelves and size four pieces of case-width plywood to these heights. Instead of shelf pins, you can use these spacers to support the shelves.
Next, draw a scaled rectangle on a sheet of paper representing a 48 inch by 96-inch piece of plywood. Layout your pieces in a manner that lengthwise rip cuts can be made along the 96-inch axis first. Next, determine the placements for cross-cutting the individual panels out of the overlength pieces. Repeat the layout process using a second sketch to double-check your math. If everything checks out, go to your big box home improvement store or a quality local lumber yard and pay them to make the cuts according to your plans. The blue or orange big box storees typically make the first cut for free and only charge a dollar for each additional piece you cut out. If you ask at a local store, try doing so during late morning or midafternoon when customer traffic is lighter. Lastly, buy a one pound box of two inch finish nails, a cheap claw hammer if you need one, and a five pack convenience bag of 3 inch nails or screws for mounting your masterpiece to the wall. Haul the pieces home (I found that I could haul material up to 9 feet long and 13 inches wide in my Ford Taurus) and start assembly. Building a basic cabinet is doable, no matter your experience.
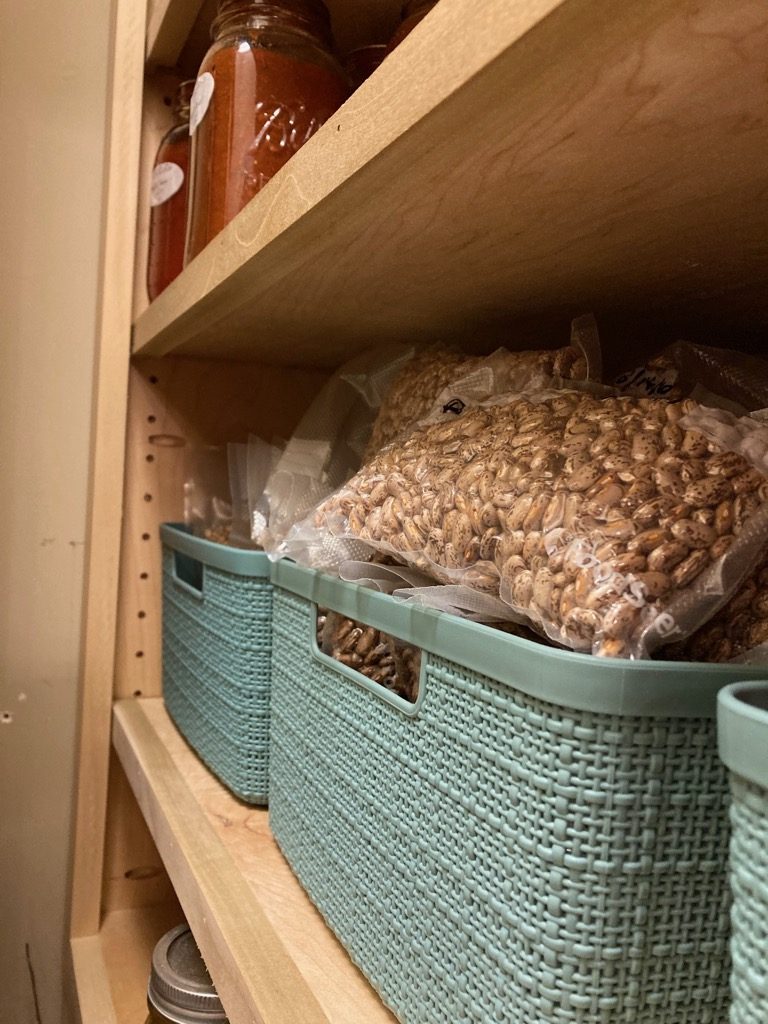
 As we once again needed more space, I used the same general build method to convert our guest bedroom closet into our canned food storage. Knowing the units would have plenty of weight to support, I opted for a higher quality, higher veneer count cabinet grade plywood and installed full backings. As you may note in the pictures, to build out the pantry four units were used instead of two. To make full use of the ceiling height, I wanted the units to extend above the door frame height. It wasn’t going to be possible to maneuver 96-inch-tall shelving units through an 80-inch door opening given how shallow the closet was. Also, the weight would have been nasty. By building smaller units they were stronger, lighter, and more maneuverable. These units were still simple to build and having the full back panel gave plenty of options for securing the shelves to the wall. I have included a photo above that shows the shelf pin holes because once again we wanted the option to customize shelf position depending on quart, pint, or jelly jar height.
For both the garage and pantry cabinets, a doorless design was preferred because we value the ability to easily view the contents. These units could easily be fitted with either hidden European-style cup hinges or face-mounted hinges and doors with minimum effort.
 One last storage space my wife pointed out was the inside face of our kitchen pantry door. While surfing somewhere on the web, she found examples of a spice storage solution that I think is brilliant. Once again all it required was building a square frame, adding a full back and cutting out an opening to fit the unit around the door knob. I built the spice shelf to fit our space. (See photo.) The depth is limited by the existing pantry shelving and the width is limited by the swing radius of the door. Although you can extend the shelf to within 5/8 inch on the hinge side, you have to keep the door knob side of the unit back from the edge so the corner of the unit will swing clear of the door frame. Half inch plywood forms the carcass and shelves while the face frame is made from ¼ inch by 1-inch store-bought trim attached with short finish nails. It has shelf pin holes covering most of its height and uses pieces of thin plexiglass 1.5 inches tall to retain the spices on the shelves as the door swings open and closed.
We became so excited after we tested its fit and function that it was never taken down for sanding and paint. The wood filler I used to cover the face frame nails catches my attention on a daily basis. If you make one of these units keep in mind that hollow core doors only have solid material along roughly three inches of the sides and top. You may need to oversize the back as we did (look closely at the photo) to achieve a solid mounting. When working with ½ inch plywood I switch from standard wood screws to what are marketed as trim head screws. These trim screws have smaller diameters which I find useful in the thinner material. I can foresee building another of these units to hang on the linen closet door for holding first aid and hygiene items.
We plan to add a true walk-in pantry to our home. Hopefully, it will happen in the next few years. I’ve had a piece of painters’ tape showing the probable roof line where the addition would join the garage wall in place for over three years. I have so much gratitude to my wife for her longsuffering related to our stuff “laying all over the place”. Currently, there are several flats of filled quart jars stacked in a corner of the guest room because they wouldn’t fit on the shelving, two sizable boxes of potato flakes for maintaining and splitting my wife’s sourdough starter are stashed in the office and a there is a case of quinoa from a shopping trip in November that gets shuffled from place to place. Neither of us enjoys “clutter” but we recognize the blessings that are represented by those jars of potatoes, tomatoes, and raspberry jalapeno jam, the relief of not having to scramble again as we did last fall to find basic potato flakes and I’m growing to appreciate quinoa.
This homesteading lifestyle has tradeoffs and stuff sitting where stuff shouldn’t be is one of them. We have worked to maximize our storage potential and I hope sharing some of our efforts will be useful to you. Good luck building your shelves and cabinets.