


(Continued from Part 3. This concludes the article.)
Resources
Once you have your route options figured out and taken into account potential obstacles and hazards, the next step should be to take a look at potential resource requirements and availability. The first resource I will typically look at is food – I always have some amount of emergency food stocked in my travel kit, including bags of nuts, trail mix, Fritos, emergency ration bars, small freeze-dried meals, etc. However, for any trip home longer than 3-to-4 days it becomes difficult to pack enough food to account for the whole trip, including any delays I may encounter along the way. As part of my route planning I include a couple of maps that show potential resource locations near the starting point of my trip home. I always have a stash of emergency cash in various denominations as part of my travel kit so I can potentially fill in any gaps in my supplies before I start out.
For stores and such I tend to use Google Maps or Bing Maps, as they’re a lot more commercially-oriented than OSM, ORS, or other open source map tools. For food, I’ll usually look for smaller locally-owned convenience and dollar stores versus the big national chains, as the local stores will be more likely to continue operating even if power goes out.
Here’s an example of the results of searching for ‘convenience store’ around Lubbock, Texas:
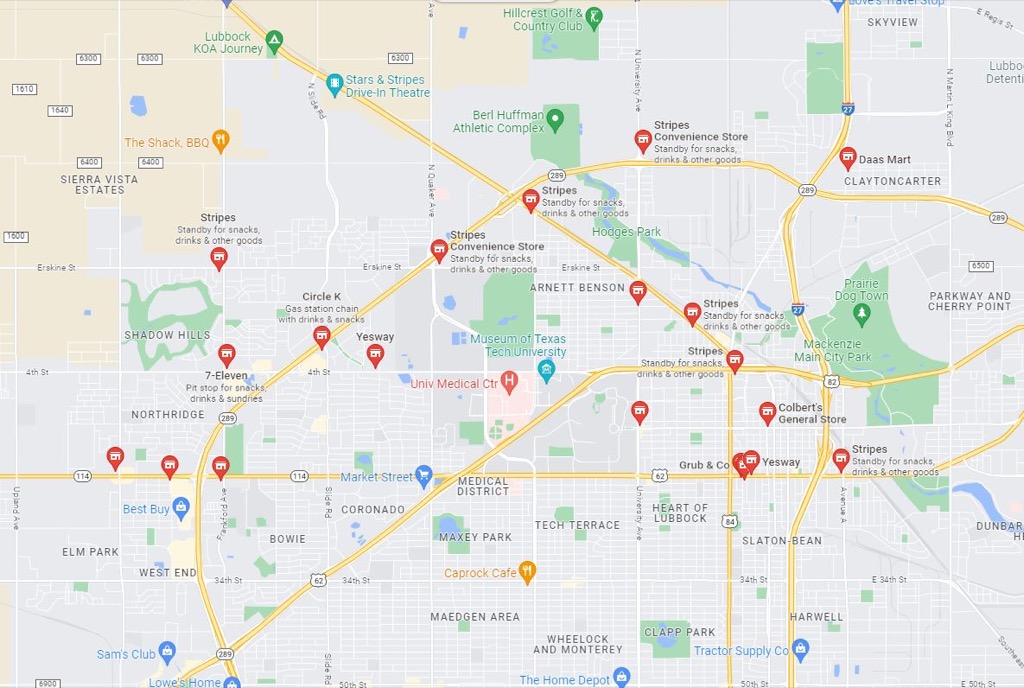
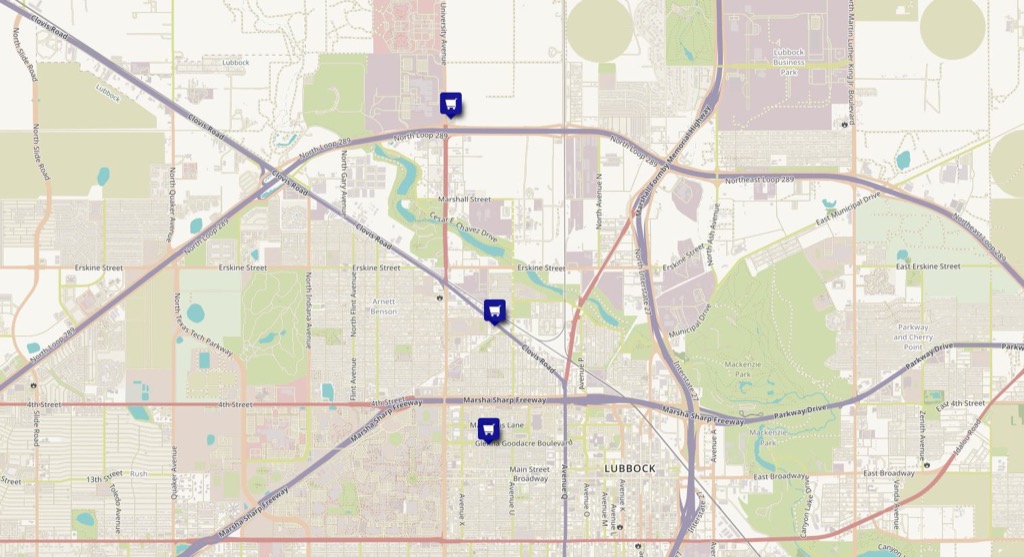
You’ll need to click on each on to find out which ones aren’t part of a chain and make a list of those. You should also search for dollar stores, ethnic food stores (e.g. Mexican, Chinese, Brazilian, etc., depending on what part of the country you’re in), bodegas, etc. Review each one and add it to a map for inclusion in your route plan document, which now illustrates what I consider one glaring weakness of many of the available mapping applications – you can’t easily add notes or points of interest to a map and save it or print it off. The OpenStreetMaps Android application called ‘OSMAnd+’ does allow you to do this, but I prefer to do my route planning on my PC with a huge screen. To address this shortcoming I use another online mapping tool based on OpenStreetMaps called uMap, which allows you to add markers and save a copy of the resulting map. You need to click on the pencil icon in the upper right corner, then click on the marker icon and click on a location on the map to add the marker. Once you’ve added a marker you can change it’s description, color, icon, etc. Here’s a screen clip that shows some examples of fictional grocery stores that I added near Lubbock, TX:
Other types of resources I map out are locally-owned bike shops, camping/outdoor stores, gun shops, hardware stores, country stores and thrift shops. While I try to pack as complete of a get home kit as possible to cover as many contingencies as I can, there may be gaps in the preps I bring that I can fill before starting my trip home, and knowing where I can buy or obtain those resources makes getting started a lot easier.
One other nice feature of uMap is that you can save the markers you’ve added and when you come back to the web site later they’ll still be there. I have added and saved hundreds of markers for stores, nuclear reactors, chemical plants, foraging locations, prisons, etc., so now when I’m planning a route I can just go to uMap, zoom into the areas along the route I’m planning and save a screen clip of them in my route plan document.
Depending on the length, specific route and time of year, you may also be able to leverage naturally-available food sources along the way. The absolutely easiest option is to forage for edible plants on or near your route, and the web site Falling Fruit provides an interactive map showing locations where others have found edible plants in the wild. Note that Falling Fruit is relatively new and relies on user contributions for much of its content, but there are already around 1.5 million locations identified worldwide. You can identify possible foraging locations and include screen clips of the map(s) in your route plan. Other good resources to include in your kit are location-specific foraging guides by Falcon Guides and general foraging reference guides by Acorn Naturalists.
For really long trips you may need to consider hunting, fishing or trapping. Hunting and trapping locations are beyond the scope of this article, but if you’re looking for potential fishing spots along your route check out FishBrain.com, Fishidy.com, and Fishermap.org.
Water (Again)
Earlier I discussed water as both a potential obstacle as well as a potential travel route; however, you also need to consider the water you’ll need to consume during your trip. Depending on the temperatures and your level of exertion you can start to feel the effects of dehydration in only a couple of hours, and you could become immobilized in a day or two, so finding water sources along your route is critical. Note that I’m assuming you have some method of purifying surface water available such as a filter, water purification tablets or boiling. As part of my normal travel routine one of the first things I do, when I arrive at my hotel, is to take out a 1 gallon (3.8L) ziplock freezer baggie, fill it with water and leave it in my room’s sink during my stay. I usually have my 32oz. (1L) Nalgene plastic bottle and a couple of 1L soft water bottles with me, so if an emergency pops up and I need to skedaddle quickly I can fill them from the ziplock bag and get moving without having to worry if the water is out.
Keep in mind that 1 gallon of water weighs around 8.3lb (3.7kg), so you’re not likely going to be able to carry more than 1 gallon at a time. With a recommended rate of water consumption of around 1 gallon per day, you’re going to need access to water sources along your route if your trip is more than 2 days or so. In some areas like New England you can’t go more than a mile or two without coming across a small stream, river, pond or lake, but in other parts of the US (and the rest of the world) you could potentially walk for days and not see water. If parts of your planned route take you through drier areas you may have to manually adjust your route to travel directly between water sources, which are usually the blue areas on ORS/OSM.
I’d also caution you against assuming that just because a map shows a surface water feature that doesn’t necessarily mean that the water will be present when you get there. Some surface water sources are seasonal, and you should also check to see if the area you’ll be traveling through is currently in a drought, which can significantly reduce available surface water supplies. The US Drought Monitor maintains a current map of all areas of the US impacted by drought; you can click on a region to get a more detailed county-level map. You should generally try to map a route between larger water sources, as those are more likely to be present under a wider range of conditions.
You Can’t Stop the Signal
Having current information on what’s happening and where can make a huge difference in your ability to get home quickly and safely. Knowing that a bridge is shut down or collapsed, where rioting is occurring, when a chemical plant is on fire and where a forest fire is raging can allow you to adjust your route on the fly and significantly increase your chances of getting home. After pretty much any type of disaster other than an EMP the radio waves will probably be alive with traffic on what’s happening, where’s it happening, who needs help and lots of other useful tidbits, so I always include lists of local radio frequencies for the locales along my planned route(s), along with higher-level state and national frequencies. RadioReference.com is the ultimate source of information on radio frequencies used in the US, and I always include a handheld scanner radio in my travel kit.
Since a lot of law enforcement agencies in the US have moved to trunked radio systems, I usually carry something like a Uniden BCD325P2, which I program with the various frequencies for a given trip. I save these scan plans on my PC so I can quickly load them onto the radio for trips I take frequently. If you have a radio that isn’t programmable you can include a list of relevant radio frequencies in your get-home plan notes. Note that you don’t have to invest in a handheld scanner that supports trunked radio in order to get valuable information – a less expensive scanner like the Raddy RF760 or the Bearcat SR30C can still allow you to listen to non-trunked law enforcement, emergency services, air and marine bands, town services, AM/FM, shortwave and many other potential information sources. Even if the disaster is something that brings down the power grid, many radio sources will still be able to transmit for at least a few hours if not days afterward so you can still gather useful information.
The Route Plan
Based on all of the ideas and data sources discussed, here’s what the outline of my standard route plan looks like:
- Destination name
- Monthly average temperatures (if I might using this route again in the future)
- 10-day weather forecast (clipped day before trip)
- Screen clip of proposed route
- If the route is longer than a day or two, I’ll also include additional screen clips showing a more detailed breakdown of each segment and potential break/sleeping locations along the route
- Map(s) showing potential hazards along the route
- Flooding, nuclear reactors, chemical, prisons, etc.
- Map(s) of potential railway and/or power line route options
- Map of potential resources near route starting point
- Map(s) of potential resources en-route
- List of relevant radio frequencies
The size of the route plan varies, depending on the distance I’ll need to cover, the number of hazards, etc., but it’s typically around 5-6 pages.
Going Mobile
Since you most likely won’t have your PC with you when you’re away from home you should consider incorporating your mobile device (phone or tablet) into your get-home route planning and execution. Earlier I discussed the capability of Joplin to synchronize notes (and hence route plans) across different devices using a cloud service, so you should make sure you install and configure Joplin on your mobile device so you can have all of your route plan details with you.
For mapping and navigating using my mobile device I use OSMAnd, with all relevant maps for my route downloaded locally onto the device. This allows me to use GPS to track where I am along the route and get back on track if I have to detour. As a bonus, OSMAnd has one of the best user manuals I’ve ever seen for an Android application, so learning to use it is pretty easy.
A couple of quick thoughts on mobile devices and GPS before I continue:
- Keeping a mobile device powered over a long trip isn’t that difficult – refer to my previous article ‘Power To Go, parts 1 and 2’ for some ideas.
- While governments can disable or intentionally degrade their GPS systems, my current phone (and most modern mobile devices) support multiple GPS systems including GPS (US), Beidou (China), Galileo (EU) and GLONASS (Russia), so four different governments would have to shut down or degrade their GPS system before I couldn’t use it effectively on my phone, which would most likely only happen during a major world war.
- The four different GPS systems combined include around 125 satellites, and a good number of them would have to be disabled or destroyed, either intentionally targeted or hit with a massive CME, in order to be rendered ineffective.
- While older GPS satellites relied heavily on ground support systems to maintain their accuracy, the current generation ones are much more robust and accurate, so even if the ground infrastructure for all four systems was destroyed I could continue using GPS for months or even years before the accuracy seriously degraded.
OSMAnd allows you to import a track of your proposed get home route, which you’ll need to export from ORS on your PC. Once you have finalized your route in ORS, click on the cloud/down arrow icon in the ‘Route Details’ section on the left side of ORS and a download window will pop up (see picture below).
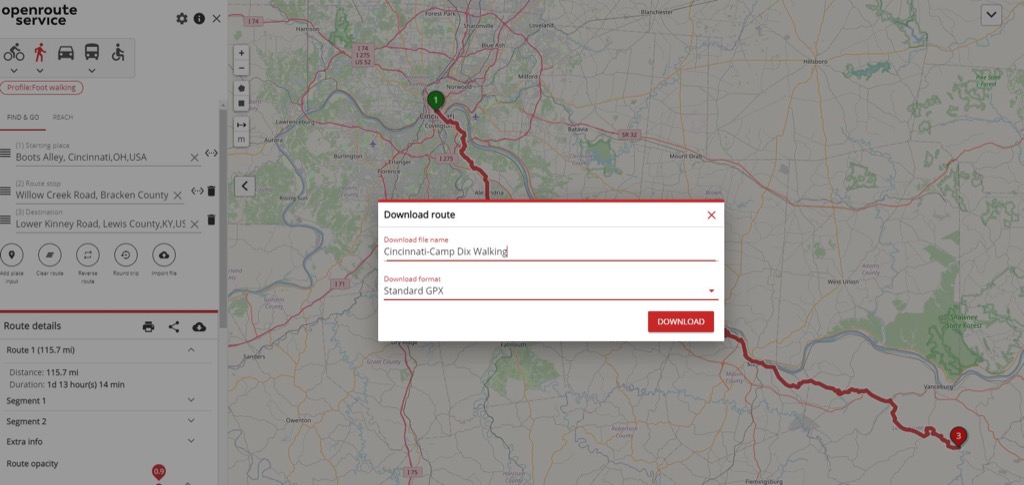
You can change the name of the route to anything that works for you, and select the download format – I recommend using ‘Standard GPX’ for OSMAnd. When you click ‘DOWNLOAD’ it’ll bring up a file browser and you can save it where you want; once you’ve saved it you’ll need to transfer it to your mobile device and import it into OSMAnd. Once the import is done it’ll show your planned route on the map(s). Now when you’re on your route home you can track your location, identify your position relative to potential hazards you listed in your route plan, and identify possible alternate routes if necessary.
Conclusion
No one wants to think they’ll be away from home and loved ones if a disaster strikes, and if it does happen you’ll want to be able to get home as quickly and as safely as possible. In this article I’ve discussed my approach to planning get home routes and the tools and resources that I use, which should provide at least a starting point and some basic ideas on how to plan a route. Everyone’s requirements and opinions are going to be different, so I recommend you think about the types of travel and trips you might go on and figure out what route planning approach works best for you. There are dozens of mapping tools, route planning tools, information web sites and other resources available, so spend some time doing some research and trying out different options.