


(Continued from Part 1. This concludes the article.)
When you practice you need to use the firearm, holster, belt, and clothing that you will use when you are carrying a firearm. This will vary with the weather. Use exactly the firearm holster positioning you will use in the real world. Cover the firearm with an outer garment such as a coat or shirt as you will be wearing when carrying. Ear and eye protection are mandatory at the range.
You may wish to include a baseball-type hat to better protect the eyes from things like hot brass during ejection. Unless physically impossible all firing should be done with aimed fire, that is, using the sights with a proper sight picture. No unaimed fire such as hip shooting should be allowed for many reasons. You should always have complete control of the firearm.
Again, strive for perfect practice and do not push for speed. Safety first, do not actively push to go faster, speed will come with time and repletion. It is said in some circles that “Slow is smooth, smooth is fast”. Smoothness in this context is developed by slowly taking the time to master a sequence of physical steps. You are carefully going through all the steps until you get them right.
When you have mastered the steps by repetitive perfect practice the sequence will blend together and be smooth. At this level, you can be very fast because the action is second nature and does not require conscious thought to perform.
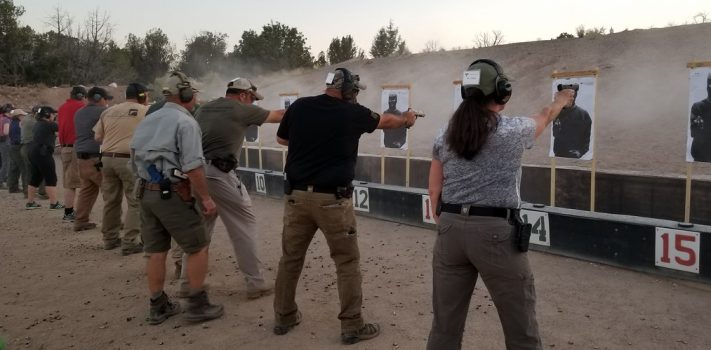
Paper targets have some major advantages as targets compared to items like tin cans. It is generally easier to see the sight picture and sight alignment when using paper targets. You will not have this luxury in the real world but it is a great training aid. If you doubt this, once you are shooting well put an old shirt over an IPSC target and take a few shots at it.
Importantly, when a paper target is shot you have a record of the shot’s impact on the target. Trends such as consistent low impacts will show up here. This record can be vital to improving your shooting by letting you see the results at some time after the shot is fired. Commercial targets, IPSC targets, paper plates, 3×5 index cards, sheets of copy paper, and so on will work well for this.
Start the exercises at 5 yards until you are clustering shots well, then go to longer distances. 15 yards is a good practice point for the experienced. When you are shooting very well at 15 yards try the same course of fire at 20 or 25 yards.
You should try out each exercise on the firing range but without using ammunition, only dry fire, to get a feel for how all the parts come together. All safety rules still apply especially Rule 1. Using the proper stance perform the complete draw and then dry fire. Concentrate on a safe draw with the trigger finger off the trigger until the sights are on the target, see Rule 3. A nice smooth controlled draw with a good grip is more important than a shaky fast draw.
Proper sight acquisition is the key to hitting the target. Given a good sight picture, you must focus on the front sight and control the trigger break by pressing the trigger and not yanking it all at once when the sight picture looks good. The trigger finger should operate independently of the rest of the hand. Hold the pistol hard with two hands. It is better to hold the handgun with too much force than with too little.
This is a good time to remember Rules 1 and 3. When you are ready for a live fire exercise first, with a CONFIRMED UNLOADED firearm, go through the entire sequence of events for each exercise in slow motion, checking every step.
At a minimum, you have to access the firearm by moving the concealing clothing out of the way, get a safe and consistent grip on the firearm with the trigger finger outside of the trigger guard, draw the firearm safely, join the other hand to the grip, point it at the target, aim it, and pull the trigger while noticing any movement of the sight picture when the hammer falls.
At no time should the muzzle of the firearm cross any part of your body or anyone else’s body. If you are not paying attention, this can happen during the draw while bringing up the support hand to meet the strong hand for the two-handed firing position. The strong hand is normally the right hand for a right-handed person, and the left hand for a left-handed person.
[JWR Adds: The gun-handling fault just described is so common that most shooting schools now teach that when drawing a pistol from a strong-side hip holster, the pistol drawing-firing stroke should begin with the strong hand resting on the butt of the holstered pistol and the palm of your support hand resting on the center of your chest. This way, you will avoid getting any part of your support hand forward of the muzzle, as both hands come forward. You do not want to have the pistol in your strong hand come out to meet a waiting support hand!
Each of these steps can be further broken down into smaller steps, another reason to do some research or get some quality training. After each exercise make the firearm safe and return it to its holster. Your finger should be out of the trigger guard when you put the firearm in the holster, Rule 3.
The total of the rounds fired in the exercises is 50, which is normally one box of handgun ammunition. Now you will start the live fire exercises. Each exercise has multiple repetitions. You may reload between repetitions as needed to complete each individual repetition without having to reload during the repetition.
The first exercise is the most basic move, drawing from concealment and firing one round at the target. This simple exercise can be considered the basis for all the other exercises and must be mastered.
Exercise 1, fire one shot, repeat the entire cycle 5 times:
Draw from concealment and fire one shot at the target.
Exercise 2, fire two shots, repeat the entire cycle 3 times:
Draw from concealment and fire two shots at the target.
Exercise 3, two aiming points, repeat the entire cycle 3 times:
Draw from concealment and fire one shot at each of two paper plates two feet apart on the target stand.
Exercise 4, two shots at multiple aiming points, repeat the entire cycle 3 times:
Draw from concealment and fire two shots at each of two paper plates two feet apart on the target stand.
Exercise 5, one shot at multiple aiming points, repeat the entire cycle 2 times:
Draw and fire one shot at each of three targets placed at 5, 10, and 15 yards.
Exercise 6, two shots at multiple aiming points, repeat the entire cycle 2 times.
Draw and fire two shots at each of three individual targets placed at 5, 10, and 15 yards.
Exercise 7, one shot using strong hand only, repeat the entire cycle 3 times.
Draw from concealment and fire one shot at the target using the strong hand only.
This sequence of exercises is just a starting place and is certainly not cut in stone. Be smart, be aware, and be safe.
After firing secure your firearm and wash your face and hands. When you are in an appropriate place clean your firearm and store it safely.
There is a lot of good information relating to these topics on the Internet. There is also a lot of garbage. I suggest you look up topics you are interested in but read them with a grain of salt and don’t blindly accept what they say as gospel.
Established organizations with known training sections such as the NRA are a good place to start. By the way, I am not connected with any of the following websites in any way. All of the following links were found with basic search engine web searches:
- A good discussion of Jeff Cooper’s Four Rules of Gun Safety by L.K.R., found right here at the SurvivalBlog website.
- An introduction on how to draw from concealment.
- A starting point on how to shoot a handgun accurately.
- Somewhat dry reading about shooting ranges, but it covers many important concepts.
- A Complete Guide to Building Your Home Shooting Range.