
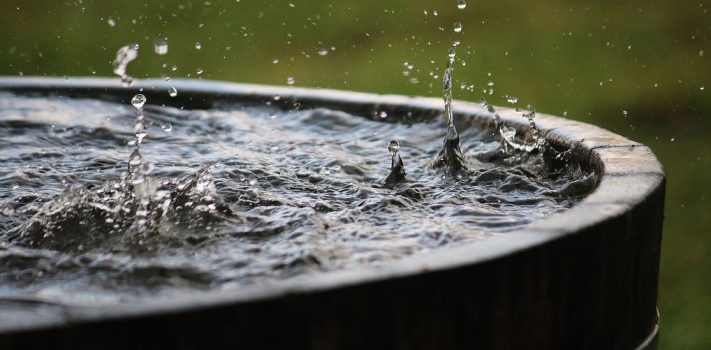


Imagine that you have a 2,000 square foot cabin in the Inland Northwest and a spring rain shower thunders by that drops an inch of rain. If you were equipped to capture the rain that hit the roof of your cabin, you would have just picked up over 1,200 gallons of water.
Rainwater harvesting is an easy win that can provide a significant supply of water. With a relatively small investment, you can provide a significant amount of water that you can use for gardens, washing, animals, firefighting, and–if treated–drinking. At the very least, capturing your rainwater as a redundant source of water makes you more prepared for tough times, and gives you greater peace of mind.
This essay will help you plan and design a rainwater harvesting system that meets your needs; provide a wide range of examples of harvesting systems; provides a quick review of treatment of water for drinking; and summarizes some lessons we’ve learned with our in-ground rainwater harvesting system.
Why Harvest Rainwater?
A significant amount of water hits our land. If we use even a fraction of it, capturing and using it saves money in electricity, saves wear-and-tear on our well pump, and provides a reliable source of water–should our well not function. Most of the water we capture is used for our garden and livestock, but people can also use it for washing, flushing toilets, and–in an emergency–for drinking. Water security is food security, which is very important with the current threats of food shortages.
Rainwater can also help store thermal energy. We are currently building a greenhouse that will have a 1000 gallon water tank in it. The high heat capacity of water means that the water will absorb radiant energy from the sun, then release that thermal energy over time to moderate the temperature inside the greenhouse.
Planning
One of the first steps in considering harvesting your rainwater is to check your state laws regarding rainwater. Different states have different ideas about who owns the water that falls on your land and buildings, and it is easy to find out the score in your state by checking the Department of Energy’s interactive map of the US that summarizes the rainwater harvesting laws in each state.
Next, to get an idea of how much water you might be able to harvest, you can use this handy online tool to find out how much rainwater your area typically gets.
Once you have a sense of the legality and availability of using your own rainwater, consider how the location and area of your buildings, impervious surfaces, and sloped land–all of these become possible sources of rainwater. Consider storing the water close to where it will be used, such as gardens, greenhouses, livestock, and living spaces. Look at your land as an integrated system that can work together to provide a resource near where the resource is used. Texas A&M Ag Extension has a great online calculator that allows you to input your information to assess your rainwater assets.
System Components
Ultimately, any system to harvest rainwater will have a few things in common. The following diagram outlines the elements contained in a rainwater capture system. You don’t have to have each of the following components to start harvesting your rainwater. But this diagram and list can be a checklist as you consider how simple or complicated your system should be.
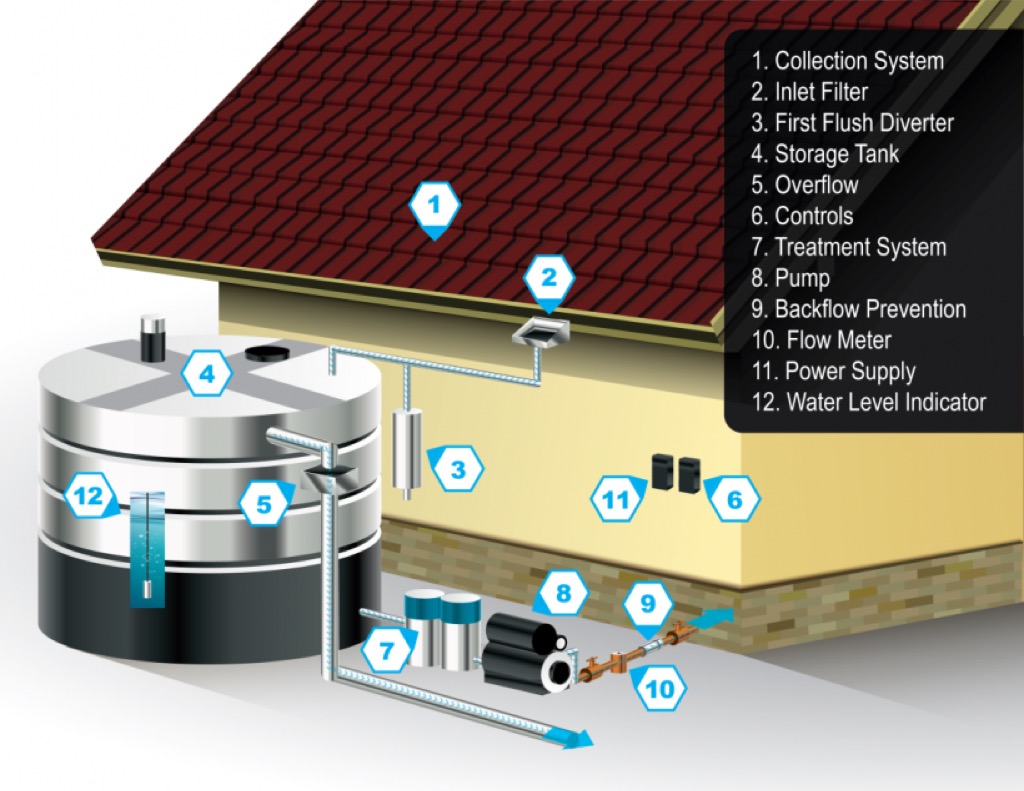
1. Collection system: How are you collecting the rainwater? A roof? An asphalt driveway (or some other impervious surface)? Sloping land? A storm drain? Any place that receives rain, and then allows it to flow in a particular direction becomes a possible source of water.
2. Inlet filter: This prevents twigs, bird poop, leaves, and particulate matter from entering your storage tank.
3. Diverter: Sometimes called a “first flush diverter”. This prevents the initial pulse of rain from entering your tank.
4. Storage tank: This may be made of coated cement, or a plastic/resin material that is opaque to reduce the growth of algae while the water is stored. See the section below dedicated to tanks.
5. Overflow: How will you deal with the very real possibility of getting more water than your tank can carry?
6. Controls: Again, the simplest systems will not contain some kind of feedback system; but the more you do this, the more elaborate your thinking will become.
7. Treatment: Consider rainwater to be non-potable–that is, not-drinkable, but usable for gardening (including edible crops), watering animals, washing, and flushing toilets. However, if you wish to create a backup system for drinking water this is where you put that treatment device. Water treatment is addressed at the end of this article.
8. Pump: This will be necessary if you are storing water in an underground cistern. If you aren’t able to use gravity to move water from one place to another, you’ll need a pump. Some people can accomplish this with small RV pumps; others use submersible sump pumps. In the description later about our system, you’ll see that we use a small 12 volt submersible pump. You pump will depend on how much water you move, how high you pump it, and how the pump is powered.
9. Backflow prevention: Often this step is implicitly taken care of when using a pump that only pumps in one direction, or using gravity to use the water from the tank. But for more sophisticated systems, a one-way valve will separate the source of water from its use to prevent back contamination.
10. Power supply: Will you use a solar panel to run your pump, or will it be connected to a grid-tied household circuit?
11. Water level indicator: This concept may be accomplished in a number of ways, but basically answers the question: “how much water is in the tank?” It may be accomplished with a gauge to tell you how full the tank is, or it may be accomplished with a float switch to shut of your pump when the water level is low. Either way, somehow you need to figure out when to stop trying to get water out of a tank that you can’t see into, and keep from burning out your pump.
Tanks A Lot
The method of storing the captured rainwater is a key part of the rainwater collection system and deserves special attention to detail. Once you know what type of tank you will use, the other components of a rainwater harvesting system become more obvious.
First, where will the tank be located? Next to the house on the surface? Underground? Or perhaps indoors? If you live in a cold climate, as we do, putting the tank underground below the frost line would keep the water from freezing. However, an underground tank in cold areas is not required if the water is harvested in the spring and used during the summer.
Second, what is your tank made of? Cement is a strong alternative for underground tank; but cement is porous and needs to be lined with a waterproofing agent. Cement can also crack from frost heaves. Resin-based plastics are often used, but they can collapse under significant ground pressure. Opaque tanks will keep algae from growing in them. Some tanks are barrels made of wood. IBC containers and 55 gallon drums also make good storage tanks. The material of the tank depends on what you can procure, and where you hope to put the tank.
Third, how do you get water out of the tank? If your tank is a higher elevation from your use, gravity can take water out of the tank. For two of our tanks, we simply lower a watering can into it and lift the water out. Our underground cistern has two different types of pumps. One is a small 12 volt submersible pump powered by a 100 watt PV solar panel. The other is a centrifugal transfer pump that I attach to my electric drill (which actually works quite well.) How you get water out of the tank depends on its location relative to where you use it, available power sources, and the volume of water you remove.
Finally, what size tank will you use? If a single rainstorm will give you 1,000 gallons at one location, you may need a pretty large tank if you hope to capture even a portion of that water. But large tanks mean a large project; starting small keeps the project simple. Our tanks range in size between 30-gallon rain barrel to 1,000 gallon undergrown cistern. The size of tank will be determined by your level of commitment, the amount of water your source will provide, and your ability to use the water.
A Simple Starting Point
Our first attempt at rainwater harvesting was a simple rain barrel under a valley in the roof at our entry. This only drains about 100 square feet of roof, but a single rain will typically fill the two 30-gallon olive oil barrels on each side of the gable.
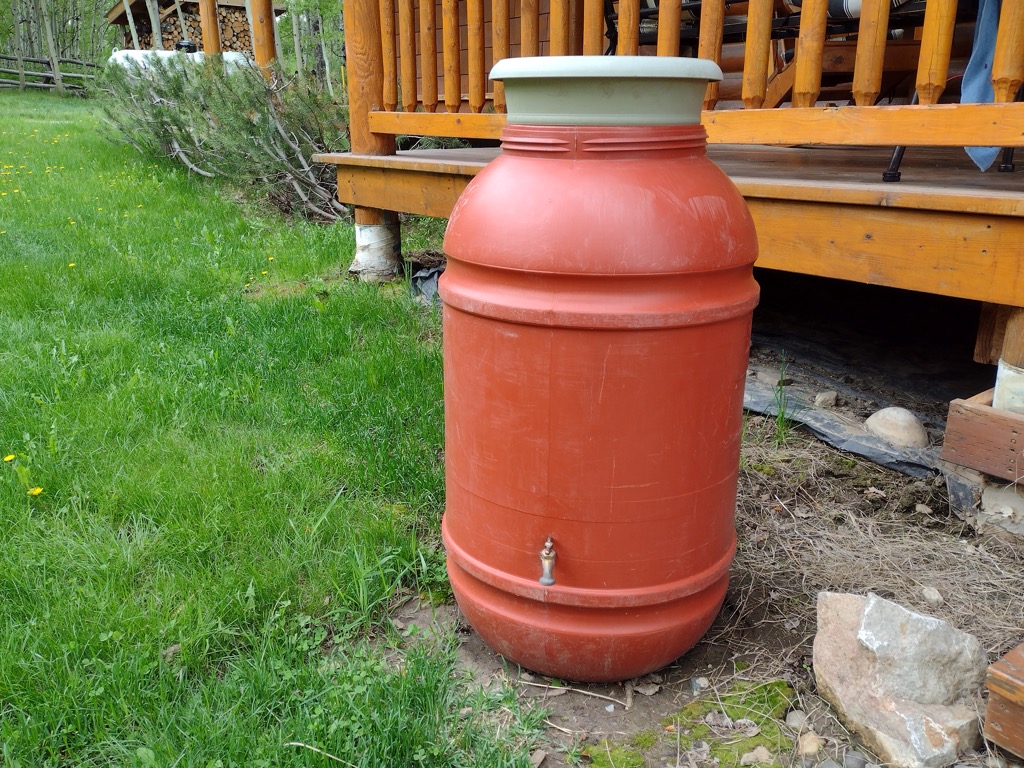
The roof gable is the catchment system. An old cracked flower pot acts as a funnel into the barrel and serves as inlet filter, which keeps bugs from breeding in the rain barrel. The barrel is–of course–the storage tank. The outlet is the faucet at the bottom, which we can hook to a hose to gravity feed into the garden, or –most often– simply dip our water pot into from the top to water our small 8’ x 16’ greenhouse, where we use about 10 gallons of water per day to grow tomatoes and cucumbers. Of course, the rain barrels need to be emptied and stored during the winter in our location, as we receive considerable snow.
We keep thinking that we’re going to expand on this simple plan by installing gutters and capturing many times the amount of water that we get with these barrels, but they work so well and so simply, that we haven’t been motivated to make that change. This is a reminder that simple is often best; sometimes it takes very little energy, money, and planning to gain considerable benefit.
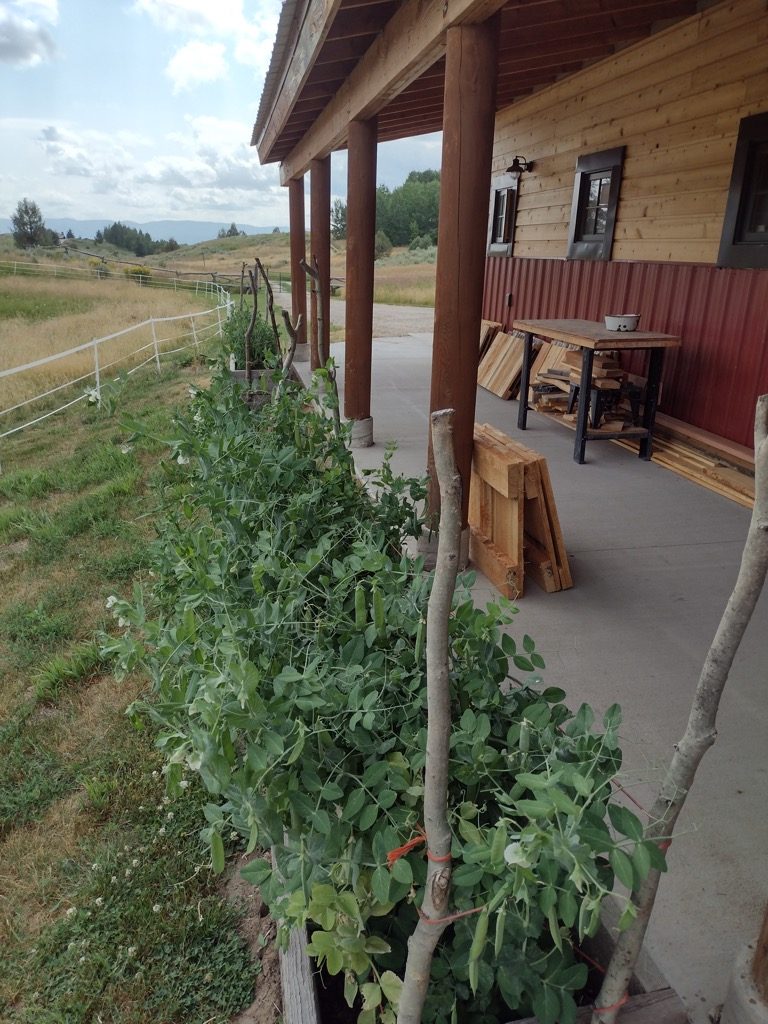
The second example is equally simple and just involves a raised bed under the drip line of our garage. We only grow peas in these boxes because they are the only crop that is hardy enough to withstand being dumped on by the piles of hail shed from the roof after the occasional summer hail storm. This simple system could be improved with a tank to store the water and mete it out, as needed. But the simplicity of the solution suits us for now.
Both these simple-but-useful methods are reminders that one can start with almost no money and a very simple plan for rainwater harvesting in order to get a large benefit. One just needs to get started. In Figure 3, you can see peas growing in raised beds under the drip line of the eaves of a garage.
Previously Mentioned Rainwater Systems in SurvivalBlog
There are two notable examples of rainwater harvesting systems that have been documented in past SurvivalBlog articles. On April 19, 2017, in Rainwater Harvesting: An Easy and Efficient Build, the author describes the details of building a specific system that stores about 440 gallons of rainwater. The author uses eight 55-gallon drums above ground next to a building, connected with PVC pipe at their base so that all the tanks fill at the same time. This is a good system that can allow someone to start small, and then keep adding drums as they wish to grow the system. I recommend this article for anyone who needs detailed directions for an expandable system built from simple materials.
The other system was described in the article, A Gravity-Fed Rainwater System, on June 7, 2019. In this system, the author put a 150-gallon plastic container on a pedestal, and gravity-fed his water to his garden. This article is a good reminder to use gravity where we can to distribute our aqueous bounty.
(To be concluded tomorrow, in Part 2.)