


(Continued from Part 1.)
How to air layer
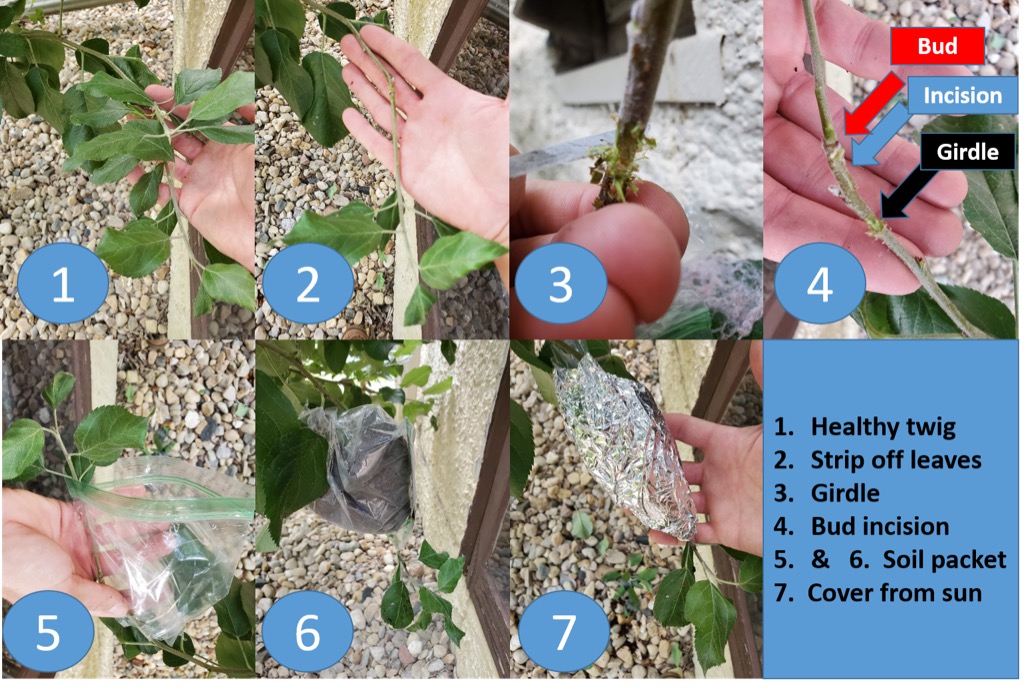
In this part of the article, I will describe the steps to air layering and then provide details and alternate methods to accomplish the same tasks for each. (see Figure 1 for a pictorial overview)
1. Identify where to make the air layer
2. Remove leaves, girdle, and make an incision near a node
3. Apply rooting hormone if you have it
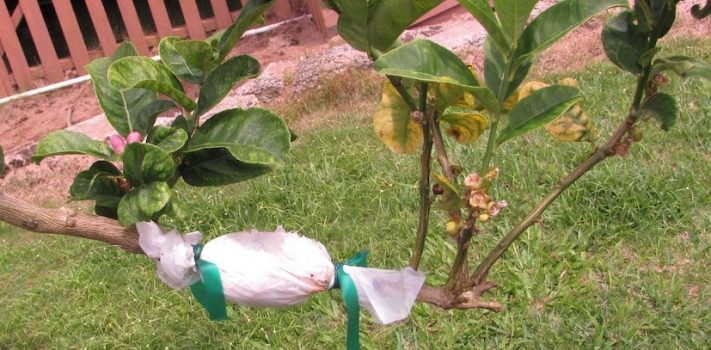
4. Cover the incision with moist soil and protect from the elements
How to air layer: Identify where to make the air layer
Twigs/branches ideal for air layering should be the freshest growth available. In the spring one would use growth from the previous season. In the summer, one would use the newly formed growth from that season. You don’t need a degree in botany to identify such growth. Tree and shrub branches grow “out” and away from the main trunk or branch. So most twig/branch tips you see will be good candidates. You just have to avoid those branches that haven’t put on new growth. This is common on some trees and shrubs, and I usually see it on branches that don’t receive full sun and/or branches coming directly off the main trunk as opposed to growing off a limb. I find color and flexibility of the twig key in finding a good air layering candidate.
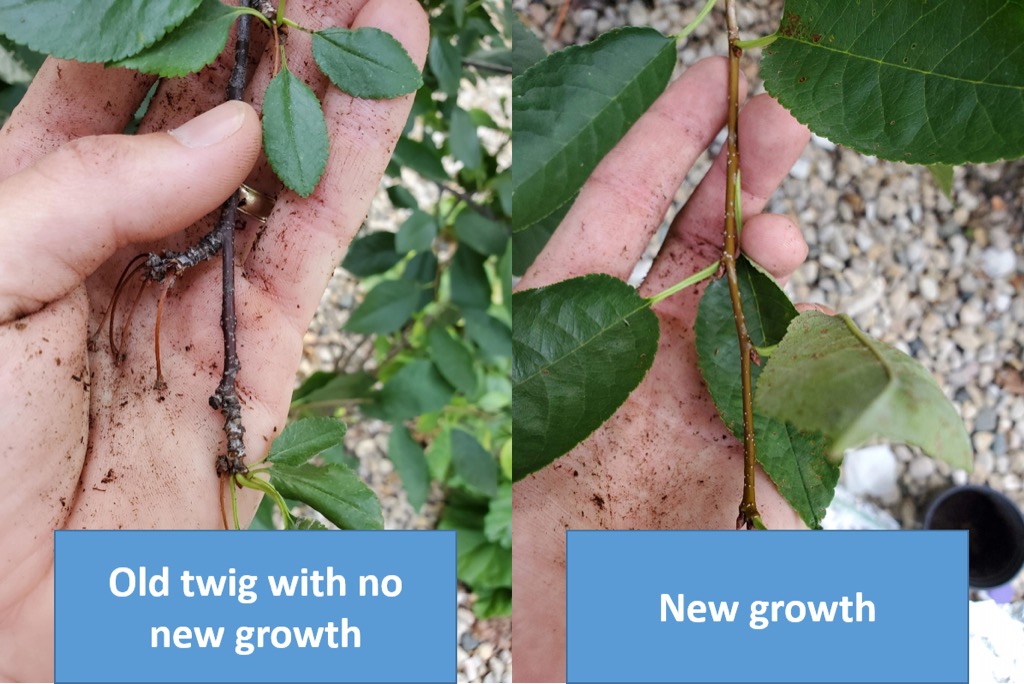
Color is usually lighter for newer growth (e.g., this is true for the 5 apple and 2 cherry varieties I own). (See Figure 2 for an example from a cherry tree) And flexibility is higher as new growth shoots haven’t fully lignified (i.e., became “wood”) yet. Length and diameter for air layering is reported in guides, papers, and books and varies a lot. You’ll read the diameter needs to be pencil size on some websites… but I have to doubt those authors have actually done what they are writing. New growth in the trees and shrubs I’ve air layered never gets this large for my perennial fruit trees and shrubs.
Many online horticultural websites/forums cater to propagation methods for herbaceous plants (i.e., non-woody plants) where thicker new growth is much more common relative to fruit trees and shrubs. For length, there is no real minimum length, you just want a node (I’ll discuss this later) and a few leaves at the terminal end of the shoot. I wouldn’t try this on a fruit tree or shrub twig over 12 inches; so new growth over 12 inches can just be air layered 12 inches back from the end of the twig. Avoid branches and twigs that are very shaded or look diseased or less robust looking. Lastly, if there are any flowers or fruit forming, remove them at this stage. We don’t want energy going into production of fruit when all the shoots energy should be focused on staying alive and forming roots.
How to air layer: Remove leaves, girdle, and make an incision near a node
After you’ve located a good site, you need to remove the leaves from where you will girdle and cut the twig/branch. Additionally, you want to remove any leaves that would otherwise end up inside the soil that you will place on over the twig. Leaving a leaf inside the soil packet for air layering is just asking to speed up potential decay/fungal growth around the layering site which we want to avoid. I remove the leaves over a length of about a wide as my palm. Be careful not to damage the plant as you remove the leaves; sometimes when you pull a leaf off it can stay connected at the petiole and pull away the bark from the twig. We will be girdling and cutting the twig already… no need to further damage it and possibly open it up on another place to fungal attack.
Now you should have a branch that kind of looks like a palm tree; a length of no leaves with leaves attached only at the terminal end. You may read that people cull leaves from the air layered plant, this is a good practice but you don’t do it at this stage, culling of leaves should be done after root formation inside the air layering packet. Now you are ready to girdle the twig. Girdling is performed via severing the bark from the twig over a roughly 1/4-1/2 inch space and all the way around the twig. For some species, you can make two cuts all the way around the twig and then connect them to allow you to remove the bark in a single square piece (“slipping the bark off” is the method you find on most online tutorials)… this is easier said than done for most species and seasons.
A much easier method is to just use the edge of a sharp knife as a scraper and rub back and forth on the twig all the way around until you remove an outer and inner layer of bark. You want to get down to the “wood” inside, usually a lighter color compared to the bark’s outer (usually dark in color compared to inner wood) and cambium (usually will be bright green in color) layers. Girdling will send an alarm message through the terminal twig end to promote root growth, exactly what we want. The girdling should be done at a place near the proximal end of the air layered twig (close to the parent plant). Between the girdling site and the end of the region where you removed branches, you need to identify a node.
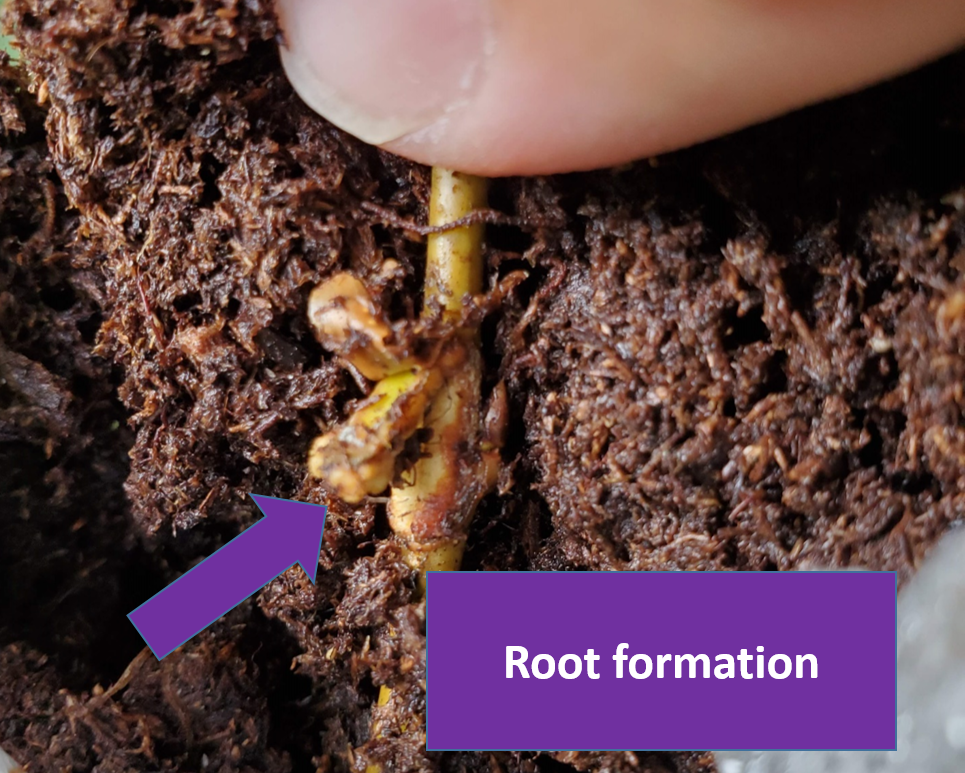
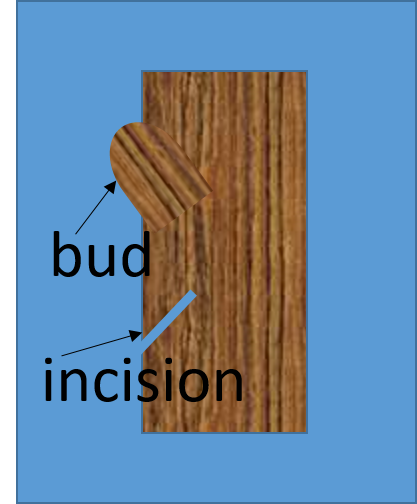
A node will just be a place where you previously removed a leaf. You may already see a new bud at the location if you are in summer. Directly below this location, you need to make an incision into the twig, roughly 1/3 of the diameter of the twig deep and at an angle “up” to the bud (see Figure 3). In my experience, the roots form from this “flap” that is left after this cut, and too shallow a cut could inhibit the growth of the roots. (See Figure 4 for an example of initial root formation). The cut should be made with a very sharp knife or razor to avoid, tearing/ripping the cambium layer and plant cells within near the node. A dull knife might damage the node which should contain special cells that are capable of turning into roots (undifferentiated cells).
How to air layer: Apply rooting hormone if you have it
After the girdling and node incision have been made, you should have a twig that looks like step 4 in Figure 1. You will have the parent tree branch with leaves, then your girdling wound, then the node incision (these latter two contained within the region you took the leaves from) then the leaves at the terminal end of the twig. After wounding the plant, you want to act quickly to apply rooting hormone if you have it and seal the wounded parts of the plant inside a soil packet, you don’t want them to dry out. I apply rooting hormone to the girdling location and the incision location. Some species are propagated with only a girdling wound and the roots form from the girdling site. In my experience the roots on my fruit trees always form from the node incision, but I still apply the hormone to both locations.
If you watch online tutorials, most people are covering large portions of a cutting or air layered plant in rooting hormone, so I don’t think there is a “wrong” way to do this, with the exception of caking the power onto the plant. Follow the directions on the hormone product you buy, but in general a “light dusting” is all that is needed. Best to dip a scalpel (I use a dissecting scalpel for girdling and node incisions) into a jar of rooting hormone., The small amount that sticks to the blade can be rubbed off inside the incisions and around the girdle wound.
Now let’s discuss the hormone products themselves. First, I would like to discuss a popular “myth” about rooting hormones. While aspirin has a similar chemical name to some rooting products, it is not known to promote rooting in the scientific literature. The presence of dozens of youtube videos and click bait links on horticultural websites promoting the use of aspirin doesn’t mean it is legit. Aspirin is wrongly thought to help because it has the chemical name “Acetylsalicylic acid” which is similar to a known promoter of plant growth called “Salicylic acid”. Just because the names are similar doesn’t mean they will have a similar effect. For example, carbon dioxide and carbon monoxide have similar names, but very different effects on humans. It is likely aspirin simply reduces the growth of fungus and bacteria inside the soil packet for the air layer, and is benign to the formation of roots. So personally, if I had no rooting hormone, I’d use aspirin (dissolving a single aspirin tablet in a liter of water) as it doesn’t seem like it hurts, but there is a lack of scientific evidence it actually promotes root growth. I would use it for its theoretical anti-fungal properties.
Commercial rooting hormones are usually sold specific to “houseplants” or “trees and shrubs”. While websites and books will talk of all sorts of tree “auxins” and synthetic rooting hormones, the majority of commercial products use a single active ingredient: Indole-3-butyric acid (IBA). It can be confusing, but several companies make various rooting hormone options with names like “Rooting Compound 1”, Rooting Compound 2”, Rooting Compound 16”, etc. The numbers for multiple companies refer to the concentration of IBA in the power/liquid/gel. For example, on one popular brand, their “1” refers to 0.1% IBA, and their “16” refers to 1.6% IBA. This convention isn’t true for all companies in this space, so look at the active ingredients label. For woody trees and shrubs, you usually want the higher concentrations, especially for later season (after spring) air layering. Household plant hormones are lower in IBA than those used for woody plants. 0.8% IBA concentration is what you will commonly find recommended by rooting hormone vendors for trees and shrubs.
Lastly, there is a source of natural rooting hormone that isn’t a myth. The Salix genus, common name “willow”, naturally produces relatively high levels of plant hormones in its bark. From a review article on the use of willow for anti-fungal and growth promotion in commercial nurseries “There is already an extensive literature existing, attesting to the effectiveness of the willow water as an aid to the successful rooting of cuttings” [Deniau 2019]. For willow, unlike with aspirin, there are multiple scientific studies demonstrating value for rooting (i.e., researchers rooting plants under controlled conditions without hormones applied and with Salix derived solutions applied demonstrating higher rates of rooting for the Salix group). In addition to rooting, the use of Salix species solutions is recognized by the European Union as a fungicide [EU]. So preparation of a Salix-based solution is beneficial to apply to fruit trees to fight disease and for air layering.
(To be concluded tomorrow, in Part 3.)