


My wife and I are convinced we need to pursue self sufficiency, and a large part of that is food self sufficiency, including providing our own protein, vegetables, and grain. I’m writing about our family’s grain gardening and am in the midst of detailing our crop operations. We’ve gone over soil preparation, planting, and reaping. Let’s now continue with drying.
Reaping and Drying (continued)
Mild fall weather during harvest time as shown in Figure 3 is unusual in the Copper River Valley, Alaska. It’s usually cold and sometimes wet; we had three inches of snow on the ground during our first harvesting year. So it is frequently necessary to dry the harvested grain before threshing. Also, peas harvested for shelling must be dried before threshing.
Constructing Drying Trash
I constructed 43 drying trays to accomplish this purpose. Construction details are shown in Figures 4 and 5. The wood is finished 1” X 2” lumber. The floors are made of galvanized ½” mesh hardware cloth. One exception is that the floor of three trays are ¼” galvanized hardware cloth; these trays serve the dual purpose of also screening grain as shown in Figure 13. All pieces are attached with screws, for strength.
Making 43 trays may seem to be a major project, but you will probably develop mass production techniques after constructing two or three trays. A radial arm saw or table saw can be used to cut quantities of end and side pieces at one time. Cut out a piece of ½” plywood that just fits the inside of the tray will assure square corners and speed assembly. Assemble the side and end pieces around the plywood mold, and clamp them together with two 24” bar clamps to form the frame; then use two drills, one with a pilot drill and screw recess head and the other clutched drill with a bit to drive the screws home.
The next step is to cut out the hardware cloth floor and affix it to the frame with screws and fender washers. Following that, clamp the lower end places to the upper end pieces and screw them in place, sandwiching the ends of the hardware cloth. The end pieces that look like handles as shown in Figure 5 actually protrude about ⅜” above each tray, and they serve to keep the stacked trays in vertical alignment. This description plus studying the photograph in Figure 5 should make the process clear.
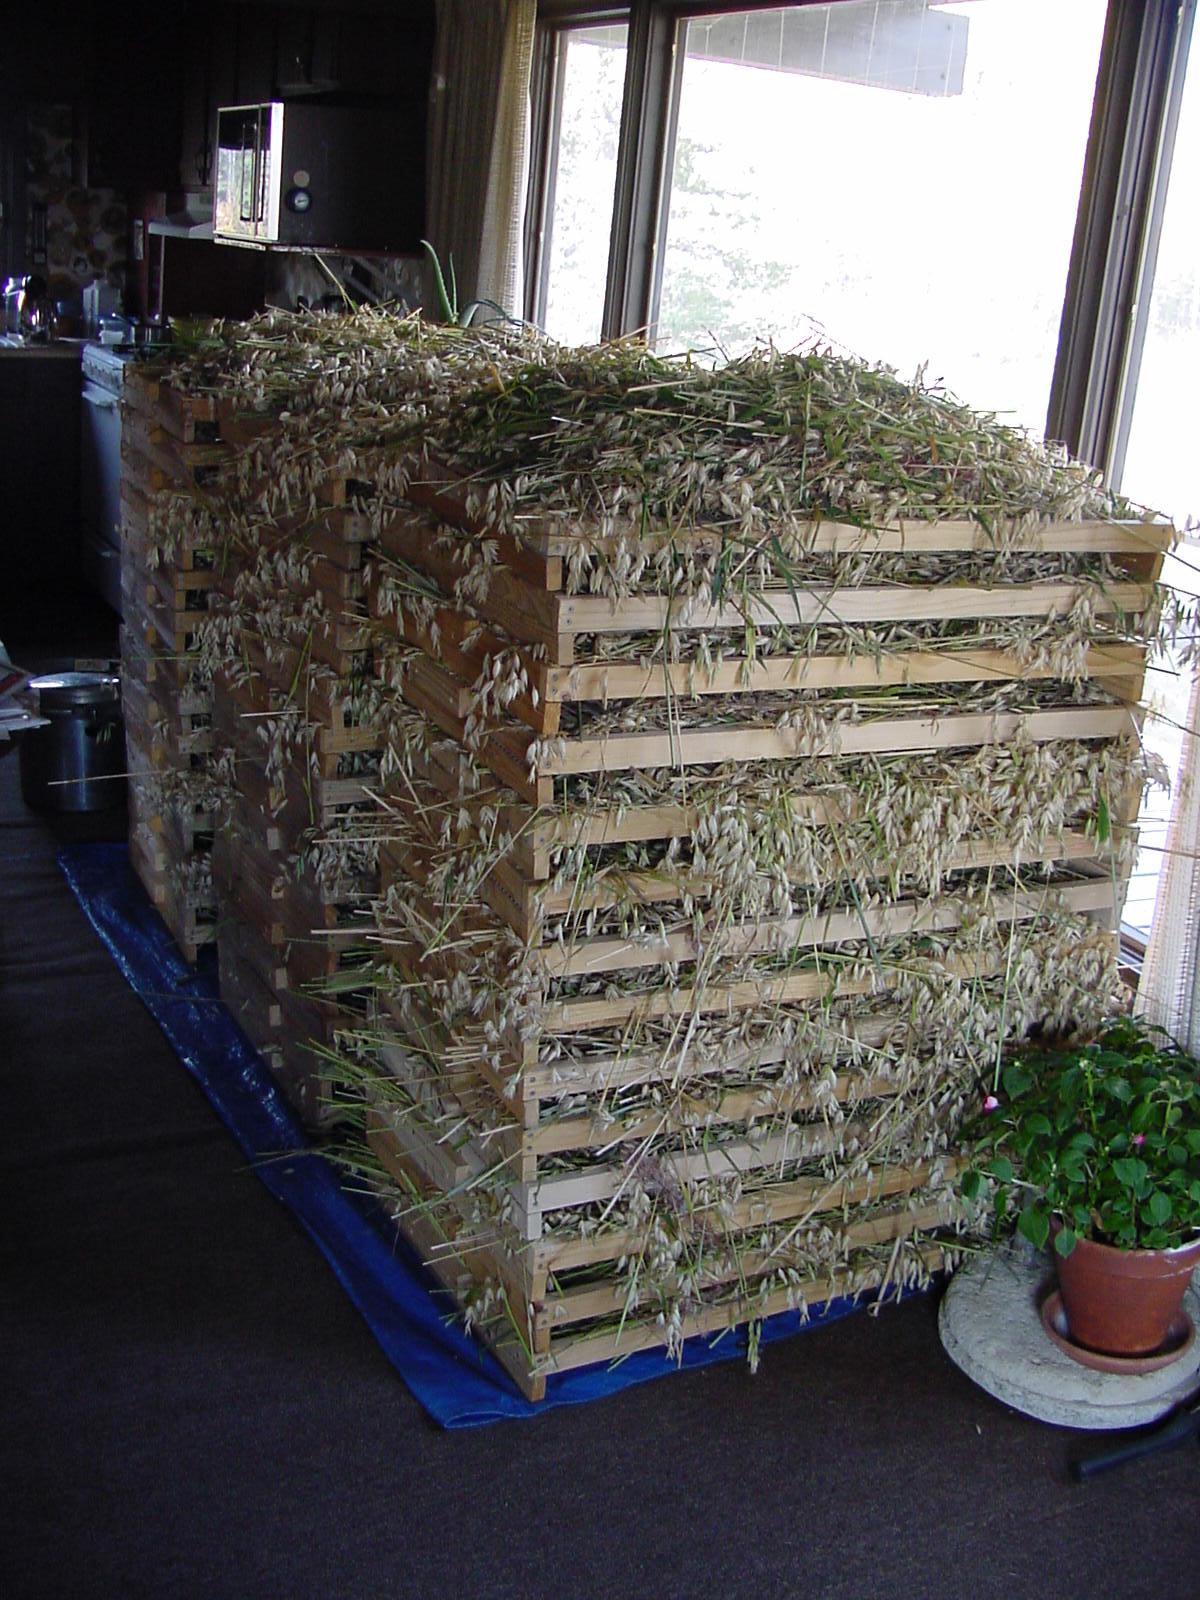
Figure 4: Drying trays filled with oats. Trial and error experience showed that trays over-filled, as shown in Figure 4, take too long to dry. We currently fill each tray approximately level full and use a floor fan to circulate the air through the stacked trays, as shown in Figure 5.
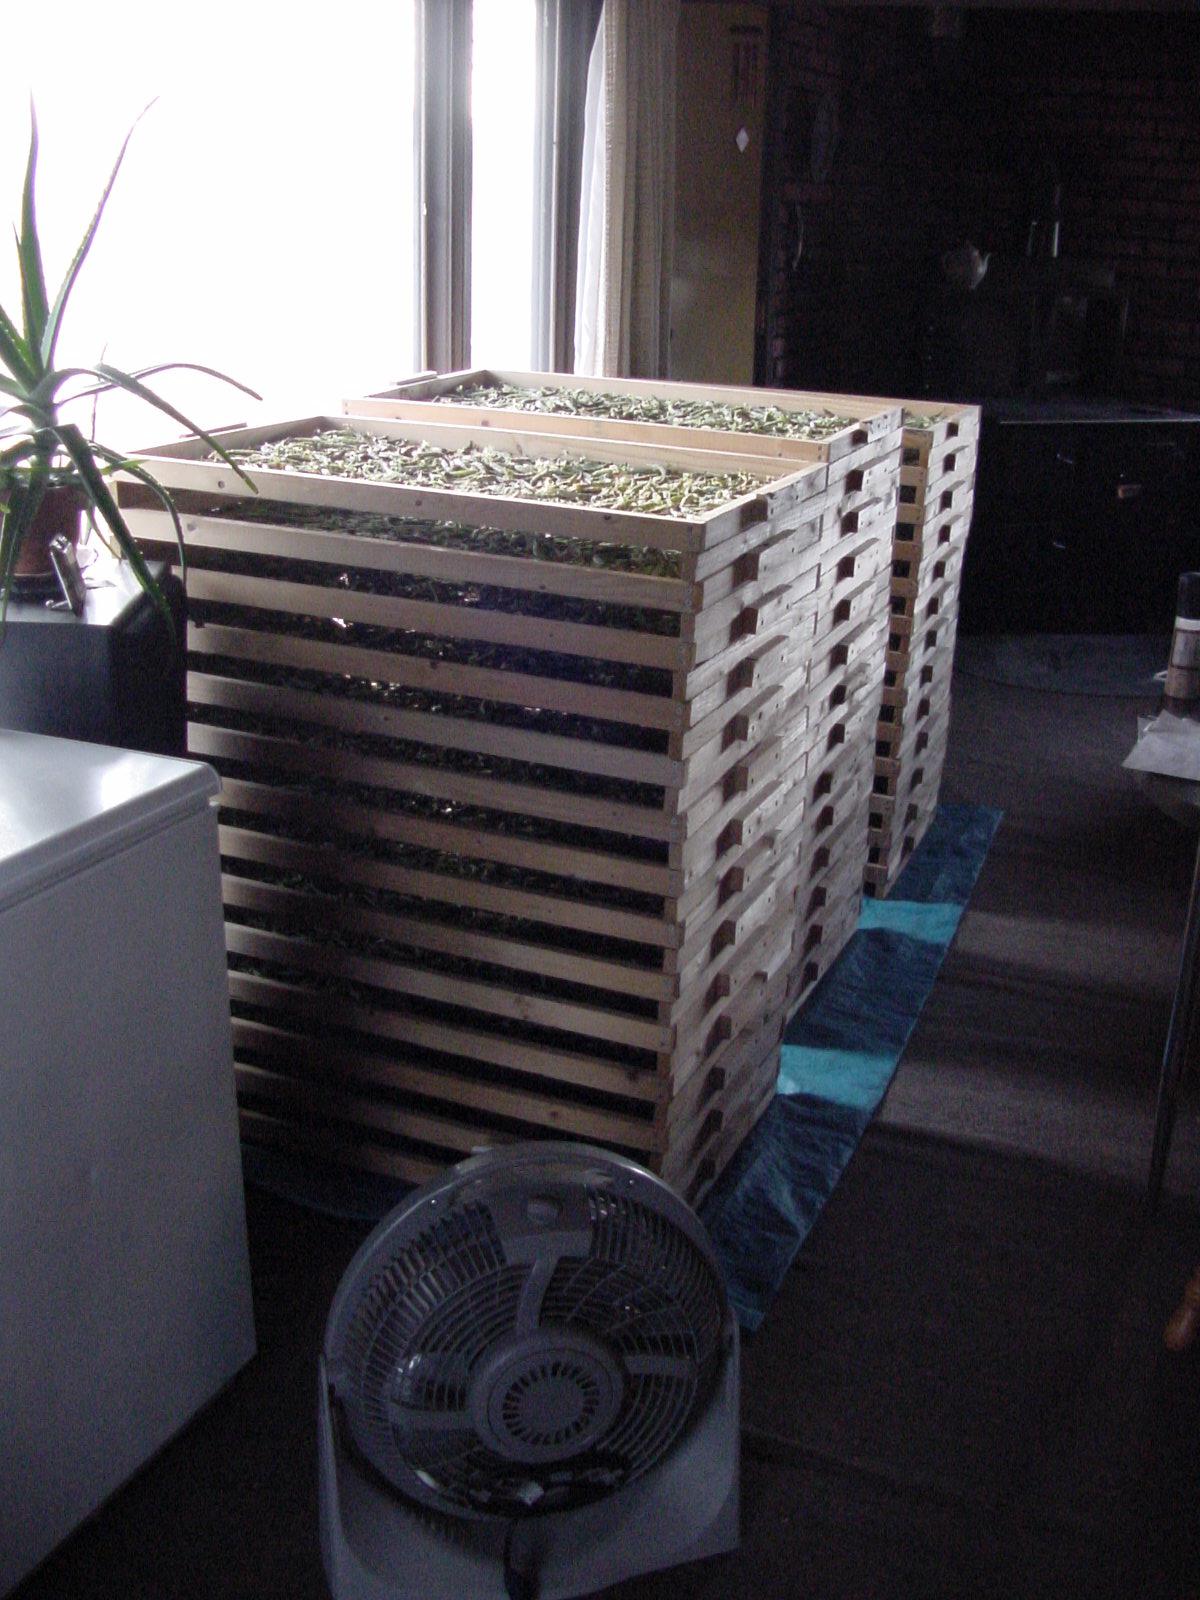
Figure 5: Peas in the drying racks, with a floor fan to circulate air through the stacked trays.
Using a Fan
The air flow through the stacked trays can be assessed with a strip of tissue held outside the rack distal to the fan. Before I used the fan, it took two weeks to dry the grain stalks. Now, with the fan and level-filled trays, grain is usually dry within 24 hours.
In the case of oats and barley, cereal stalks, and grain heads in each of the three stacks of drying trays, this nearly fills our tractor trailer. Therefore, three stacks of trays roughly equates to three trailer loads.
Amount Produced
We can usually thresh, winnow, and clean three tractor trailer loads per eight hour day, which produces 15 to 20 gallons of processed grain per day. Therefore, we have developed a routine of reaping the grain and filling the trays to dry one day, and then threshing, winnowing, and cleaning the dried grain the following day. Additional labor and drying racks could allow double production during the reaping and drying stage of harvesting by keeping the threshing/winnowing operation going every day. If we’re lucky with dry weather, we can go directly from reaping to threshing without the intervening drying stage.
Threshing and Winnowing
The key piece of equipment is the Rodale thresher. I used the plans and directions for construction of the core of the Rodale thresher from Gene Logsdon’s book entitled Small-Scale Grain Raising. It’s available for purchase. You can also find plans for the thresher with a Google search for “Rodale thresher”. The dimensions of plywood side-pieces and placement of the bolt holes and motor cut-outs were followed exactly with excellent results. Those people who designed the Rodale thresher were good craftsmen. Places where I deviated from the original plans are described below.
Rodale Thresher Modifications
The ¾” shafts on which chain links are welded must be grooved on each end to accept keys that lock pulleys on the ends of the shafts (see Figures 9 and 14). Set screws alone on the pulleys are unlikely to resist the torque when the beaters snatch a wad of green stalks. Get these grooves cut by a machine shop before any other operations.
Welding Operation on Thresher
For those readers with even less welding experience than me, I’ll describe the welding operation in more detail. With welder’s chalk, mark the center of each shaft. Then measure the width between the plywood walls, and divide this width by half. Measure from the center mark this half-width, and encircle the shaft with a chalked lines, on both sides of the center mark. The welded chain links must remain within these two shaft-encircling chalked lines. Then draw four equidistant chalk lines along the length of the shaft, dividing the round shaft into four equal quarters.
The 3 hp motor spins clockwise, viewed from the shaft end. Therefore, all the shafts spin clockwise, viewed from the same side of the thresher. Keep this in mind as you weld the chain segments; the welded chain segment leads, the freely-moving link follows.
Directions
The directions called for 3-link chain pieces welded to the round steel shafts. The chain that I used was old galvanized high tensile 5/16” anchor chain. I surmise that the Rodale craftsmen used proof coil chain. My high tensile chain, if the central link was welded to the shaft, did not allow freedom of movement for the advance or trailing links, so, therefore, I converted all the 3-link chain segments to 2-link segments. Even then, it was necessary to slide the advance link back on the shaft until the trailing link moved freely. Minimum space between the trailing link and the concave appeared to be one scant fingertip.
On the center mark of the round shaft, place one 2-link segment, adjust it until the trailing link moves freely, then clamp it in position on one side of the link with vice grips. Spot weld the link opposite the vice grips. Then remove the vice grips and weld the link solidly.
Like most amateur welders, I use lots of rod, but I have never had my welds break. You do not want broken links flying around inside the thresher. To evenly melt liquid steel on both the link and the ¾” round shaft, the welding rod must dwell on the shaft much longer than on the welded chain link. After the first chain segment is solidly welded, weld the second segment 180 degrees opposite; your chalk lines will be your guide. Again, keep in mind the clockwise spinning shaft. The third chain segment is welded lateral to and between the first pair, just clearing them.
The 4th chain segment is welded opposite the 3rd segment. Continue welding chain segments, moving laterally on both sides until your last chain segment is close to the encircling chalk lines. The directions called for 13 sets of 3-link segments per shaft, but I count twenty or twenty-two 2-link segments per shaft from the photograph (Figure 6). Again, these directions plus viewing the photograph in Figure 6 may make the process clear.
The Motor
The directions called for a 3 hp motor, and I suggest that all three of those horses are needed. Threshing oats with partially green stalks sometimes results in a large bolus of stalks being yanked into the beaters at once; being in a hurry, I’ve sometimes stalled the motor several times in succession. The thresher seems to operate better nearly full than nearly empty.
Not being initially certain about optimum beater bar speeds, I bought a 2”, 3”, 4”, and 5” multi-pulley for the motor shaft (see Figure 15). Using the 4” pulley at the motor and 6” pulley for the driven pulley on the beater bar shaft, the motor spinning at 1725 rpm, the result is 1725 * (4” / 6”) = 1150 rpm beater bar speed. (A math shortcut is used here; pi is a constant and cancels out.) My three-year experience using this thresher at these settings was that it does an excellent job of threshing. Thinking that peas may be more fragile, I geared down the beater bar speed to 400 rpm for dried peas, but they didn’t thresh well. Threshing peas at 1150 rpm, as with cereals, I’ve yet to see a fractured cereal grain or dried pea.
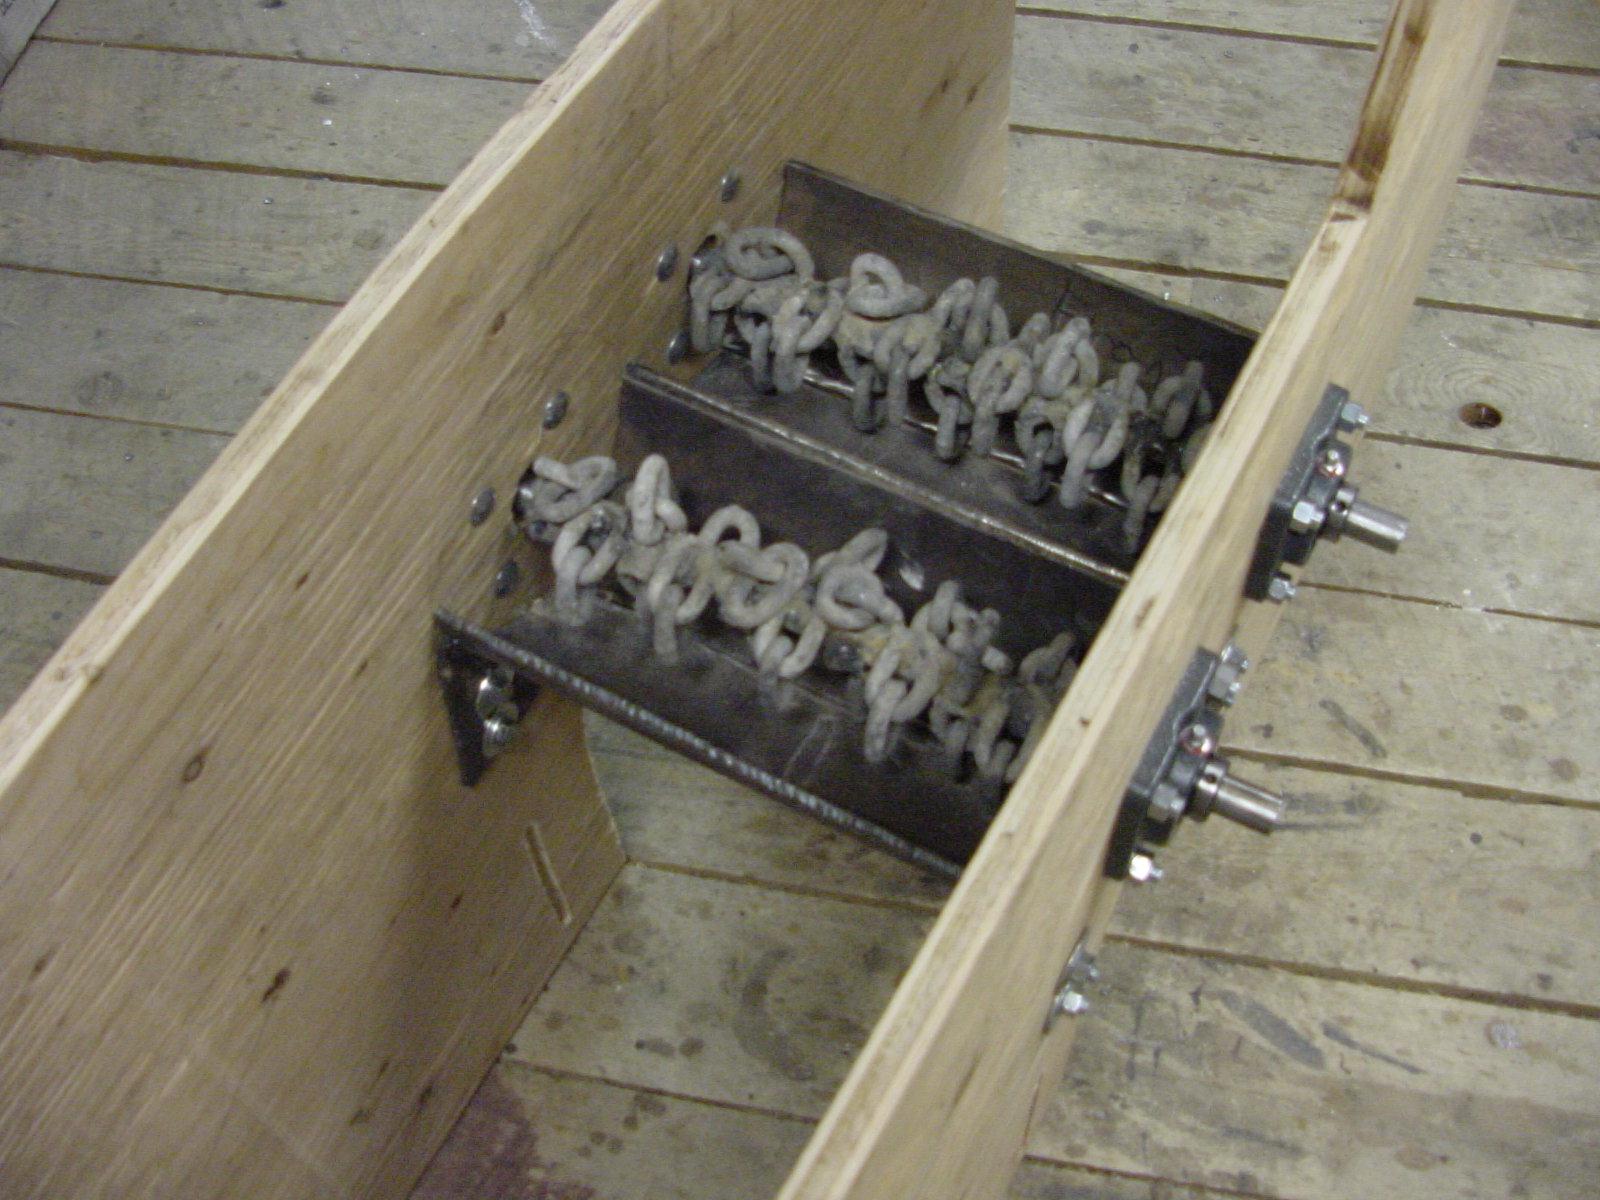
Figure 6: Chain links welded to the round bar and the position of the concaves.
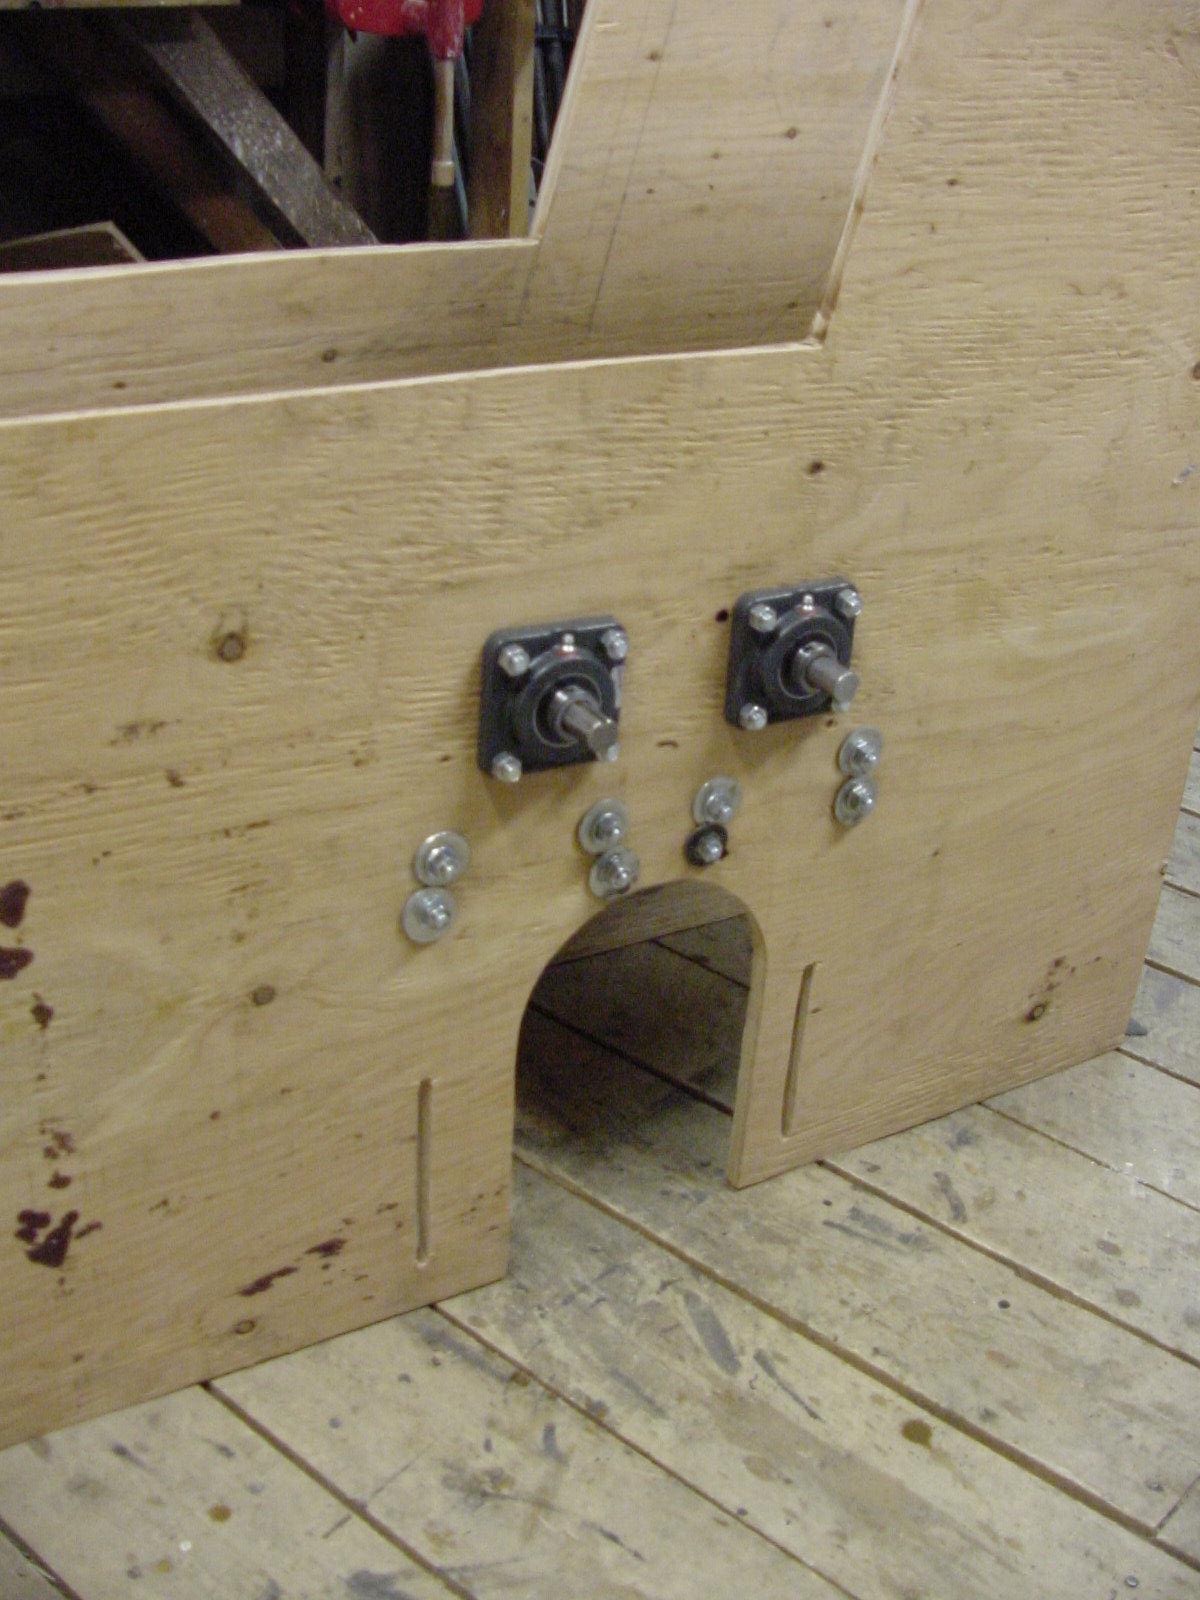
Figure 7: Showing the beater bar bearings and the motor cut-outs. A groove in the end of one beater shaft for acceptance of a key to bind shaft to pulley, is visible.
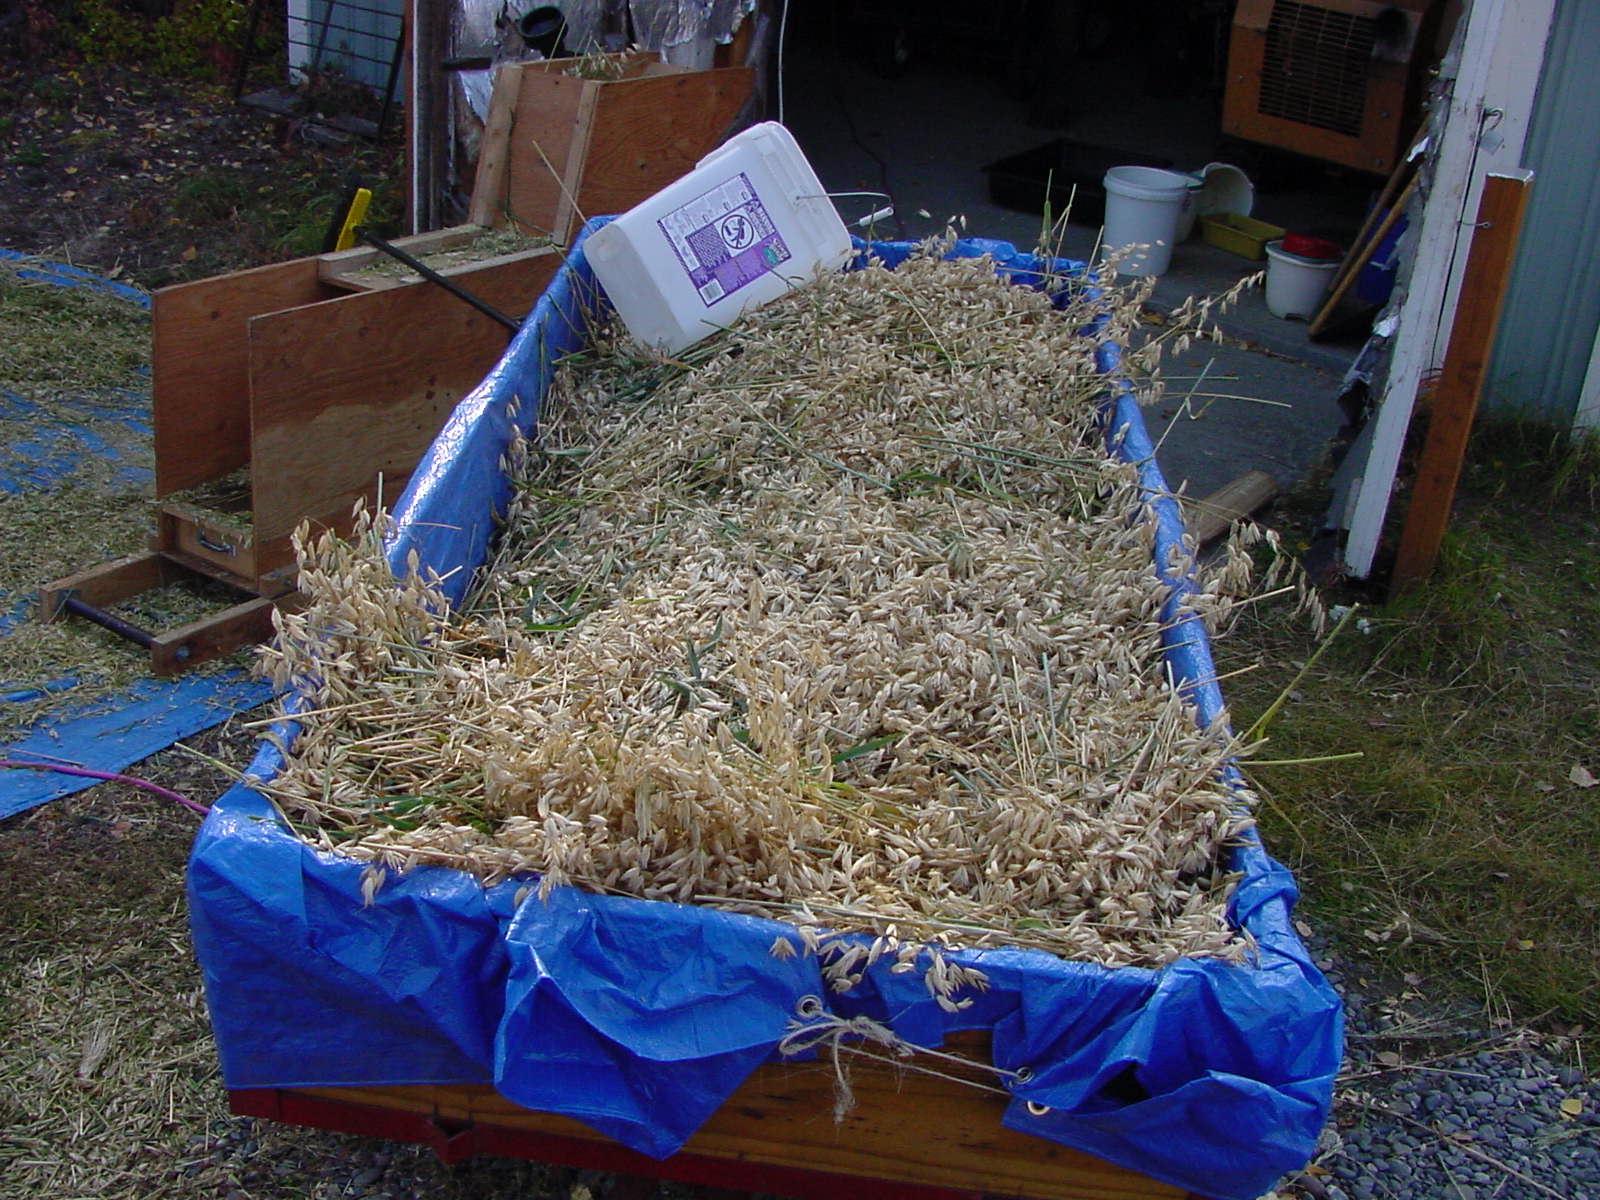
Figure 8: Trailer with oats ready for threshing

Figure 9: Dumping a 5 gallon bucket of oats into the thresher. The rectangular pail was sold with kitty litter (Scoop-Away) and is just the right size to fill the thresher hopper. Note the exposed pulleys and fan belt; keep young kids and situational oblivious adults away from this operating thresher, and don’t allow anyone working for the government (OSHA) on your property. Better, cover the exposed pulleys and belt with galvanized hardware cloth. Note the parka; obviously, this photograph was made in a different year from that of Figure 3.
Tomorrow, we will continue to discuss more modifications on the Rodale Thresher and move on from there.
See Also:
- 1 – Mid-Scale Grain Gardening in Alaska- Part 1, By Alaskan Gardeners
- 2 – Mid-Scale Grain Gardening in Alaska- Part 2, By Alaskan Gardeners
- 4 – Mid-Scale Grain Gardening in Alaska- Part 4, By Alaskan Gardeners
SurvivalBlog Writing Contest
This has been part three of a four part entry for Round 74 of the SurvivalBlog non-fiction writing contest. The nearly $11,000 worth of prizes for this round include:
First Prize:
- A $3000 gift certificate towards a Sol-Ark Solar Generator from Veteran owned Portable Solar LLC. The only EMP Hardened Solar Generator System available to the public.
- A Gunsite Academy Three Day Course Certificate. This can be used for any one, two, or three day course (a $1,095 value),
- A course certificate from onPoint Tactical for the prize winner’s choice of three-day civilian courses, excluding those restricted for military or government teams. Three day onPoint courses normally cost $795,
- DRD Tactical is providing a 5.56 NATO QD Billet upper. These have hammer forged, chrome-lined barrels and a hard case, to go with your own AR lower. It will allow any standard AR-type rifle to have a quick change barrel. This can be assembled in less than one minute without the use of any tools. It also provides a compact carry capability in a hard case or in 3-day pack (an $1,100 value),
- Two cases of Mountain House freeze-dried assorted entrees in #10 cans, courtesy of Ready Made Resources (a $350 value),
- A $250 gift certificate good for any product from Sunflower Ammo,
- Two cases of Meals, Ready to Eat (MREs), courtesy of CampingSurvival.com (a $180 value), and
- American Gunsmithing Institute (AGI) is providing a $300 certificate good towards any of their DVD training courses.
Second Prize:
- A Model 175 Series Solar Generator provided by Quantum Harvest LLC (a $439 value),
- A Glock form factor SIRT laser training pistol and a SIRT AR-15/M4 Laser Training Bolt, courtesy of Next Level Training, which have a combined retail value of $589,
- A gift certificate for any two or three-day class from Max Velocity Tactical (a $600 value),
- A transferable certificate for a two-day Ultimate Bug Out Course from Florida Firearms Training (a $400 value),
- A Trekker IV™ Four-Person Emergency Kit from Emergency Essentials (a $250 value),
- A $200 gift certificate good towards any books published by PrepperPress.com,
- RepackBox is providing a $300 gift certificate to their site.
Third Prize:
- A Royal Berkey water filter, courtesy of Directive 21 (a $275 value),
- A large handmade clothes drying rack, a washboard, and a Homesteading for Beginners DVD, all courtesy of The Homestead Store, with a combined value of $206,
- Expanded sets of both washable feminine pads and liners, donated by Naturally Cozy (a $185 retail value),
- Two Super Survival Pack seed collections, a $150 value, courtesy of Seed for Security, LLC,
- Mayflower Trading is donating a $200 gift certificate for homesteading appliances, and
- Two 1,000-foot spools of full mil-spec U.S.-made 750 paracord (in-stock colors only) from www.TOUGHGRID.com (a $240 value).
Round 74 ends on January 31st, so get busy writing and e-mail us your entry. Remember that there is a 1,500-word minimum, and that articles on practical “how to” skills for survival have an advantage in the judging.
So in order to process grains into a basic end product (reaped, threshed, winnowed), you need a lot of time and equipment. Conversely, to utilize potatoes, you dig them out of the ground and wash them off prior to use.
I don’t think the author or I are advocating sole sourcing our food consumption to either grains or potatoes. Rather, the point is what it takes to be self sufficient, with either grains or potatoes or a combination being a primary caloric source. I think the author’s point is to show what is practical for one or two given crop productions for the average schmo, and my point is one of economics of scale and simplicity by comparison for a similar output. To each subscriber, their dietary needs and desires may vary.
Crops fail, and there are no more guarantees that a grain crop will be harvestable in Alaska than a potato crop might be. In fact, history would tend to indicate that potatoes have done far better over time than grains have there. There are no sure things in any crop. However, potatoes are arguably a much more reliable and efficient primary crop that can be grown there. I don’t know anyone who grows just barley, or oats, or potatoes. A decent and variable fruit and vegetable crop combined with hunting/fishing and forage would at least be highly desirable, if not outright necessary, for sustained subsistence. What we are talking about here is one major element of several that need to be considered for self sufficiency in what can be a very difficult region to survive in. In a SHTF or rudimentary self sufficiency mode of operation, average well prepared Alaskans are going to be overwhelmed with labor needs almost to the point of failure. Having the where-with-all in place ahead of time to provide a chance of success is a huge step toward surviving long term. Making the most of the time and resources you have access to is another huge step in the right direction. Being able to successfully grow and harvest primary crops in Alaska sufficient for your needs in perpetuity is the former. My emphasis on making that primary crop potatoes instead of grains is in my opinion the latter. But then I tend to consume more potato products on average than all grains combined in my diet. YMMV.
Benjamin, I think, perhaps, you skipped reading some of Part 1 of this article. In Part 1, I proposed for discussion purposes that food gathering can be subdivided into protein harvesting, vegetable gardening, and grain gardening. This article was intended to focus on grain gardening, period. I also grow a sufficiently large vegetable garden to be self-sufficient in root crops (especially potatoes, carrots, onions, beets, and turnips, our favorites among vegetables) and greens such as kale, broccoli, cabbage, spinach, cauliflower, celery, lettuce, and sweet peas. We also have a solar-heated greenhouse that produces, cucumbers, zucchini, herbs and especially tomatoes. But addressing those aspects of food self-sufficiency was outside the scope of this article.
As I said in Part 1, “Vegetable self-sufficiency (including root crops, such as potatoes, carrots, and turnips, as well as greens, such as brassicas and spinach) is fairly easy to attain, even with Alaska’s short growing season.” I did not say that grain gardening was intended to supplant vegetable gardening.
Perhaps, you can help here: From what I can remember of history, I cannot think of any civilization that was dependent on vegetable crops only – all that I can recall were primarily based on grains (rice, wheat, rye, barley, oats, etc). There were reasons for that.
Grains store indefinitely if moisture content is kept low; try storing potatoes longer than one year.
A failure in a potato crop is a failure in next year’s seed potatoes. Yet, most people who base self-sufficiency on vegetable-only gardens, assume that seed potatoes will be available commercially. If seed potatoes are not available from storage of your current crop or the lack of commercial seed potatoes, you are in “hard times”.
I usually have to hoe my vegetable garden up to 7 times during the summer. After grain is planted, it is care-free until harvest time.
One of the negatives of “mid-scale grain gardening” as I’ve described it is that it takes a lot of equipment as compared to gardening with a rototiller. Yet that equipment makes possible a whole different scale of gardening. I used a rototiller for years, and I could not grow but a small part of the vegetable and grain gardens that I can grow now with ease, using tractor-mounted equipment. Typically, it takes me longer to mount, adjust and lubricate the equipment than it does to till the garden plot with whatever implement I’ve mounted. Gardening equipment can be used for multiple purposes – much of the same equipment is used for grain and vegetable gardening, and is also used to haul firewood, as well as general towing and carrying. The equipment, including the tractor, seems to last forever on garden-sized plots – I have under 400 hours on my tractor in 7 years of use, with little signs of wear. By contrast, I grew up on a farm where my father and I would more than occasionally work shifts, all night long, to get plowing or planting done ASAP. Still, tractors and equipment lasted decades.
Another negative is that currently, oats out of the grocery store are cheap, cheaper than can be produced by cropping. However, people buying equipment for “hard times” are looking at probabilities in the future, and they expect oats to possibly be unavailable in local grocery stores, or they don’t expect it to be cheap because of depreciated dollars due to inflation or because of disappearance of the “petro-dollar” (whose future existence is currently becoming tenuous). They are trying to look ahead and mitigate the personal and family impacts of “hard times”.
You’re right that grains cannot supplant potatoes in terms of easy calories produced, but that’s not the issue for me. Why not have it all: food self-sufficiency to mitigate “hard times”, sufficient equipment to make extensive gardening much easier, an oat crop for oat meal and granola; barley for supplementing stews and mixing with wheat for bread; root crops such as potatoes, carrots, onions, plus a green vegetable such as broccoli, sweat peas, or kale for supper; don’t forget the salad with your greenhouse tomatoes, lettuce, and cucumbers. We really enjoy our greenhouse zucchini, too. The goal is to make “hard times” better than just survival; we enjoy our gardening and it’s products.. We enjoy the minimal labor that farm equipment provides for us seniors. Much of the specialized equipment can be hand-built at minimal cost – as I’ve demonstrated in this grain gardening article. Greenhouses, even more advanced ones, can be built easily. One simply needs conviction of the need, a willingness to sacrifice some impulse buying to pay for the basics, and spare time to build.
I think it is always good to remember the importance of diversification be it investing or growing food for self-sufficiency. If you place everything into one basket you are bound to fail at some point in the future and if the failure is food that will sustain your family the results could be deadly.
Alaska is divided into a few regions; southwest or south east coastal which are rain forest type areas. Central region is more moderate and the Mantnuska valley falls into that region and is well prepared for those 35 pound cabbages one sees … then there is the interior where I live. To grow here will take intense green house and skill set work. For a perpetuity type SHTF scenario; maybe “go south” is the best advice.
Question, would the crops be enough in sales to pay the property tax on your land.
One thing I see in history is Governments never really die but change leaders. But all of them tax. And unless one has barter equal to what is owed on your property each year, the government “will” confiscate your property