


Finishing an AR-15 80% Lower
During the eight years of Obama’s presidency, a record 144 million pre-purchase NICS background checks were performed. This is almost exactly twice the number we saw during eight years of George W. Bush. Whether the numbers return to Bush-era levels under a Trump presidency remains to be seen. Certainly, while a background check is not an actual gun sale, it is widely believed that the numbers do correlate closely to actual gun sales.
This substantial increase in firearms sales also saw a corresponding increase in firearms technology development. Good examples of this include the rise in popularity of the AR-15 rifle with pistol versions and availability of several new calibers; the proliferation of new firearms models; and solid sales growth for items like suppressors and specialty stocks that used to be regarded as curiosities. While Obama’s anti-gun stance clearly polarized the nation, a broader firearms mindset also became evident by increased concealed carry permit issuance and broader concealed carry legislation. Firearms training classes also proliferated as the idea of gun ownership actually attracted many new shooters, and, of course, there was the emergence of the 80% firearms industry.
The 80% firearm idea is simple. It allows an individual to legally purchase an unregulated firearm lower receiver as an incomplete and non-functional receiver blank or casting. The individual can complete the final machining operations themselves using their own equipment to do so. When properly completed, it becomes a functional gun receiver, which can then be assembled into a complete firearm when fitted with the remaining non-regulated parts. When done properly, most are indistinguishable from their commercial counterparts. However, as covered in Parts 1 and 2 of this article series, its use and ownership is limited to the builder and a family member who might inherit it.
First Things First
It is easy to get psyched at the idea of building your own legal “ghost gun”. Hopefully, you can learn something from my experience and mistakes. I wish this kind of input had been available to me before I charged off into uncharted territory. We will examine the options currently available and review a number of tips and tricks to assist you in the completion your own 80% receiver. We will also identify some common potential pitfalls to avoid.
First of all, completing an 80% receiver requires some experience at how to properly use hand and power tools. Those lacking skills here should fine a more experienced friend to mentor them so as to minimize their potential frustration. Also, be aware building an AR-15 using an 80% lower is really a project with two distinct phases. Phase 1 is taking your 80% blank and completing the necessary steps to make it functional. Phase 2 is to use that completed lower, now at 100%, by then assembling the rest of the parts properly to produce and test the completed firearm. I strongly recommend participating in the assembly of at least one conventional AR-15 build using a factory-built or other known-good lower receiver before tackling one with your 80%ers. This way you will experience what a normal AR-15 build feels like, so you will have some sense of whether the lower you just finished machining is being stubborn, if it is just a normal assembly challenge, or if there is another defective component. That said, let’s begin.
Picking a Material and Finish
Before your order a receiver, jig, and tools, you need to decide whether you want a receiver made of aluminum (which is harder to machine) or polymer (which is easy to machine). If choosing polymer, will you choose an injection molded polymer to machine or mold your own using a two-part polymer mold pour? Review the options carefully because once you build one, you will own it for a lifetime.
If choosing aluminum, there are generally two ways to buy an 80% aluminum receiver; they come raw or anodized. A raw unfinished receiver should be later finished to protect it from corrosion and scuffing. The best for finishing raw aluminum are the hard-cure coatings such as Gun Kote, Cerakote, or Dura Coat. Spray paint will work but may need frequent touchup. The second alternative is to buy it already hard anodized. An anodized finish is an electrolytic plating operation that significantly and uniformly forms a durable aluminum oxide finish that protects the surface. The machining operations performed while completing the receiver will leave raw aluminum exposed where it was machined but corrosion coating those areas isn’t as critical.

If you opt for a polymer lower, no additional finishing will likely be needed. Black is the most popular but many non-black options also exist. Color can be introduced by molding it using a color polymer feedstock or using a hard-cure coating over a black receiver after completion. I personally choose an anodized lower for my first build because that’s how every high-end AR-15 I saw was built. I used a polymer lower for a second build because my goal was to build a real AR-15 rifle chambered in .22 lr that weighed less than 4 lbs.
Here’s a chart that shows the comparison:
![]()
Choosing a Supplier
After selecting the type of material and finish, you will have to review what each maker has to offer and decide where to buy. Be sure to review what type of jig / tool combination they have available and how much support they offer. One final note about selecting a company’s lower system is whether they have gone to the trouble of getting their own ATF Determination Letter. This letter certifies that their product is an ATF-approved true 80% lower. Here’s one reason why it might someday matter. A few years ago, one firm in the early days of 80% receiver– Ares Armor in southern California– was raided by the ATF and temporarily shut down because they built their 80% lower with a different color piece of plastic permanently molded at the exact location of the fire-control cavity. Buyers would then simply Dremel out or mill away the different-colored plastic from that area and drill a few more holes to complete their lower. It was a clever approach, but the ATF held that by adding the color in the shape of the cavity to be removed, Ares Armor was illegally facilitating the manufacture of a firearm by its actions. Essentially they were now judged to be selling a firearm, not an 80% lower. A lower from a maker without a Determination Letter may be just fine, but I think it is better to be safe than sorry. Oh, the ATF also confiscated Ares Armor’s entire 80% receiver customer list along with Ares Armor’s other business records.
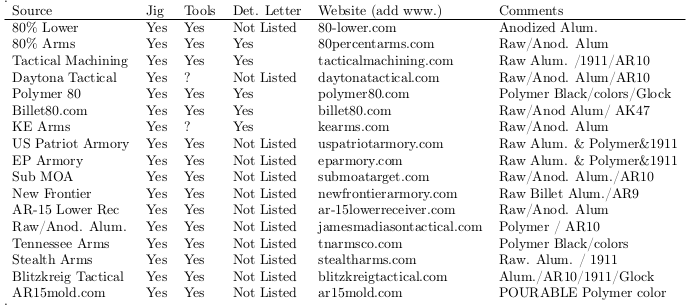
Choose your lower and you’re on your way. I compiled a pretty complete list of most of the available sources I could find and whether they offer matching jigs and tools. I also tried to find out whether they have an ATF Determination Letter. I made no attempt to compare them, other than a few comments. No claims are made for the completeness or accuracy of the list. I have no involvement, recommendations, or worries relating to any of them, except for what I have already discussed.
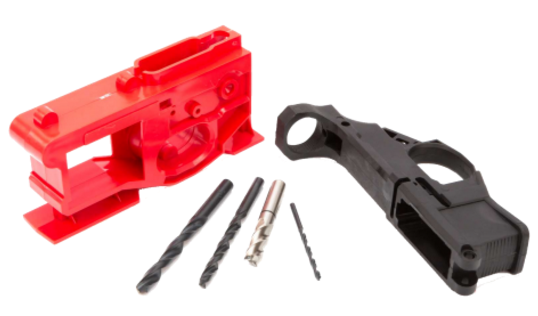
Jigs and Cutting Tools
Most manufacturers also offer a jig suited for their lower with a tool set to match. If possible, consider getting your jig, cutting tools, and lower from the same source. They are more likely to work together, which will give you a better chance at success. The best jigs have replaceable drill bushings, but this is not critical. I like drill bushings because they are replaceable and reduce wear from repeated use. This means that hole placement will stay more precise over time. The best jig makers also have both written and video instructions. I would definitely avoid the peel-and-stick label jig templates that some vendors offer as an alternative to a jig to guide your work. A friend was halfway through a milling cut when his label template wrapped itself around the spinning cutter. It shredded his confidence right along with the template. Aluminum jig came to the rescue.
Doing the 80% Machining
– For drilling the hammer pin, trigger pin, safety selector hole, and other holes needed, a good electric hand drill or drill press will do as long as you are careful. Lube while drilling or milling helps also. Milling out the fire control pocket will be the most challenging part. It is the operation where people make the most mistakes and break the most tools. That’s because people are less familiar with milling, which is different than simple drilling. In milling, the spinning cutter is stationary and you feed the workpiece into the cutter. Drilling is done on a stationary workpiece and the spinning bit is fed into the workpiece. Also, in milling you are often taking material off of two surfaces at once, so it is easier to slip. Personally, a benchtop drill press and a manual $49 Harbor Freight cross-slide milling vise is the minimum I am comfortable with. Like you, I’ve had projects ruined by power tool bit slippage. Make sure you properly clamp the workpiece, control the feed rate between bit and workpiece, and prepare to stop quickly. There are videos all over YouTube of people using these methods successfully. Good luck and be careful!
Plan Ahead
Do your homework and dry fit parts and jigs together to make sure they fit; then, reread everything and watch the video one more time! YouTube and Vimeo are loaded with some good and bad examples of people completing their lower. Watch a few. It’s an inexpensive way to learn from the mistakes of others.
![]()
Some Random Considerations
- RPM and Feed Rate – Watch your spindle speeds; you need a minimum speed to cut properly, and too fast will burn the bit and workpiece as well as melt the polymer. I’ve seen several recommendations to stay around 600-800 RPM, but YMMV. Keep a can of cutting oil near and use it frequently, especially on the harder aluminum grades used in AR-15 lowers. Remember that WD40 is not a lubricant. Also, watch your feed rates (how much and how fast you push cutter into the workpiece). More passes with less removed per pass is better than too much. Bit breakage is to be expected, and I don’t recommend starting a build without a spare milling cutter.
- Mistake Proofing – Preventing mistakes is way easier than trying to fix them. Here are some suggestions:
- Cover exposed surfaces with blue painters tape to prevent scratching.
- Use screw-on drill collars to keep drilled hole depths from going too deep.
- Use the tool stops on your machine or clamp on small blocks of wood to guide tool movement and limit slippage and overtravel.
- Repairing mistakes – Fortunately, if you still make a mistake, there are some limited ways to reverse the damage. JB Weld two-part epoxies are a godsend here. Stick to the standard JB Weld and the JB Aircraft weld. It can be machined like aluminum or polymer, once it sets. Avoid the 15 min. Kwik Weld; it’s not as strong. Rapid Fix is a 2-part system that includes cyanoacrylate liquid and a fine plastic powder. It makes a fast-drying slurry that can actually fill holes with multiple applications and can be machined and painted later.
Should I serialize it?
Putting permanent identifying marks on your lower is not legally required but strongly recommended by the ATF. You may want to consider it for two good reasons:
- It will allow you to identify and recover your firearm if it is stolen, and
- Commercial firearms made after 1968 must have a serial number affixed by the manufacturer. Removing the serial number or owning a gun with the number removed are both felonies. Older guns that never had one are okay. However, if a local LEO decides that your unmarked but legal ghost gun may really be evidence of a felonious serial number “file off”, the burden of proof will be on you to prove it doesn’t have one or need one. That said, many people avoid the problem by using a short numeric code on the area normally covered by the grip using an inexpensive metal stamp set or engraver. Since your unique number is only known by you and is nowhere “in the system”, there is really not much downside.
You followed all the tips, and now it’s done!
Now that you have a functioning receiver, it’s time for the rest of the build. Since the focus of this series is the 80% receiver, I am going to leave the balance of your AR-15 build up to you. There’s a ton of good info online about doing the remainder of a build. I hope this detailed look at the possibilities of completing your own Ghost Gun lower has been worth your time.
Next up: Building an 80% Firearm– Part 4, 80% versions of 1911 and Glock-type pistols.