
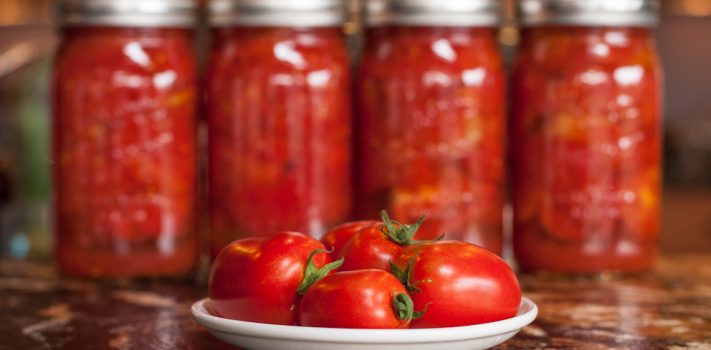


Freeze Drying Tomato Sauce
I am absolutely thrilled with the results from our Harvest Right Freeze Dryer! I can not only dry fruits, vegetables, meats, and herbs, but I can freeze dry meals. With that accomplished, I began to think about sauces. Sometimes a recipe will call for just a tablespoon of tomato paste. Who wants to open a whole home-canned jar or even a store-bought can of tomato paste just to extract one tablespoon? Then, you have to figure out what to do with the rest before it spoils and (I almost can’t tolerate thinking of it) it has to be thrown into the trash. When you have invested your time, energy, know-how, resources, and maybe even some emotional attachment toward the full cycle of making tomato sauce, from seed to sauce, you count every drop as precious. Hopefully, you have gallons of sauce as a truly sweet and satisfying reward for your efforts, but each drop is a reward for the many months of care and resources invested. You don’t want any to end up in the trash or compost, which is reserved for the unedibles! So, with this in mind and knowing that some recipes just need a tablespoon or a cup, it is wonderful to be able to have freeze-dried tomato sauce powder available. (I would imagine it might be possible to make this through long-term low heat dehydration if some lemon juice was added to help preserve it during the slow processing as well, but I have not experimented with this. We’d need someone to write in who has done this to tell us if it is plausible.)
I simply make my sauce as described in Part 2 of this article series, let it cool to where it is just lukewarm, and then pour about four or five cups of the sauce onto each of the four freeze dryer trays. If I am putting thicker sauce onto the trays, I can pour the sauce directly onto the trays and then load the trays with the sauce on them into the freeze dryer. However, if I am putting sauce that contains a lot of tomato juice (and just isn’t cooked down much) to where it is runny, then I leave the trays in the freeze dryer and simply slide them out about 1/4 of the way, which is far enough that I can ladle in the sauce and slightly tilt the tray to distribute the sauce without removing the tray altogether. I find that it is very difficult to avoid spilling liquids in these trays when I am carrying and loading them into the freeze dryer, so pouring liquids into trays that are already loaded into the freeze dryer works best for me.
Once the trays are loaded with tomato sauce, I set the freeze dryer’s freeze time setting for eight hours and the drying setting also for eight hours. This is usually enough drying time, but occasionally an additional two hours of drying is required. The newer Harvest Right model makes adding more dry time easy. I just remove the food, lift it to check, and if it isn’t ready put it back in, close the pressure valve, and push the “more dry” button and “start”. If, when I test any freeze dried food, it isn’t brittle and won’t crumble easily and/or it feels as if the food is holding any extreme temperature (either heat or cold) then I assume there is some liquid holding in that temperature and put it back to assure that there is no moisture. (I learned early on in the freeze drying experience that just because food seems dry to the touch, it may not be dry inside, when months later I found a vacuum sealed jar full of moldy freeze-dried potatoes. The potatoes had seemed dry but weren’t completely dry inside. It was quite disappointing to have to throw food out! However, we learned.) With tomato sauce (and most foods), it is the area against the bottom of the pan that is most likely to retain moisture the longest, so be sure to lift to check the tomato sauce, which will be like a solid piece of powdery styrofoam when finished freeze drying. I cut the pieces of “styrofoam” into sections that are about 3”x3” and then place those into my wide mouth Mason jar funnel that is part of the canning tool set and then use the flat bottom of my rubber mallet wood handle to pound the “styrofoam” tomato sauce into powder inside the jar. My rubber mallet’s flat wooden handle works great for pounding all kinds of powders and spices into our Mason glass storage jars. Any tomato sauce powder left in the freeze dryer’s tray is also scooped into the jar, as I don’t want any tiny bit of sauce lost.
To make about 1/2 cup of reconstituted tomato sauce, I just pour 1/3 cup of water into a cup and spoon tomato powder into my water until I reach the desired thickness I want. It usually just takes about two or three heaping tablespoons of powder to get what I’m looking for. Mix with a fork to break up any chunks and it will blend with the water quickly. To make paste, you will just about double the amount of powder, or use what is necessary to reach the thickness you want. The amount required depends upon the density of your powder, which is determined on how much you pound it into the jars. I can put about two or three quarts of my liquid tomato sauce in one quart jar, once the sauce is freeze dried and turned to powder.
Freeze Drying Salsa
When the tomatoes, onions, cilantro, garlic, and jalapenos are ripe and available, it is “salsa time”. Our family wishes it were salsa time all year long, as it is one of our all-time favorite snacks and is quite healthy too. It is just a problem that tomatoes and these vegetables are not available in our garden year ’round. I have tried canning it, but that drastically changes not only the texture but the flavor too. I still use the canned version salsa for some recipes, but we don’t like it by itself as a dip. Cooking the vegetables changes and combines the flavor, so there are no crisp, distinct individual vegetable flavors. We get no punch from a chunk of sweet onion or a kick from a bit of jalapeno. So, what could we do? We found that we could freeze it and still retain some distinct flavors between the vegetables, but the texture wasn’t quite as good as fresh, especially when it was frozen long term. We also has some issues with freezer burn and leakage with a some Ziploc bags that either weren’t sealed well, were defective, or were dropped and split open (sometimes without notice) while frozen and only discovered in the messy thawing process. Sauce just wasn’t easy to package and store in the freezer in small bags it seemed, but since it could be frozen and still keep a good flavor we decided to try it in the freeze dryer. Voila! We got our answer.
Now, for the off-season salsa cravings, we have freeze-dried salsa that is easily reconstituted in just the amount needed for the moment. There is no need to open or defrost a whole quart when there is just one person requiring a half cup for a snack or the family needing only a cup to use on top of tacos.
I make batches of the salsa per the recipe that I am sharing below, and pour about four to five cups of salsa into each of the four freeze dryer trays, with the trays still in the freeze dryer and just pulled out 1/4 of the way while I load them. (I opt for the stainless steel trays rather than aluminum ones, as I believe the stainless steel are healthier and more durable. There is no concern over them reacting to tomato products.) The trays should not be filled all the way to the lip but should have a little bit of expansion/ripple room, about one-quarter of an inch, so it doesn’t overflow or splash out for any reason. Then, I set it to freeze for eight hours and dry for eight hours.
When checking to see if the salsa is done, again be sure to lift from the bottom to check the vegetables that were lying against the bottom of the tray, as they will be the last to dry. If they are crisp and crumbly when pinched, then remove trays and break or cut the salsa into pieces about 3”x 3” squares, placing those in the jar funnel and pushing them into the jars with a spoon rather than crushing with the rubber mallet. You do not want to crush your salsa vegetables, but you do want to break up your squares a little. There will be much more air space in your stored freeze-dried salsa jars than in your freeze-dried tomato sauce powder, because your salsa is not crushed into a fine powder like the tomato sauce.
To reconstitute salsa, spoon some dried salsa into a bowl and sprinkle cold water over it until the vegetables have absorbed water and there is a little extra liquid in the bottom of the bowl. If this doesn’t make enough reconstituted salsa, add more dried salsa and water. Stir and let sit for a minute or two, stirring every thirty seconds, to be sure the water has distributed throughout all of the vegetables before serving. It just couldn’t be much easier or faster, and it tastes so very good!
Freeze Drying Tomatoes
There are times when we want some cubed tomatoes and not just tomato sauce in our meals and recipes during the off season. Why pay in the neighborhood of two dollars or more per pound for organic tomatoes, if you have a garden and a freeze dryer? We use them in casseroles, on tacos, and in pasta dishes. Meaty, fresh tomatoes, with peel left on, can be cut into cubes up to 1/2 inch in diameter and freeze dried. I place the cubed tomatoes in a single layer on a freeze dryer tray and freeze for eight hours and dry for nine hours. (The whole process takes more than 17 hours but is usually done in roughly 24-30 hours. There is time required for transition between processes and pressure to build.) Once the tomatoes are dried, I use a spatula to gently scoop them into wide mouth quart Ball jars and lids and vacuum seal them. I also always label the lids of all of my jars, so I can easily look into a box of jars and draw out the one I need.
To reconstitute the tomatoes, simply let them sit in cool water between fifteen minutes and an hour. They will have lost some of their firm texture but remain quite useful and certainly economical.
Recipe: Sarah’s Smoky Garden Salsa
Ingredients:
- 8-10 meaty, large Roma-type tomatoes
- 1 large Spanish onion, cut in half and coated in olive oil
- 4-8 jalapenos (preferably red ones, if available; quantity depends upon your heat level preference)
- 4 tsp chopped garlic
- 3 Tbsp white vinegar
- 2 tsp Hickory liquid smoke
- 3 Tbsp firmly packed, chopped cilantro
- 2-3 tsp salt, to taste
Procedure:
- Over high-temperature grill or searing burner, place tomatoes, jalapenos, and oil-coated onion halves. Grill until onions and jalapenos are blackened a bit on two sides and tomato skins are blistered all over. Remove to a plate that will catch liquids; let cool
- Once tomatoes are cooled enough to handle, peel skins and place them into a food processor or blender. Cut onion halves in half again and add to food processor also.
- Cut stems off jalapenos and remove most of the seeds; add to the food processor/blender along with the garlic, vinegar, liquid smoke, cilantro, and salt.
- Pulse in the food processor on low speed until the onion, tomato, jalapenos, and cilantro are well chopped and all is blended but not pureed. (You may need to pulse.)
Recipe: Sarah’s Tomato Meat Sauce
Ingredients:
- 2 pounds Italian sausage, casings removed, or ground beef
- 1 large onion, finely diced
- 1/4 cup minced garlic, or to taste
- 2 quarts tomato sauce
- 1/2 cup chicken broth
- 1 large bell pepper, diced (I prefer red bell pepper, but any color should work.)
- 2 Tbsp dried Italian herb seasoning
- 1/2 cup chopped fresh basil, or 2 tablespoons dried basil
- 1 tsp salt
- 1/2 tsp ground black pepper, or to taste
- 1 Tbsp fresh parsley, chopped
- 1 tsp crushed red pepper, or to taste (optional)
Procedure:
- Heat a large, heavy pot over medium-high heat and stir in sausage/beef, onion, bell pepper, and garlic. Cook and stir until the meat is crumbly and evenly browned, about 15 minutes. Use a potato masher to mash and blend the meat mixture every few minutes. Drain and discard any excess grease.
- Stir in tomato sauce, chicken broth, Italian seasoning, basil, parsley, salt, black pepper, crushed red pepper, and one cup of water.
- Simmer on low for 6 to 8 hours.
Notes: Simmering time can be reduced, but recipe is best if not rushed. If reducing simmer time, also reduce amount of water added accordingly. Additionally, I usually make my own beef-based Italian sausage to use in this recipe, but you can use what you buy at the store or any Italian-seasoned venison, turkey, or other meat also.
Best Wishes for Your Tomato Harvest
I’m wishing you a great bunch of tomatoes this year and for years to come, whether you choose to enjoy them all fresh, can or freeze dry tomato sauces, freeze dry cube tomatoes, or make lots of salsa and other sauces. Maybe you dehydrate or sun dry tomatoes. (It has been a long time, but I used to enjoy sun-dried tomatoes that I stored in oil, though I found it challenging to keep the bugs away.) However you enjoy tomatoes, I hope you have begun or soon will begin to know that pleasure and health benefit and that something here has been useful in that pursuit. Blessings.
I think I’ve read you have a homemade vacuum sealing set up. Could you expand on this please?