


How to Build a Rocket Stove From Tin Cans
Prep Mode
Two types of cans can be used for the main body of your tin can rocket stove– a #10 can or a metal paint can. I much prefer the metal paint can for two reasons. First, it has a lid. Secondly, it has a built-in handle.
I will explain how to build a rocket stove out of a paint can. The process is basically the same for the #10 can.
Let’s start by taking a look at what the finished product looks like. This is a 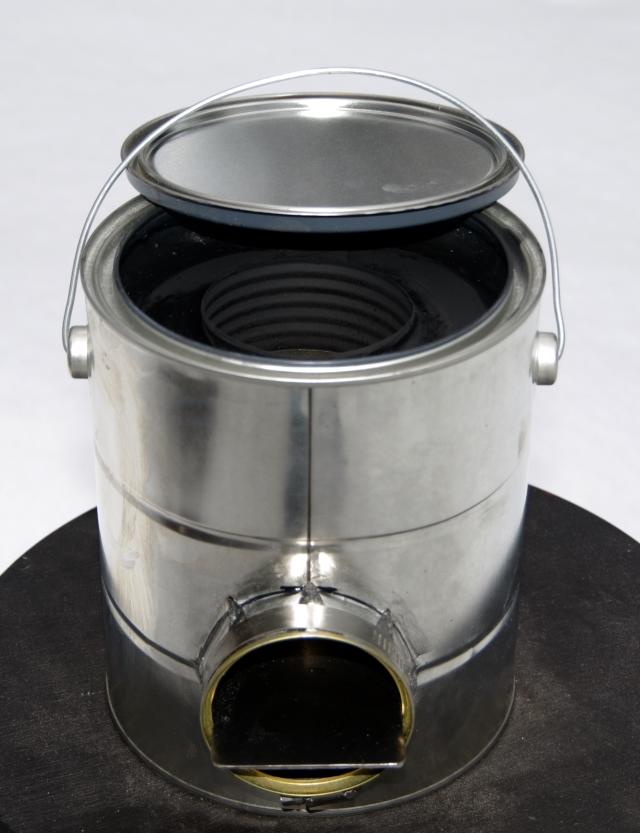 photo of a paint can rocket stove I built.
Material list:
- A metal paint can
- Burn chamber: One piece of 3” Schedule 40 pipe, 6” long, cut at a 45º angle at one end
- Vertical Burn riser: One piece 3” Schedule 40 pipe, 5½” long, cut at a 45 degree angle on one end
- One piece ¼” steel rod, 1” long
- One Collar – 8” x 8” 24 ga. cold rolled steel plate with a 3 9/16” hole cut out of the center. (Sheet metal can be substituted.)
- Fuel shelf: One 4” x 2¼” 1/8” flat steel
- Two pieces – 1” x 1½” 24 ga. flat stock
- At least a 8” x 8” piece of cardboard for a template
- One tube high temperature furnace cement for metal to metal applications
- One tube high temperature clear silicone caulk
- Perlite (or Vermiculite), enough to fill the paint can
Tools needed:
- Mig Welder with .035 wire (A stick or TIG welder will do.)
- Vice
- Drill motor
- One 3 9/16” metal hole saw
- Plasma cutter is ideal, but a good jig saw with a metal cutting blade will suffice.
- Bench or hand-held grinder or a good combination bastard file
- Scissors or box cutter
- Black Sharpie
- Caulking gun
- Steel tape or ruler
- One 1/8” steel drill bit
- Gloves
- Safety glasses
Directions:
- Weld the burn chamber to the burn riser. (The six-inch long piece is the horizontal burn chamber; the 5½-inch piece is the vertical burn riser.)
- Weld the 1” long ¼” steel rod to the underside and one inch from the rear of the burn chamber. This 1” tall steel rod will allow space for the Perlite (or vermiculite) insulation on the bottom of the paint can and provide support for the burn chamber/riser.
- Align the horizontal burn chamber on the outside front of the paint can to determine the 3 9/16” hole for burn chamber to fit through the paint can. Mark the outline with the Sharpie.
- If you have the 3 9/16” metal hole saw, center punch the center of the circle and cut out the hole. If you don’t have the hole saw, center punch the circle’s center point and drill the center hole. From the center hole outward, draw dissecting lines to the outer edge of the circle, dissecting the circle in half, then quarters, et cetera.
- Using a plasma cutter, cut along these lines to the outer edge of the circle, being careful to not go beyond the edge. If no plasma cutter is available, a box cutter or sturdy bladed knife will work.
Bend the tabs back to the edge of the circle. Practice fit the burn chamber/burn riser into this hole, adjusting as need be. You want a snug fit.
- Cut the cardboard into an 8” square. Find the center point. On the cardboard, place the 3½” OD pipe centered on the cardboard, using the center point as a guide.
Mark the outer edge of the circle with the Sharpie. Using the lid of the paint can, draw a circle centered on the cardboard template. The paint can lid is a bit smaller than the inside of the paint can, so you want to make your circle on the cardboard template a little bit bigger but not too much bigger than the outside edge of the lid. You will cover any excess space inside the can with the furnace cement later.
- With your scissors or box cutter, cut out your template. The end results should look like a donut. Place your cardboard “donut” template on your 8” x 8” 24 ga. flat sheet steel.
Mark with the Sharpie. With either the plasma cutter or the jig saw, cut along the outer circle. Cut out the inner circle. Again, you should now have what looks like a donut, but this time out of 24 ga. metal. This “donut” is too big to fit inside the can as it is. You want to cut the “donut” in half, to make a two-piece collar.
- Place your burn chamber/burn riser inside your paint can. Wear gloves, as the edges of the cut paint can are sharp. Grind or file down the outer edge of the collars where they meet each other until both halves of the collars fit inside the paint can. Again, perfection is not required, as you will cover this outer edge where the collars meet the inside of the can with furnace cement.
If you cut the hole for the burn chamber instead of drilling the hole, cut off the sharp points of the tabs before final assembly.
- With the burn chamber/burn rise inside the paint can, pour your Perlite (or vermiculite) inside the can to within 3/8’s of an inch of the top of the burn riser.
- Fit the two halves of the collars around the burn riser and on top of the insulation.
There should be a gap where the collars come together. Fit the two pieces of 1” by 1¾” 24 ga. metal strips over these gaps and tack weld on. You should now have a fairly tight fitting collar covering the insulation.
- Fill the space where the collars meet the inside of the paint can and the burn riser with the furnace cement. Fill the space between the collars and the burn riser with furnace cement. On the front of the stove where the burn chamber enters the paint can, caulk the space between the two with the high temperature silicone.
- Fit the 4” x 2 ¼” 1/8” flat steel fuel shelf into the burn chamber. Do not cover the burn riser space at the rear of the burn chamber. Leave about ½” at the bottom of the chamber for the air feed.
- It’s not necessary, but you could paint the collars with a high temperature paint for a more finished look. I used Rustoleum. Clean the outer surface of the paint can with paint thinner and a clean rag.
- Pat yourself on the back; you are finished building your 3” steel pipe paint can rocket stove and you’re a little bit more prepared.
Survival Mode
If you find yourself in a situation where you do not have access to the materials and tools needed (or electricity) to build your rocket stove with Schedule 40 pipe, you can resort to using 3” tin cans and a #10 can. However, using cans for your burn chamber/burn riser will only be a temporary fix, as the cans will burn out after several fires.
The build process using tin cans is basically the same as with Schedule 40 pipe.
You need three 3” cans, plus either a metal paint can or a #10 can.
For the burn chamber and the bottom half of the burn riser for my stove, I used Stagg’s Chili cans.
If possible, for the top of the burn riser, use a can that is a bit bigger than the bottom can so it will slip over the bottom can for an easier, faster build. Make sure the top of the burn riser is at least 1” below the top rim of the can.
Use self-tapping screws to keep the cans together.
Be sure to seal the gaps in the burn chamber/burn riser with the furnace cement before assembly to keep the insulation inside the stove.
Instead of the Perlite/Vermiculite insulation, sand or even pea gravel can be used. Soil would even be better than nothing in a pinch. You want to keep as much heat in the burn chamber/burn riser as possible by insulating the burn chamber and burn riser. Obviously, using sand, pea gravel, or soil will make the stove heavier than if you use Perlite (or vermiculite).
The #10 can, unlike the paint can, will not have the convenient carry handle.
Where the tin can for the burn chamber sticks out of the front of the stove, cut the sharp tips of the tabs off, and secure the tabs to the burn chamber can with a plumber’s clamp, if available. Cover the holes with the high temperature clear silicone sealant.
Why You Need a Rocket Stove and How to Build Three Types
You now know how to build three types of rocket stoves, in both Prep or Survival Mode.
Each has their advantages and disadvantages.
The 13 Brick Rocket Stove is a fast, easy, and relatively inexpensive build, and it works very well for stationary use and, as mentioned, can be moved if need be.
The 3” Steel Tubing Paint Can Rocket Stove is more difficult to build, but it is a durable and portable rocket stove and can be built for about $25, if one has the skills and proper tools. In either Prep Mode or Survival Mode, the tin can burn chamber/burn riser stove will cook food and heat water for a period of time, perhaps long enough to save your life. Also, there is enough room inside the paint can stove to store some tinder, kindling, a lighter, et cetera. Stick a newspaper or rag inside the burn chamber to keep everything inside the can.
The 4” Square Tube Rocket Stove is also a good option. It is very durable, again for those with the skills and tools.
Once I gathered all the materials, I built the tin can paint can stove in about four hours. A local paint store was kind enough to give me several paint cans for free. I saved up the tin cans over time with this stove in mind. I already had the Perlite, caulking, paint, et cetera and only had to purchase the clamp, which cost me $2.50.
While still in Prep Mode, consider building several stoves of each type, both for use and for bartering purposes later, when in Survival Mode. As you can see, it would be wise to build your stove or stoves while still in Prep Mode.
Your life, and the lives of your family and friends, may depend on your preparedness.