


We are continuing to look at how to collect our garden seeds. I am sharing how I do it simply without the use of expensive seed cleaning screens that most people can’t afford or won’t spend the money on. There certainly are other ways to go about this, many of which I have tried myself. I am not an expert, but I am happy to share what I have learned from observing, investigating, trying, failing, and succeeding at collecting seeds from my garden and planting them in my garden to produce another year’s crop. If you are collecting seed to sell and want clean seed and a high germination rate, you may need to approach things a bit differently than I discuss elsewhere in this article. I am sharing what is easiest for me and practical for most people, and I have what I consider to be a very good germination rate that is acceptable to me. I always plant some extra seed, anticipating some failure (whether from the seed, watering, or birds) so that I can transplant where those failures occur. You should consider doing the same. Also, if you want to end up with very clean, pretty seeds with little or no seed chaff among them, then you may want to consider investing in seed cleaning screens. The highest quality seed cleaning screen set I have found are available from strictlymedicinalseeds.com (formerly Horizon Herbs). However, be ready to invest close to $200 for them. You can get one or two sizes of screens elsewhere of lower quality for considerably less, but since there is a vast difference in sizes of seeds it is my opinion that having a more screens of various sizes is helpful in order to be thorough in removing the chaff that is larger than the seed as well as pollen, dirt, and/or sand that may be smaller than the seed. It takes different screens to deal with different size seed. Sunflower seeds and lettuce seeds are drastically different sizes!
Let’s get back to discussing our seed collecting, beginning with vegetables. Then, we’ll look at common herbs and garden-friendly flowers.
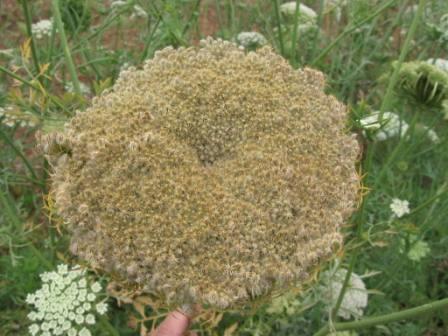
Carrots
Carrots are bi-annual plants. They require two growing seasons before they produce seed, so you must leave at least a few carrots in your garden from year to year to have carrot seed. I have also transplanted carrots out of my annual garden into another perennial area for seed-collecting. Carrots will produce sizable bushes that will produce pin-wheel-like flowers and seed-pods. Each pin-wheel seed pod contains a dozen or more seeds, so it isn’t necessary to have more than one or two carrot plants for seed. Again, I let these plants mature and die, or come pretty close to it, before harvesting the seed. I cut the stems and shake the seed pods in a 5-gallon bucket to release the seeds. There is little debris with the carrots usually but lots of seed, because I try to cut above the dried leaves. Again, after I’ve collected all of the seed from the carrot bushes into my bucket, I pound the sides of the bucket to separate debris a bit. I use my hands or a hand rake to lift stems or leaves or anything else that doesn’t belong from the surface. Also, any lady bugs are rescued. This seed also goes into ziploc bags. I put about two cups of seed into each gallon size ziploc storage bag and fold two paper towels to set on top of the seed that is spread across the bottom of the bag. The bag is sealed and then set in the window so that any moisture can rise and be absorbed by the toweling. Also, any tiny bugs, like aphids, will try to climb to the top to escape and be captured on the paper toweling, where they will die within days. Paper towels are replaced daily as long as there is any sign of condensation on the bag. Once there is no more condensation or movement by insects, the seed is poured out into trays for a final drying. It is left to air dry on trays or on baking sheets for at least three days before being placed in bags or jars. Carrot flowers are white and their seeds are small, variegated brown, flat, and oval.
Celery
If the stalks of some celery are left to grow and mature, eventually a flower shoot will emerge. Tiny white flower will bloom and, if pollinated, become celery seed. They look almost like clusters of tiny baby’s breath. It is important to wait until the stem turns completely golden brown and become dry before you cut it to collect the seeds, so that the seeds have the ability to mature. The seeds are small, flattish, oval, variegated tan and brown, and similar to carrot seeds. After cutting the stems, I lean the seed cluster over a 1-gallon bucket and then pull upward on the stem with my hand, forcing the seeds to drop off. Another way is to put the seed heads between your hands and gently roll your hands together, but this is hard on your hands. To protect your hands, you can also use a rolling pin. Just place the seed clusters between pieces of parchment paper and then gently roll with the rolling pin a few times to force the seeds to come loose. Toss the stem into the trash and lift the parchment paper be the edges and pour the seed into a colander. If your colander holes/screen is large enough to allow the seed to fall, your seed head will be captured in the colander. If your colander holes/screen is too small
Onion
Onions, if left buried in the ground a second season, will grow stalks that produce a flower ball, which if pollinated will become filled with tiny, round, black onion seeds. I find that my onion seeds either have to be planted in pots in the fall and cared for indoors or a greenhouse through the winter in order to be transplants for the spring to produce by fall, or I have to plant in the spring and leave them in the ground through the winter for a second year. However, the flavor is strong rather than sweet when grown in the second manner, it seems to me. However, the onion bulbs can survive winter, if planted deep enough and covered with straw or other plant cuttings, provided that your winter temperatures are not too severe. I always lose some onions when left over the winter, but some remain and them flourish in their second growing season. To collect the seeds, wait until the seeds have turned from green to black and the stalks have dried completely. Then, I merely cut the seed stalks and turn one upside down into a bucket or pale and rub the seed head between the palms of my hands to release the seed. There will be some dried white chaff that will fall into the bucket or pale, but you can separate this out with either your colander or screen or just bump the bucket and let the chaff rise to the top, since the seed is heavier and will go to the bottom, and then pick it out.
Tomatoes
When crushing my heirloom tomatoes, I use my KitchenAid crusher/strainer attachment and then simply take the tomato seeds, skin, stem, and whatever else comes out to be discarded and I place this in a pot mostly filled with potting soil outside in the sun where the seed can begin drying after the fermentation process and the fruit flies remove the cellulose encasing. I came across the great success in this process purely by accident, but it works. Each year I produce literally hundreds of tomato plants in my pots. I stack the seed-skin mixture at least an inch thick in the pots, and then in the spring merely pinch out two inch tall plants to transplant, exposing more seeds, which quickly germinate and grow too. I may have two or three batches of tomato plants from a single pot. For tomatoes that I slice for sandwiches rather than use in sauces, I merely cut the tomatoes in half and scoop out the seed clusters and place them in the pots, as described above. just be sure to keep different types of tomato seeds separate and in labeled pots so you can place them in separate garden areas and prevent cross-pollination.
Potatoes
Potatoes that are stored in cool, dark places, like cellars can often be used as “seed” potatoes. You want to have at least two eyes on the portion of potato that you plant, so be sure to save plump, healthy potatoes that have lots of eyes and just don’t eat these. Then, you can cut these potatoes into several pieces, each with multiple eyes, to plant and produce dozens of potatoes in the next season.