Recent history has shown us that clean water is almost always one of the first items to become unavailable after a disaster. Since I live within a day’s walk of the Atlantic Ocean and occasionally camp near the shore, I wanted to make a portable water distiller that could handle salt water as well as some of the more contaminated fresh water sources.
In this article, I outlined my objectives for a distiller and now am writing how I built one. So far, in part 1, I have provided a materials list and provided the first few steps, which included wrapping the copper coil around the water bottle, preparing the bottle cap and the barb adapter on that cap, building the cooling/carrying case, and also building legs for the distiller.
Now, let’s continue moving forward with our build of the distiller. Then, I will tell you about the test results and give you some tips on storing and using it.
Paint and Plug
Several coats of battleship grey paint went on the cooling tower. Paint is necessary because uncoated galvanized metal will rust if it is exposed to salt water. Once the paint dried, I temporarily plugged the output hole. (I used a ¼” bolt and some rubber washers.) Then, I filled the tower with water to check for any leaks in the seam or around the base.
Leaks
If you find any leaks, fill them in with silicone sealer on the inside, since it will last longer.
I then cut the high-temp silicone tubing into several lengths as described below:
- One @ 2′ to go from the boiler output (barbed adapter in the boiler bottle lid) to the cooling tower input (top end of the copper coil). The silicone tubing I had fits snugly over the copper tubing, so I did not need to put any kind of barbed end on the coil. Using the flexible silicone tubing to get the steam from the boiler to the cooling tower makes it easy to position things where I need to without having to bend the copper, and since the silicone tubing is rated for up to 200° C (392° F), it can handle the steam.
- One @ 10″ to go over the end of the cooling tower output and down into my water bottle. Note that silicone tubing tends to collect dust and dirt easily, so I keep this piece in a ***ziplock bag*** when it is not in use.
I cut what remained into three even lengths to attach vertically to the outside of the copper coil using some wire to act as spacers or bumpers. Since the outside of the coil is smaller in diameter than the inside of the cooling tower, this keeps the coil centered and prevents it from rattling around during transport.
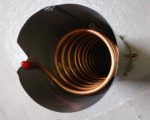
Once the paint on the cooling tower dried and all leaks had been sealed I slid the coil down into it and pushed the end of the copper coil out the 1/4” hole I had drilled. (This may require some gentle bending and filing of the hole.) Then I used some more JB Weld to keep it in place. You should scrape off some of the paint around the opening to get a better hold. This is important since the copper coil can move around a little, and if you just use silicone to seal the hole it will eventually pull loose.
Storage
I kept the rubber caps that came in the copper tubing package so I can cover the ends of the coil while not in use to keep dirt out. Slip the metal legs and boiler bottle into the cooling tower and wrap the silicone tubing around it near the top for storage. You could use another metal end cap as a cover, but they fit pretty tightly and I was worried about scraping the paint off and getting some rust on the exposed metal. Personally, I use an old hiking tent carry bag from my bag collection to carry the distiller.
Set Up
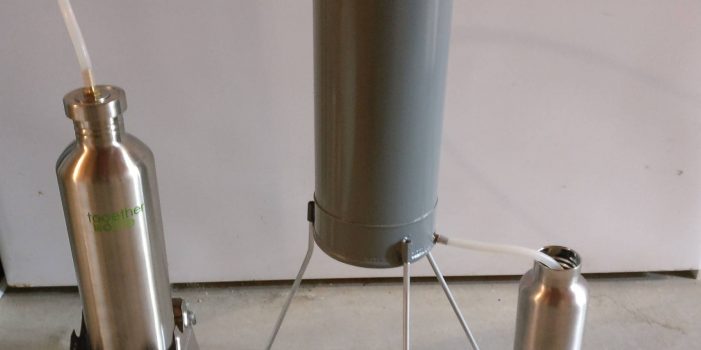
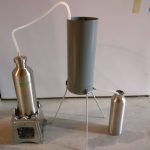
To set the distiller up, remove the legs, silicone tubing sections, and the boiler bottle from the cooling tower/case. Screw the legs into coupling nuts at the base of the cooling tower and attach the 2′ length of silicone tubing to the top coil input, and the 10″ piece to the coil output. (Do not place the output tube into your clean water bottle yet. Just leave it hanging.)
Fill Boiler Bottle
Fill the boiler bottle to about an inch or so from the top with the water you want to distill, screw the lid on, and place it on your heat source. (It fits perfectly on my camp stove, which is shown in the above picture.) Connect the free end of the 2′ silicone tubing to the barb on top of the boiler bottle, fill the cooling tower with water, and light your fire. Once you start seeing water come from the output tube, let it drip for a minute or so to clear potential VOCs and other contaminants. Then, place the output tube into your clean water bottle.
If you have access to more water (contaminated is fine), pour it into the cooling tower as the process moves along to cool the heated water. This improves the condensation and converts more steam into water. Once the 32 oz. bottle is full, turn off the flame, let the boiler cool down, and then dump the contents out. The distillation process is more likely to include contaminants in the steam as the pure water in the boiler evaporates, and the last 25% or so of your source water that is left in the boiler will be a very concentrated mixture of stuff you don’t want to drink.
Test
I have used this with a few gallons of ocean salt water and some water from a boat club on a river, and I tested the output using a DIY water testing kit from Home Depot. The output from both sources tested as drinkable. Furthermore, the output tasted like fresh water.
Notes
In addition to what is written above, I have a couple of notes that follow:
- Over time you tend to get crud built up inside the boiler bottle. I found a bottle brush that I now keep in the kit to clean the residue out of the boiler bottle after each use.
- Keep in mind that you are dealing with fire, boiling water, steam, and hot metal, so if you are not careful you can end up with some nasty burns. I keep a silicone pot holder glove in the kit in case I need to grab something hot to make adjustments or break it down in the event I need to quickly vacate the area.
- If you want to distill more than one bottle in a session, pour the water from the cooling tower into the boiler for subsequent distills, since it is already partially heated and should boil quicker.
See also:
SurvivalBlog Writing Contest
This has been part two of a two part entry for Round 77 of the SurvivalBlog non-fiction writing contest. The nearly $11,000 worth of prizes for this round include:
First Prize:
- A $3000 gift certificate towards a Sol-Ark Solar Generator from Veteran owned Portable Solar LLC. The only EMP Hardened Solar Generator System available to the public.
- A Gunsite Academy Three Day Course Certificate. This can be used for any one, two, or three day course (a $1,095 value),
- A course certificate from onPoint Tactical for the prize winner’s choice of three-day civilian courses, excluding those restricted for military or government teams. Three day onPoint courses normally cost $795,
- DRD Tactical is providing a 5.56 NATO QD Billet upper. These have hammer forged, chrome-lined barrels and a hard case, to go with your own AR lower. It will allow any standard AR-type rifle to have a quick change barrel. This can be assembled in less than one minute without the use of any tools. It also provides a compact carry capability in a hard case or in 3-day pack (an $1,100 value),
- Two cases of Mountain House freeze-dried assorted entrees in #10 cans, courtesy of Ready Made Resources (a $350 value),
- A $250 gift certificate good for any product from Sunflower Ammo,
- Two cases of Meals, Ready to Eat (MREs), courtesy of CampingSurvival.com (a $180 value), and
- American Gunsmithing Institute (AGI) is providing a $300 certificate good towards any of their DVD training courses.
Second Prize:
- A Model 175 Series Solar Generator provided by Quantum Harvest LLC (a $439 value),
- A Glock form factor SIRT laser training pistol and a SIRT AR-15/M4 Laser Training Bolt, courtesy of Next Level Training, which have a combined retail value of $589,
- A gift certificate for any two or three-day class from Max Velocity Tactical (a $600 value),
- A transferable certificate for a two-day Ultimate Bug Out Course from Florida Firearms Training (a $400 value),
- A Three-Day Deluxe Emergency Kit from Emergency Essentials (a $190 value),
- A $200 gift certificate good towards any books published by PrepperPress.com,
- RepackBox is providing a $300 gift certificate to their site.
Third Prize:
- A Royal Berkey water filter, courtesy of Directive 21 (a $275 value),
- A large handmade clothes drying rack, a washboard, and a Homesteading for Beginners DVD, all courtesy of The Homestead Store, with a combined value of $206,
- Expanded sets of both washable feminine pads and liners, donated by Naturally Cozy (a $185 retail value),
- Two Super Survival Pack seed collections, a $150 value, courtesy of Seed for Security, LLC,
- Mayflower Trading is donating a $200 gift certificate for homesteading appliances, and
- Two 1,000-foot spools of full mil-spec U.S.-made 750 paracord (in-stock colors only) from www.TOUGHGRID.com (a $240 value).
Round 77 ends on July 31st, so get busy writing and e-mail us your entry. Remember that there is a 1,500-word minimum, and that articles on practical “how to” skills for survival have an advantage in the judging.


I gotta say, this article is one of the better ones I have seen on Sblog in a long while.
However, for me, the most important part is the results. The three sentences you dedicated to discussing the results not only leaves me skeptical, but the lack of fire stains on your canteen seems suspect. I hope there is a part three, and better yet, a video to demonstrate your results could be just right. You have a heck of an idea here, which certainly could be very profitable for you. But, we need more evidence that this actually works. As intelligently mentioned in the comments section of yesterdays article, how much energy does it take to make this work? Does it work over a camp fire? Great concept and idea you have here, JMD. But, we need more evidence that it works.
All in all this is pretty cool. Wondering though about time needed to distill enough water to fill the 32 ounce container and I see the 55 ounce container is not currently available. I had not heard about nickel being poisonous and will read up on it. Makes me wonder about my cookware as the vast majority of it is stainless.
Okay, I read up on it. Briefly but it is real. Also copper and aluminum which are also used in cookware. It’s more of a concern with acidic foods and tends to be less problematic with after repeated use. Meaning less of it leaches out as the pot is used.
We drank many gallons of reverse osmosis water while sailing. We used a PUR Power Survivor 35 water maker. It made 1.2 gallons an hour and we ran it off of our solar panels. Katadyn now owns PUR and the newer model is a Power Survivor 40 which costs close to 4 grand. The Survivor 35 was a manual model that depended on working a lever to generate the pressure needed to push the water through the membrane. These are still supported by Katadyn and parts are readily available. Support should continue as these are part of the Navy’s life raft survival kits. You can buy them for about 2400 dollars. They are frequently available on eBay (maybe military surplus?) but if buying used plan on doing a rebuild and check with Katadyn for prices. The membrane will need to be replaced periodically but this can be prolonged by “pickeling” between uses. Again, check with Katadyn. there is an even smaller unit called an 06 which is about the size of a cigar box. $1200 dollars and it makes just shy of a quart an hour. these are also used by the military and are packed in pilots bailout survival kits.
I have no affiliation with Katadyn but I did like the PUR power survivor a lot!
Very good article but if I was going to do a distillation unit I think I’d go for a solar still type setup. It could be be fairly large and would be passive. Kind of the reverse of a solar dehydrator.
I did enjoy the article and think it was slightly Rube Goldbergish which IMHO is a true complement. Not overly complicated and I’m wondering if anyone has any thoughts on a wood gas generator?
Muddykid – the reason there are no fire stains on the bottle is that I took the pictures while I was building it, not after I tested it. In terms of time, it took about 40 minutes to process a full boiler of salt water (from starting the fire to a full output bottle), and I had to wait 10 minutes or so for everything to cool down so I could pack it back up. Keep in mind this isn’t meant as a replacement for other water purification methods – my primary use case was for processing salt water.
Regarding profitability, I have absolutely no plans or desire to produce these. People are more than welcome to build them for their own use.
J.M., thanks for this follow up. The time to process the full boiler sounds pretty reasonable. I think I am going to try and make one. Very cool idea and design.
Thank you for this very interesting article, and also for testing your design out in real life. I’ve seen a lot of creativity that’s never actually put to the everyday use test. Since you drank the water your kit produced, that’s good enough for me. I also appreciated the info about water testing kits at Home Depot. This method of producing drinkable water seems like a winner and right now is a good time for home experimentation and practice, well before the time it’s suddenly needed. Your hard work and clear instructions are appreciated!
Nice article. Down where I come from the copper coil is called a worm and you need a “thumper” to keep from wasting steam. The soil is poor where I live so the locals sold shine to make end meet during the depression.