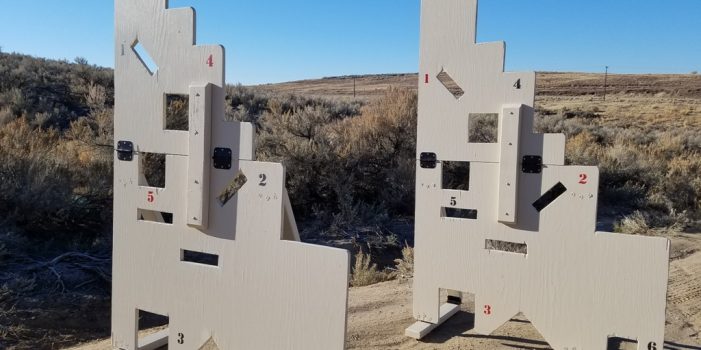
This article describes how to build a compact (folds up to a 4’x3’ travel size), portable (setup or takedown in a couple minutes) range barricade. This version uses hinges to make transporting and assembling it easy. In part 1, we walked through the approximate cost in terms of hours and financial commitment, the materials, and the first five steps of the project. Let’s continue our building project with the remaining steps.
Step #6
As Step #6, attach hinges to plywood barricades as instructed in the following:
- On the plywood barricades, use the attached plans to locate and mark the hinge locations. All four will be “A” leafs (three knuckles), and they will be installed on the downrange side of the plywood.
- On the bottom of the barricade, the hinges are installed 1” inset from the tall side and 13” inset from the low side. This should leave you 27” between the 2×4 feet. Hinges are set so that the swaging sits against the bottom edge of the plywood. Mark the holes for the hinge.
- Where the supports attach to the barricade, the hinges are inset the same distance either side as the bottom hinges. If you are using the same standard dimension door hinges as this project uses, measure up from the bottom to 29-7/8” and scribe a line across. Place the bottom edge of your hinge leaf, opposite the knuckles, on this line. The knuckle will be above it. Mark the holes for the hinge.
- Remove the hinges and drill the marked holes out with a ¼” drill bit.
- Flip the barricade over and on the up-range side of the plywood hammer a #8 Tee nut into each hole.
- Flip the barricade back over, set your “A” type hinge halves in place, and screw them in with #8×3/4” screws.If you elected not to build this as a folding barricade, you should now be ready to assemble it. For a folding barricade, continue with steps # 7 and #8.
Continue reading“How to Build a Compact, Portable Range Barricade- Part 2, by I.S.”