
“In the fields of observation chance favors only the prepared mind.” – Louis Pasteur, in a lecture at the University of Lille (7 December 1854)
- Ad STRATEGIC RELOCATION REALTYFOR SALE: Self-sustaining Rural Property situated meticulously in serene locales distant from densely populated sanctuary cities. Remember…HISTORY Favors the PREPARED!
- Ad USA Berkey Water Filters - Start Drinking Purified Water Today!#1 Trusted Gravity Water Purification System! Start Drinking Purified Water now with a Berkey water filtration system. Find systems, replacement filters, parts and more here.
Notes for Monday – May 23, 2016
May 23 is the birthday of George Lars Kellgren (born 1943 in Borås, Sweden), the founder and chief engineer of Kel-Tec. According to LeftistAgendaPedia, he designed many firearms for Husqvarna and Swedish Interdynamics AB in Sweden. He moved to the U.S. in 1979 and his original U.S. designs were for Intratec and Grendel brand firearms. He founded Kel-Tec in 1991.
This is also the day on which, in 1934, Bonnie Parker and Clyde Barrow were killed by police near Gibbsland, Louisiana.
o o o
Don’t forget! We are coming up on the end of Round 64 of the SurvivalBlog Writing Contest. If you have an article you would like to submit to the contest, finish it up and email it to SurvivalBlog. If you haven’t read the list of prizes that are going to the top winners, you should take the time to read them below. Sometimes I look at these prizes and wish I could enter the contest! Remember, if you have won the contest before and it has been longer than a year, you can enter and be eligible again. Past winners of the Honorable Mention prizes can enter the contest any time.
o o o
Ready Made Resources is having a sale on the Night Vision Depot. PVS-14 3GEN hp+ Autogated ITT PInnacle Night Vision Unit. These are the best there are and come with a 10 year factory warranty. At only $2950, it is a must have.
o o o
Camping Survival just received a large shipment of Mountain House foods and is wanting to move them out the door quickly. Up to 40% off of all MH foods from May 23rd to the 29th.
- Ad California Legal Rifles & Pistols!WBT makes all popular rifles compliant for your restrictive state. Choose from a wide range of top brands made compliant for your state.
- Ad Don't wait - get the ultimate US-made ultra-high performance US-made SIEGE Stoves and stunning hand-crafted SIEGE belts for Christmas. For stocking-stuffers see our amazing fire-starters. Gifts that can save lives. Big Sale!Every bespoke SIEGE buckle goes through an hours-long artisanal process resulting in a belt unlike anything else, with blazing fast performance and looks and comfort to match.
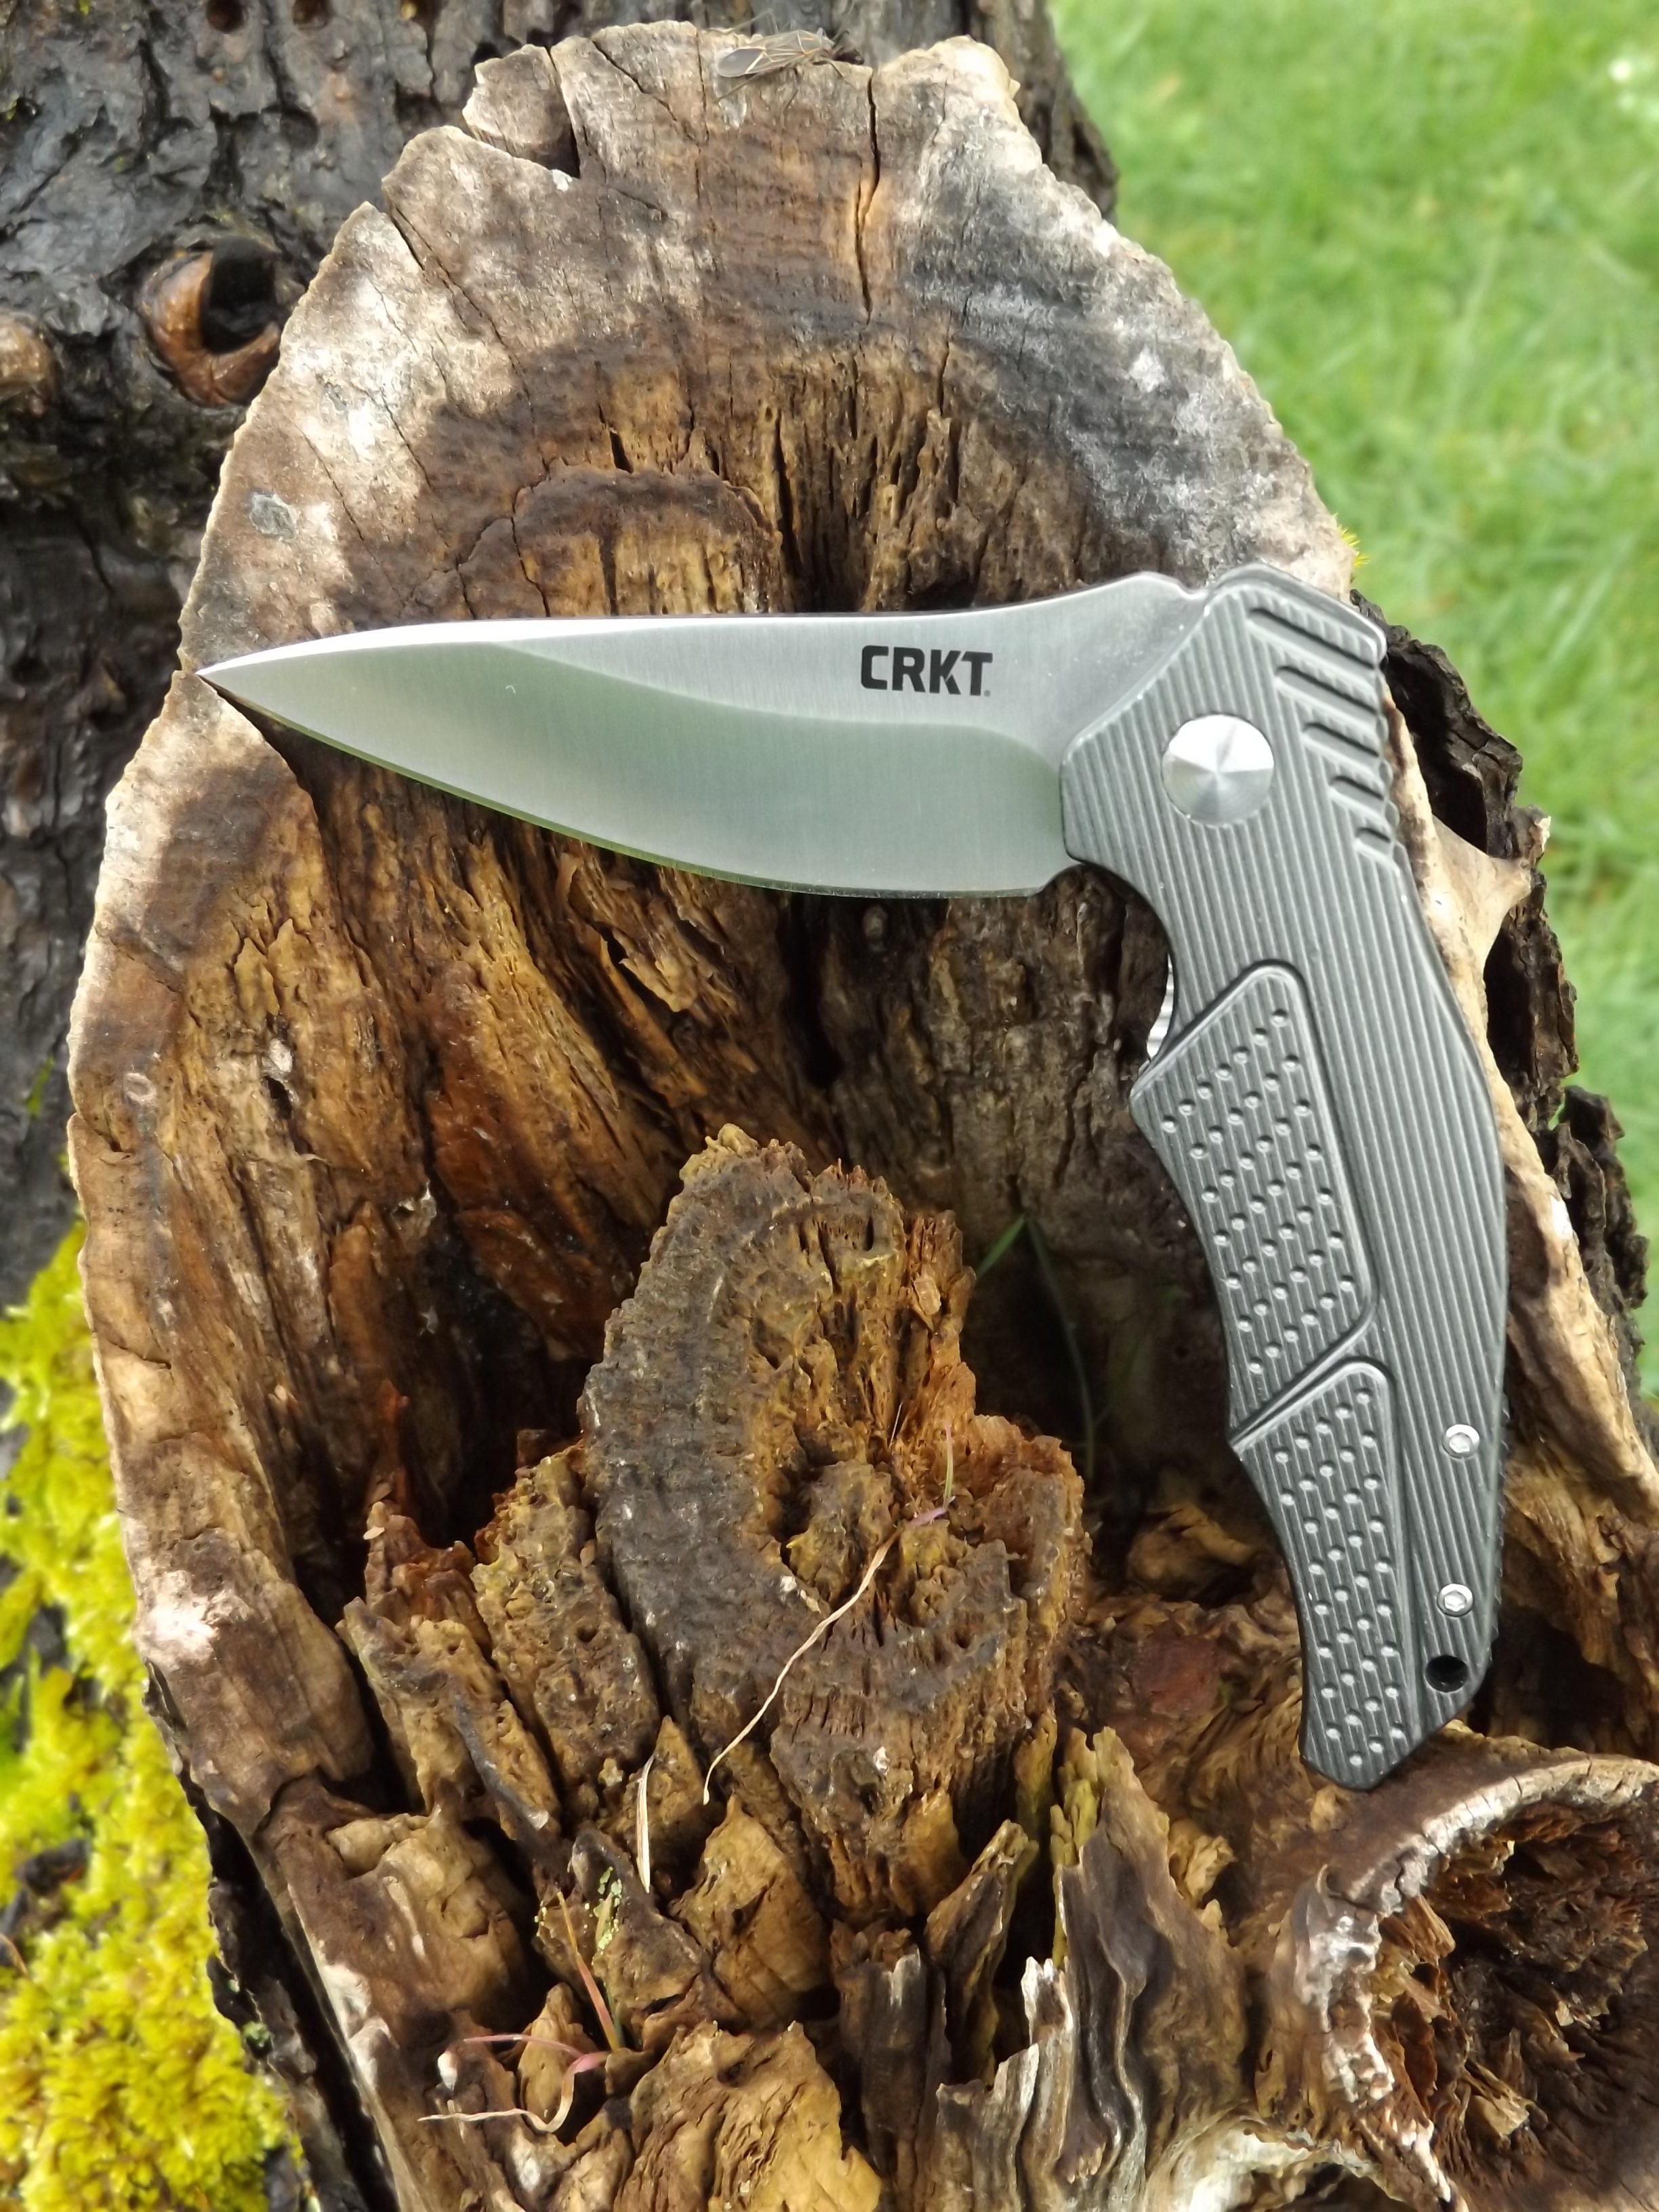
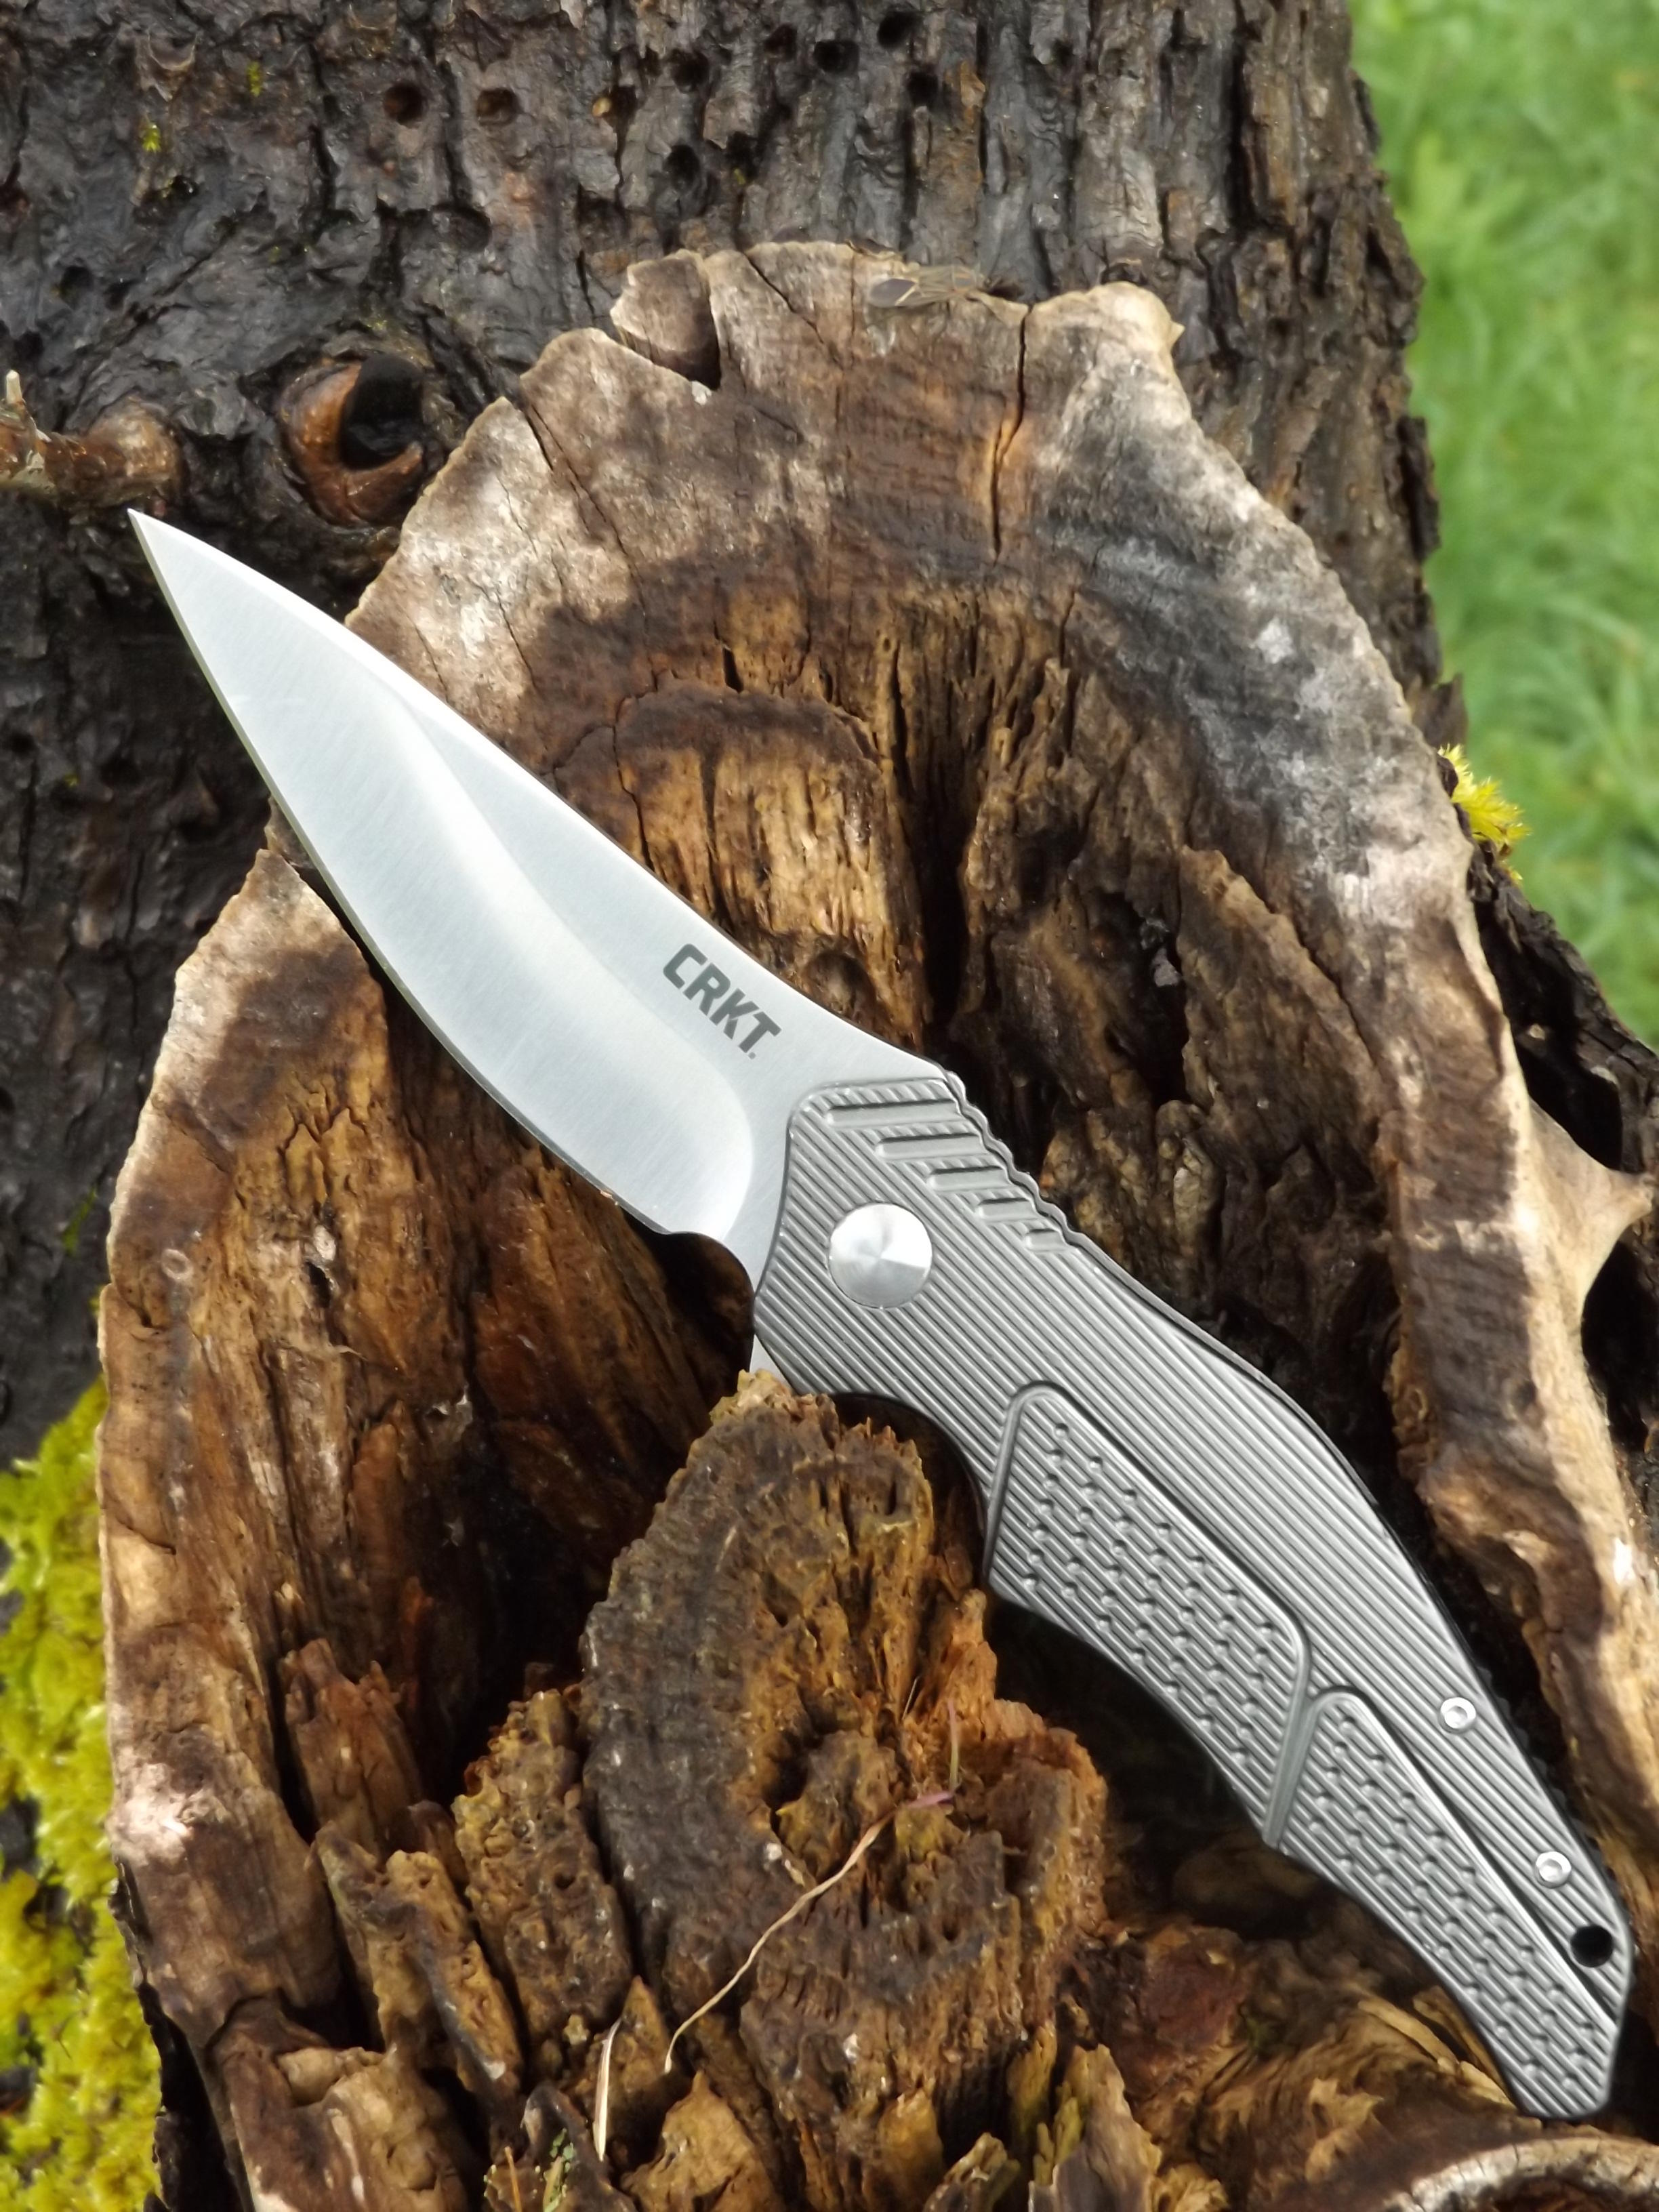
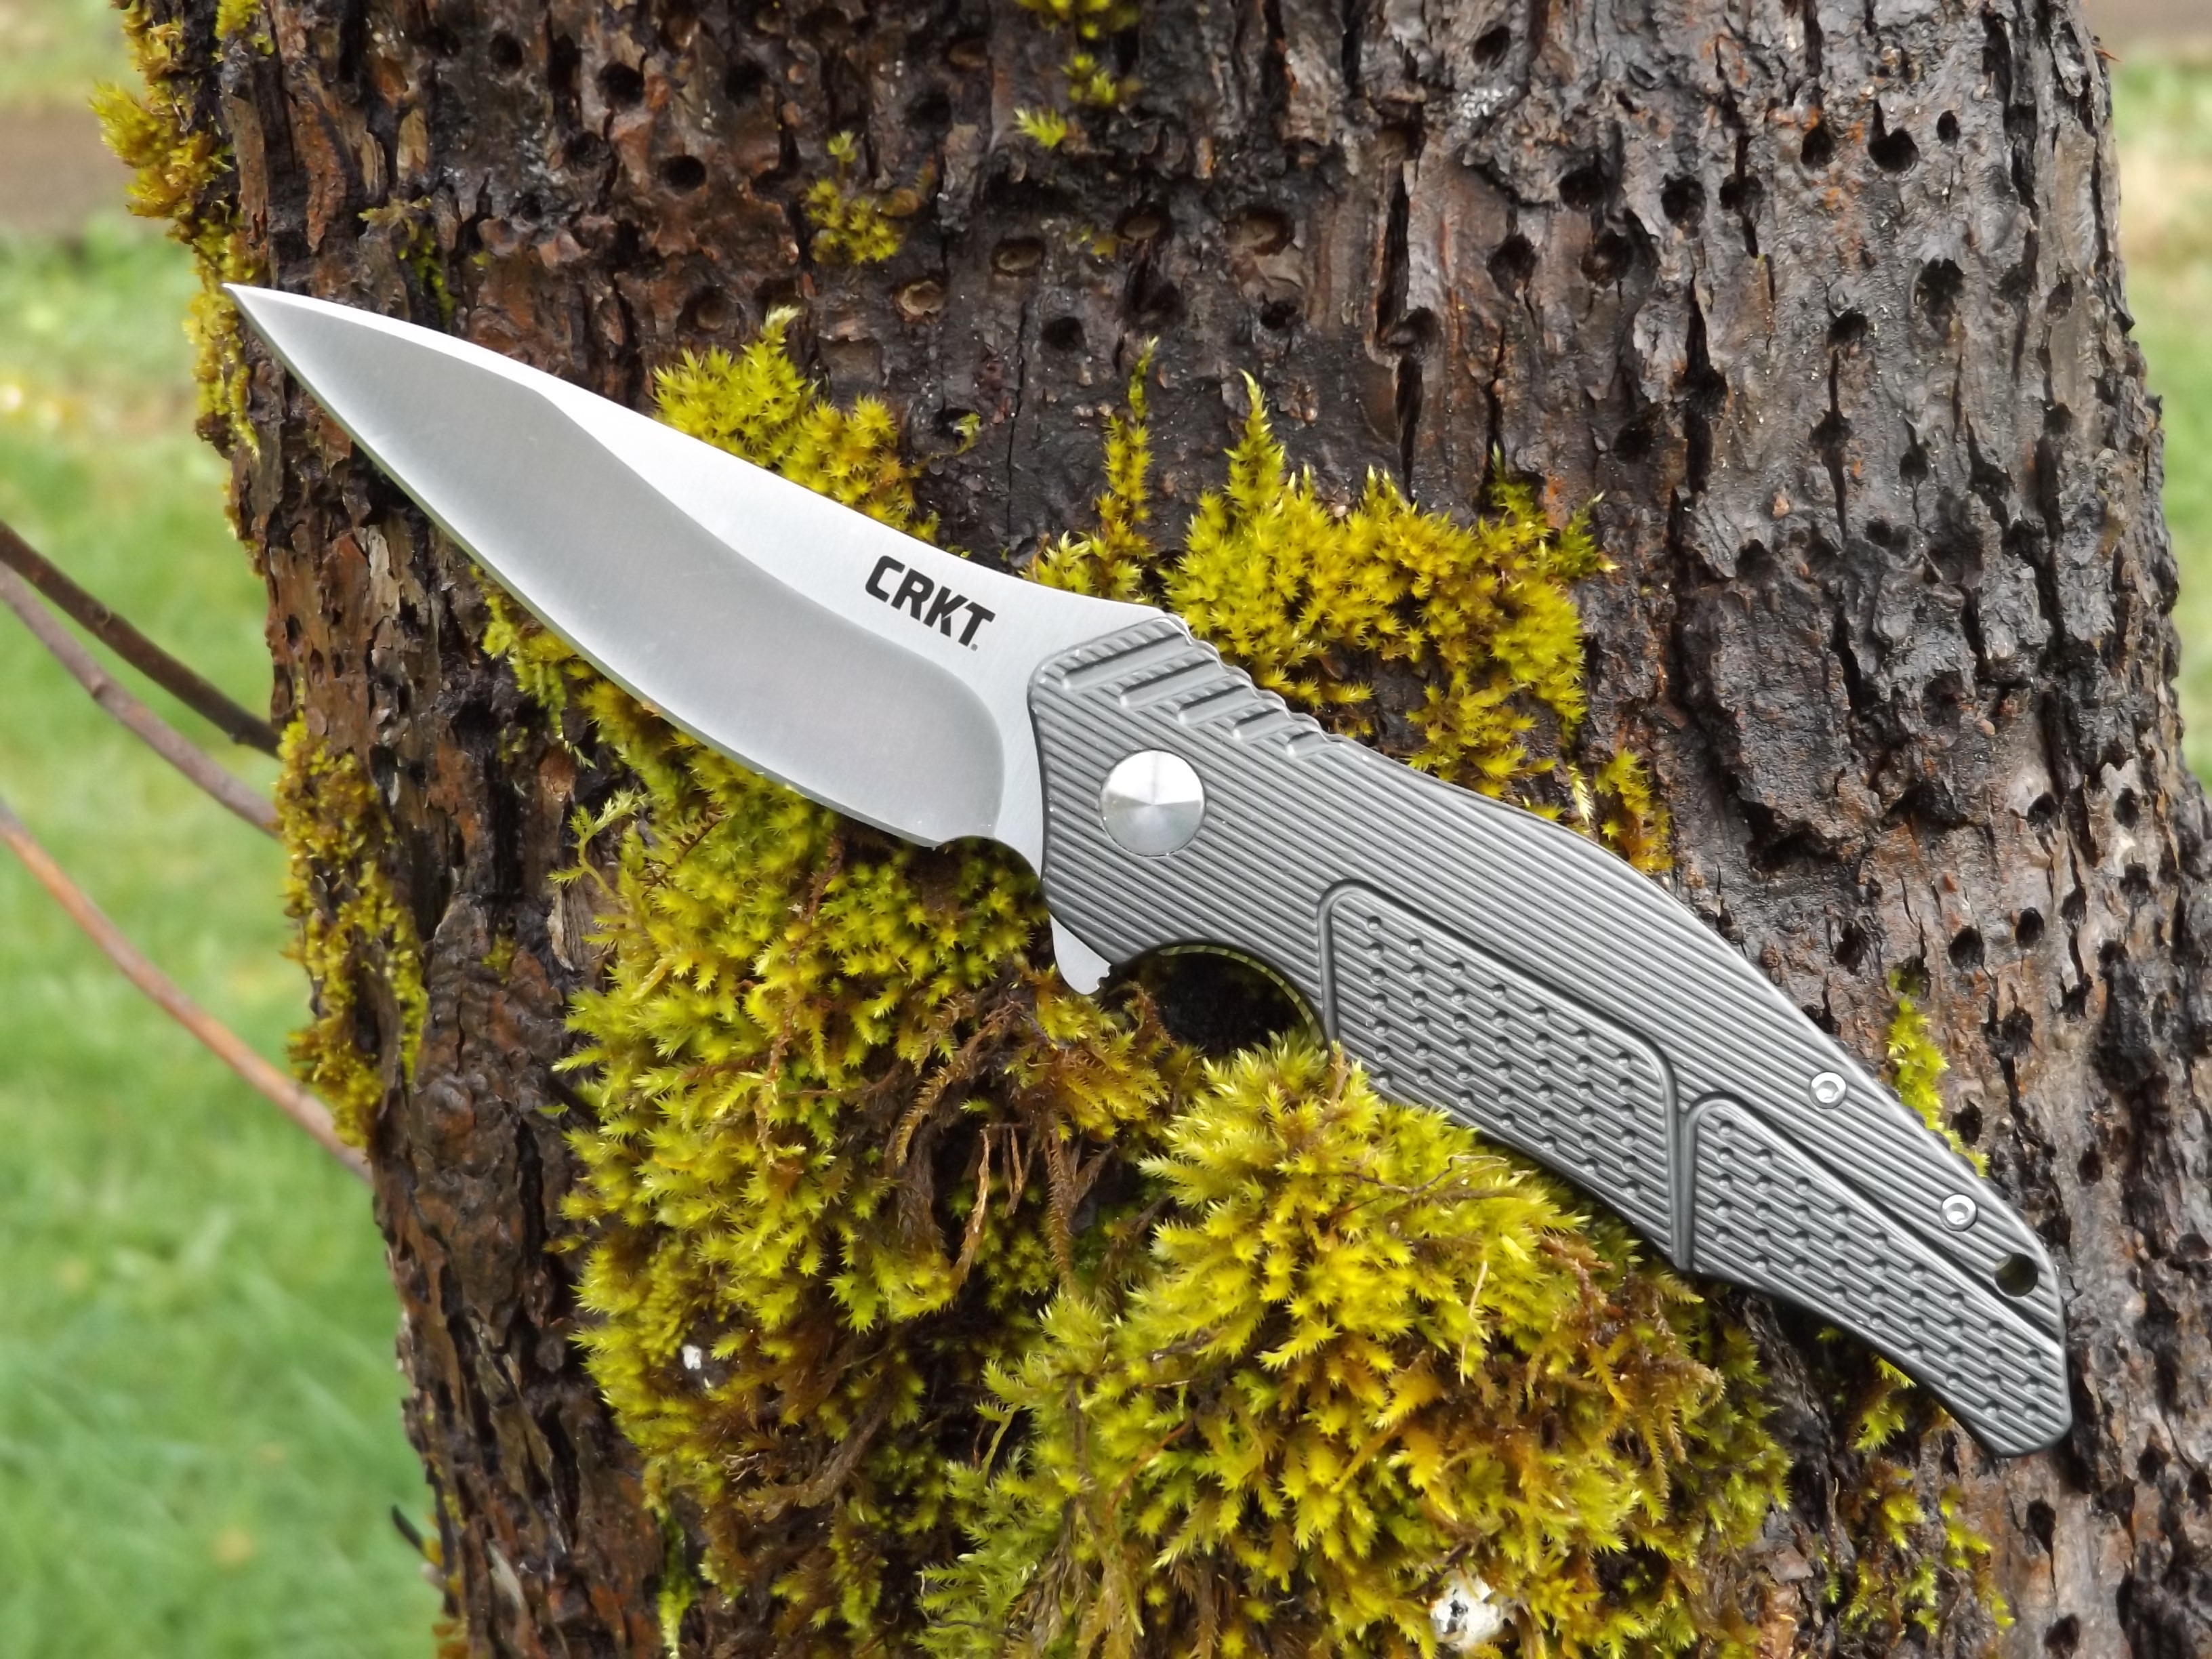
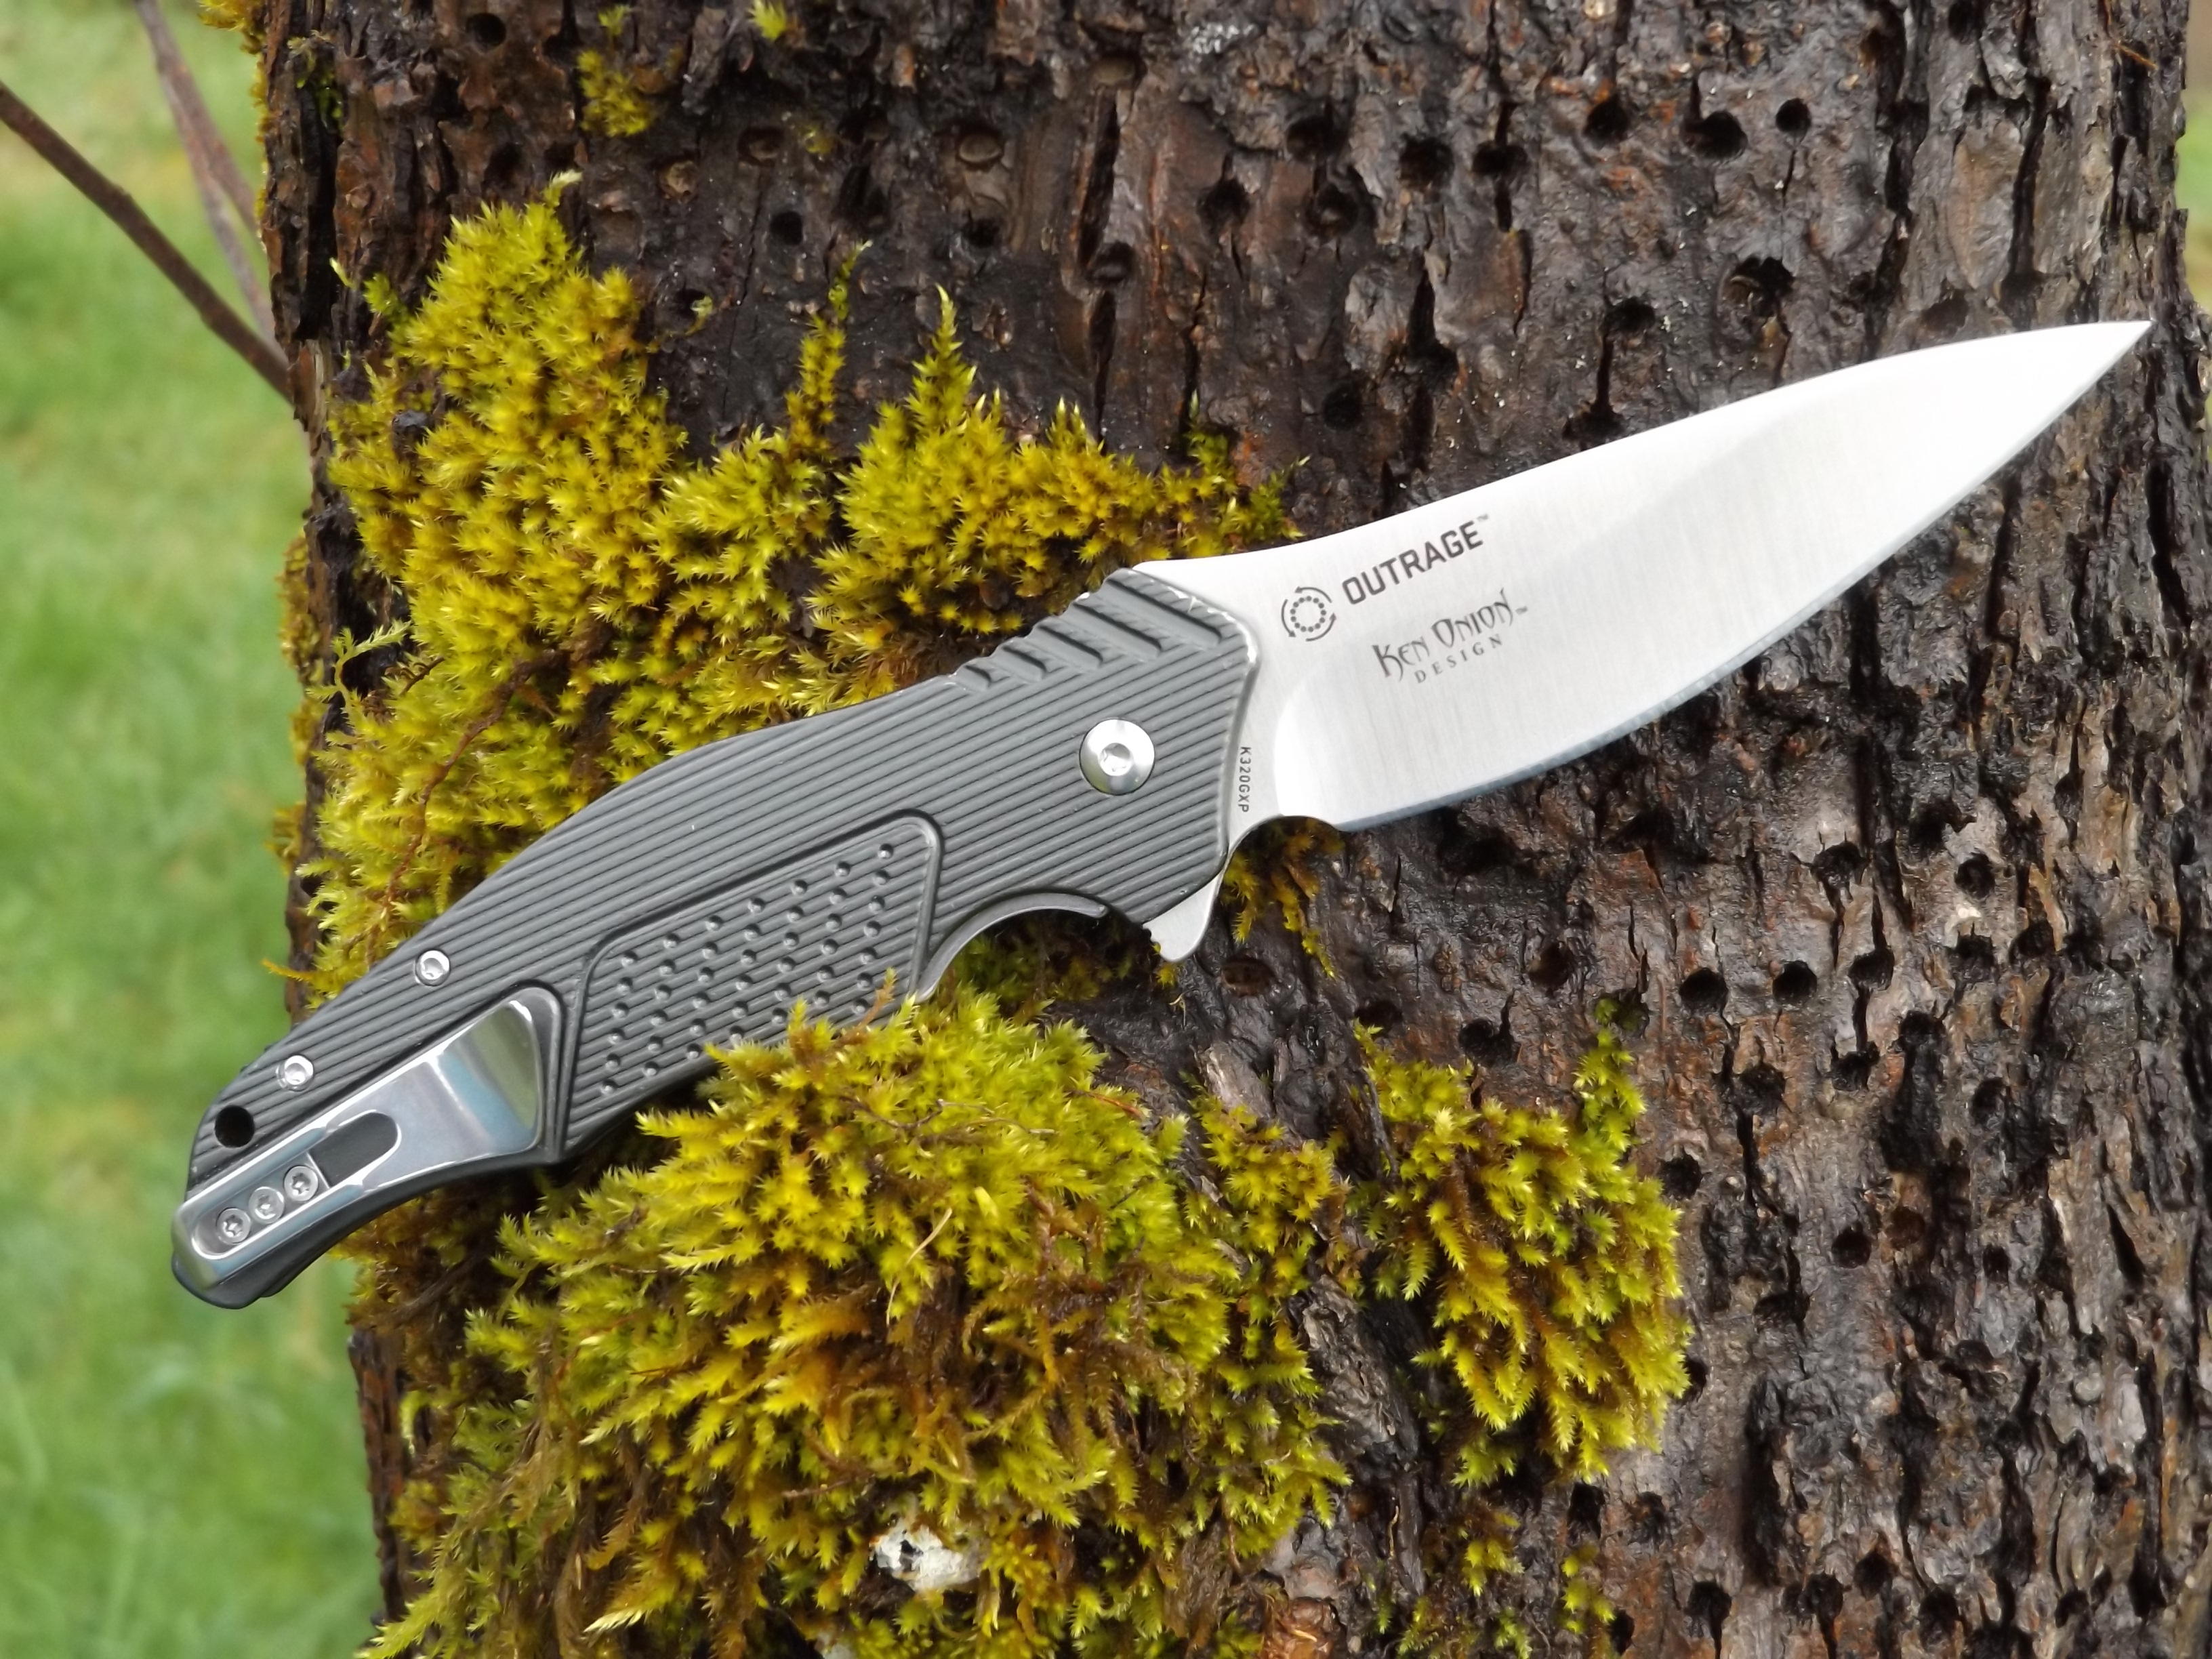
Pat Cascio’s Product Review: CRKT Ken Onion “Outrage”
I’ve personally been designing knives for about 30 years. I commissioned various custom knife makers to produce my designs, most of which were for my own personal use. However, several of my designs are being produced by Mil-Tac Knives & Tools and Columbia River Knife & Tool for retail sale. I’m honored that these companies thought enough of my designs to produce and sell them to the public at large.
I make no claims to being any sort of world famous knife designer. I just know what I like and what works. I wish I had the talent to actually make handmade knives, but, alas, my hands and brain won’t work together. I’ve had a professional custom knife maker try to teach me to make knives, all to no avail. It’s no easy task, designing a knife that has all the elements that most people will like. Everyone’s hands are different sizes, and we all know what we like in a knife when it is in our hands. A knife design has to flow. If it doesn’t, then it is nothing more than a sharpened crow bar of sorts, and at that, a poor substitute for a crow bar. My only claim to fame as a knife designer is what I learned in my high school drafting classes. However, if you were to see some of my original designs I put down on paper, you’d wonder how the final product turned out as well as it did.
Ken Onion, who is a world famous knife designer and custom knife maker, is one of those knife designers whose designs always seem to flow. No matter what knife he designs and has made, they all have that “flair” that is distinctly a Ken Onion design. Onion has collaborated with several knife companies over the years to produce some of his designs so that we all could afford to purchase them. I wish I could afford one of his custom hand-made knives, but they seem to start at about $4,000 and go up from there, and there is a waiting list to buy his knives. They are always in great demand. If you’re lucky to catch Onion at a knife show and you want one of the knives on his table, don’t put it down; write him a check on the spot. If you put the knife down, the odds are that someone next to you will buy it.
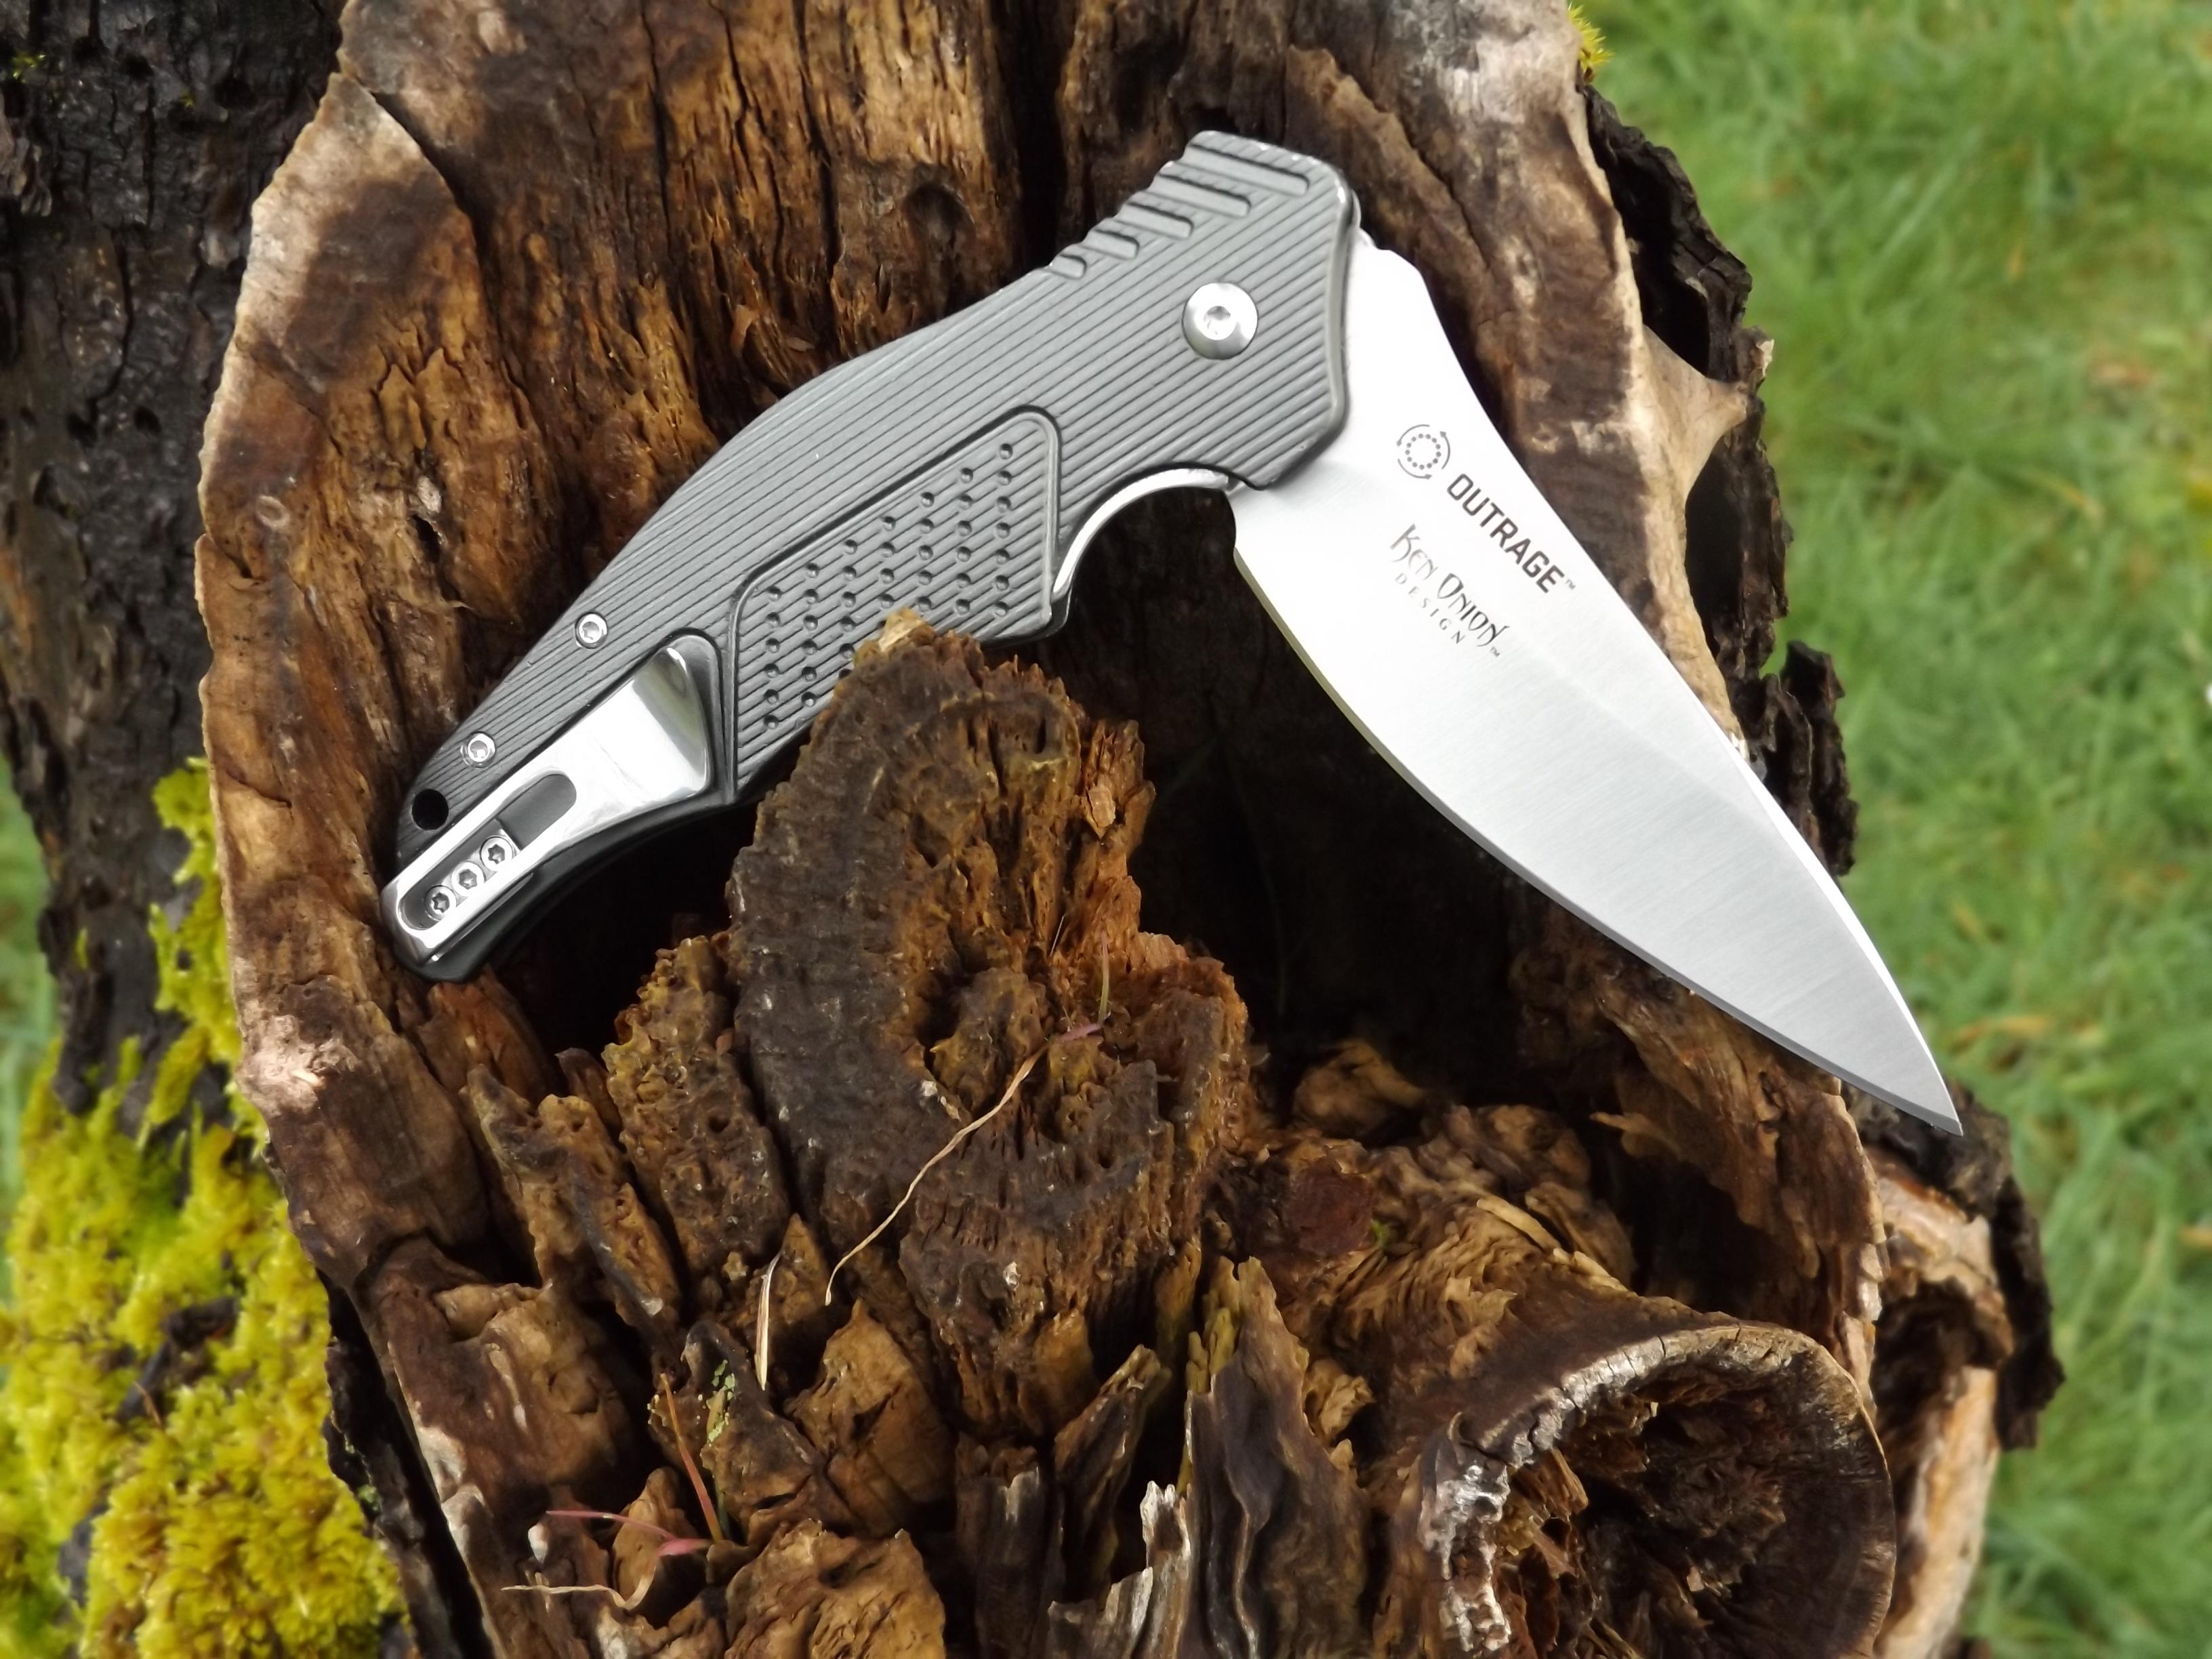
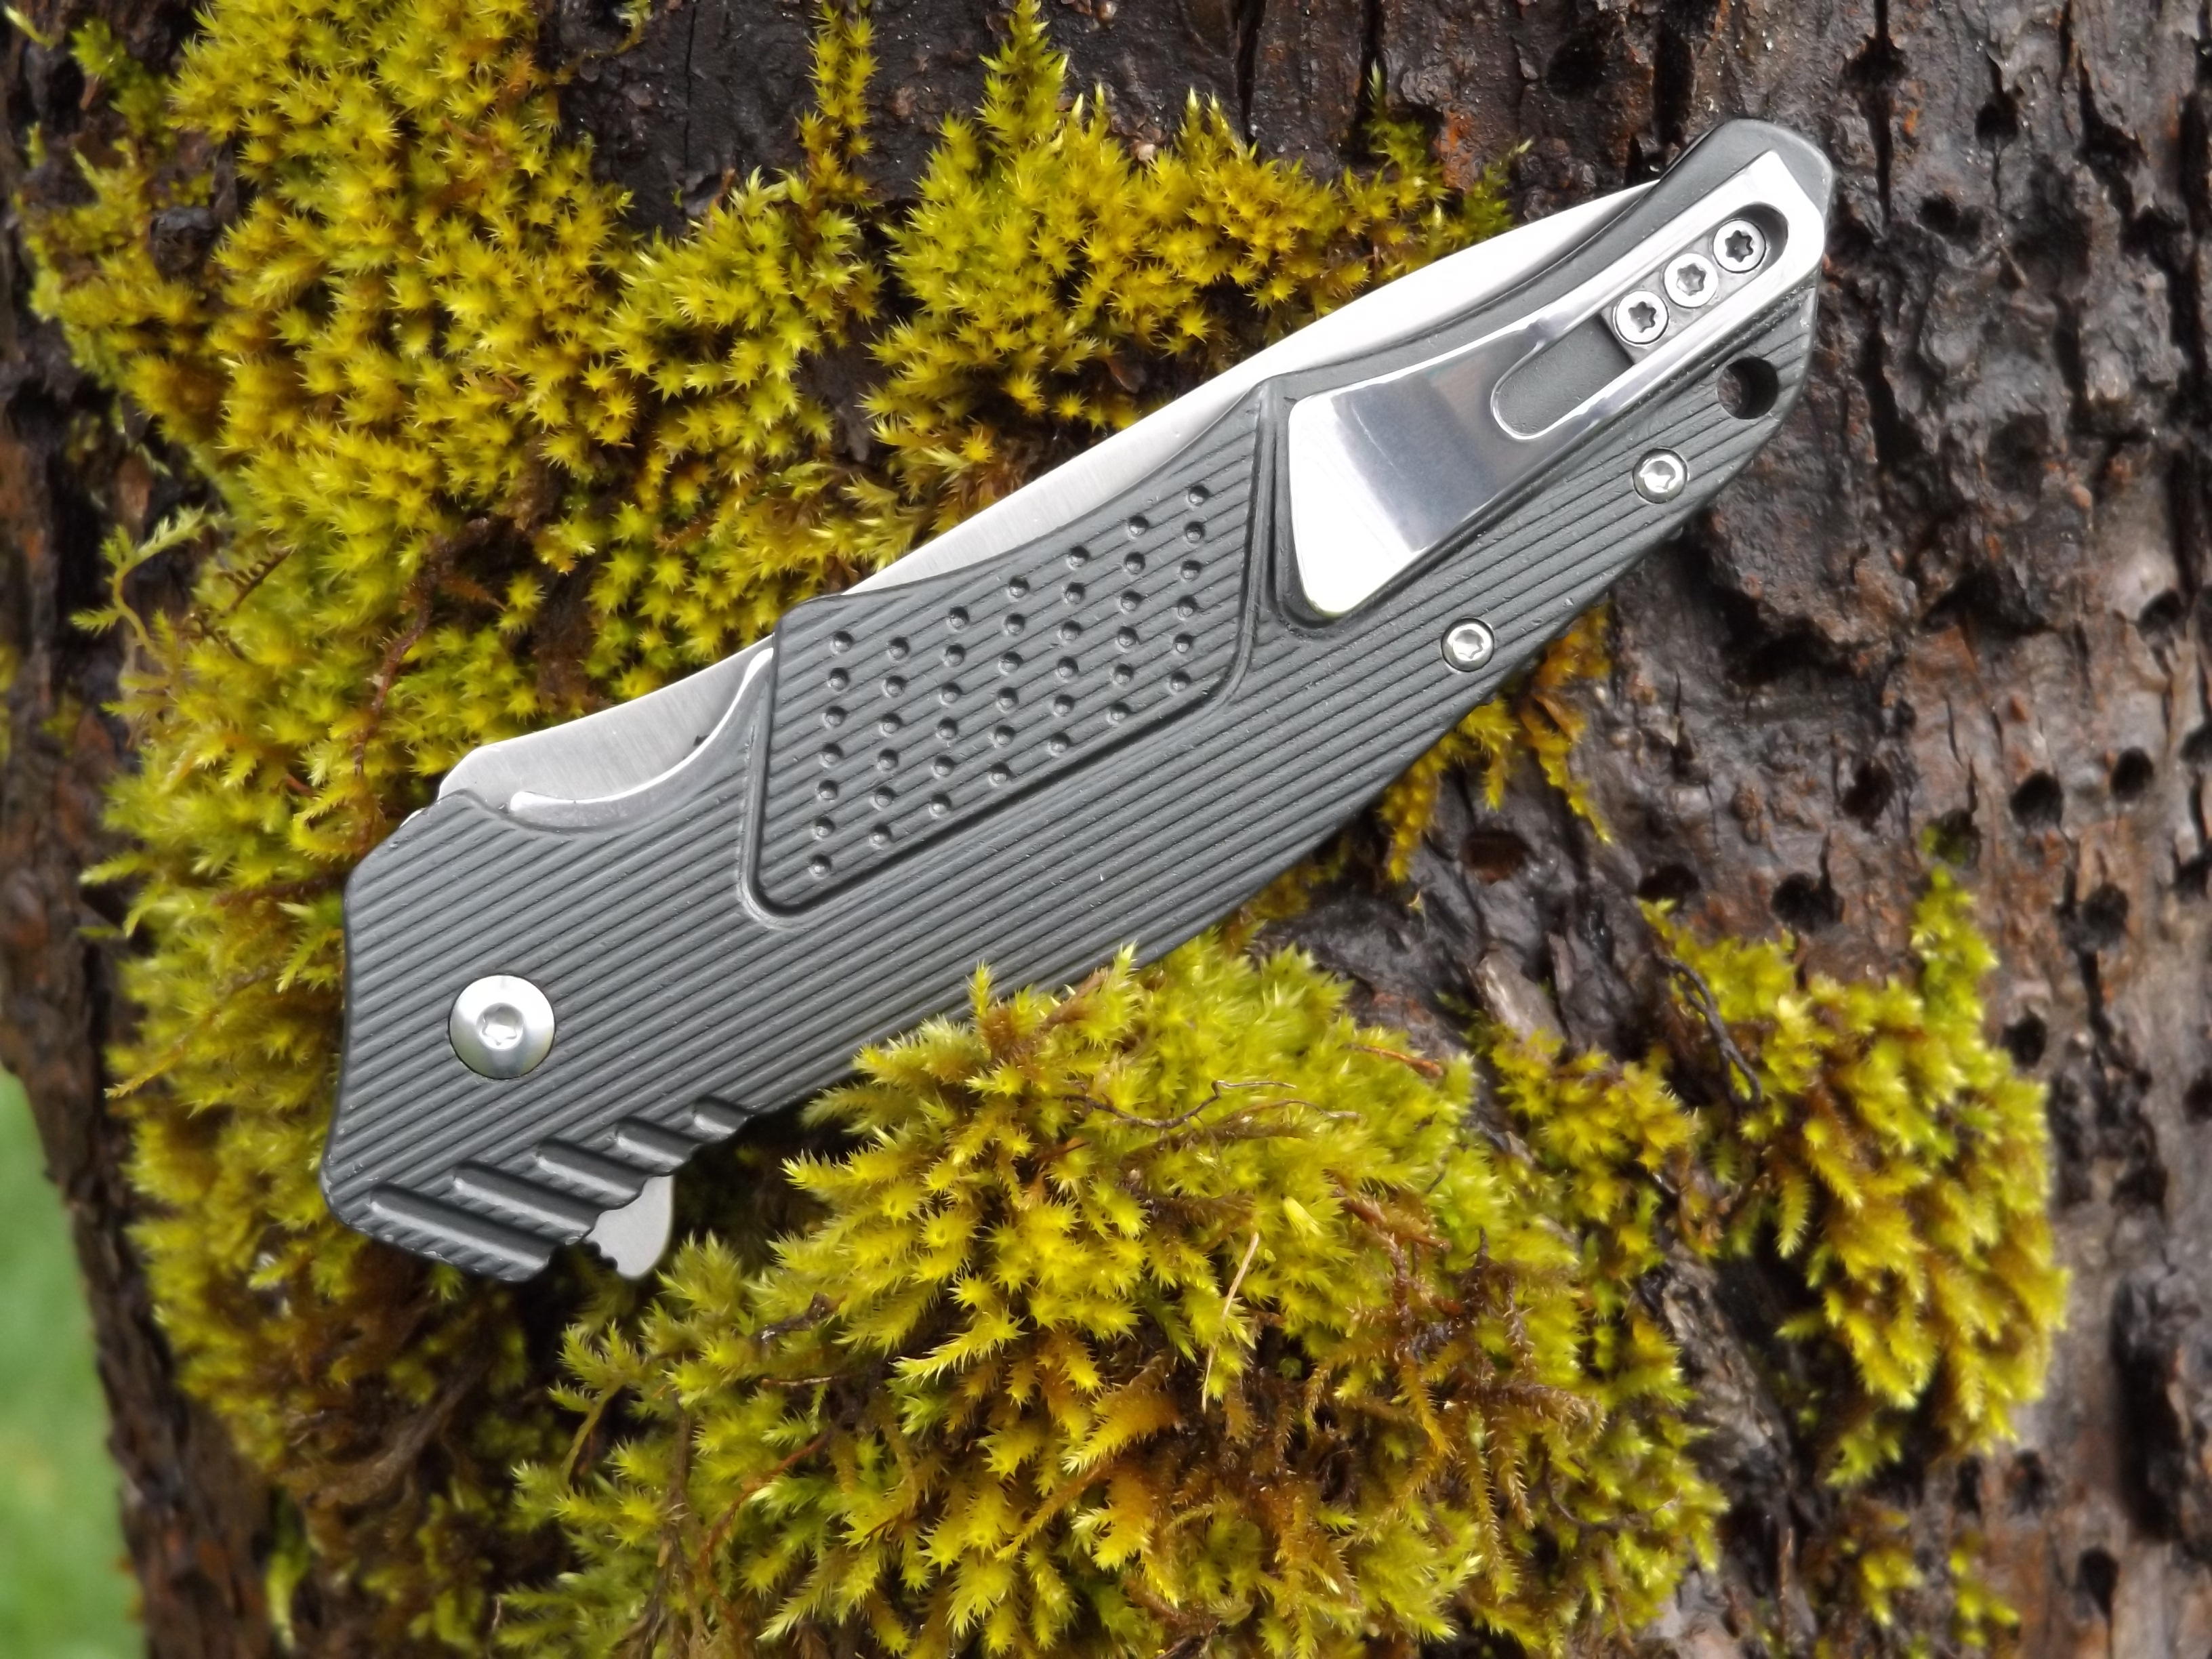
Enter the Columbia River Knife & Tool’s Onion “Outrage”– one of Ken’s newest and hottest designs in a folding knife. The Outrage is produced in China; however, as I’ve stated over the years, you get as good of a knife as you want made in China or Taiwan. So don’t let that “made overseas” moniker scare you away. The Outrage is 7.88 inches in overall length when opened. Closed it is 4.67 inches, and it weighs 4.5 oz, with a blade length of 3.19 inches made out of 8Cr13MoV stainless steel. The Rockwell hardness of the blade is 58-60, which is about perfect for this stainless steel. It has a nice satin finish on the blade with a hollow grind, and the blade is a drop point design. The handle material is 6061 aluminum with some beautiful sculpting on it for a sure grip, and there is a small lanyard hole in the butt of the blade. The locking mechanism is a locking liner, and the liner is made out of 2Cr13 stainless steel.
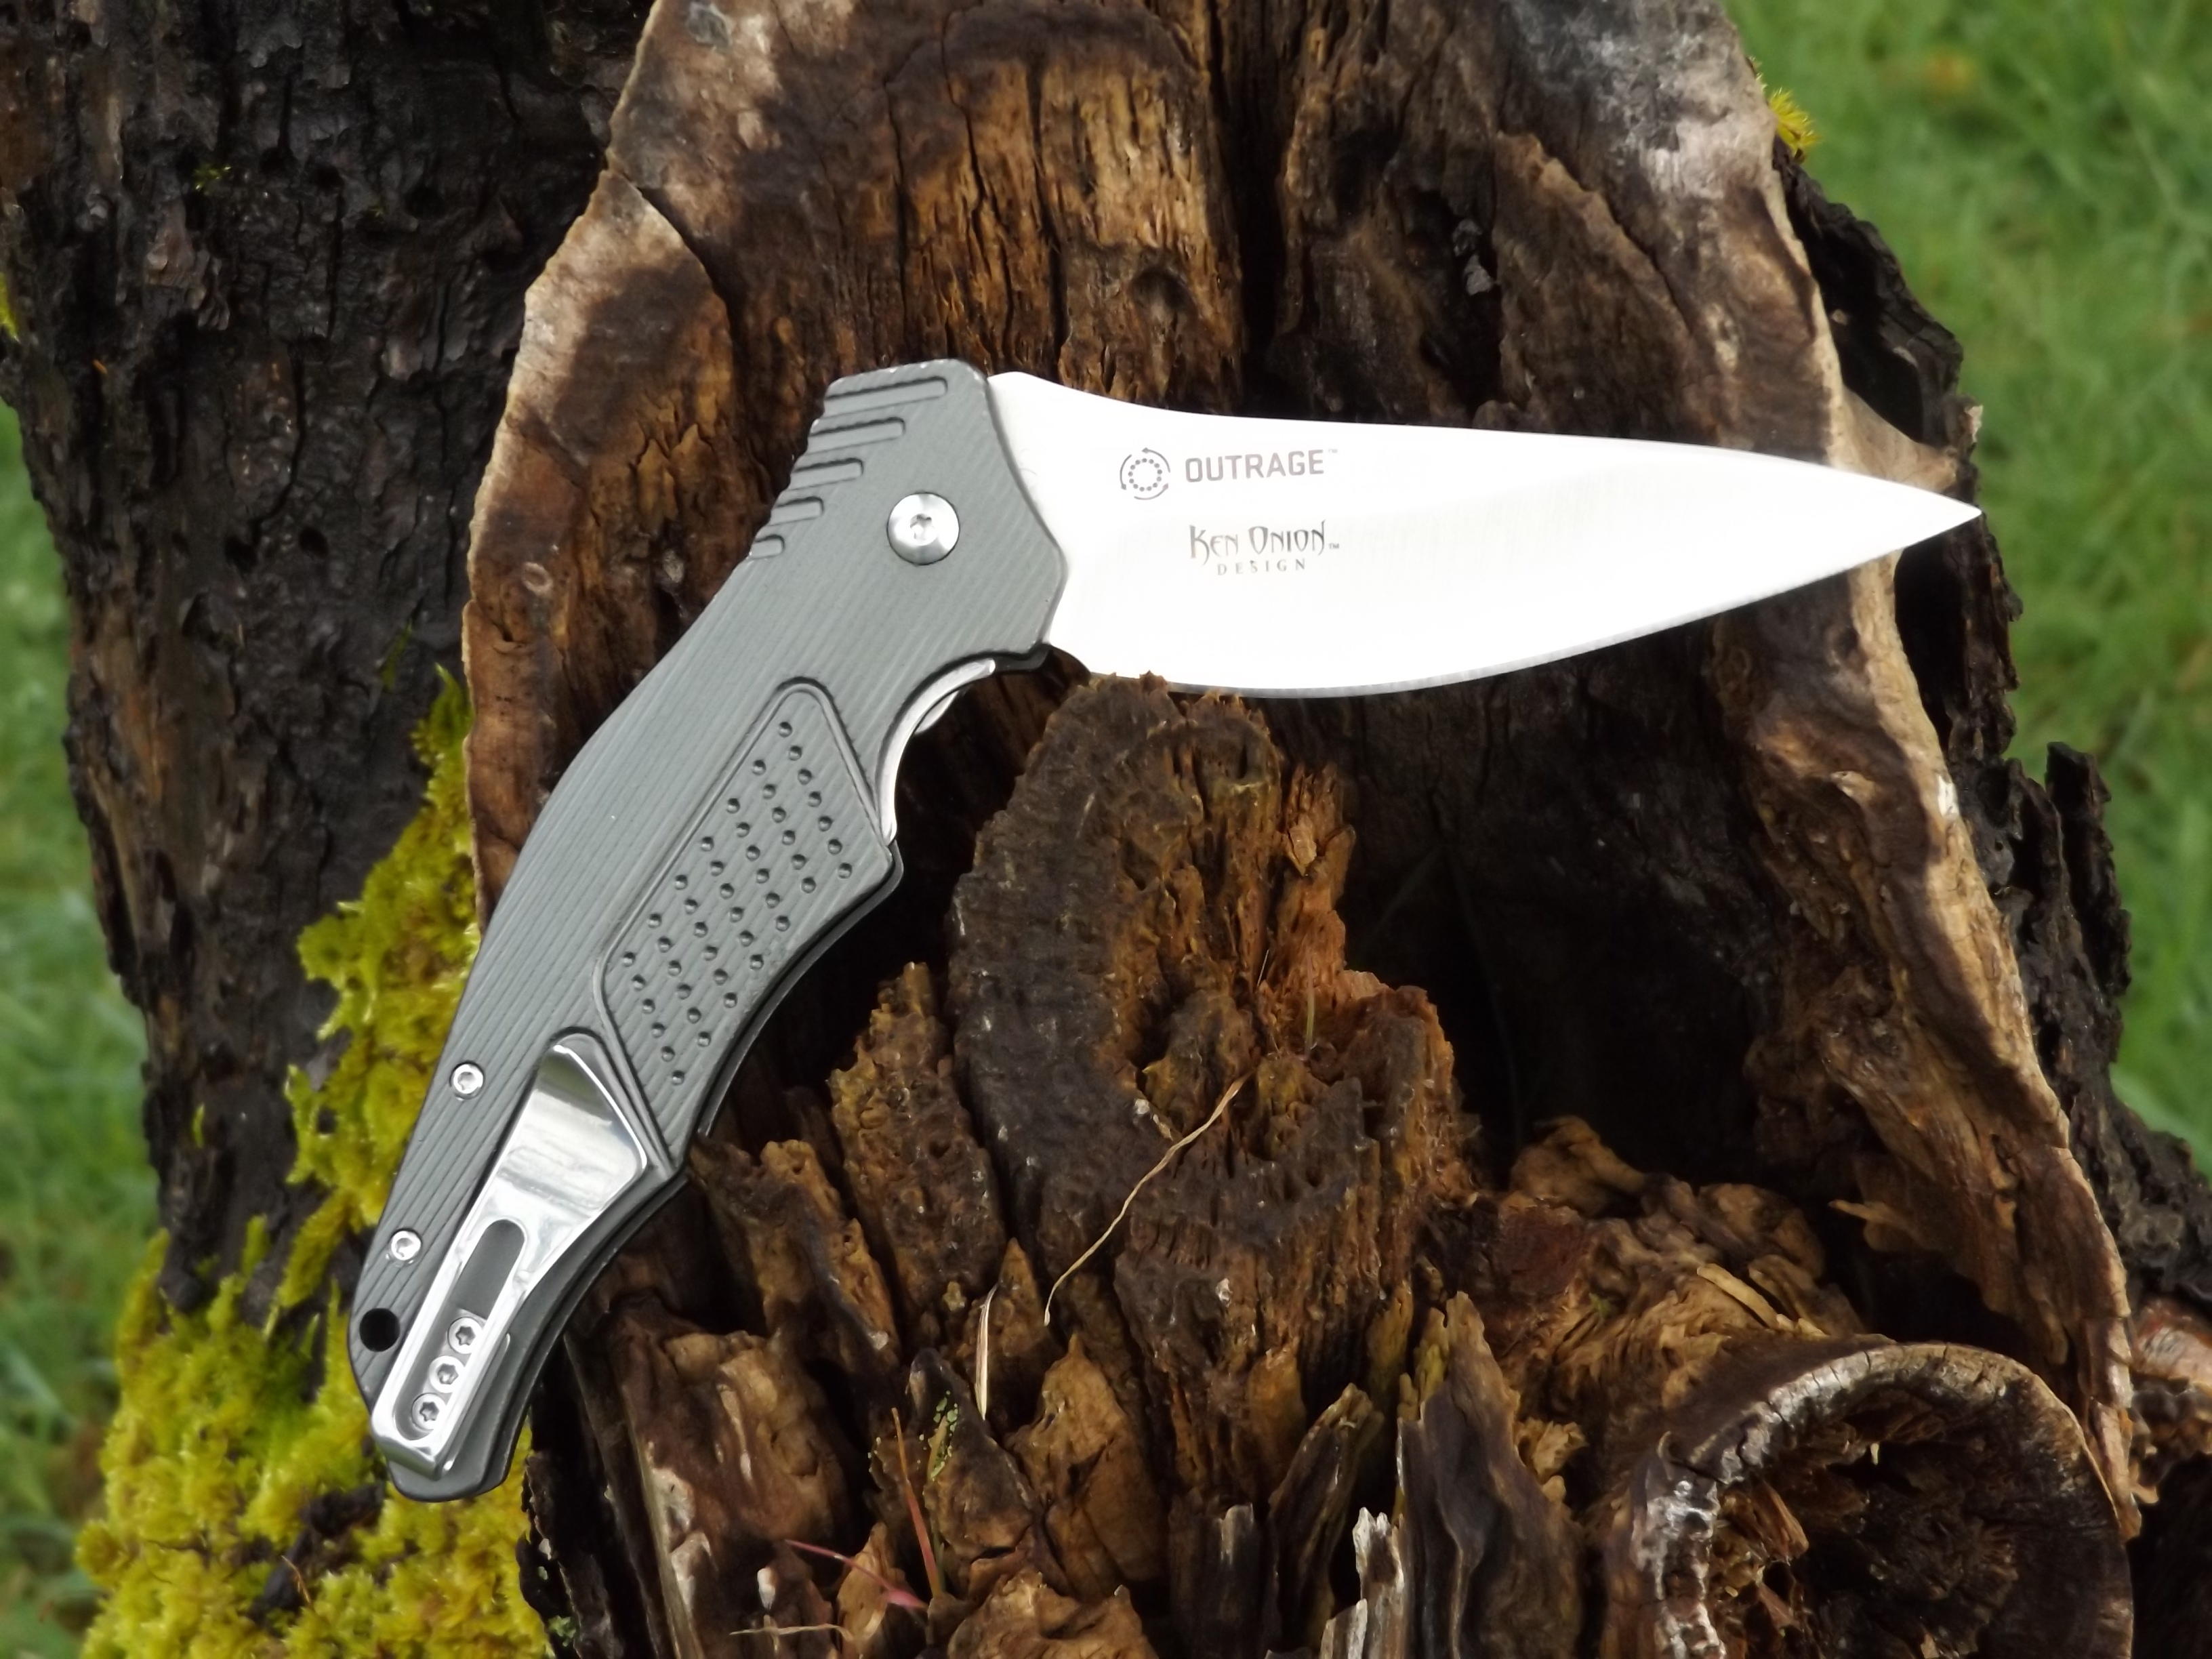
The aluminum handle scales are dark gray in color– gun metal gray! The blade comes out of the handle with a simple push of the “flipper”; there are no thumb studs at all. The blade rides on the IKBS ball bearing pivot system that deploys the blade ever so smoothly (effortlessly). With just a light push on the flipper, and the blade is out and locked. It is butter smooth, for lack of a better description. We also have the pocket/clothing clip, which allows for tip up carry in the right pocket. However, the knife can also be deployed from the left front trouser pocket as well.
I like to call the Outrage a “Gentleman’s folder”, but I’m not making any claims to being any sort of world recognized “gent” of any sorts. Still, the Outrage has that certain style and flair, and when you pull it out of your pocket to do some serious cutting chores it just screams “Gent’s” folder to my way of thinking. It’s very classy looking, to say the least. CRKT is so proud of this newest Onion designed folder that they have featured it on the front cover of their 2016 catalog.
Now, don’t let the term “Gent’s” folder fool you into believing that the Outrage is only meant for pulling out of your pocket at a meeting and cleaning your finger nails with it. Such is not the case. To be sure, when working corporate security, I’ve seen guys pull their pocket knives out and clean their finger nails. I don’t know if their fingernails were dirty, they were just showing off their folding knife, or they were just bored to death, like I have been in many meetings that produced no results.

For the better part of a month, the CRKT Outrage rode in my right front pocket. I actually do carry all the folding knives I get for testing, sometimes for a week and other times, if time permits and I don’t have too many folding knives on-hand for testing, for a month or so. I hardly knew the folder was in my pocket; it rode nice and low, with the somewhat wide pocket/clothing clip, but it was still readily accessible for fast deployment.
During the course of my testing, the knife was used around the kitchen, even though it wasn’t designed for this sort of work. It did fine cutting veggies and meats. I also tested it against some poly rope, which is super tough stuff to cut, and I did have to cut through the rope twice to cut completely through it. It is thick rope. However, the blade didn’t slip off the poly rope; it dug right into it. Almost daily, I have either USPS, UPS, or FedEx bringing me packages that need to be opened. They’re usually boxes, and this is always a good test of any knife. Cardboard is really tough on a blade and will dull one in short order, too. The Outrage had no problem handling any of the daily tasks I set it against.
Many people tend to forget that a knife, any knife, is a tool first of all and can substitute as a weapon secondly. Now, I wouldn’t want to go up against someone who is armed with a firearm, or for that matter a baseball bat, armed only with a folding knife. However, there are circumstances where I can see a folding knife used for self defense, especially in some of the big cities where there are restrictions on carry handguns or they are flat out prohibited from being carried. If stopped by the police for whatever reason and they spotted the Outrage, the knife doesn’t scream “tactical” to my way of thinking; it is just a very classy looking folder. Some folding knives look vicious, and the police might really start to question you as to why you are carrying such a knife. With the Outrage, if questioned, you would simply state you use the knife to open your mail at work or for daily cutting chores. The Outrage really grew on me during the long-term testing, and I hated to put it aside when several other folding knives arrived that I needed to test for future articles. The Outrage feels really good in the hand, and I let a lot of people handle it. They all commented on how good it felt, and said it’s not too big or too small, either. I prefer folding knives with blade of 3.5 to 4.0 inches for the most part, but this Outrage just really caught my attention.
Full retail on the CRKT Outrage is only $69.99, and it is a bargain. If you shop around, you can often find most CRKT products discounted deeply. Now, here’s the bad news; I checked the CRKT website while working on the article and found that the Outrage is currently out of stock, which doesn’t surprise me in the least. Ken Onion knives, either factory produced or his hand made versions, are always in great demand. Check out the Outrage at your nearest knife or gun shop. I’m expecting you’ll break the wallet out and buy it!
– Senior Product Review Editor, Pat Cascio
- Ad Click Here --> Civil Defense ManualNOW BACK IN STOCK How to protect, you, your family, friends and neighborhood in coming times of civil unrest… and much more!
- Ad Trekker Water Station 1Gal Per MinuteCall us if you have Questions 800-627-3809
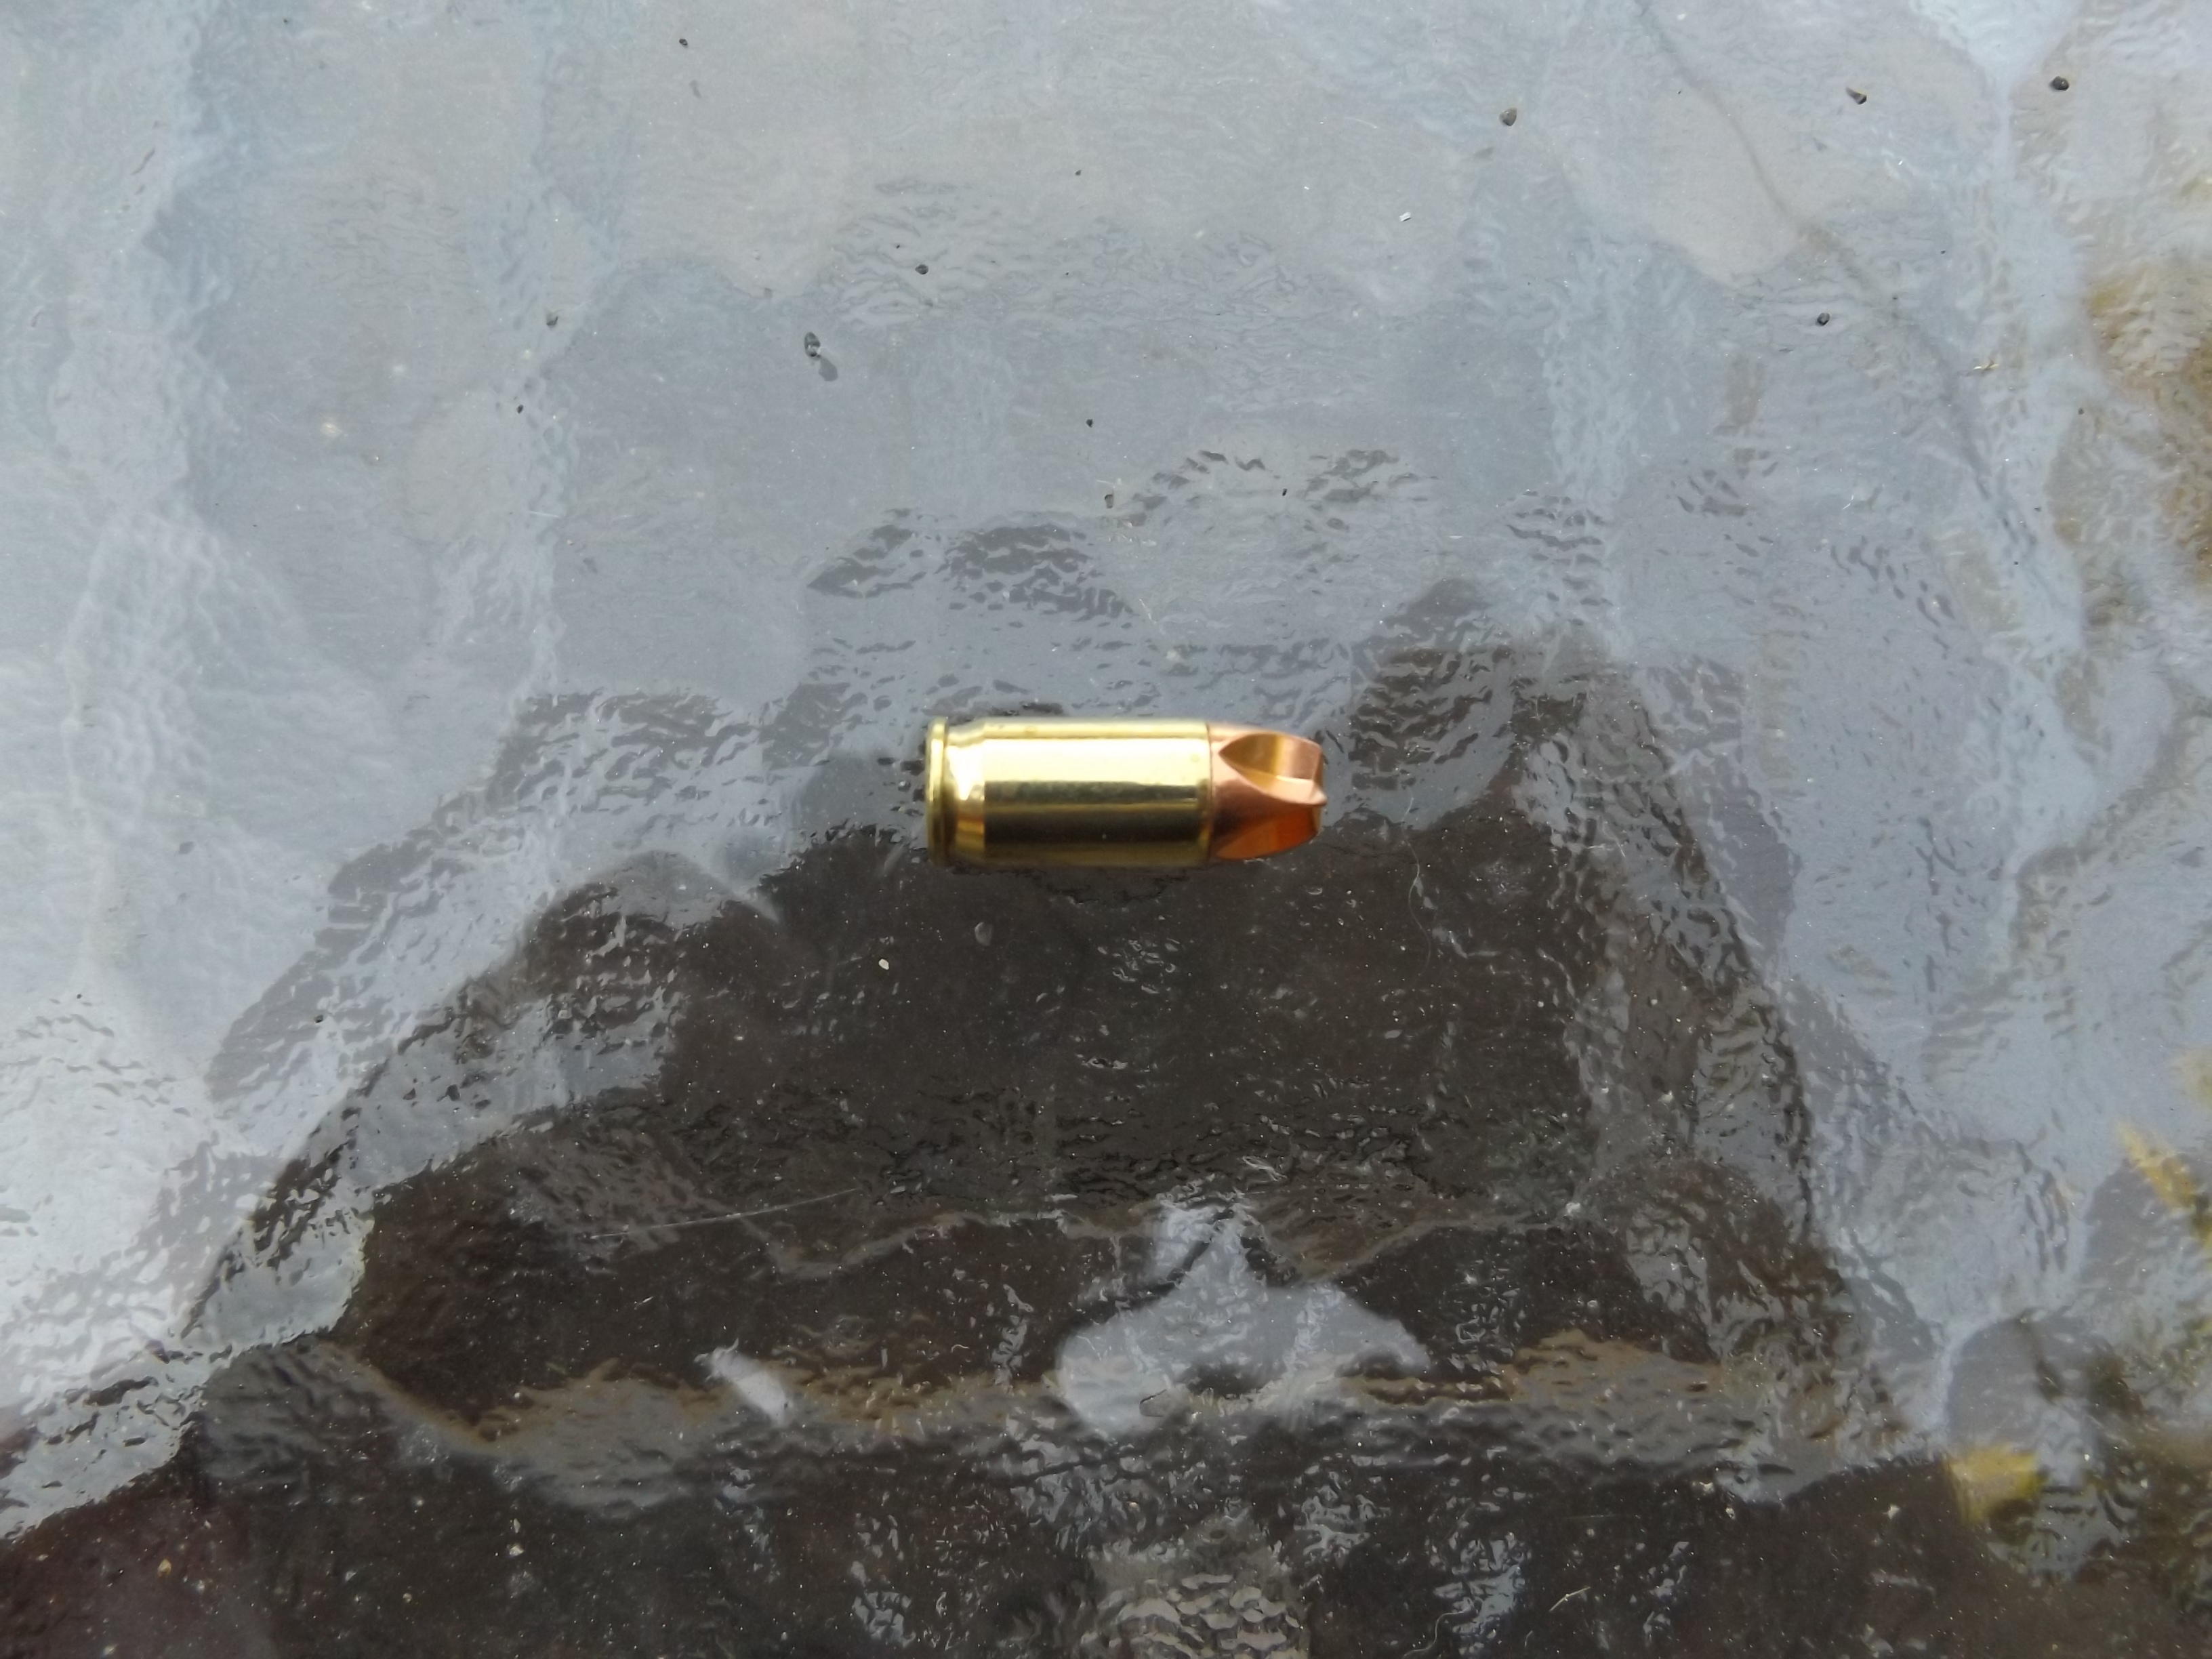
Pat Cascio’s Product Review: Black Hills Ammunition .380 ACP Xtreme Defense
I have been running Black Hills Ammunition through my firearms since 1992, when I first started writing gun articles. I have yet to have a single round fail me in any way. I think it is safe to say that I’ve easily fired hundreds of thousands of rounds of Black Hills ammo through various firearms for articles. And, to be sure, Black Hills is always on the cutting edge of new products. However, with that said, they do not just jump on the band wagon because everyone else is doing so.

Jeff & Kristi Hoffman are the owners of Black Hills, and they are very proud to be one of the leading ammo manufacturers in this country. They even produce a proprietary round for all our of Special Forces. They are the only ammo maker producing this round, and that says a lot. They go to great lengths to test their ammo, and we aren’t just talking going out and shooting into ballistic gelatin either. There are many protocols that they have to go through to produce this specialty ammo for our military.
About six months ago, I asked Jeff Hoffman about this new “Xtreme” all-copper bullet that is not a hollow point; it is a solid. However, unlike a FMJ bullet, the “Xtreme” has a frontal section that looks like an “X” as you look down on the round. It isn’t just that simple, either. This bullet is designed for deep penetration, and it does not simply slip and slide through a body; instead, it rips through, creating a massive temporary wound channel.
Hoffman promised me that he was experimenting with this new bullet and I would get some for testing. True to his word, he provided me with 300 rounds of his .380 ACP 60-gr Xtreme Defense round. That isn’t a misprint. These are a light-weight bullet at only 60 grs. Many .380 ACP bullets are in the 95-100 grs bullet weight. I received .380 ACPfrom the very first batch of this new ammo. Nice!
Now, you have to understand that, once again, this round does not perform like a FMJ round, nor does it duplicate a JHP round. Instead, as already mentioned, this round was designed to rip and tear through a body, doing the maximum damage possible, all the while penetrating deep enough to get the job done. Many JHP rounds, in lesser calibers like .380 ACP, expand nicely but they just aren’t penetrating deep enough to stop a bad guy. Penetration is king, when it comes to lesser calibers. However, you have to have a balance between penetration and having the bullet do as much damage as possible, too.
I routinely carry a little Ruger LCP.380 ACP in an ankle holster. It is a back-up to whatever my main gun is. It has been a real challenge to find just the right balance between power and penetration. I’ve used standard velocity round in FMJ and JHP as well as +P round, again in FMJ, JHP, and even Hard Cast bullets. The little Ruger has taken a beating but never failed. Needless to say, +P rounds are a real bear to shoot in the little LCP, and Ruger advises against using +P ammo in this itty-bitty gun.
The first thing my wife (who also carries her LCP on a regular basis along with another gun was to see if these unusual rounds would even feed in our guns. There were zero malfunctions. The rounds fed and ejected nicely, and an added bonus was the very light recoil with the 60-gr bullets. It makes the little LCP very controllable, to be sure.
I also did some limited testing against water-filled milk jugs, and the Xtreme Defense round easily penetrated three gallon jugs. It didn’t just slip and slide through them; it caused massive damage, much the same as a JHP would do. Yet, it penetrated deeper.
Ammo makers are producing this round at higher velocities and are using a heavier bullet. However, Hoffman has decided on the 60-gr bullet for use in the .380 ACP, and I’m certainly not going to second guess his extensive testing and experience as an ammo maker. This is now my default round in my LCP–, as it is in my wife’s LCP, too. I’m extremely impressed with this round, and you should be, too. Black Hills Ammunition doesn’t even have this round on their website yet, but you can call and order it. I think you’ll be impressed with it.
– Senior Product Review Editor, Pat Cascio
- Ad Survival RealtyFind your secure and sustainable home. The leading marketplace for rural, remote, and off-grid properties worldwide. Affordable ads. No commissions are charged!
- Ad LifeSaver 20K JerryCan Water PurifierThe best water jerrycan you can buy on the market! Mention Survivalblog for a Free Filter ($130 Value)
Recipe of the Week: Corn Pudding
Ingredients:
- 3 slightly beaten eggs
- 2 cups cooked or canned whole kernel corn, drained
- 2 cups milk, scalded
- 1 Tbsp instant minced onion
- 1 Tbsp melted butter
- 1 tsp sugar
- 1 tsp salt
Directions:
- Combine ingredients and pour into a greased 1½ qt baking dish (or any baking dish that fits into a 4½ quart or larger slow cooking pot).
- Cover with foil or a lid (but do not use plastic).
- Set a metal rack or trivet on the bottom of the slow cooking pot. Pour 4 cups of hot water in the pot.
- Set the baking dish on the rack in the hot water.
- Cover pot and cook on high for 2 to 2½ hours or until done.
Makes 6 servings.
o o o
Do you have a favorite recipe that would be of interest to SurvivalBlog readers? Please send it via e-mail. Thanks!
- Ad Civil Defense ManualClick Here --> The Civil Defense Manual... The A to Z of survival. Looks what's in it... https://civildefensemanual.com/whats-in-the-civil-defense-manual/
- Ad USA Berkey Water Filters - Start Drinking Purified Water Today!#1 Trusted Gravity Water Purification System! Start Drinking Purified Water now with a Berkey water filtration system. Find systems, replacement filters, parts and more here.
Letter Re: How To Trim Your Horse’s Feet
Hugh,
There’s a lot of good information in the article on trimming horses’ feet. The old saw is “no hoof, no horse.” So you have to be able to provide good hoof care. I don’t have the education or breadth of experience that RB does, but I’ve been trimming my band of horses for more than 20 years. I’ve found some things over the years that make things easier that folks may want to consider.
I prefer to trim sitting down. I’ve never developed the skill that lets me trim comfortably standing the way a farrier does. I bought a mechanics stool on wheels. It’s low and has a place under the seat for tools. On the front feet I position the seat of the stool about even with the horse’s leg and then sit down. If I’m doing the left front, for example, my left leg will be a little behind the horses leg, and I’m sitting facing about 45 degrees to the rear When the horse lifts its leg, I put it under my left knee (which is bent at about a right angle at the knee) and then let it rest on top of my right thigh just behind my knee. I do all the cleaning, trimming, cutting, and rasping with the foot in this position. I ground tie my horses and they stand quietly for the trimming. A horse that’s not familiar with the procedure usually needs the help of a handler the first few times. A horse needs to be gentle and quiet to work with them this way. If they’re not that way, that’s the first thing they have to learn. Standing for trimming and shoeing are skills the horse needs to excel at.
On the rear feet, I use a hoof stand to support the hoof and the leg. Doing so lets me work either sitting or standing without having to support the leg. The stand I use is made by Equine Innovations and comes with a cradle for supporting the hoof and a hoof jack for the bottom of the foot to rest on when it’s being rasped from the top. There are other hoof stands as well. Find what works for you.
A good source for hoof stands and all the necessary farrier tools is NC Tool. If it has to do with maintaining horses’ feet, they have it. They carry a very good selection of high quality tools and supplies, ship quickly, and have always given good service. If you’re looking for hoof knives, nippers, rasps, or anything else, you won’t go wrong.
Horses can perform at high levels without the need for shoes. For them to do so requires the trimmer to know what he/she is doing and may require transitioning the horse to being barefoot. There’s a lot of information available on this. In my opinion, this is one of the best sites. This is Pete Ramey’s website, and it has a lot of useful information on barefoot trimming and hoof maintenance. – M.
- Ad Ready Made Resources, Trijicon Hunter Mk2$2000 off MSRP, Brand New in the case
- Add Your Link Here

Economics and Investing:
Something Stunning Is Taking Place Off The Coast Of Singapore – “I’ve been coming to Singapore once a year for the last 15 years, and flying in I have never seen the waters so full of idle tankers,” – B.B.
o o o
JWR’s interview on the Kennedy Financial Podcast: Ep. 53-JAMES WESLEY, RAWLES, Capitalism, Gold, Silver & MORE!
o o o
407,000 Workers Stunned As Pension Fund Proposes 60% Cuts, Treasury Says “Not Enough” – B.B.
o o o
Preparing For Much Higher Gold And Silver Prices
o o o
SurvivalBlog and its editors are not paid investment counselors or advisers. Please see our Provisos page for details.
Odds ‘n Sods:
Furniture firepower: Gun sales drive specialty ‘concealment’ craze Excerpt: “’Gun concealment furniture’ sales, once the province of solitary craftsmen making custom goods have gone mainstream, allowing firearms owners to maintain easy in-home access to hidden handguns and rifles.” – G.G.
o o o
SurvivalBlog reader R.V. wrote in to suggest Greg Cote, LLC as a source for firearms magazines.
o o o
Why – Krayton Kerns, DVM (The Conservative Cow Doctor) explains why King Obama recently decreed all American schools will accommodate any and all of the government endorsed 15 sexes into the same restroom or locker room.
o o o
Several readers wrote in with the link to this article on the Washington Post: Primed to fight the government A fast-growing U.S. movement armed with guns and the Constitution sees a dire threat to liberty (Note: You may require a login to view the article, and it is written from the typical leftists view.)
o o o
Jim’s Quote of the Day:
“What a man needs in gardening is a cast-iron back,—with a hinge in it.” – Charles Dudley Warner, My Summer in a Garden (1870)
Notes for Sunday – May 22, 2016
May 21st is the birthday of weapons designer John Douglas Pedersen (born 1881, died 1951).
o o o
Today, we present another entry for Round 64 of the SurvivalBlog non-fiction writing contest. The nearly $12,000 worth of prizes for this round include:
First Prize:
- A Tactical Self-Contained 2-Series Solar Power Generator system from Always Empowered. This compact starter power system is packaged in a wheeled O.D. green EMP-shielded Pelican hard case (a $1,700 value),
- A Gunsite Academy Three Day Course Certificate that is good for any one, two, or three day course (a $1,195 value),
- A course certificate from onPoint Tactical for the prize winner’s choice of three-day civilian courses, excluding those restricted for military or government teams. Three day onPoint courses normally cost $795,
- DRD Tactical is providing a 5.56 NATO QD Billet upper with a hammer forged, chrome-lined barrel and a hard case to go with your own AR lower. It will allow any standard AR-type rifle to have a quick change barrel, which can be assembled in less than one minute without the use of any tools and a compact carry capability in a hard case or 3-day pack (an $1,100 value),
- Gun Mag Warehouse is providing 20 Magpul PMAG 30-rd Magazines (a value of $300) and a Gun Mag Warehouse T-Shirt; (an equivalent prize will be awarded for residents in states with magazine restrictions),
- Two cases of Mountain House freeze-dried assorted entrees in #10 cans, courtesy of Ready Made Resources (a $350 value),
- The Ark Institute is donating a non-GMO, non-hybrid vegetable seed package (enough for two families of four) plus seed storage materials, a CD-ROM of Geri Guidetti’s book “Build Your Ark! How to Prepare for Self Reliance in Uncertain Times”, and two bottles of Potassium Iodate (a $325 retail value),
- A $250 gift certificate good for any product from Sunflower Ammo,
- KellyKettleUSA.com is donating an AquaBrick water filtration kit with a retail value of $250, and
- Two cases of meals, Ready to Eat (MREs), courtesy of CampingSurvival.com (a $180 value).
Second Prize:
- A Glock form factor SIRT laser training pistol and a SIRT AR-15/M4 Laser Training Bolt, courtesy of Next Level Training, which have a combined retail value of $589,
- A transferable certificate for a two-day Ultimate Bug Out Course from Florida Firearms Training (a $400 value),
- A Model 175 Series Solar Generator provided by Quantum Harvest LLC (a $439 value),
- A Trekker IV™ Four-Person Emergency Kit from Emergency Essentials (a $250 value),
- A $200 gift certificate good towards any books published by PrepperPress.com,
- A pre-selected assortment of military surplus gear from CJL Enterprize (a $300 value),
- RepackBox is providing a $300 gift certificate to their site, and
- Safecastle is providing a package of 10 LifeStraws (a $200 value)
- American Gunsmithing Institute (AGI) is providing a $300 certificate good towards any of their DVD training courses.
Third Prize:
- A Royal Berkey water filter, courtesy of Directive 21 (a $275 value),
- A $245 gift certificate from custom knife-maker Jon Kelly Designs, of Eureka, Montana,
- A large handmade clothes drying rack, a washboard, and a Homesteading for Beginners DVD, all courtesy of The Homestead Store, with a combined value of $206,
- Expanded sets of both washable feminine pads and liners, donated by Naturally Cozy (a $185 retail value),
- Two Super Survival Pack seed collections, a $150 value, courtesy of Seed for Security, LLC,
- Mayflower Trading is donating a $200 gift certificate for homesteading appliances,
- Montie Gear is donating a Precision Rest (a $249 value), and
- Two 1,000-foot spools of full mil-spec U.S.-made 750 paracord (in-stock colors only) from www.TOUGHGRID.com (a $240 value).
Round 64 ends on May 31st, so get busy writing and e-mail us your entry. Remember that there is a 1,500-word minimum, and that articles on practical “how to” skills for survival have an advantage in the judging.
How To Trim Your Horse’s Feet- Part 2, by R.B.
Using the Hoof Knife
The next step is cutting away dead sole at the toe to find the white line. Dead sole is hard, flaky, and depending on the moisture of the foot may come out with little effort. If you live in a dry area, I recommend watering down an area about 10 feet in diameter around your horse’s water trough for about a week before you do your trimming. This way, every time they drink they will stand in water and mud, which will soak into the sole and make the trim a lot less work. After cutting away the dead sole at the toe down to the white line, you will want to cut away more of the dead sole to create a bowl like surface to the bottom of the foot. 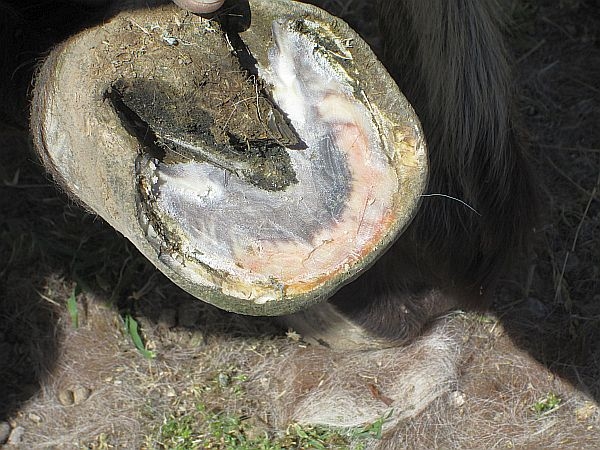 You can tell the difference between dead sole and live sole by using your thumb to press down on the sole. If it feels soft and spongy it is live, and you do not want to cut into live sole. Live sole is sensitive and has blood flow. It is known as the quick, and cutting into it will cause bleeding. If you accidentally cut into the quick, you should stop cutting; most likely, the horse will insist on it. You will need to treat the area with an iodine wash and seal it with something like pine tar. I should note also that if you see an area of light pink in the sole or even in the hoof but that area has no blood flow, it is most likely an old bruise and will not cause bleeding and can be cut out without damage. Bruises are common in horses with bare feet or in rocky areas.
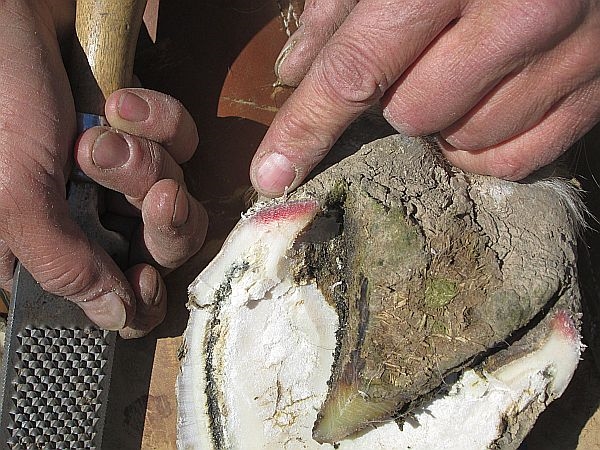
Once you have your bowl-like surface in the sole, you will also want to clean out the commisure. The commisure is the deep part of the foot that runs down both sides of the frog. Remember that the frog is the fleshy triangular pad in the center and back of the foot. The deepest parts of the commisure may have a condition known as thrush. Thrush is a bacterial infection on horses’ feet and is common around the frog. It is black and smells like dirty old socks. The condition can easily be treated holding the foot up, pouring in a little Clorox bleach, and holding it there for a few minutes. It is typical when feet do not get cleaned regularly, and it can clear up quickly from a trimmed and cleaned foot. If left untreated, it can get serious and even cause lameness. Once you have trimmed the sole and cleaned out the commisure, you can now move on to the bars.
The bars are like extended pieces of hoof wall that turn back up from the heel and angle toward the front of the frog. The bars should be trimmed smooth with the sole. 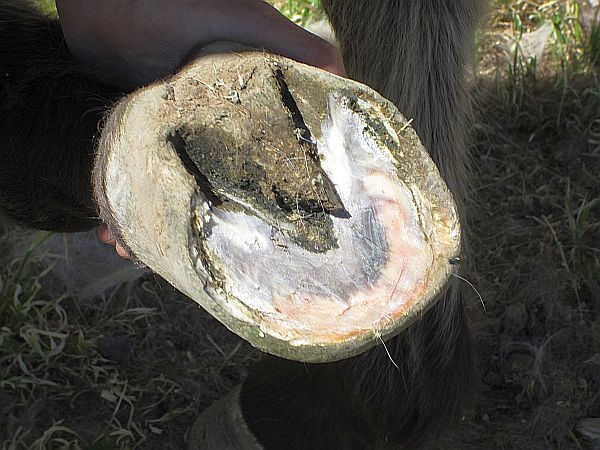 If not trimmed, they can overgrow the sole and trap rock and debris between the bar and the sole. Compressed by the weight of the horse, that debris can puncture the soft tissue of the sole and cause an abscess. Abscesses are very painful for horses and though rare, in my experience, they are a nasty wound that are difficult and time consuming to treat. Keep the bars trimmed and the white line clean, and that will eliminate most of the potential for abscesses caused by improper trimming. Keeping the white line clean is important because it can cause a condition known as gravel. When debris, such as gravel or sand, gets stuck in the white line, it can become trapped as the foot continues to grow. With no where else to go, the debris will travel up the sensitive laminae of the foot and exit at the coronet band in a condition known as a blow out. It is very nasty looking, though treatable. It’s better to avoid the problem in the first place.
From the bars, we move on to examine the frog. Excess frog should be trimmed away and should be trimmed from the front to the back. The bottom of the frog is usually hard and may even be peeling away on its own. Care again must be used on the frog, because under the dead tissue is live tissue with circulating blood. There is a bit of disagreement in the horse world about the amount of frog that should be trimmed. One camp trims the frog down to live tissue, making the frog actually set below the level of the hoof wall, while the other camp only trims the frog of dead tissue and may leave enough to actually extend slightly below the level of the hoof wall. I do not put forth the reasoning for either train of thought. Rather, I will just explain what has worked for me for the last 30 years. I was initially trained to trim to a natural angle [see image 2] and a natural foot. In my years of experience, I have found that only trimming dead frog and leaving just a little below the hoof wall, or even with a horse shoe, seems to work very well as excess frog tends to shed naturally on its own about twice a year.
Using the Nippers
The next part of the standard trim is nipping the hoof wall. Using your hoof nippers you start by making a straight and level cut right at the exposed white line in the center of the toe. 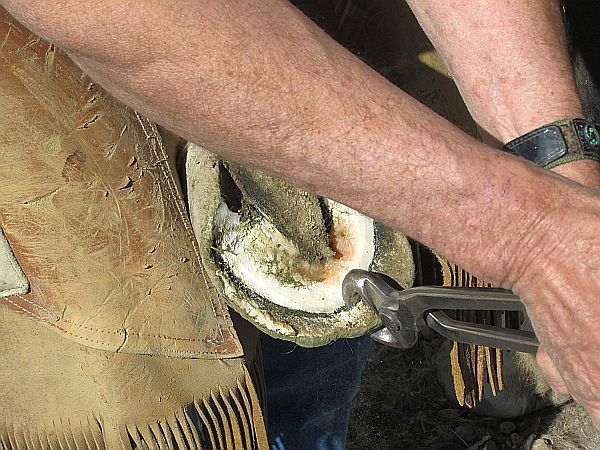 A good rule of thumb for a straight and level cut is to keep the blade of the nippers level left to right with the sole that you just cleaned out, then keep the handles of your nippers at a 90 degree angle from the flat part at the front of the toe. Remember that you can always cut more, but you can’t put any back. The objective is to trim the excess hoof straight and level from front to back. The hoof wall is like a fingernail. Its thickest part is at the toe; it thins considerably along the quarters and thickens again at the heels.
  Try to make the cut as even and smooth as possible, as nipping is much easier work than rasping. Any uneven areas left with the nippers will have to be leveled with the rasp.
Using the Rasp
Rasping is like filing. Using the rough side of the rasp with your dominant hand on the handle and your other hand on the front of the rasp, you want to slide the rasp forward from the heel to the toe in a circular motion from the outside of the foot to the inside of the foot. Remember that the toe is the thickest part of the hoof so most of the pressure will be applied with the hand on the front of the rasp while the hand on the handle end is used mostly just to push the rasp forward. 
 Be very careful not to put excess pressure on the handle end of the rasp as you move it over the quarters, as this thin area will file away very quickly, leaving a very uneven foot if you’re not careful. Repeat this motion from back to front on the right and left side of the foot. When you have the foot level from front to back, you now want to make sure it is level from side to side. This is done by examining the foot while looking down the back of the leg. Imagine a straight line going down the center of the back of the leg, and then imagine a perpendicular line going from heel to heel. Your horse’s heels should be perfectly level using this imaginary line. If they are out of level you can make small adjustments using the rough side of your rasp backwards by racking the rasp towards you.
 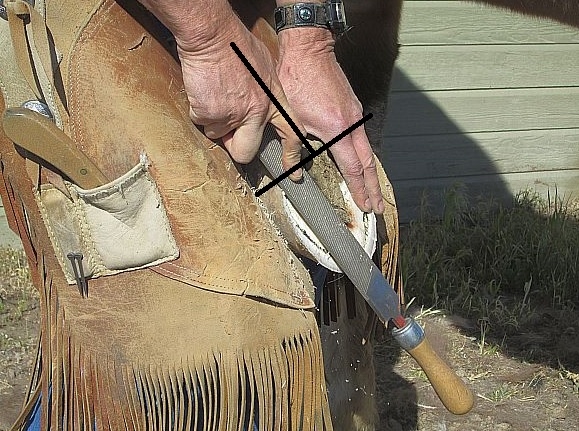 If you occasionally examine the heels while you are rasping, using the imaginary T-line technique, you can avoid the back rasping on the heels by increasing or decreasing downward pressure on the handle end of the rasp, but you should always finish your rasping at the bottom of the hoof wall by making sure the heels are level.
The final part of the rasping is called “rolling the toe”. This is done by taking the rough side of the rasp and making a downward cut at a 45 degree angle all the way across from the left side of the toe to the right side of the toe. Then, with the soft side of the rasp and working now on the outside of the foot, you want to smooth both the top side and the bottom side of the 45 degree cut you just made. The goal is to make the toe round so that it can roll over smoothly as the horse moves. If you leave the foot flat, as the horse moves it will chip and break the edges of the hoof wall. Imagine a round tire and how it rolls as opposed to trying to roll a triangle. If the triangle is heavy, it will break the points of the triangle as you roll it over. 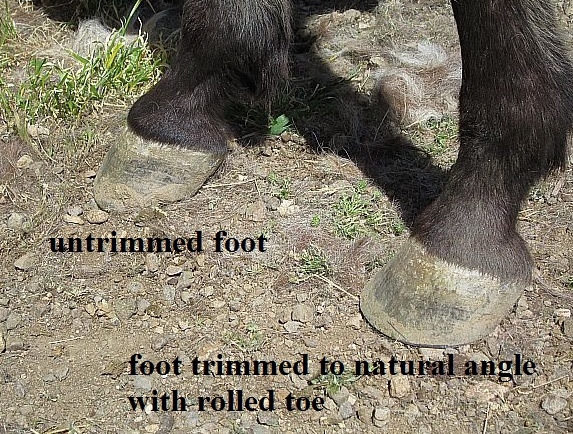
Lifting the Horse’s Back Foot
The rest of the trim is just repeating the process on each foot. Like I said before, I start with the front left foot and then move to the back left, followed by the back right, and finishing with the front right– all in a counter-clockwise rotation. Contrary to what you might think, the back feet are much easier than the front feet. The actual trim work is the same, aside from the shape of the foot. All horses have rounded front feet and more pointed back feet. The big difference is that when you lift up the back feet, you don’t have a horse body in your way. You can just lift the leg, put it in your lap, and go to work. The process of lifting the back leg is much like the front. You start by facing the leg and taking the hand that is closest to the horse’s head and putting it on the horses hip bone. It usually only takes a little pressure on that point to get the horse to shift his weight to his other leg.  Then you take your other hand and start at the top of the horses leg and slide it downward to the hock.
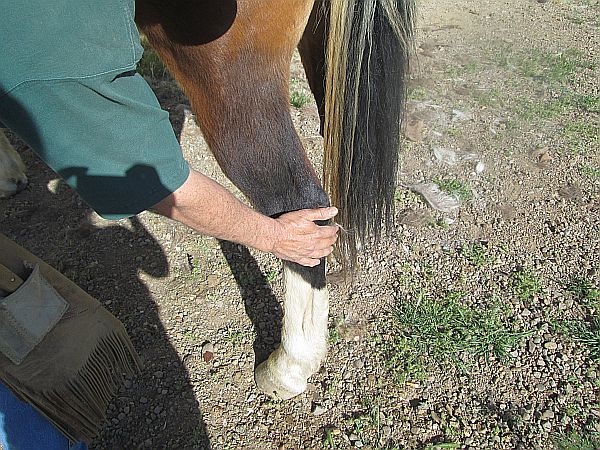
 Now, move the hand from the hip, face the rear of the horse, and reach down and grab the foot by the toe.
 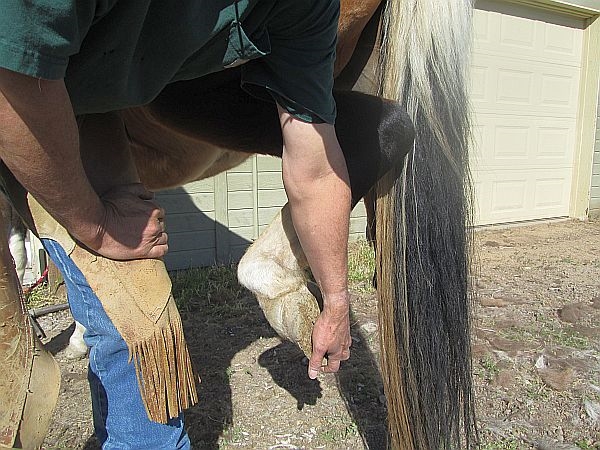 Hold that position for one to two seconds to allow the horse to get comfortable. Then, you just slowly pull the leg straight back while moving your leg that is closest to the horse under the leg until the horse’s foot is resting on your knee.
 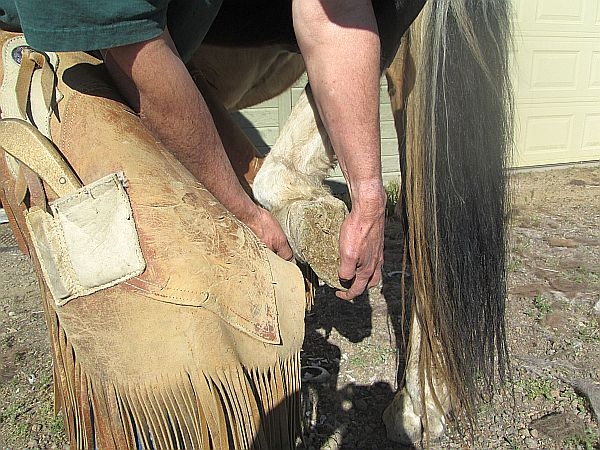 Now with another half step forward, you bring your knees together and slide the horse’s foot securely into your lap.
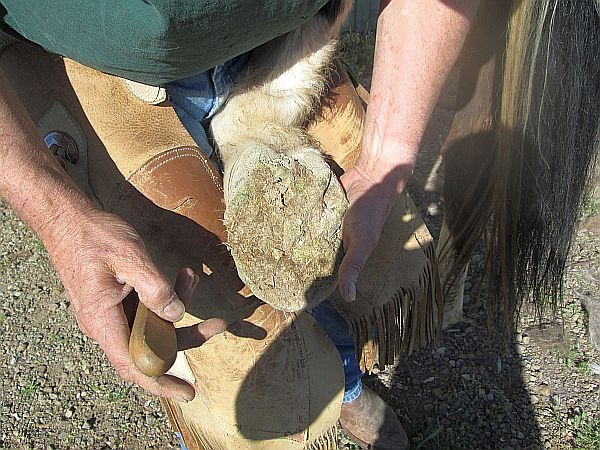 In this position you can comfortably work on the horse’s foot with your back straight and relaxed.
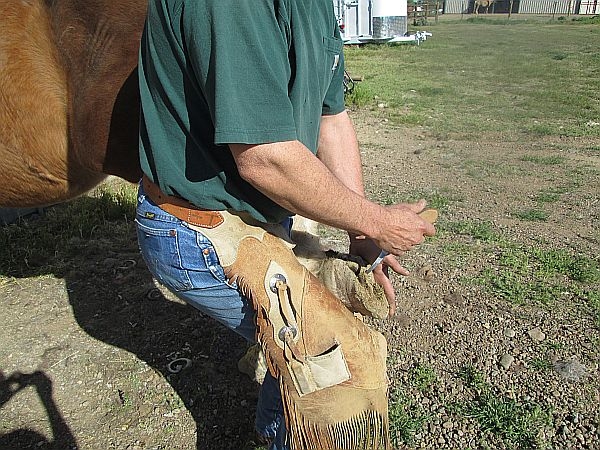
The last thing I should tell you is that this article is just a guide. You can print off the outline, put it with your tools, and get as much practice as you can. Getting knowledgeable and comfortable with this work takes experience. Like shooting, if you want to stay proficient with your firearm, you have to go to the range and practice. The same is true of any other skill you collect; you have to practice using your tools to stay proficient. I recommend contacting a local farrier and asking if you can ride along with him/her once in a while, or you can look for an introductory course at a local college or trade school.
That is the bare bones of trimming your horses feet. Technically, there is not much to it. Physically, there are muscles you seldom use that take a beating at first. Mentally, it is like the famous words of Will Rogers: “There is nothing better for the inside of a man, than the outside of a horse.”
Tea for Two Hundred, This Year and Next- Part 1, by Sarah Latimer
I grew up watching old movies. Doris Day was one of my favorite actresses. I loved her girlish bounce, playfulness, and the wink of her eye. So, I’m frequently reminiscent of her movie “Tea for Two” when I ask various members of the household if they’d like to join me in sharing some tea by asking, “Tea for two?”. I don’t really remember much about the movie since it has been such a long time since I watched it, but it became a common saying in my household, and it still is. However, we don’t just consume tea in individual bags around here every once in awhile. We consume a lot! Plus, we save some for future pleasure and health benefits, too.
It’s garden time and we’re busy planting, but I thought I’d take the time to write about some of the wonderful teas and flavor ingredients our family and those who visit us enjoy regularly from our garden (or from our long-term store house). You might want to consider planting some of these in your annual or perennial gardens, too, or maybe this will encourage you to research your favorite tea ingredients to find how you might grow them where you live. Many of our teas are homegrown, but some of our tea ingredients are purchased and prepared for long-term storage; there are ways to do so economically, and I’ll share some of these ideas as well. As a bonus, many of these teas are also healthy and have dual uses or possibly many uses, making the plant even more attractive to grow.
The stores have wonderful boxes of loose or bagged teas for sale, but most of these are costly, ranging up to $0.45 a cup or more. It’s big business, and our family are not the only ones who like drinking tea for pleasure and health purposes. Tea is gaining in popularity. Ready-to-drink tea sales, according to statistica.com, increased to $6.6 billion in 2014, up from $6.2 billion in 2013. Loose leaf tea sales increased to $1.3 billion in 2015, with most tea imported from China, India, Indonesia, Sri Lanka, and Kenya. Some green and black tea is grown domestically, with Lipton, a few other international and regional tea companies, and boutique tea producers having tea farms in the southern half of U.S. states, since tea bushes can be grown in zones 7-11. Traditional green and black tea bushes can also be grown in green houses, of course, and it is possible to successfully grow tea in large pots indoors in sunny windows, from what I read, but that’s not optimal. The traditional tea bushes naturally live a long time and grow quite large, which is difficult to do in a container.
All in all, it’s a lucrative business. At the market rates, with the amount of hot and iced tea our household consumes, we could easily spend $1,000-2,000 a year or even more just on tea at our present consumption, and that doesn’t include our coffee or juice budget. In our on-going efforts at frugality, we have found that there are better ways for us to use our financial resources and still be able to enjoy our delicious, satisfying, and healthy teas with little cost.
We grow much of our own tea and tea flavors, and we buy the other in bulk. By growing our own and doing our research, we know what we are consuming, the condition in which it was grown, and the plant’s health benefits. For those things we grow ourselves, we can be confident they were not sprayed with pesticides or contaminated with dangerous fertilizers and unhealthy water.
Furthermore, we never know when the Schumer will hit the fan, whether for the nation, our region, or maybe just for our family in the form of a period without income or a major, unexpected expense. If we ever had a repeat of the Boston Tea Party, where all imports were rejected, I’d want my own indefinite supply! While I doubt we’ll experience this, I do wonder if the importation of tea will be able to continue indefinitely. Like many items our nation enjoys, most of our tea is imported, and war seems to be emininent as well as financial crisis, so only the Lord God knows for certain what our future holds and what resources we will be able to import in the months and years ahead. Having our own self-sustaining supply of the things that we need is very important and becoming more important to me each with each day’s news report.
You may think that it is silly for me to be concerned about having a tea supply when there are much more basic and critical supplies necessary for life. Certainly there are! Tea may not be a staple necessity, but it is important for our family’s emotional and physical health. Under normal conditions, we drink tea every day in some form or fashion. For me and other members of our family, tea is one of the simple pleasures of life, and we enjoy being able to share this pleasure with our guests also. When SHTF, having some sense of normalcy will help keep us level headed and focused. Tea is one of those things that I intend to continue providing to my family that they can look forward to in the troubled days. So, it is my goal for our family to not only have what we need on hand and within reach for the long term but to have many of the things that we enjoy available to us as well. Noah had family, food, shelter, work, and water. The clothes and shoes of the children of Israel didn’t wear out while they spent 40 years in the wilderness, and at times they had more than their fill of manna and quail as well as “the Rock”, who provided water to them as they traveled. Regardless of what is going on in the world in a crisis situation, I don’t want to just survive; I expect our family to thrive, and I’m getting started now.
Plants We Grow For Tea
What do we grow on our property that is useful for tea? Well, the list is continuously changing. I am looking into adding tea plants (camellia sinensis), but I have not yet acquired these. (I understand that it is best to buy the plants rather than the seeds, because the germination rate of the seeds is slow, but I am no expert on this matter. Research this for yourself.) Collecting the leaves for green, black, or oolong tea look like quite a labor-intensive effort, but you know what goes into the plants that are nourishing you and you have a continued supply, as long as you are able to water and care for them. In doing my research, I understand that one must collect the new leaves with the best ones being produced in the springtime. The bushes can get quite large and I’d need several to meet our family’s tea demands, but I read that it is helpful to keep them pruned to encourage new growth (and leaves for tea). The leaves have to be hand picked, then bruised, and often rolled before being fully dried. Christine Parks, who writes for the American Camellia Society, provided a detailed pdf paper on how she grows and processes green/black tea in her backyard.
I don’t have tea bushes yet, but in writing this article and looking back at my information on growing green and black teas, I am more serious than ever about getting some bushes soon. These are nice bushes with beautiful camellia flowers on them. So, even if we don’t pick the leaves, they would look nice on the property! If and when SHTF, we will want black tea for sure, and I only have a few year’s worth stored away. I’ll tell you later how we store our teas and tea flavoring ingredients to retain long-term freshness. Let’s get right into what we grow on our property currently and what you can, too.
We grow (for tea):
- Chamomile
- Lemon Balm
- Lemon Grass
- Peppermint
- Spearmint
- Lavendar
- Calendula
- Strawberries
- Blackberries
- Blueberries
- Peaches
- Apples
- Roses/rose hips
- Borage flowers
- Nasturtium flowers
Now, I’m not including the medicinal tea ingredients that we grow. Those are okay, but not really pleasant, in my opinion. Stinging nettle tea is actually not bad, but it is not a joy, like the ingredients I’m listing here. Echinacea is down right bitter, and there are many other medicinal plants we grow also that can be ingested as tea, but I’m not going to go into those specifically in this article. I’m focusing on what tastes good here, though there are health benefits, some of which I may mention.
Using the Plants We Grow
Let’s talk about the plants I grow and how I use each, specifically.
Tea by the Cup or Glass
What tool we use for infusing our tea has a lot to do with what ingredients we are using. If I am merely making a ginger root tea, then I can simply slice a thin piece of peeled ginger root and put it in a cup of hot water by itself to let it seep for five to ten minutes and remove it at the end of that time. However, if I am using chamomile or another tea/herb that has fine particles, I must use a very fine mesh infuser. Medium-sized or large particle tea, like black tea with coursely chopped leaves, can be put into a tea ball or a closed spoon with the holes to allow the infusing to occur. Alternatively, one can just dump everything into hot water and then pour through a fine mesh strainer after it has seeped. I use all of the above methods, depending upon what ingredients I have, how much I am making, and what is available to me at the time. Straining the tea and flavanoids out is important, because I don’t know anyone who enjoys drinking chunks of anything in their tea. If making iced tea, I seep a strong cup of tea in hot water and then slowly pour it over ice cubes, add a little chilled water and stir. Something new that we recently tried and found to work nicely for traveling, gift giving, or for carrying in your lunch box, brief case, or purse, are paper tea bags. They add a small expense but are very convenient. Because I was uable to find a supply of tea bags from a U.S. manufacturer, we ordered these drawstring tea bags from China through Amazon and found them to work rather well. The only drawback is that it takes several weeks for them to arrive, so be sure to allow that time in your planning and order a decent quantity if you want a long-term supply of these. It’s very easy to mix up a tea blend, put a heaping teaspoon inside one of these, tie it closed, and place several in a sandwich ziploc bag for convenient carry in my purse and use wherever I go.
Tea by the Pitcher or Teapot
Basically, I use the same tools as I do for the cup or glass but larger ones and have pitchers that can handle the hot water for seeping teas. If I am making iced tea, which is a staple in our home throughout most of the year (yes, I am a southerner and I’ve even been mocked publicly in a fine Boston restaurant for ordering iced tea in the winter but insisted upon a glass of ice and a cup of hot tea anyway!), I simply fill my infuser basket with tea and/or herbs and pour hot water into the pitcher to let it seep. Then, I let the infuser drain its yummy nectar and add ice water to fill the pitcher. I am especially fond of the Republic of Tea pitcher that allows for loose tea infusion as well as fruit infusion. In tea pots, I may use tea balls or baskets also.
Letter Re: Amazon Discussion
Hugh,
Another great Amazon tool isn’t really Amazon at all. To determine whether today’s price is the best price, copy the item’s URL and go to camelcamelcamel.com. There, you’ll be able to see a historical chart of the item’s price and set up a notification when the item reaches the price you’re comfortable with (not only on Amazon but with third party sellers as well, if you’re so inclined).
Camelcamelcamel.com is a great tool, if you don’t need to buy it today, for those items that may be more costly and in your budget at a lower price. – Dayzymom
Economics and Investing:
Balance Due: Credit-Card Debt Nears $1 Trillion as Banks Push Plastic – G.G.
o o o
Swift Banking Network Struggles With Wave of Cyberattacks – It would be prudent to have cash, even when traveling around. Local banks might take an outage if the Swift network goes down. – P.S.
o o o
Crony Capitalism And The Feudal America Of Trump And Clinton – J.B.
o o o
Two-Thirds Of Americans Would Struggle To Cover $1,000 Emergency – G.G.
o o o
The Biggest Winner Of The Oil Bust: Interview With Aeromexico – Airlines have thrived throughout the oil bust as fuel costs fell rapidly, but now that oil prices are slowing turning around airlines are trying to hedge the best price for the years ahead.
o o o
SurvivalBlog and its editors are not paid investment counselors or advisers. Please see our Provisos page for details.
Odds ‘n Sods:
Wonderful idea and program on urban farming. An All-Volunteer Squad Of Farmers Is Turning Florida Lawns Into Food – DMS
o o o
New Surveillance System May Let Cops Use All of the Cameras – Note: All of these systems that allow the police or public to access private video cameras depend on users not configuring their cameras appropriately. Always change the password on any camera, even if you don’t think that it has access to the Internet. – B.B.
o o o
Schumer to Introduce Further Gun Control Legislation – RBS
o o o
Two from Mike Williamson, SurvivalBlog’s Editor at Large:
Useful site for tracking local crime
o o o
An interesting article on the intrusive methods of policing: The Problem With Smart Policing – T.Z.