
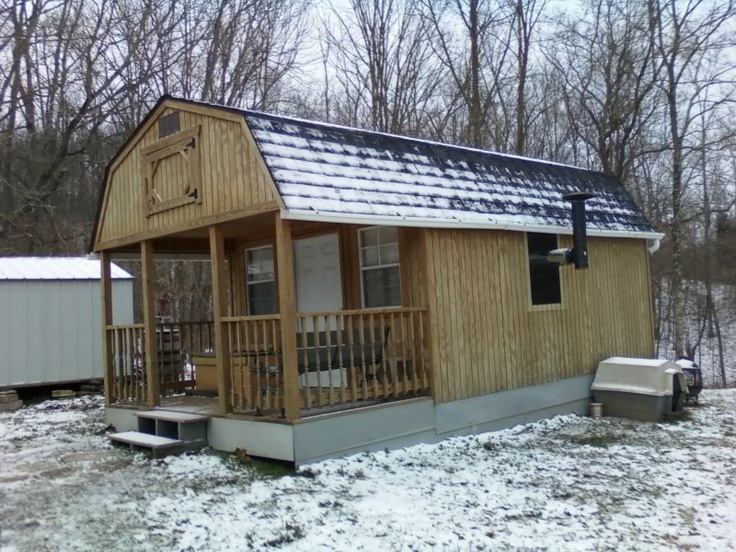


There are many builders of sheds that are available all over the U.S. I picked this builder as an example because their products are available in my area and I have seen their products in person. This builder also offers free delivery and setup in my area. Make sure that the exterior paint color and roof color you choose will blend in with the area where your cabin will be placed and will not stick out saying “I am here, so please come and get me”.
First, pick your size of ***LINK to http://www.backyardoutfittersinc.com/products/treated-buildings/lofted-barn-cabin-playhouse/***shed. Some options are:
- 12′ X 28′ with a metal roof for $6,820.00 + approx $500.00 for a workbench & shelves
- 12′ X 32′ with a metal roof $7,695.00 + approx $750.00 for a workbench & shelves
- 12′ X 36′ with a metal roof $8,640.00 + approx $900.00 for a workbench & shelves
For this estimate, I used the 12′ X 28′ with a metal roof at $6,820.00 + approx $500.00 for the workbench & shelves.
Supplies Needed
Now, move on to my shopping list, which includes the following:
- Laundry sink, $95. Get one or two? I would purchase two; you will see why later on.
- Curved shower curtain rod, $56.
- One Shower curtain (fabric), $5.00
- 12” square ceramic tiles (quantity will depend on which size cabin you picked), under $100
- Roll insulation (quantity will depend on which size cabin you picked), approx $200
- 1/4” birch plywood (quantity will depend on which size cabin you picked), approx $1,000
- Bag of nails, $10
- Composting toilets, $20 (5-gallon buckets with toilet seat lid)
- Additional 5-gallon buckets, free
- Six each Plastic 55 gallon drums, $20 each (minimum quantity), or if available the 250 gallon totes.
- Six each No freeze faucets $42 each for 55 gallon drums (not needed if you are using totes)
- One each Drum pump $20, optional
- Ten yards of 100% cotton fabric. Be sure to pick something colorful and fun, plus one yard of quilt batting, total of $60.
- Eye hooks $5
- 100′ para cord $10.
- 12 each Pallets (free)
- Two gallons of paint or varnish $50
- 24 to 30 concrete blocks, $30
Building The Cabin
Now, let’s start building your bug out location. This is a simple but very functional bug out cabin. This cabin does not have any electricity, running water, or sewer. However, as you will see, you will be able to do without these.
Once you have your building delivered and leveled, you are ready to turn the empty shed into a very usable cabin.
- Set out all of the purchased materials, supplies, and any equipment and future supplies you brought from home or made, after the delivery people leave. Sort them in to piles of like items.
- Clean out the 55-gallon drums or totes and add the frost-proof faucets to each of the drums. Set each drum or tote on top of two or three stacked pallets. Set one at each corner and one in the middle of each long side of your cabin. Because the building I chose has a metal roof, it is perfect for a rain catchment system.
- Add the rolled insulation to the walls and roof. If you live in very cold winter area and have the extra funds, I would also add foam insulation board over the rolled insulation for extra R-Factor.
- Add the birch plywood over the insulation.
- Tile the top shelf of the work bench. (Use the large 12′ X 12” tiles to keep the grout lines and costs to a minimum.) This will now be your kitchen counter. You now have enough room for a camp stove and food prep and a 5-gallon water jug over the future laundry sink. The shelf under the kitchen counter is for the everyday food storage and storage of your dishes. If you have the funds, I would also tile this shelf using the same 12′ X 12” tiles. I would also add some peg board and peg board hooks over the counter as storage for holding equipment, such as large utensils and pots and lids, out of the way.
- Add one of the laundry sinks next to your new kitchen counter. Add a 5-gallon bucket under the sink to collect the water for disposal as needed. Use this sink for dishes and hand washing and winter weather laundry.
- Next to the laundry sink, install the curved shower curtain rod and the fabric shower curtain, and then install two composting toilets behind the curtain– one toilet for liquids and one for solids. (As a special note, urine can be poured around your cabin to repel wildlife.)
- Measure and cut the fabric to cover the kitchen counter lower shelfs; make sure to include enough extra fabric to the height to make a channel. Measure and cut the fabric to cover the back wall storage shelves, making sure to also include enough extra fabric to make a channel to hang the fabric from. If there is any leftover fabric, I would use it to make cloth napkins, dish towels, and window quilts. For the window quilts, just use cup hooks and grommets to hang them.
- Using the cup hooks and paracord, string the paracord just under the kitchen counter. Using the cup books and paracord string the paracord in front of the storage shelves. String the paracord through the channel in the fabric, to hide your new storage areas. Instead of sewing a channel for the paracord, you could insert grommets in the fabric.
- Paint or varnish the floor, as not only a way to protect the floor but also to protect your feet from potential splinters and to give your cabin a more finished look and feel.
- If you purchased a second laundry sink, place it outside on the back wall of the cabin. This will be used for laundry in good weather and for processing game and fish in the spring, summer, and fall. Remember to add a 5-gallon bucket underneath the sink. A folding work table or a hand-built table should be placed next to the outdoor sink to add extra work surface and a place to set a 5-gallon jug of water. If you are in a cold weather area, please remember to bring the water jug inside at the start of winter to prevent the jug from breaking.
- Take the concrete blocks and build a square using two to three blocks on each of the four sides and then three to five blocks high. Fill the hollow blocks with soil or sand. Place metal screening material, then a heavy duty metal cooking rack over the top, and you now have a burn box, an outdoor cooking stove, an outdoor canning stove, or even an outdoor dehydrator.
- Use the leftover paracord outside to build a clothesline.
The back wall of storage shelves inside the cabin will be used to store all of your LTS foods, supplies, and clothing.
Estimated Cost to Build Your Bug Out Cabin
The combined list of supplies, including the shed but not the land comes to an approximate total of $10,000.
Depending on the area of the U.S. where you live, you may want to and need to add a small pot belly stove and the necessary bricks to set the stove on. A small wood stove is available for under $300, plus the cost for the stove pipe, and it will heat this square footage very well. These types of stoves have a flat top so you can cook a meal on it or make a pot of coffee with an old time percolator. Just a personal note that I think coffee made in a percolator is better than a drip coffee maker or any french press, but I am a Folger’s women and think Starbucks and other designer coffee is swill.
Depending on what you have available on hand, you may be able to reduce the costs. For example, as I already have the fabric, quilt batting, paracord, cup hooks, buckets, nails, shower curtain, paint, and some other supplies, so my costs go down. Furthermore, you may be able to obtain some of the items, such as blocks and bricks for free. The items you have on hand will assist in completing any upgrades.
It only took two days and two people to turn this once empty shell of a shed into a 336 square foot completed bug out cabin.
Now, it was time to stock the new cabin. That meant adding the LTS food stuffs, a Coleman camp stove, camping dishes, cooking utensils, pots and pans, clothes, cots, folding camping chairs, bedding, medical supplies, 5-gallon water jugs, oil lamps, water filter, et cetera. I suggest adding some homemade small hand-braided rugs around the cabin for more of a home feeling and to keep the feet warm during the winter months.
Extra storage space can be obtained by adding some screw in coat hooks along the walls for coats. Add some reusable grocery bags on more of the hooks to hold things like gloves, scarves, homeschooling materials, books, sewing supplies. Even more extra storage can be added by using fabric boxes to store clothing, such as socks, underwear, and dirty laundry. Additional hooks could be placed on the outside walls for storage of items such as extra buckets, gardening tools, fishing equipment, snow shovels. Because the cots are folding, they can be folded up and stored during the day.
Optional items I would add over time, as money permits, include the following:
- Fold up TV tray tables
- Inflatable mats for the cots
- An outhouse to dispose of waste from the indoor bucket toilet and for use during the warm months. (This would be my very first project) after the cabin was completed. If you have additional helpers, it can be completed at the same time as the cabin.
- I would add some type of brace to the inside of the door and a dead bolt.
- I would also add some very heavy window quilts to not only keep heat in during the winter and the heat out during the summer, but will also keep out any prying eyes.
- I would also add a folding laundry drying rack for use indoors during bad weather. To protect wooden the floor of the cabin, place a heavy rug and then old towels on top of the rug, before setting the drying rack on top of towels.
- Picnic table, for good weather eating outdoors and homeschooling.
- If there are children. If you have children spend the extra $500 to $600 to get the loft space for use as an extra sleeping area and storage space.
- If you are planning on getting a 12′ X 36′ or larger, some builders offer a loft on each end. Just add some homemade curtains for privacy and noise reduction.
- The only thing I have not covered is a shower. As this bug out cabin has no electric or indoor plumbing. I live in an area where we get lots of cold and snow during the winter season; so for spring, summer, and fall I would take a hard-sided kiddie pool outside and using a ice pick add two or three rings of holes in the bottom of the pool, add about 2” or 3” of pebbles, then place on the ground add a 4” X 4” post on each side of the pool, then top the posts with another 4” X 4” post and add some eye hooks and a shower curtain. Add some additional hooks on the underside of the top post to hang sun shower bags. There is also, in the PAW fiction book Lights Out, a description of an outdoor shower using a 55-gallon drum. For winter use, I would purchase a stock tank and use heated water indoors.
This project would lend itself to future upgrades, such as some solar panels for a future limited amount of electricity, say for a chest freezer that could be located outside. Also, more water storage and roof gutters would be nice.
If you have a large family, more than one of these cabins can be constructed and placed in a circle with the doors facing inside the circle and the outhouse outside of the circle.
If you are in a state, such as Oregon, that thinks they own the water that falls from the sky which you and I call rain, you can complete everything but adding the rain catchment water barrels before SHTF. Then, later, add the rain catchment water barrels after SHTF.
Disclosure: I have no affiliation with any of the links that are posted. These links are for instructional and pricing purposes only.
One final thought is that if you have additional money, you can have a basement dug and built; then set the shed over the completed basement. Just cut out a 4′ X 4′ section of the floor and then re-attach the cutout floor section with hinges and add a ladder for easy access, and cover it with a rug so you have hidden access to the basement.