


(Continued from Part 4.)
Another potential standalone camera option is one of those inexpensive infrared night vision cameras. While their primary function is night vision, they can also be used to take pictures during the day. Here’s a sample from a GVDA GD900, which is a compact night vision device with a 12MP sensor and 4X digital zoom that costs around $50:
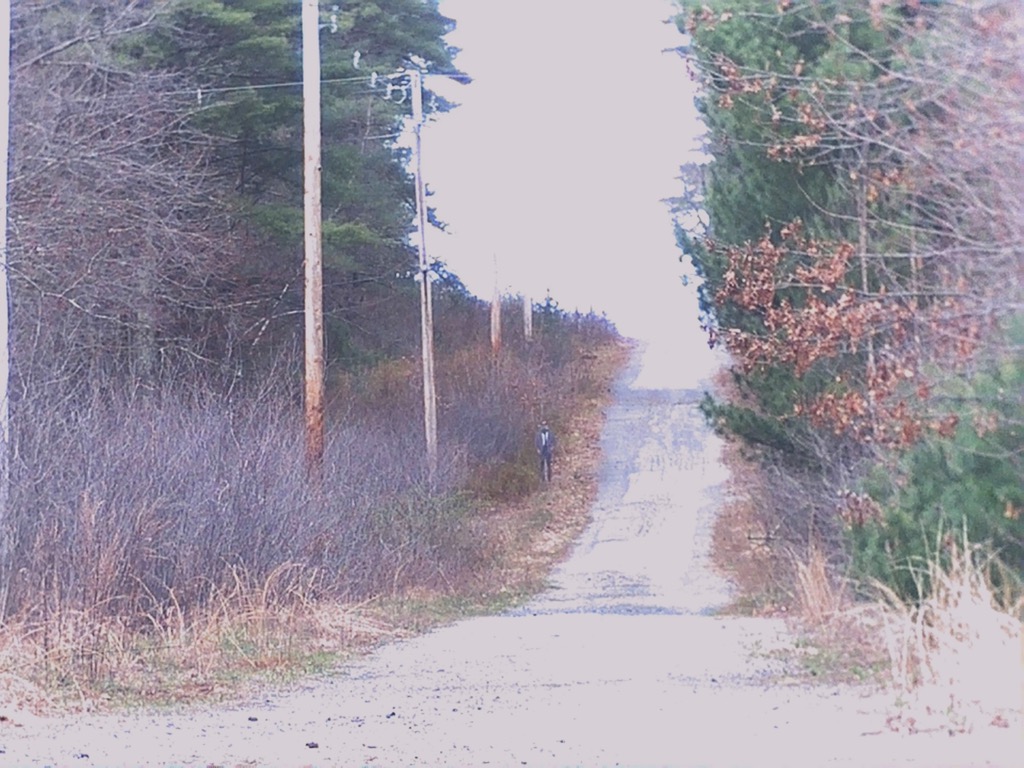
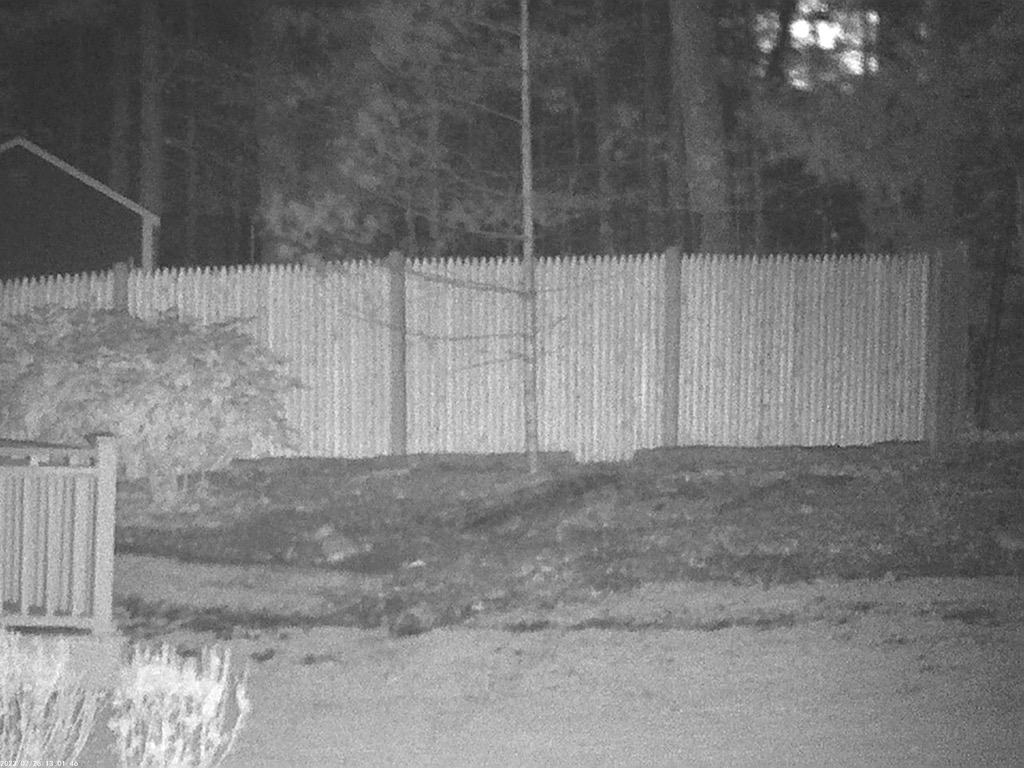
You can recognize that there’s a person there, but you couldn’t identify them. For comparison, here’s a picture using the same GVDA device at night at a different location (the state forest I used for the other pictures closes at dusk) – the fence is 6’ tall and around 200’ away, and the IR illuminator on the device is on high:
While inexpensive infrared night vision devices can provide a somewhat decent capability to collect images day or night, devices such as light intensification and thermal optics can provide a significantly higher level of capability in low- or no-light situations. Light intensification optics amplify existing light to provide night vision and are what the military generally uses, but they can cost thousands of dollars and I haven’t found one yet that provides an image/video recording option so you’d have to write a description of what you saw.
Thermal optics display the heat differences between objects and tend to be available at a lower starting price point, and many of them either have a built-in imaging capability or work with your cell phone to take pictures and videos. With thermal imaging devices you need to be aware of the image resolution – the imaging chips used in these devices are much more complex and expensive than normal camera imaging chips, so many of these devices will only provide a relatively low resolution.
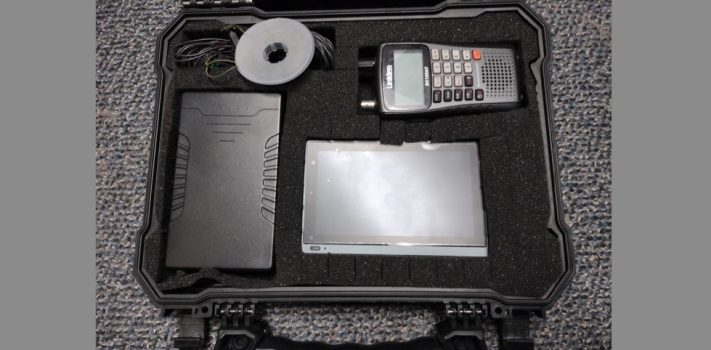
I currently own a FLIR Scout TK which provides 160×120 resolution, and a Seek Thermal CompactPRO XR which attaches to my cell phone via USB and has a 320×240 sensor. The Seek Thermal device is small enough to fit in your pants pocket, making it an extremely mobile solution.
Remember that if you’re using your cell phone in the dark for taking pictures/videos the screen will light up your face, potentially making you visible for a long distance. To reduce the risk of being spotted you can use a USB extension cable for any imaging device that attaches via USB (like the Seek Thermal) and hold the device out while you’re behind cover, or shroud your head and the device with some light-blocking material. I’ve found that the thin reflective material used in pop-up windshield sun shades works well and is pretty lightweight and inexpensive.
Another type of camera that can be useful when collecting intelligence in the field is a wearable or point-of-view (POV) camera – this can be something like a body camera worn by law enforcement or an action camera like a GoPro. A company called Boblov makes some decent body cameras and there are dozens of inexpensive action camera options available. These can be attached to a pocket, belt, backpack straps, etc. and turned on when you encounter a situation you want to record. If you want to be able to record inconspicuously, find a model that has remote activation or a one-button record feature; that way you’re not obviously fiddling with the camera when someone you want to record is looking at you. I have the Boblov M6 that I like to use when playing paintball; it take great video and can record for over 10 hours on a single charge.
You can also use your cell phone as a body camera – I bought a cheap cell phone holder and taped it to a double-sided hook-and-loop strap as shown below:
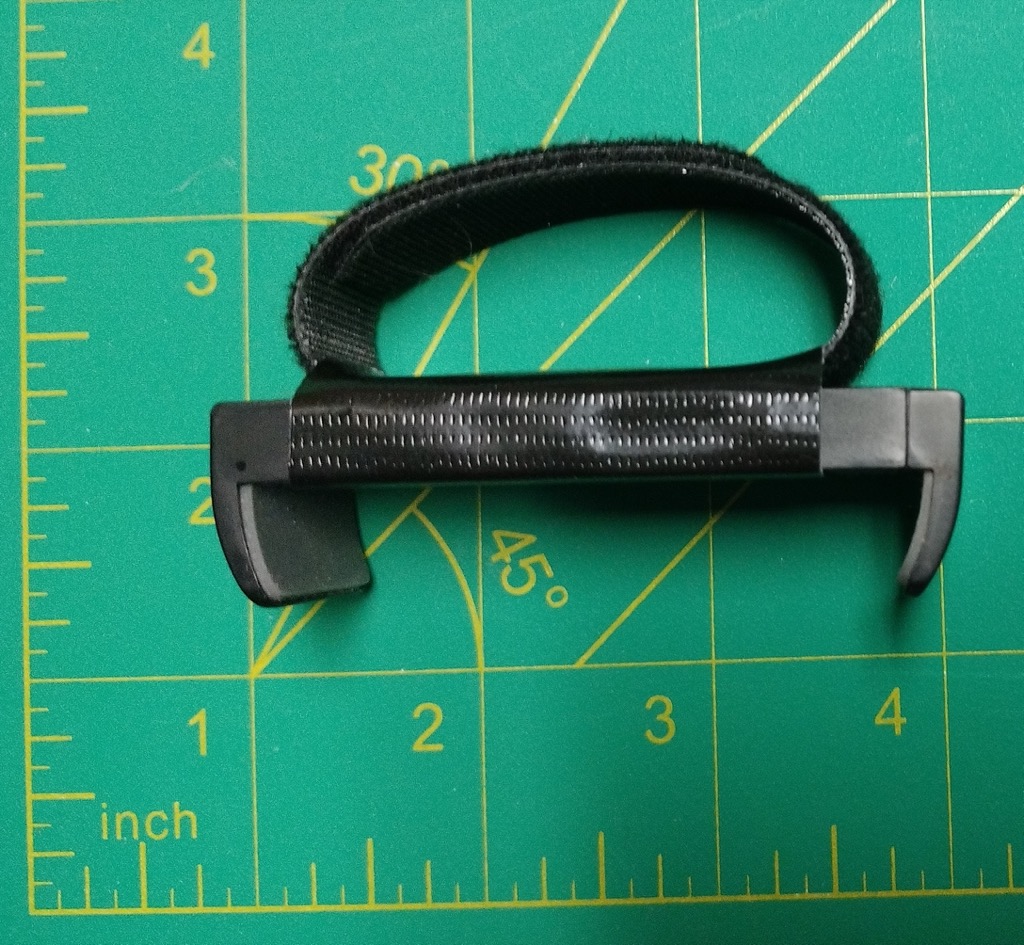
The strap can be wrapped around the shoulder strap on a backpack with the back camera facing out to record whatever is happening in front of you:
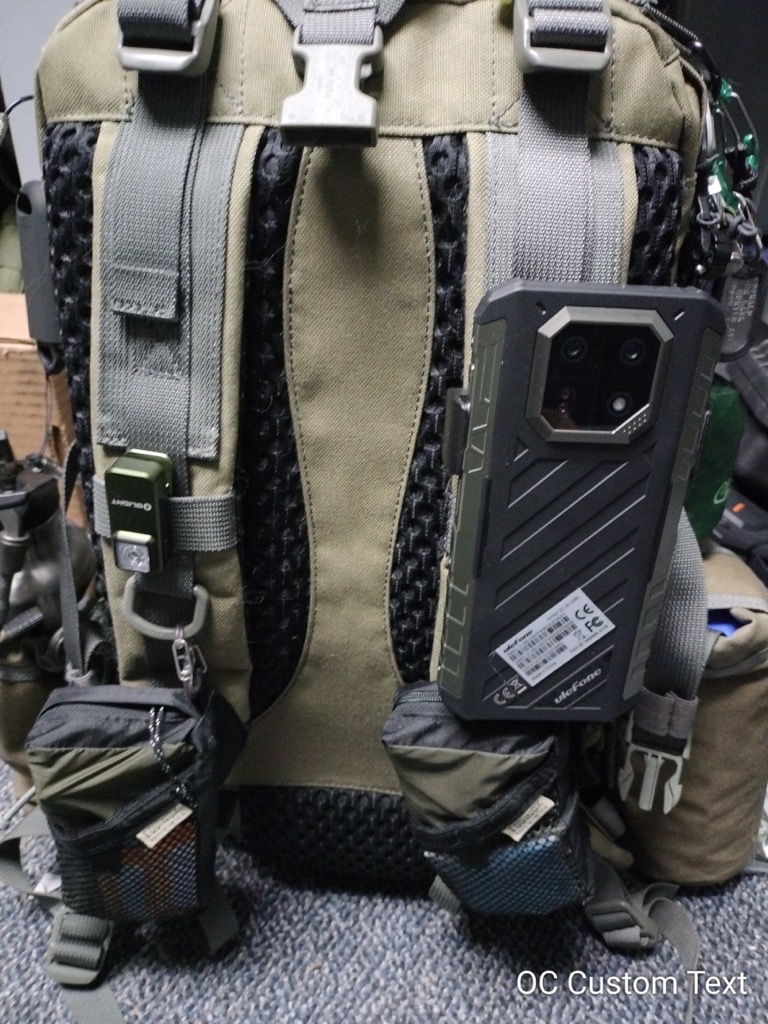
If you want to take this approach I recommend that you disable all of the phone’s login options (PIN, thumbprint, face recognition, lock screen, etc.) so that it opens up directly to the currently running app when you press the power button, and leave your camera/video recording application running. Pair your phone with a Bluetooth camera remote and keep the remote in a pocket; now you can casually hit the power button on your phone while ‘adjusting’ your backpack strap, then put your hand in your pocket and hit the remote button to start recording. You should also make sure you disable the flash in your camera app so it doesn’t light up when you’re recording someone in front of you. If you want to be even more inconspicuous you can cut a hole for your phone’s camera in a vertical phone pouch and attach that somewhere on the front of your body.
Camera drones are another possible option for collecting pictures and videos for intelligence. This allows you to potentially gather visual intelligence from a long distance away while not being in the line of sight of your target of interest. The potential downside is that most commercially available drones make a unique buzzing noise which can be difficult from a fair distance, so your target may be aware that someone is recording them and decide to shoot down your drone.
Just like any other image collection system, with drones you definitely get what you pay for in terms of image quality. Those cheap made-in-china drones that are advertised as ‘4K with stunning image quality’ usually have cheap plastic lenses and no anti-vibration systems, so the picture quality won’t be very good. On the other end of the spectrum are models like the DJI Inspire 3, which has a cinematic-quality 8K camera with interchangeable lenses, but it’s going to cost you several thousand dollars. To give you an idea of a mid-range option, here’s a picture from my $300 DJI Mini 2 hovering 100’ above my position 600’ away from the target:
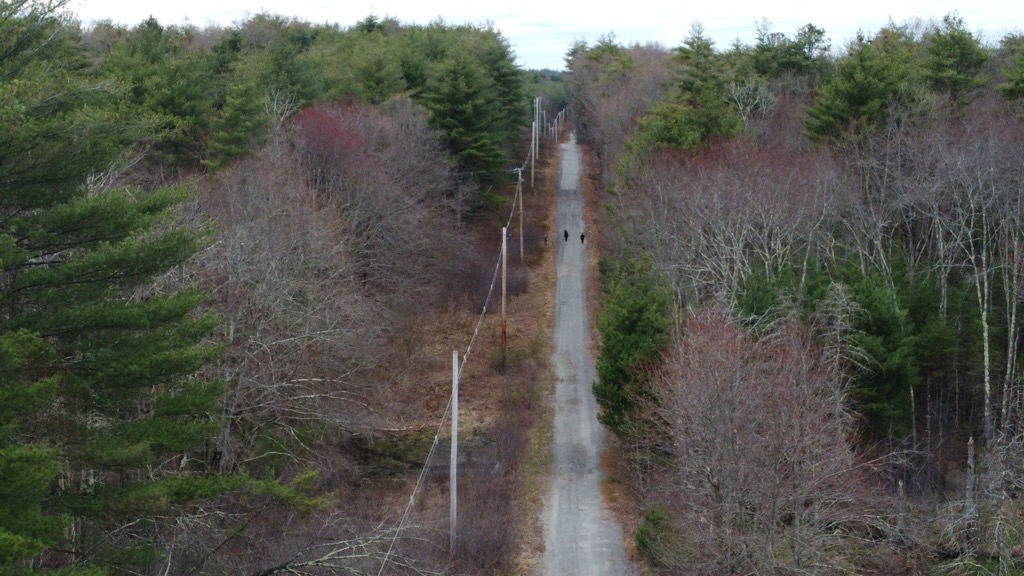
You can barely make out the target, but you can detect the presence of two hikers that happened to be walking by right next to it. I could have flown the drone closer to get a much better picture but I wanted to provide an “apples-to-apples” comparison with the other camera options I’ve shown.
A final type of standalone camera that may be useful for field intelligence collection is a trail camera – you could set it up facing a trail, road or path to take pictures of everyone that passes by. You’ll need to regularly visit the camera to download any photos that have been taken and recharge the batteries (assuming you don’t connect it to a solar panel). Most trail cameras store their pictures/videos on a removable SD or Micro SD card, so I recommend having a spare card and swapping them each time you visit, but some of them support connecting via Bluetooth or WiFi to view and download what’s been recorded. Most trail cameras are optimized for relatively close-range motion detection and imaging (around 50’), so you’ll need to do a good job of camouflaging to reduce the risk of someone spotting it.
Image and Video Context
As I previously mentioned, having metadata such as location information is critical to providing context for pictures and videos. If you use anything other than your phone’s built-in camera (with or without an add-on telephoto lens) you won’t be able to take pictures with it within OsmAnd, since the app currently only allows you to embed pictures using the system camera app or it’s own built-in camera app. If you do use an external camera there are a couple of options available for adding location data:
1. Add a Map Marker inside OsmAnd (the little triangular flag) at the location you took the picture
2. Add a ‘Favorite’ on the map with a brief description of the picture(s) you took
3. Take a picture of OsmAnd on your phone’s screen centered at the location you took the picture(s)
4. Add a note in Obsidian describing where you took the picture(s)
I tend to prefer the first option, and I try to frequently add map markers as I’m moving along on a hike or walk; that allows me to establish a location-based timeline so I can correlate the timestamps of pictures/videos taken with external devices with my location data. For any of the options, having the time accurately synchronized between all of your devices will be critical later on when correlating the notes to the pictures.
Audio Intelligence
While probably not as broadly useful as images and video, audio recordings can provide potentially valuable intelligence in some cases. The most obvious use case is to use audio recording instead of typed information to record your notes/thoughts/observations. As I mentioned earlier OsmAnd includes the ability to record audio notes with geotagging by tapping and holding a location on the map, then selecting ‘Actions’ and ‘Take an audio note’. I also mentioned using speech-to-text in the Android keyboard to enter notes by speaking them. Another phone-based alternative is a voice recorder app – most Android phones have one built in, and there are dozens of options in the Google Play Store. You can also use a standalone voice recorder, of which there are hundreds of options available. While some people are much more comfortable documenting information by dictation versus writing, you also need to consider scenarios where noise discipline may be an issue. One of the features I’ll be discussing in a future article is incorporating the ability to transcribe audio from things like videos and recorded audio notes into text to simplify searching for information.
The ability to record other people talking for intelligence purposes is another useful application of audio recording. For recording someone you’re talking directly to, all of the camera options I discussed earlier record audio with video, so even if you don’t get good video you could still have a record of the conversation. There may be scenarios where you’re talking to or interviewing someone and video recording isn’t advisable, but pressing the ‘record’ button on a small voice recorder to record the conversation would be possible. There are sound-activated voice recorders that look like a pen, and clicking the button on top starts the recording, which would allow you to be pretty discrete about recording someone. You could also get one of those super-small voice-activated recorders and hide it somewhere that people of interest might gather to talk and retrieve it later when no one is around. Some of the recorders can run for 12+ hours on a single charge, so you can record a lot of audio, but you’ll eventually need to physically return to the location to pick up the device.
If you want the ability to record sounds like conversations at a distance there are a couple of options. The simplest option is a directional microphone, also known as a shotgun microphone, which is basically a long tube with slots cut on the sides and a sensitive microphone on one end. The slots on the sides create what’s called an interference pattern, significantly reducing the noise coming from the sides and only allowing sound from the direction the microphone is pointing. It’s important to note that a shotgun microphone doesn’t amplify sound, it only minimizes stray sounds around you to focus on just what it’s pointed at, so if you couldn’t hear something to begin with a shotgun microphone won’t do you any good.
Note that shotgun mics behave somewhat like telephoto camera lenses – the longer the microphone the narrower the cone of sound it’s going to bring in. At the high-end is something like the 18” Sennheiser MKH 816, which retails for around $1,000, but you can find shorter less expensive models for under a hundred dollars. Like camera lenses, you get what you pay for with microphones. Be aware that it’s generally recommended that shotgun microphones not be used indoors – the echos off of hard surfaces like walls messes with the interference patterns created by the slots in the tube. You should also always use wind protection when you’re using a shotgun microphone – these are furry or foam covers that significantly cut down on wind noise.
For picking up normal conversation, a shotgun microphone will probably only help you out at distances around 50’ or less, depending on ambient sound conditions. You can attach the microphone to an amplifier like the MIC-1000 to amplify quiet sounds; the amplifier requires 5V to operate so you’ll also need a small USB power battery for this setup.
If you need to record sound from longer distances you should consider a parabolic microphone. These are basically bowl-shaped dishes with a microphone suspended in the middle of the dish. The disk shape concentrates the sound coming in, allowing you to pick up quiet sounds from a long distance (100’+ in good conditions). If you’ve ever watched a football game (American football) you’ve probably seen the sound guys on the sidelines holding the huge 4’ clear dishes wearing headphones – they’re recording what’s being said by the players on the field. Parabolic microphones range from the small cheap 8” handheld kid’s toys to huge professional-grade ones, but a good quality one will cost you anywhere from $200 to well over $1000. If you’re reasonably handy you can make your own parabolic microphone – just search the web for ‘diy parabolic microphone’.
I don’t consider shotgun or parabolic microphones to be a mobile solution – a decent quality model of either is going to be relatively large and cumbersome, so they’re better off used in something like an observation post.
If you want to be able to listen to and record audio remotely in real time and a shotgun or parabolic microphone won’t meet your requirements, a wireless remote microphone may be a viable option. ‘Super secret Israeli spy microphones’ have been available for years on places like eBay, and they actually work pretty well – you just need a decent FM radio to pick up the transmissions. However, with the popularity of things like amateur video production and vlogging (video blogging) exploding in the last few years, there are now mainstream wireless microphone options that work just as well if not better than the so-called ‘spy’ options.
The simplest is called a Lavalier microphone, and they’ve been used for years by people delivering presentations to large audiences. There are extremely small options now available that have a receiver that plugs into your cell phone for listening/recording, and the range and battery life are pretty decent. One of the coolest options available these days is the Hollyland Lark M2 series, which uses microphones that are the size of large buttons that can run up to 10 hours on a single charge and transmit up to a claimed 1,000 feet to a wireless receiver that plugs into your cell phone.
(To be concluded tomorrow, in Part 6.)