


Training is paramount, and how you train determines how you will respond in situations. For many of us, the limit of our firearms training has been on a “square range” (i.e., shooting bench and paper targets down range). However, limiting your training to that artificial realm will set you up for failure when things go wrong. Effective training will teach you the fundamentals of shooting, movement, and communication. Learning how to effectively use and shoot from behind cover, in a variety of positions, is a critical part of this training. A range barricade is useful for this purpose.
A Plan For a Helpful “Trunk Range”
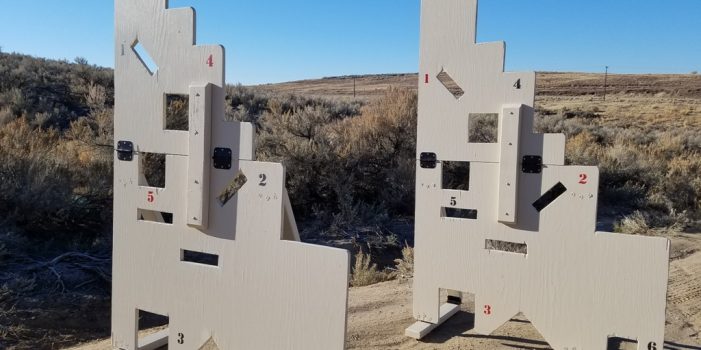
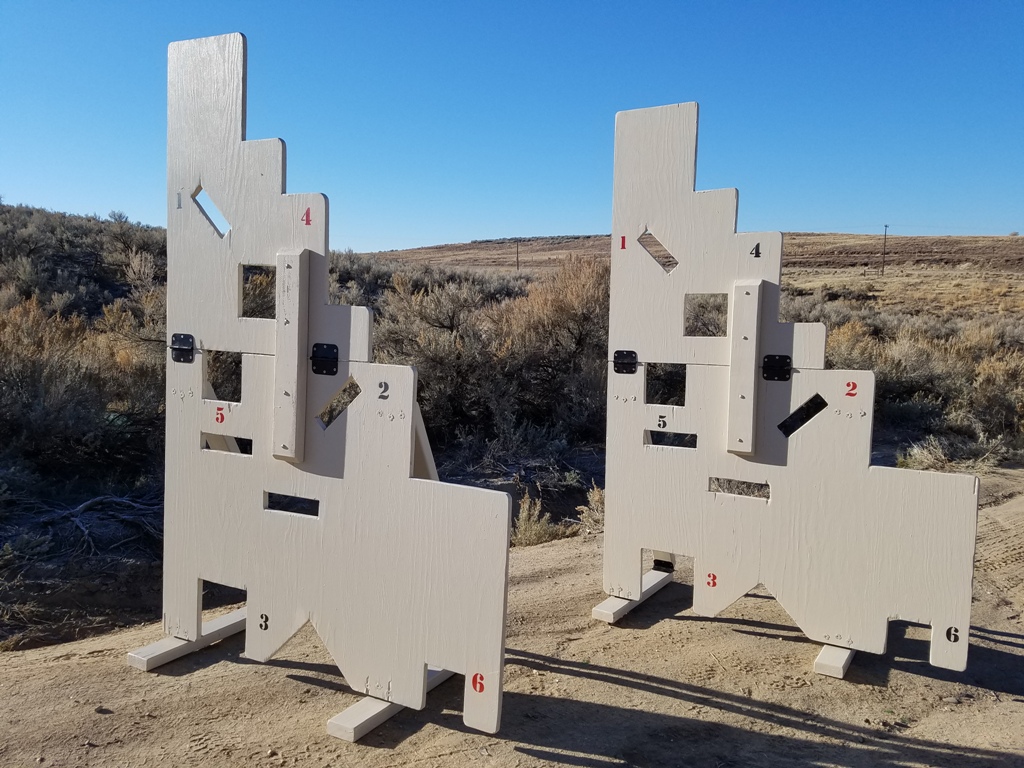
Few of us have the room to set up a shooting range on our property. Therefore, a plan was born to create a helpful “trunk range”. The plan called for one that could be transported in the trunk and backseat of a sedan or SUV and quickly set up on an appropriate venue and included target stands, steel targets, and training barricades modeled after VTAC’s classic barricade and FrontSight’s “Wilson Wall”.
A Compact, Portable Range Barricade
This article will describe how to build a compact (folds up to a 4’x3’ travel size), portable (setup or takedown in a couple minutes) range barricade. While based off the VTAC barricade, of which plans and write-ups are available online, I have not seen anyone use hinges to create a strong and easy-to-transport design like this.
If Space Is Not a Constraint
If space is not a constraint, you can skip the folding upper portion of this design. The materials and instructions refer to this as “without the folding option”.
Costs and Assumptions
 Construction takes approximately four hours, costs run less than $100 in 2018, and the materials listed will build two complete barricades. If you are unable to haul a 4×8 sheet of plywood home from the store, by reducing the overall height from 6’ to 5’ on the barricade, you can have the plywood ripped down at the store to more manageable 4×3 and 2×3 sections – all transportable in most sedans. Likewise, the three 8’ long 2x4s can be cut down into the appropriate lengths prior to transport.
Finally, I am assuming the builder and shooter will exhibit common sense safety measures both in construction and use, including the wearing of eye and ear protection, following firearm safety rules, et cetera. I’ve tried to be as understandable as possible in these instructions and plans. Please reference the pictures if anything is unclear.
Materials
The following are materials required:
- 4’x8’ sheet of plywood, ~3/4” thickness recommended. (A prototype was built out of 3/8” plywood to test, but it was too flexible to be effectively braced against, and the weight and cost savings was not enough to justify it). 23/32 plywood will run you $34-45, depending on grade from a big box store.
- Three 2x4x8’ boards.
- 16 standard door hinges (though only 12 are required without the folding option) and standard wood screws (#9×1/2 and which are typically included with the hinges). The dimensions are based upon a typical interior door hinge with a 1/4″ pin and both leaves half swaged. If you use something else, be aware the hinge placement dimensions will be ever so slightly different! I was able to buy an 18-pack of hinges on Amazon for $25.
- For assembly, you will need to separate each hinge leaf by removing the hinge pin. For these hinges, one side has three knuckles (referred to as Leaf A); the other side has two knuckles (Leaf B).
- The reason this is important is so that any leg/support assembly will work on any position, on either barricade. Standardization! (Or you can disregard this and label each leg to a specific position.)
- 48 Countersunk machine screws, #8×3/4” (only 24 are required without the folding option)
- 48 “T” nuts, #8 (only 24 required without the folding option)
- Eight ¼”x2-1/2” carriage bolts or similar screws, along with eight nuts and eight wingnuts (only required for the folding option)
- Optional – primer and paint for protection and labeling
Tools
 The following tools are helpful to complete the project:
- Tape measure
- Pencil or pen
- Square and straight edge
- Skil saw
- Jig saw for cutouts
- Recommended – chop or miter saw for cutting 2x4s
- Drill with 1/8”, 1/4”, and 3/8” or 1/2″ bits
- Hammer to set “T” nuts and remove hinge pins. (You will want to take this to the range to setup and tear down.)
- Punch to remove hinge pins. (This is also something to take to the range for setup and tear down.)
- Recommended – sandpaper or sander
Steps
There are only eight main steps to completing the portable barricade (and only six if it is not folding). Gather your materials and tools and begin.
Step #1
For step #1, use your tape measure and edges to mark the stepped shape of the barricades onto your plywood, referencing the plans. Then, cut plywood into two identical barricades. The final size will be 4’ wide by 6’ tall. If you need to transport smaller pieces of plywood home to use, have the 4×8 plywood ripped into two 4×3 sections and one 4×2 section. You will lose the top 12”x12” portion of the barricade by doing this, giving you only a 5’ tall final height. Once home, mark and cut the barricade shapes.
To cut the steps with a jig saw, drill a 3/8” or 1/2″ hole at the corner. You will use this hole to begin cutting with your jigsaw.
It’s recommended you chamfer all outside sharp corners with your skill saw. Then, sand all edges.
Step #2
Step #2 involves marking the cutouts on plywood and then cutting, using your jig saw. (Drill a hole in the corners first and then use your jig saw to begin your cutting outward from the hole.) Note: Cutout sizes and locations are merely suggestions. Feel free to modify, but be aware of interfering with the leg attachment and folding hinges/support. Additionally, you will sand all edges of the cutouts.
Step #3
In #3, you will cut the 2x4s into the following sections:
- Four 36” long supports
- Six 24” long pieces (only four required without the folding option)
Complete this step by sanding all edges of the boards. Sides opposite the hinges may be chamfered to reduce snagging potential. (See drawings and pictures.)
Step #4
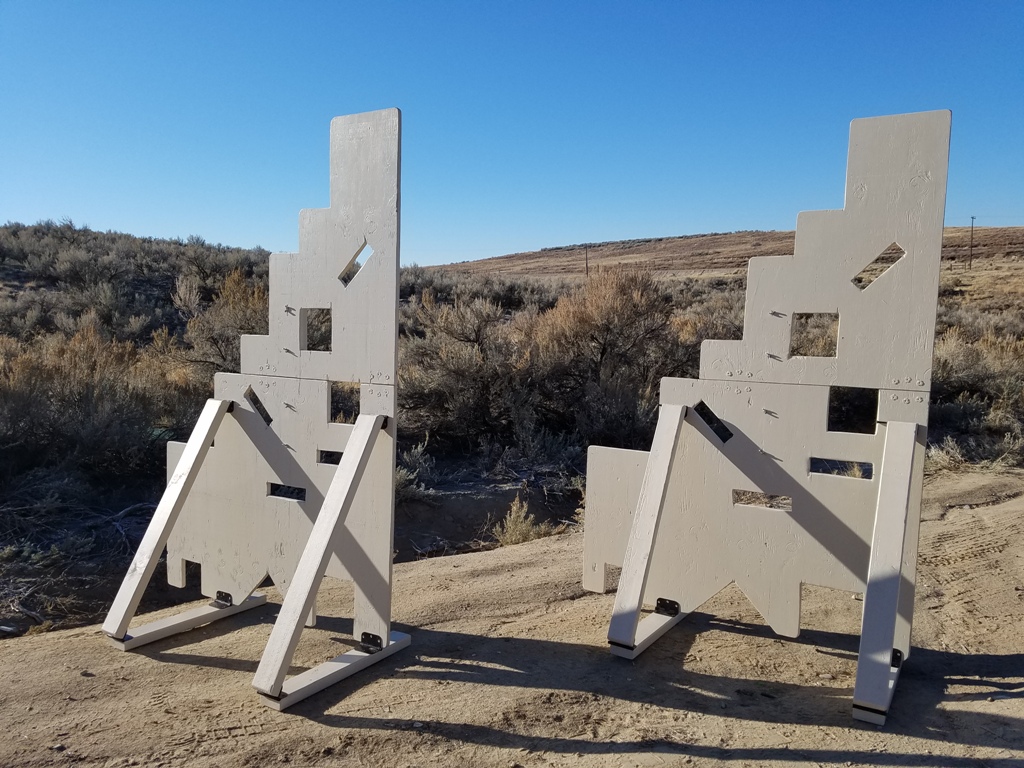
 Step #4 is to attach hinges to the supporting 2x4s. Each of the four 36” long supports has a “B” hinge leaf (two knuckles) attached to either end, on the same side. Place the hinge leaf at the end of the board, mark the screw holes, drill 1/8” pilot holes, and then screw the leaf in place. Then, repeat this process on the other end.
Step #5
Step #5, like #4, is to attach hinges, but this time you attach them to the bottom feet 2x4s. Four of the 24” long 2x4s will be the bottom feet. On one end of each leg, attach an “A” hinge leaf (three knuckles). Place your leaf, mark, and drill 1/8” pilot holes. Hold off on installing the hinge until you complete the following action.
From the end of the 2×4 where you will install your hinge leaf from the previous step, measure 15-1/2” and mark a line. Place a “B” (two knuckles) hinge leaf at this line, mark, and then drill pilot holes. (See picture.) You install both hinge leafs onto each leg in the pilot holes you have drilled– “A” on the end and “B” about three quarters of the way along the leg.
Tomorrow, I will walk you through the final steps plus give you some tips on using the barricade.
See also:
- How To Build a Compact, Portable Range Barricade- Part 2, by I.S. (Active on 11/25/18)
SurvivalBlog Writing Contest
This has been part one of a two part entry for Round 79 of the SurvivalBlog non-fiction writing contest. The nearly $11,000 worth of prizes for this round include:
First Prize:
- A $3000 gift certificate towards a Sol-Ark Solar Generator from Veteran owned Portable Solar LLC. The only EMP Hardened Solar Generator System available to the public.
- A Gunsite Academy Three Day Course Certificate. This can be used for any one, two, or three day course (a $1,095 value),
- A course certificate from onPoint Tactical for the prize winner’s choice of three-day civilian courses, excluding those restricted for military or government teams. Three day onPoint courses normally cost $795,
- DRD Tactical is providing a 5.56 NATO QD Billet upper. These have hammer forged, chrome-lined barrels and a hard case, to go with your own AR lower. It will allow any standard AR-type rifle to have a quick change barrel. This can be assembled in less than one minute without the use of any tools. It also provides a compact carry capability in a hard case or in 3-day pack (an $1,100 value),
- Two cases of Mountain House freeze-dried assorted entrees in #10 cans, courtesy of Ready Made Resources (a $350 value),
- A $250 gift certificate good for any product from Sunflower Ammo,
- American Gunsmithing Institute (AGI) is providing a $300 certificate good towards any of their DVD training courses.
Second Prize:
- A Model 175 Series Solar Generator provided by Quantum Harvest LLC (a $439 value),
- A Glock form factor SIRT laser training pistol and a SIRT AR-15/M4 Laser Training Bolt, courtesy of Next Level Training, which have a combined retail value of $589,
- A gift certificate for any two or three-day class from Max Velocity Tactical (a $600 value),
- A Three-Day Deluxe Emergency Kit from Emergency Essentials (a $190 value),
- RepackBox is providing a $300 gift certificate to their site, and
- Two 1,000-foot spools of full mil-spec U.S.-made 750 paracord (in-stock colors only) from www.TOUGHGRID.com (a $240 value).
Third Prize:
- A Royal Berkey water filter, courtesy of Directive 21 (a $275 value),
- A large handmade clothes drying rack, a washboard, and a Homesteading for Beginners DVD, all courtesy of The Homestead Store, with a combined value of $206,
- Expanded sets of both washable feminine pads and liners, donated by Naturally Cozy (a $185 retail value),
- Two Super Survival Pack seed collections, a $150 value, courtesy of Seed for Security, LLC,
- Mayflower Trading is donating a $200 gift certificate for homesteading appliances.
Round 79 ends on November 30th, so get busy writing and e-mail us your entry. Remember that there is a 1,500-word minimum, and that articles on practical “how to” skills for survival have an advantage in the judging.
Excellent idea. I have limited space but that concept will work well in the space I have.
Also the laser targets and others of such design would be easy to incorporate plus they can be changed to add the element of surprise.