


(Continued from Part 5. This concludes the article.)
Scent and Touch
Smells and tactile input generally won’t provide a lot of significant intelligence by themselves, but there may be instances where they could be useful. For example, the smell of smoke can be detected from a long distance away, especially if you’re downwind from the source. If you’re patrolling and you smell smoke, make a note at the location using OsmAnd and include the current wind direction – that way if you don’t have time to check it out immediately it can be added as a ‘to be investigated’ item on a later patrol. Some other examples include:
- You’re investigating a recent fire and you detect a strong odor of an accelerant like gasoline or kerosene, so you can probably assume it was arson and not an accident.
- Decomposition is another strong odor that can carry quite a distance and may indicate the presence of bodies.
- A chemical smell might indicate a nearby chemical leak/spill or contamination in water.
- The smell of food cooking usually indicates the presence of people.
- The smell of exhaust fumes can indicate the presence of an internal combustion such as a vehicle or generator.
- The smell of gunpowder can indicate that a firearm has recently been fired somewhere nearby.
- The scent of strong body odor or feces can alert you to the presence of people.
As far as I know, there isn’t a commercially available scent recorder, so you’ll need to make geotagged notes in OsmAnd as Favorites to document what you encountered; don’t forget to include atmospheric conditions such as wind speed and direction, temperature, etc., as these can impact how and where odors travel.
Tactile (touch) information also has limited usefulness, but there are some instances where it can complement other intelligence. Some examples include:
You come across a recently used camp site where someone made a fire – by (carefully) feeling the temperature of the fire’s remain you may be able to tell if if was recent (warm) or old (cold).
You encounter a body and need to estimate how long ago they died. You can feel the body’s temperature and check for stiffness of the joints (rigor mortis) and estimate how long they’ve been dead using the following rough guidelines:
- If the body feels warm and no rigor is present, death occurred less than 3 hours before
- If the body feels warm and stiff, death occurs 3-8 hours before
- If the body feels cold and stiff, death occurred 8-36 hours before
- If the body feels cold and it’s not stiff, death occurred more than 36 hours before
A lot of factors such as ambient temperature can significantly influence the accuracy of these estimates, but in the absence of your own CSI team they can provide a potentially useful timeline.
Outside of robotic laboratories there really isn’t any kind of general ‘touch’ recorder, but you can record temperature values using a contact or infrared thermometer.
Signals Intelligence
Radio transmissions can provide extremely valuable intelligence about what’s going on around you. This can range from hearing a bunch of guys using cheap Wally World walkie-talkie radios to plan an ambush for your team to a shortwave transmission from Florida telling you a hurricane is moving up the coast. Even if you have a nice radio shack with a massive array of antennas at home, sometimes being just a mile away can allow you to hear a signal that you wouldn’t receive at your fixed location.
To start you need to determine what types of radio signals you’ll most likely encounter in a post-SHTF world. Complex systems such as cell phones, trunked radio systems, and repeaters usually require a fairly advanced supporting infrastructure and line power, which means they won’t be in use for too long after the critical infrastructure goes away. Types of signals you should focus on are those that are commonly used by handheld and mobile equipment, since these will the easiest to continue using in a grid-down scenario. Based on these assumptions the radio bands you’re most likely to encounter include:
| Band | Approx. Frequency Range |
| Citizens Band (CB) | 26-27MHz |
| Aviation Band | 121-126MHz |
| 2M Band | 144-148MHz |
| Multi-Use Radio Service (MURS) | 151-155MHz |
| Marine Band (boats, non- military) | 156-162MHz |
| 1.25M Ham | 219-225MHz |
| US Military Air Band | 225-380MHz |
| US Military Intra-Squad Radios (ISR) | 396-400MHz |
| 70CM Ham | 420-450MHz |
| Family Radio Service (FRS) | 462-467MHz |
| General Mobile Radio Service (GMRS) | 462-467MHz |
Note the overlap between the FRS and GMRS bands – the difference is that with GMRS you’re allowed to have fixed base stations and repeaters and transmit with 5W of power, versus 0.5-2W for FRS. All of those inexpensive ‘walkie-talkies’ you see on the shelves at Walmart use the FRS band, so those will probably be the ones you’ll encounter most often. Note that this list isn’t meant to be exhaustive – other mobile radios such as Business Radio Service (BRS) may be in use, but these aren’t nearly as common as the ones listed above.
In order to collect radio signals when you’re in the field you’ll obviously need some type of handheld or mobile scanner. My recommendation for an inexpensive option is the Uniden Bearcat BC125AT – it covers the frequencies listed above, is relatively inexpensive (around $110) and it provides Close Call technology, which allows the radio to pick up nearby transmissions above a certain signal strength even if you don’t have the frequencies programmed in. Another option is the Uniden Bearcat SR30C, but the BC125AT costs about the same and the SR30C doesn’t cover the Military Air or 1.25m ham bands.
Regardless of what handheld radio you choose you’ll need to program it to scan the frequencies or bands listed above. How you do this varies between different types of radios, but I recommend you use a software applications such as Uniden’s free application or one of Butel’s paid ARC applications instead of trying to manually enter all of the desired frequencies by hand on the keypad. The Butel applications have one significant advantage – they can import all of the radio band/frequency details from RadioReference.com, (assuming you have a RadioReference premium subscription, which is $15 for 6 months). This can save you a ton of effort versus manually entering frequencies and text names and eliminates the chances of mistyping something.
The BC125AT can be combined with a digital voice recorder and a small external USB battery pack to create a scanner/recorder that can be carried in a jacket chest pocket or an outside pocket in your backpack with the antenna sticking out. Here’s a picture of one possible setup:
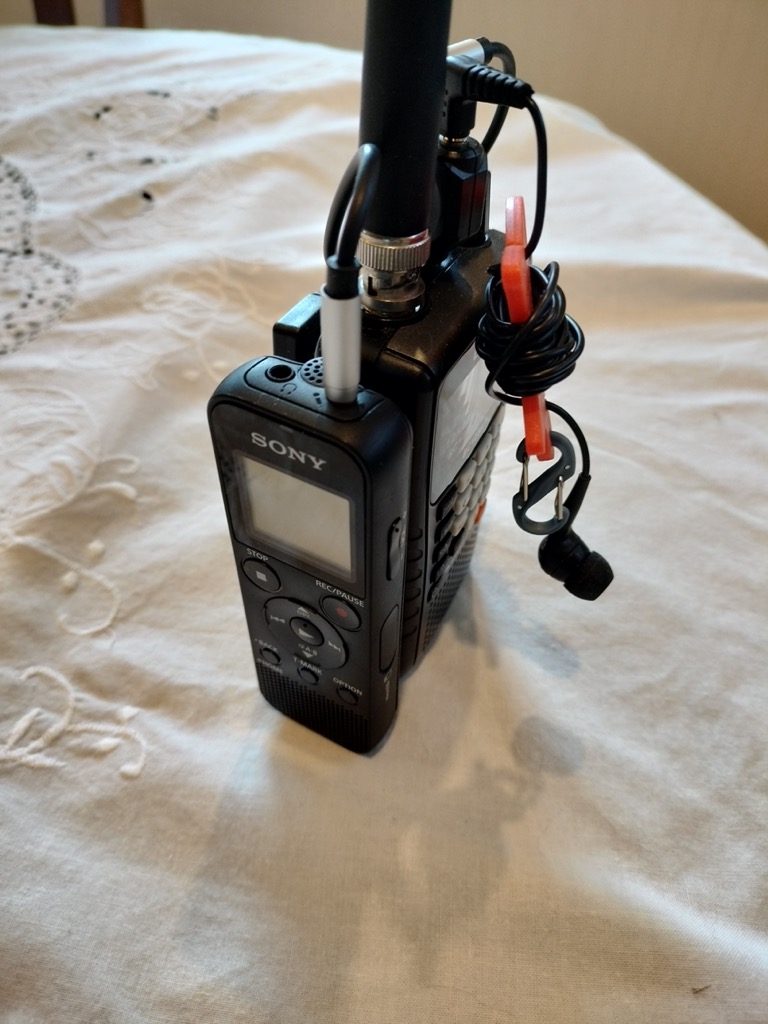
I used velcro to attach an Attom Tech 3000mAh battery to the back of the radio (radio pocket clip removed) and a Sony ICD-PX370 digital voice recorder to the side. A short USB-to-mini-USB cable connects the battery to the USB port on the radio to provide external power, and I used an audio output splitter to send the audio from the radio to both the Sony recorder and a mono earphone so I can listen to radio intercepts while I’m on the move. The Sony recorder is configured to record using voice activation, so it only records when a signal is received. With two rechargeable AA batteries in the radio and the external USB battery this setup can run for over 20 hours. A BC125AT radio, digital voice recorder, external battery, cables, headphone and a Remtronix antenna cost around $220 combined.
This approach is a great and relatively inexpensive way to listen to and record radio transmissions while you’re mobile, but it does have some disadvantages – on most digital voice recorders, using voice activation results in all received transmissions being stored in a single large audio file. This means that you may need to perform an extra step to chop the audio file up to separate the transmissions when you’re uploading the file for intelligence analysis back home. Another issue is that you won’t be able to collect any metadata such as frequency, time or location received for each separate transmission.
A significantly better but much more expensive solution for mobile collection of radio transmissions is one of the newer handheld scanner radios with recording capability built in, such as the Uniden BCD436HP, Uniden SDS100 or Whistler TRX-1. These cost around $550-$650, but they provide the ability to record received transmissions directly onto a microSD card installed in the radio. The names of the WAV files they create contain the date/time of the recording, and inside the files is metadata such as date/time, frequency, group, name, etc. You can plug the radio or microSD card into your home intel management computer to upload all of the recordings. Run time for any of the three radios with the built-in battery is around 6-8 hours, but all of them can be plugged into an external USB battery pack to significantly increase it.
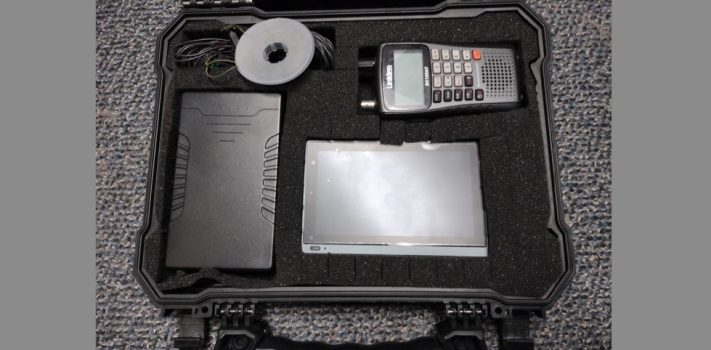
A slightly more complex but less expensive mobile/portable solution for recording radio transmissions is the use of a software package called ProScan running on a computer connected to your scanner. ProScan only supports Uniden radios, runs on Windows and a license costs $50, but it’s an incredibly powerful and flexible application. While you can use pretty much any Windows laptop as a portable solution to run ProScan, I wanted something that would allow the complete solution to fit inside a large backpack pocket or the pockets in my smock/field jacket, so I went with a Higole 1 Pro ‘palmtop’ Windows 11 tablet running ProScan. With an added 12V Talentcell battery to provide extra power (the Higole tablet requires 12V and the radio is charged by the 5V USB cable that connects it to the Tablet) and the display on the tablet turned off the whole setup runs for 12-14 hours. Here’s a picture of the components stored in a padded handgun case:
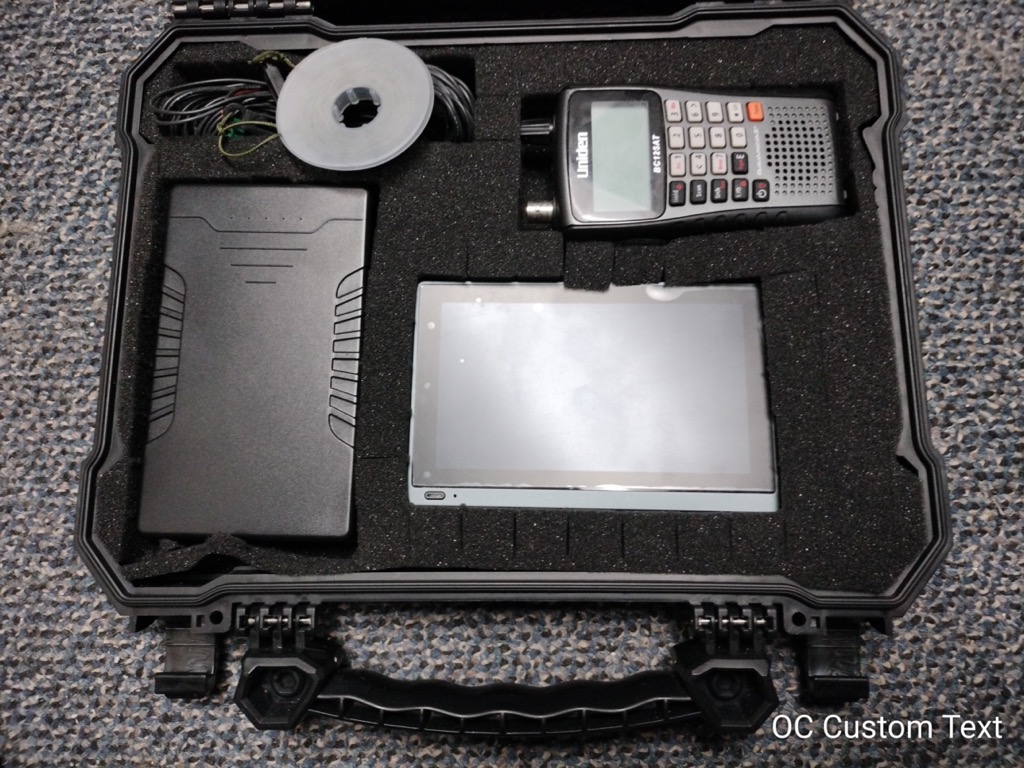
All of the components and cables cost around $400 combined. A couple of recommendations if you plan on using ProScan to collect signals intelligence:
Click on ‘Options’ in the menu bar and select the ‘Recorder’ tab:
Click on the ‘Recordings Location’ button and select a folder to store the received transmissions recording MP3 files in.
Clear the ‘Custom Recording Folder’ field – if there anything in there it will create separate subfolders for each category of received transmission instead of putting them all in a single folder.
In the ‘Custom Filename Format’ field enter “%DT – %S – %C” – this will name each separate recording file with the date/time, System/Site name and channel name, which will make them easy to recognize.
Next select the ‘Recording Text Tags’ tab in the ‘Options’ window:
Type ‘ProScan’ in the ‘TIT2 (Title)’ field
Type ‘%S – %C’ in the TPE1 (Artist)’ field
These will add internal metadata in each recording, which is easier to work with once it’s uploaded to your intel processing system
Regardless of what you choose for a mobile signals intelligence collection solution, one thing that can have a huge impact on its effectiveness is the antenna you use. For any handheld radio, I highly recommend that at a minimum you replace the OEM rubber ducky-style antenna with something like the Remtronix 842B/S (‘B’=BNC, ‘S’=SMA). The Remtronix 842 is a wideband antenna that dramatically improves the reception over pretty much any factory-provided antenna. There are a lot of other handheld antenna options available from well-known companies like Diamond Antennas, so do some research and select the best one you can afford.
If you plan on being in one place like an observation post for a while there are some portable antenna options available that can significantly improve the reception of your scanner, but they require some setup:
- Attach a 23’ length of silicone-coated wire using a breakout connector (or for SMA) and use a throwline (length of Microcord or paracord tied to a rock) to string it up over a high branch.
- Attach a shorter length of wire to your radio using a breakout connector and attach the other end to a tall piece of metal like a high fence post or metal sign. You’ll need to make sure you have the metal conductor in the wire solidly in contact with clean bare metal on the object – I always carry some emery cloth, steel wool and Gorilla tape or a small rare earth magnet to hold it down. Using random metal objects is a crap shoot in terms of improving signal reception, but based on my experience it’s usually worth trying.
- RTL-SDR Blog Multipurpose Dipole Antenna Kit (scroll down the web page for the antenna kit)
Tram 1411 Wide Band Antenna – The individual elements can be unscrewed and the whole thing can be transported in a tent pole bag and assembled on site. You can zip-tie the antenna to a 10’ long cut branch/sapling and stand it up using some paracord guylines. - Moonraker Ltd SkyScan VHF/UHF Receive Antenna – Transport and set up like the Tram 1411, but the Moonraker has a 1/4”-20 threaded hole in the bottom of the base shaft, so you can bring a 10” section of 1/4”-20 threaded rod and zip-tie that to a branch/shaft.
These are just some antenna options that I have personal experience with and they all work well. Well-known companies like Nagoya and Diamond provide a wide range of high-quality handheld scanner antennas, and there are also hundreds of articles on the Internet on making your own DIY scanner antenna. When researching antennas for your scanner keep in mind that you’ll want to be able to receive a pretty wide range of frequencies (26-467MHz), so focus on wideband antennas designed for scanners.
One other aspect of signals intelligence that is worth considering (but way beyond the scope of this article) is direction finding – e.g. determining which direction a radio signal is coming from. This can be useful if you start picking up a lot of unusual or suspicious radio traffic and want an idea of where it’s originating. Direction finding with radios is a fairly involved topic, but websites such as HomingIn provide a lot of great information on equipment and practices.
With direction finding the size, orientation, and shape of the antenna are a lot more critical than for general omnidirectional scanning, so make sure you have antennas that are appropriate for your expected signals environment and practice using them before you need them. My recommendations include a simple Arrow Fox Hunt Loop, a Laird 450-480MHz Yagi antenna and/or Log Periodic antenna as a starting point. Note that the loop antenna is bi-directional, so when you have the best signal strength it means the signal is either coming from directly in front of or behind you. If you want to really get involved in radio direction finding, having something like a TinySA Ultra signal analyzer can allow you to locate and analyze different signal frequencies and strengths.
Uploading Your Take
Once you’ve returned home from your travels you’ll need to upload all of the intel you’ve collected to a central intelligence system for correlation and analysis. How you do that depends on the specific apps and devices you used in the field to collect the information. You’ll also need to figure out where to upload everything to on your intel analysis system – I recommend creating a single folder named something like ‘Intel Upload’ and uploading everything into that. Having everything in one place makes processing it much easier.
OsmAnd includes the ability to export all of the data you collected in the app (Favorites notes, Markers, pictures, videos, etc.) in a single export file. On the OsmAnd main screen click on the three bars in the lower left corner, select ‘Settings’, then scroll to the bottom of the options list and select ‘Export to file’. This will display the ‘Export’ menu – expand ‘My Places’ and check ‘Favorites’, ‘A/V Notes’ and ‘Map markers’ for export. Note that if you haven’t created any of a specific type of item OsmAnd won’t let you check that box. Once you’ve selected the items to export click on ‘Continue’ and a ‘Share’ side-to-side scrollable list will pop up at the bottom of the screen to allow you to select where to save the exported file. Select ‘Files’ (or whatever file manager you have installed), then navigate to the ‘Documents’ folder on your Micro SD card and click ‘Select Documents’ – the file will be saved with a name of ‘Export_YYYY-MM-DD.osf’. The .osf file OsmAnd creates is basically a compressed zip file with a different extension – once you’ve uploaded it to your intel system, right-click on it from Windows File Explorer and select the ‘zip/extract here’ option to extract all of the individual files into the upload folder.
There are a number of options for moving stuff from your Android device to your intel analysis system, but the easiest is probably just plugging your phone into a USB cable and plugging the other end into your desktop system. Depending on your version of Android your phone may pop up a menu with options for charging, copying files, and some other things. Click ‘Transfer files’ on your phone and it should appear as a new storage device on your system. You can now open up Windows File Explorer and you should see your phone listed as a new storage device in the left window. Click on the small arrow next to the name of your phone and you should see two sub-folders – ‘Internal shared storage’ and ‘SD card’ (assuming you have a SD card installed). If you followed my recommendations and used the ‘Documents’ folder on the SD card for your Obsidian and OsmAnd storage, click on the arrow to the left of ‘SD card’ to expand it, then click on the ‘Documents’ folder to access all of your data. You can drag-and-drop all of your intel container files to your Intel Upload folder on your PC.
Any notes you created using Obsidian are going to be in the sub-folder with the same name of the vault you created, hopefully in the Documents folder on the Micro SD card, so the entire sub-folder should be copied over to your ‘Intel Upload’ folder on your intel analysis system. You should copy the sub-folder itself, not just the contents of the sub-folder. Each Obsidian vault sub-folder has a file named ‘.obsidian’, which makes it easier to distinguish it from any other sub-folders you may need to copy.
If you used an app on your mobile device other than Obsidian or OsmAnd to collect pictures, audio notes, etc. you’ll need to figure out where the apps stores its data so you can upload it. For example, the USB Camera Pro app I mentioned earlier stores pictures/videos in the default ‘Pictures’ folder on Android, but you can change that in the ‘Settings’ options. I created a folder called ‘USB Camera’ in the Documents folder on my SD card so that I have everything in one place when I go to upload. Other apps may store files in different folders and may or may not allow you to change it – you’ll need to play around with the app to understand where it stores things and if you can change it.
If you used a separate device such as a voice recorder or compact digital camera to collect intel you may need to remove the Micro SD card and plug it into your intel computer using a card reader to copy the files into the Intel Upload folder. Most digital cameras store pictures and videos in a folder named ‘DCIM’ (Digital Camera Images) on the card, but some may use a different folder structure. Some devices also allow you plug them directly into a computer using a USB cable to upload files. Spend some time learning where files are stored on your device and the best way to upload them.
Once you’ve successfully uploaded everything to your Intel system you’ll need to process all of the files and move them into the application you’re using for correlating, analyzing and managing intel, but that’s a discussion for the next article.
Summary of Recommendations
1. Use a mobile phone device with a decent camera as the core of your field intel collection system
2. Use OsmAnd maps on the mobile device for location-based intel collection when possible
3. Use Obsidian Mobile on the mobile device for documenting longer notes
4. Assuming GPS isn’t available, add a Map Marker documenting your location at regular intervals in OsmAnd to make a time-based record of your route; I recommend at least every half hour, or whenever you take a picture or make a recording outside of OsmAnd (e.g. separate app or digital device)
5. Make sure that the time setting is synchronized as closely as possible across all of your digital devices used to collect intel
6. Obtain a decent telephoto camera capability
7. Practice using all of your apps and devices until you are comfortable with them
8. Turn off location-based services on all devices when practicing to simulate GPS being down
9. Learn where each phone app or separate device stores the files it creates and practice uploading them to a computer
Conclusion
In this article, I’ve discussed various software and hardware that I use to collect information while I’m out and about. I use the software and devices I’ve discussed pretty much every time I go out for a hike, walk, trip, etc. to practice and adjust what I do and how I do it so that I’m familiar with everything and optimize it for my situation.
In ‘normal’ times we tend to rely on external sources for news, alerts, and other information we need to understand what’s happening in the world around us and make decisions; in a long-term grid-down scenario you’re only going to have yourself and your family or group to rely on, so you should start planning and practicing now to develop the capabilities you’ll need to effectively collect information both at home and while you’re out and about.