


(Continued from Part 3.)
Map Markers are similar to Favorites but much simpler, since they don’t allow you define a custom name or add them to a group. Markers are designed to allow you to plan a route, but they can be very useful for documenting the route you’re taking. Adding a Marker is similar to adding a Favorite – tap and hold your current location, then click on the ‘Marker’ (triangular flag) option on the bottom pop-up menu. A colored Marker flag will be added to that location; note that the color of the flag will automatically change for each new Marker you add. Markers are a simple way to document your route and providing a timeline; this simplifies adding geolocation data to external pictures, videos, audio recordings, etc. later on.
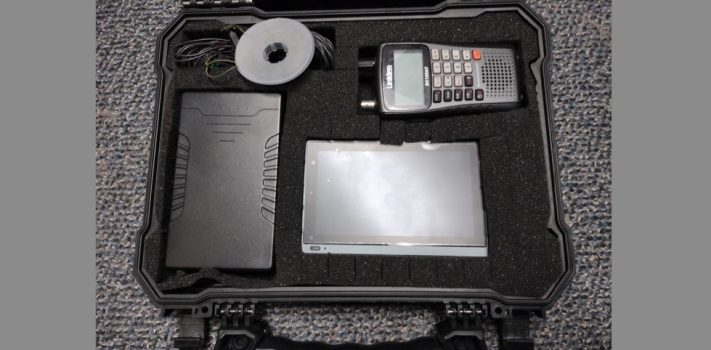
Now for one of the most powerful features of OsmAnd for field intelligence collection – select a location on the map like before, and this time select the ‘Actions’ option in the bottom menu bar. This presents you with options to take a picture, video, or audio note that will be geotagged with the lat/long of the location you selected on the map, even if GPS is not available. Note that OsmAnd can only use the camera and microphone built into your cell phone for recording media objects, which is a good argument for getting a phone with the best camera you can afford. The Ulefone Armor 22 I use has a pretty decent 64MP camera and lens, and its built-in infrared night vision allows me to take pictures in the dark without having to use a visible flash.
Note: Obsidian mobile for Android does have a plugin called ‘Map Viewer’ that allows you to take location-based notes. However, it’s default configuration requires Internet access in order to load the map tiles needed to display maps, which defeats my ‘no Internet access required’ goal. It is possible to set up a map tile server directly on the phone using Mobile Tile Server and download the map tile databases from some place like maptiler; however, this is a somewhat complex solution to implement and tends to run poorly on many mobile devices. Because of these issues, I chose OsmAnd for all of my location-based intelligence collection.
Optics in the Real World
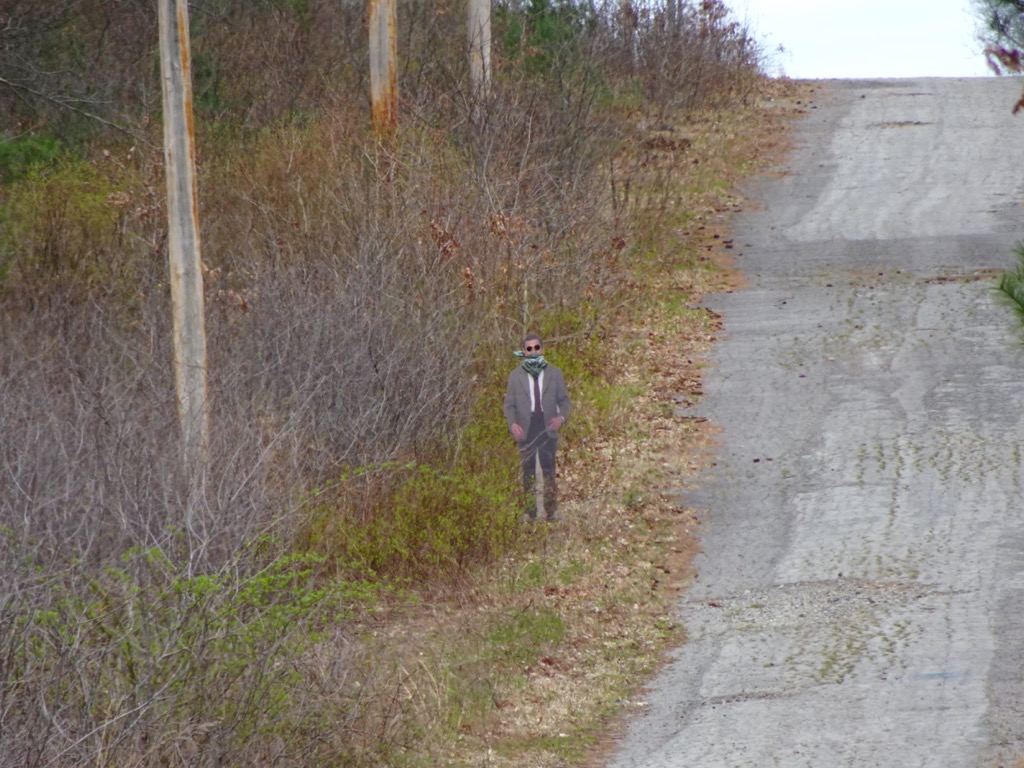
Earlier, I provided a general overview of optics and how they work, so let’s take a look at some specific examples that I have access to. For the sample pictures in this section I went out to a local state forest and set up a life-sized 5’9” tall cardboard cutout of a man about 600’ away. (None of my friends were willing to stand still in the woods for an hour or so while I took pictures. The day I did this had some really poor photography conditions – it was overcast with a yellow-tinged sky and there was a lot of tree pollen in the air – which I felt worked out well since you’ll seldom have perfect shooting conditions in the real world. All of the daytime pictures were taken with the device on a tripod. I only took pictures, since I don’t think Mr. Rawles wants to deal with dozens of huge video files on the SurvivalBlog servers.
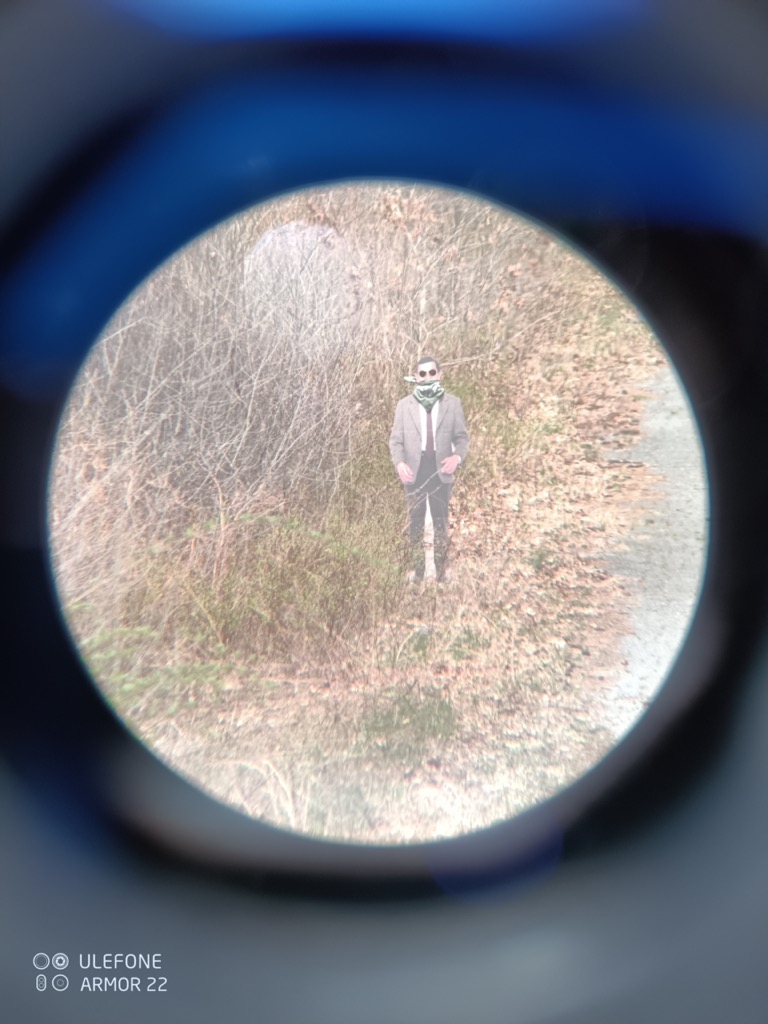
I mentioned in the previous section that you can use the built-in camera in your phone to take pictures/videos in OsmAnd – here’s a picture from the primary camera on my Armor 22 with no zoom:
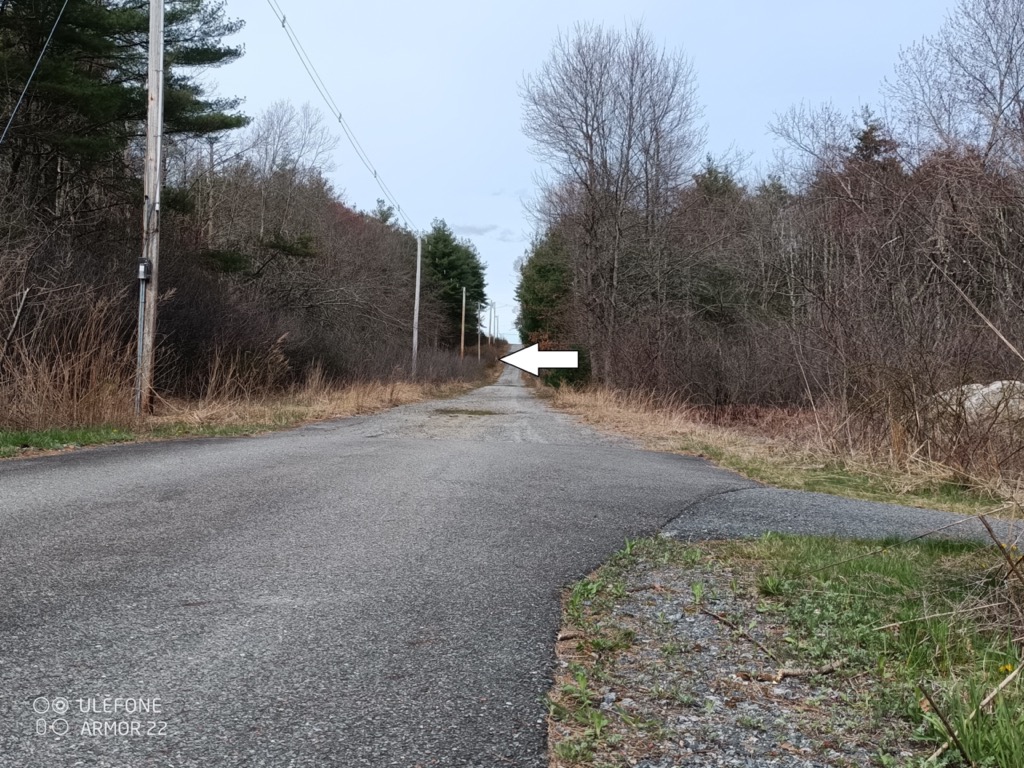
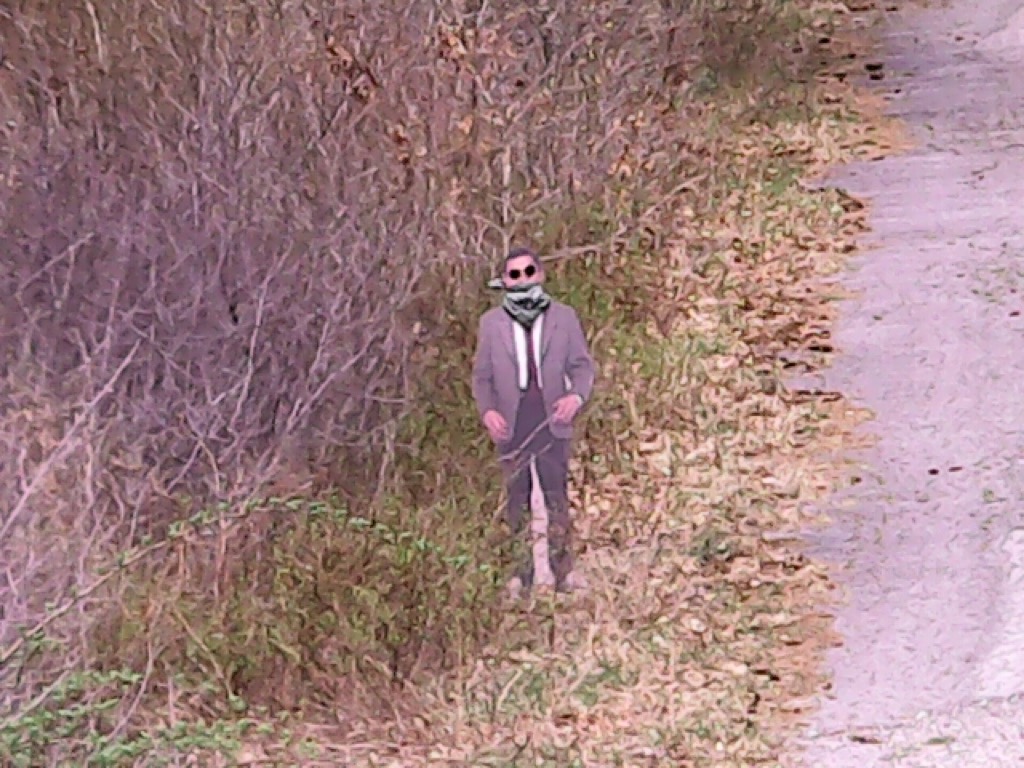
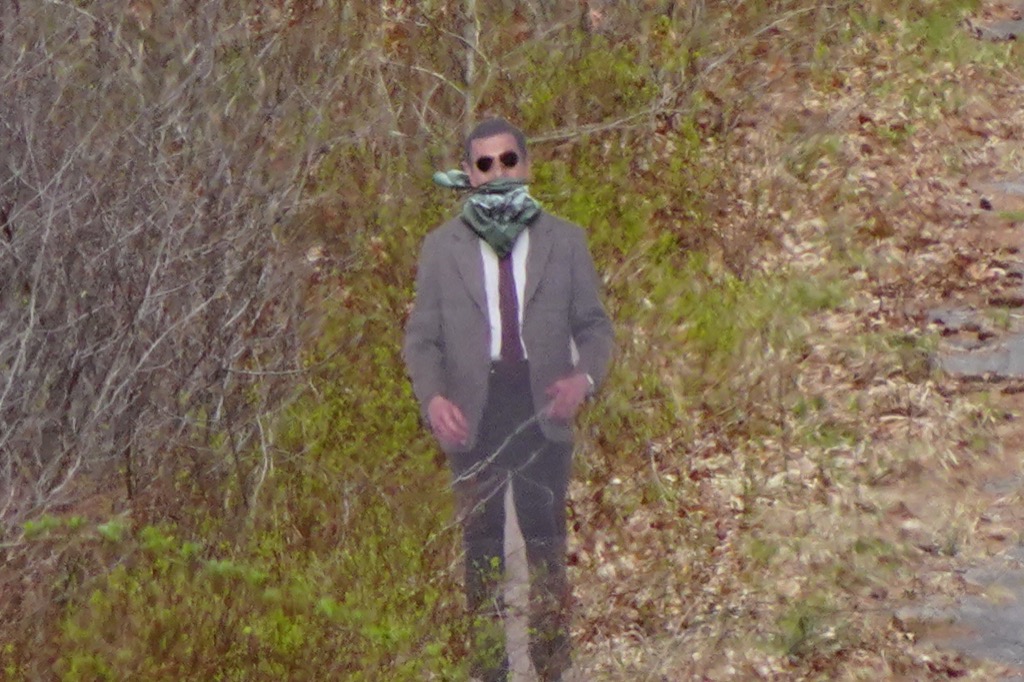
The arrow is pointing to the cardboard cutout on the left side of the road, which you can barely make out. Here’s the same image but fully zoomed in using digital zoom:
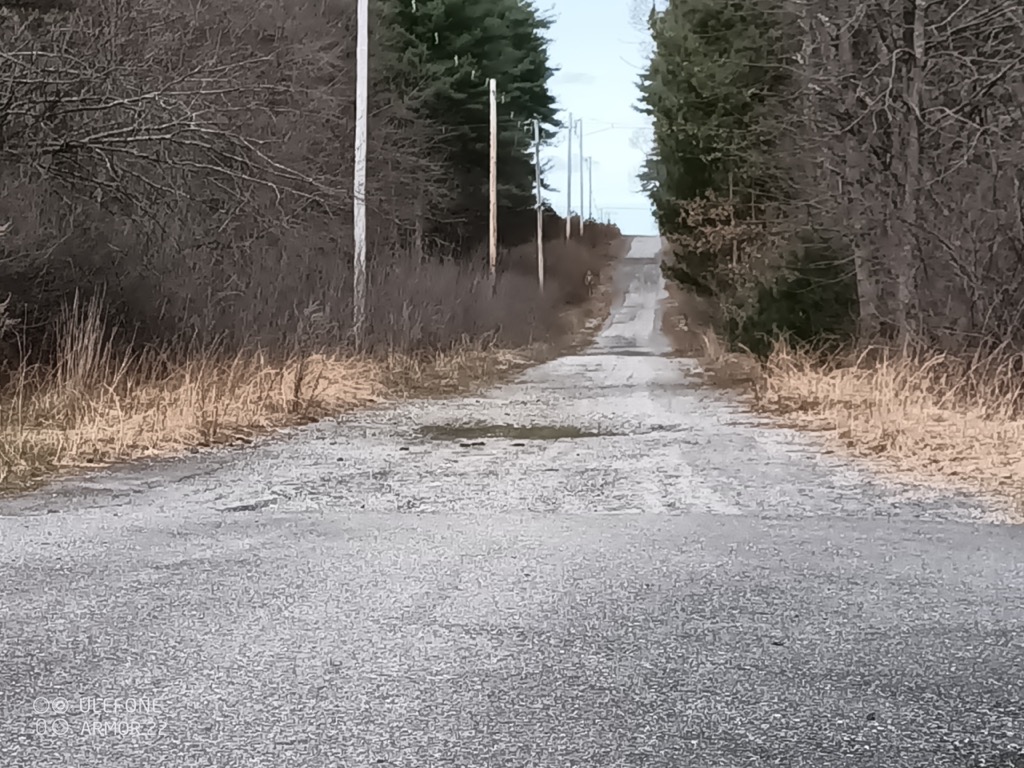
Notice you can almost recognize the shape of a person, but there’s not much detail. The next picture is also taken with my Armor 22, but with my Roxant Viper 10×25 monocular attached to the camera lens using a metal tridapter phone adapter, which gives very fine control over positioning:
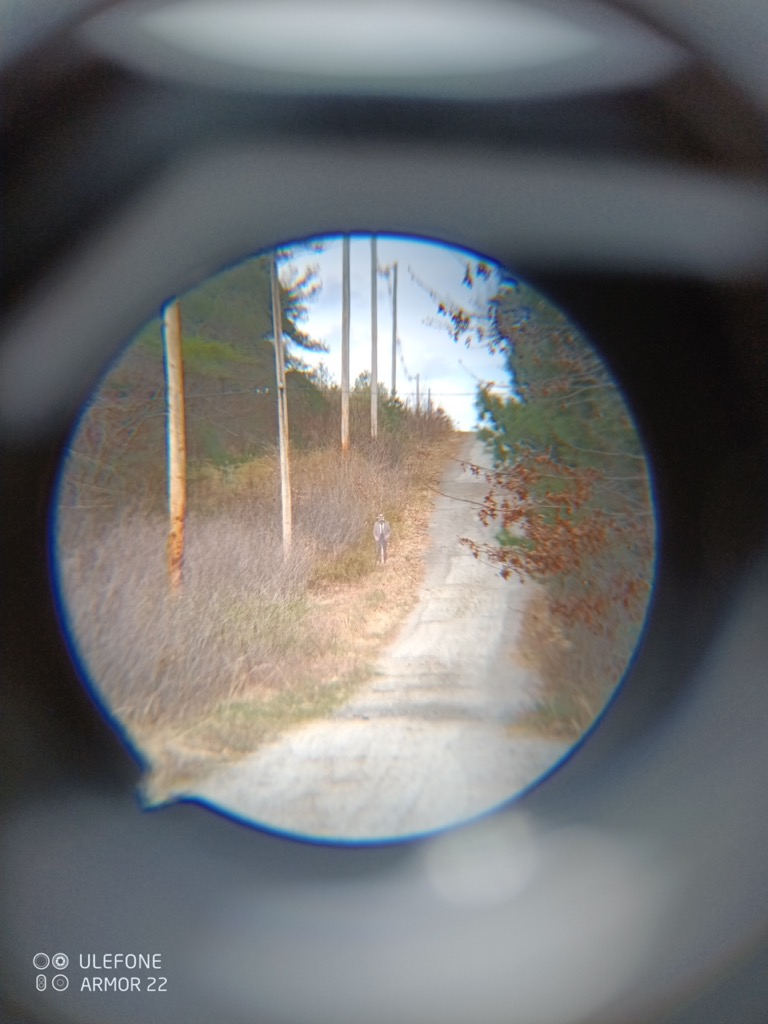
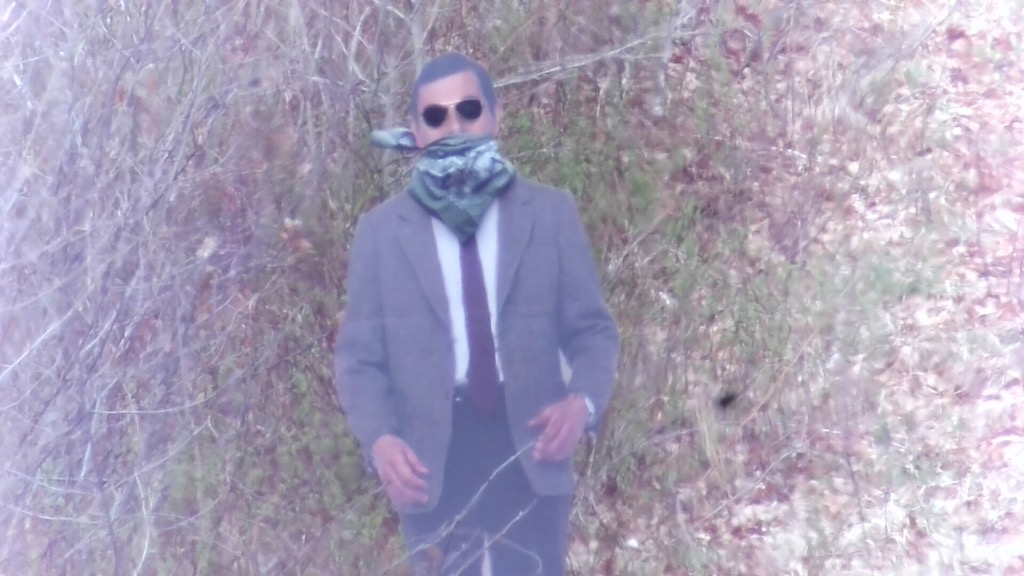
You can make out some more detail at this point, and I’d still consider this a mobile solution, even if attaching the monocular to the phone is a bit awkward. Next I took a picture with my phone attached to my Simmons 20-60x60mm spotting scope set at around 35x magnification, which is definitely a portable (versus mobile) solution:
You can make out a lot more detail and potentially recognize the person, but with the trade-off of less mobility.
If you want to go beyond what your cell phone camera and lens attachments can offer there are a number of camera options available that can connect to your phone via USB. Note that you’ll need an app that can control a USB camera if you decide to use one – I recommend ‘USB Camera Pro’ which I’ve used for years and has handled every USB-connected camera I’ve tried.
One of the least expensive USB telephoto cameras in a compact package is the W110 70x digital telescope. It only supports a relatively low 640×480 resolution, but it provides surprisingly decent pictures. Here’s an example at 600’:
You could probably recognize a person with this, and it’s compact enough that you could hold the lens in your hand while taking the picture, making it a reasonably mobile solution. There are newer versions of a digital telescope that claim to provide higher 1080p resolution and connect via WiFi instead of USB, but I haven’t tried one of those yet. As I mentioned earlier, if you’re going to be using any sort of telephoto lens I strongly recommend using a tripod or bracing it against something sturdy to minimize any movement that will result in blurry pictures.
For a really powerful long-range portable camera solution for things like setting up an OP, you can use something like an ELP 4K ‘industrial’ camera with a long lens. ELP cameras are used in various applications like industrial process monitoring, but they work just as well for surveillance. I have an ELP 4K (8MP) USB camera with a 500mm lens and a 2X adapter, making it effectively 1000mm. Here’s a picture with that setup:
You can easily identify someone with this from 600’ away, and the camera, lens and adapter was around $150 total. Note that the 500mm lens I bought had a Sony A-mount, so I had to get a Sony A-mount to C lens adapter to attach it to the ELP camera. I have put together a camera package that I use to take wildlife pictures that includes the ELP camera, the 500mm lens and 2X adapter and a remote-controlled motorized pan/tilt mount, all attached to a tripod. Here’s a picture:
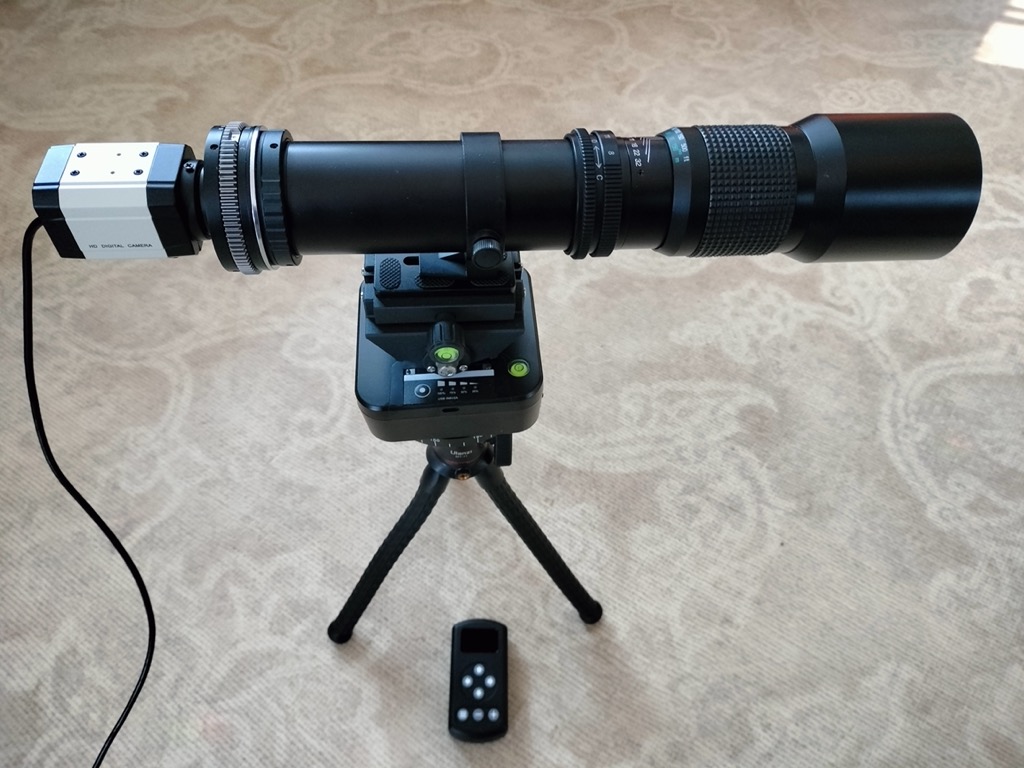
The remote-controlled motorized pan/tilt makes it a lot more stable when moving the camera around to change the view or follow movement. Another advantage to this setup is the ability to use the camera remotely – it comes with a 6’ USB cable, and you can easily add another 10’ USB extension cable, allowing you to set up the camera where you need to but stay hidden while you use it.
One final type of phone-controlled imaging device is called an electronic eyepiece – it’s a small device designed to fit over the end of an optic like a monocular, binocular, telescope, etc. and take digital pictures through the lens. The device I have has a built-in rechargable battery and creates its own WiFi network that you connect to with your cell phone in order to take pictures. The pictures are stored on a microSD card on the device and can be uploaded to your phone over WiFi. Like the devices I previously mentioned the quality of the pictures is going to depend on the optics you attach it to. Unfortunately I didn’t have it with me on the day I was shooting, so I don’t have any sample pictures.
Standalone Cameras
While using a phone’s built-in or USB-connected camera may be convenient, using a separate standalone camera can offer some advantages, such as:
- Larger higher-quality objective lenses
- Zoom lenses
- Interchangeable lenses
- More adjustable settings
- Larger image sensor
One consideration for standalone cameras is that they typically store pictures on a removable Micro SD card, which is an additional item you’ll need to upload to your central intelligence system, separate from what’s on your cell phone.
My favorite digital camera is the Sony DSC-HX99, which supports up to 4K resolution photos/videos, has a built-in 24-720mm Carl Zeiss zoom lens and fits in a shirt pocket. I’ve been using this for a couple of years and it takes great pictures. Here’s a picture of the target at full zoom:
While at first glance this picture may not seem much better than the USB telescope or the ELP 500mm, the Sony has a much higher quality lens and more megapixels, allowing you to zoom in further digitally and still retain a lot of resolution, and it’s much more compact and faster to deploy. Here’s the same picture digitally zoomed in further:
You can easily recognize someone with this and the picture quality is even more amazing in better lighting conditions, all from a device that fits into a shirt pocket.
(To be continued tomorrow, in Part 5.)