


(Continued from Part 1.)
There are also a variety of different types of image collection devices that the lenses sit in front of to view and process the light coming through the lens:
- Mark I eyeball – Many types of lens devices like binoculars are designed to be held directly up to your eyes, typically to allow you to view things at a distance.
- Digital Single Lens Reflex (DLSR) cameras – These are large-body cameras that have interchangeable lenses and lots of advanced bells and whistles.
- Compact digital camera – Smaller digital cameras with built-in lenses.
- Cell phone camera – Virtually every cell phone sold these days includes a camera.
- USB cameras – These are cameras that connect to a computer or cell phone using USB.
- Security cameras – Cameras designed to be mounted in a fixed location and send image data to a central monitoring/recording location, usually via WiFi.
- Point of view (POV) cameras – These are things like action cameras (e.g. GoPro) and body cameras that are designed to be attached to a person.
- Drones – Pretty much every drone sold today has a camera.
- Night vision devices – Mostly digital vision devices that either amplify available light or use infrared light to allow you to see in low-light situations.
- Thermal cameras – Cameras that allow you to view the infrared energy emitted by the heat something produces. Note that these work just as well in the daylight as they do at night.
- Digital eyepieces – These are devices designed to attach to the eyepiece of a telescope, spotting scope, etc. and connect to a cell phone via WiFi to provide a digital imaging capability.
To make things even more complicated there are a wide variety of adapters that allow you to mix-and-match lenses with various image collection devices they weren’t originally designed for. Some examples include:
- Kenko Lens2scope adapters are attachable eyepieces allow you to use a variety of detachable camera lenses as monoculars/spotting scopes. This is nice if you have previously invested in SLR cameras and lenses (film or digital) and want to be able to re-use the lenses for other purposes.
- Cell phone lens adapters allow you to attach various optical devices over your cell phone camera.
- Mount adapters allow lenses with one type of mount to be used on a different camera.
With digital imaging devices you also need to consider how many pixels (picture elements) the imaging sensor is capable of grabbing, which is generally listed in megapixels (MP). Assuming you have good shooting conditions and a decent-quality lens, more megapixels can potentially allow you to zoom in on the image to make out finer details. However, the more megapixels the larger your image files will be and the longer it may take to save each image as you take them. The same applies to taking videos with a digital imaging device – videos taken in 4K at 60 frames per second (fps) will be huge compared to ones taken at 1080p at 30fps.
Having a high-pixel camera doesn’t automatically mean you’ll be able to zoom in on any picture and read a license plate from hundreds of feet away (like on television) – the focal length and quality of the lens, the available lighting, the steadiness of the shooting platform and dozens of other factors will have a significant impact on the quality of your images. You need to spend time practicing with your device to understand what picture and video settings work best in a given situation and how to change them quickly.
Features like image stabilization on digital imaging devices can also be critical, as they can minimize blurriness in images that result from hand movement when you’re taking pictures. Image stabilization is especially critical when you’re using long telephoto lens, as the long lens tends to amplify any movement. Most current mid- and high-end digital imaging systems like cell phone cameras have image stabilization built in, but when possible you should still use a tripod or brace the lens against something solid when taking pictures with long lenses.
Note that I’ve barely scratched the surface when it comes to all of the considerations and options around optics; there are literally hundreds if not thousands of possible options and combinations you can work with. Later in this article, I’ll be providing examples of some of the options that I use.
Time
When analyzing collected intelligence, accurately knowing when something happened or when it was detected can have a big impact on understanding what it means in a broader context. Multiple small pieces of seemingly unrelated information can provide critical insights when viewed in the context of an accurate timeline. I’ll be discussing the use of various digital devices to collect and store intelligence information, and in order to ensure that the data collected is timestamped accurately you need to verify each device you use has its internal date/time set correctly and consistently across all devices. I recommend that you select one central date/timekeeping device (clock, calendar, watch, etc.) as your source for timekeeping at home, and use that to verify the settings on all of your mobile devices each time you leave home. You can use a USB-powered wall clock with battery backup, a mechanical clock, a solar-powered watch, a sundial, or whatever works best for you.
Note that many digital devices will lose track of time when their internal battery is completely drained, so as part of the regular maintenance of your digital preps should be to charge all of your electronic devices and turn them on to verify their time settings.
Intel Collection Tools
Note: The following sections focuses on using apps on an Android mobile device for intel collection. The apps I discuss (or something similar) are also available for Apple iOS devices; however, I have zero experience using any Apple products, but I assume the most of the setup and use would be similar.
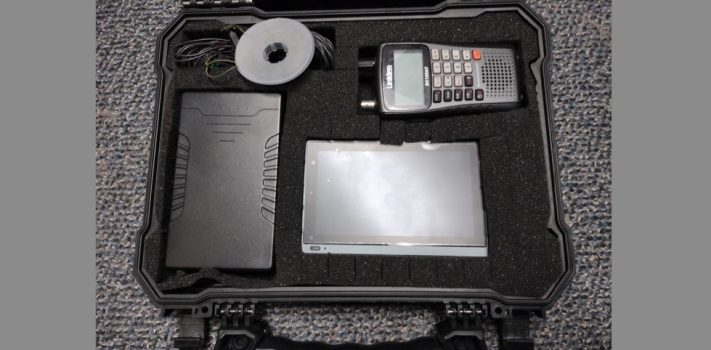
It’s probably no surprise, but my primary field intel collection device is a cell phone, and I’m currently using a Ulefone Armor 22. The phone is a rugged (IP68/IP69K) Android phone with a 64MP main camera as well as a 64MP infrared night vision camera. I carry the phone whenever I go hiking/backpacking/camping to document my trips and practice my intel collection techniques so I can refine my tools and processes. It has a 128GB microSD card installed to expand the storage and provide another mechanism for exchanging data with my desktop computer. I always recommend using a microSD card in your phone to store all collected intel information – that way if your phone gets broken you may still be able to access the data you’ve collected by removing the microSD card and plugging it into a computer. I’ve never installed a SIM card in the phone or connected to any wireless carrier (I always keep cellular services turned off) – I only connect it to my home WiFi network to install/update apps and upload collected data, or my field WiFi network to upload or exchange data when I’m off-grid. The phone is waterproof, rugged, and has a huge battery, so it’s a lot heavier and bulkier than most standard cell phones.
Data Collection Software
My primary data collection software tools are Obsidian and OsmAnd+ (‘+’ is the paid version of OsmAnd) running on the Armor 22 cell phone. Obsidian is primarily a note-taker, and OsmAnd is a mapping app with a bunch of very useful features. I’ll explain in more detail how I use them shortly, but there are a few things you should do when you first set them up to enhance your ability to easily interoperate with a central intel management system.
Before setting up Obsidian and OsmAnd+ there are some files you should download onto your phone. I’ve created two ‘seed’ files that contain pre-defined lists of the categories that I mentioned previously (e.g. ‘Security’, ‘Safety’, ‘Health’, etc.) in formats that can be used by the apps. Obsidian allows you to assign tags to notes and OsmAnd+ allows you to put objects you create into categories, which makes organizing and managing them a lot easier later on. The two files are named ‘Obsidian Seed Tags.md’ and ‘osmand-favorites-groups-all-seed.gpx’, and they can be downloaded here. Download both files into the ‘Documents’ folder on the microSD card on your Android device – we’ll use them later on.
Obsidian
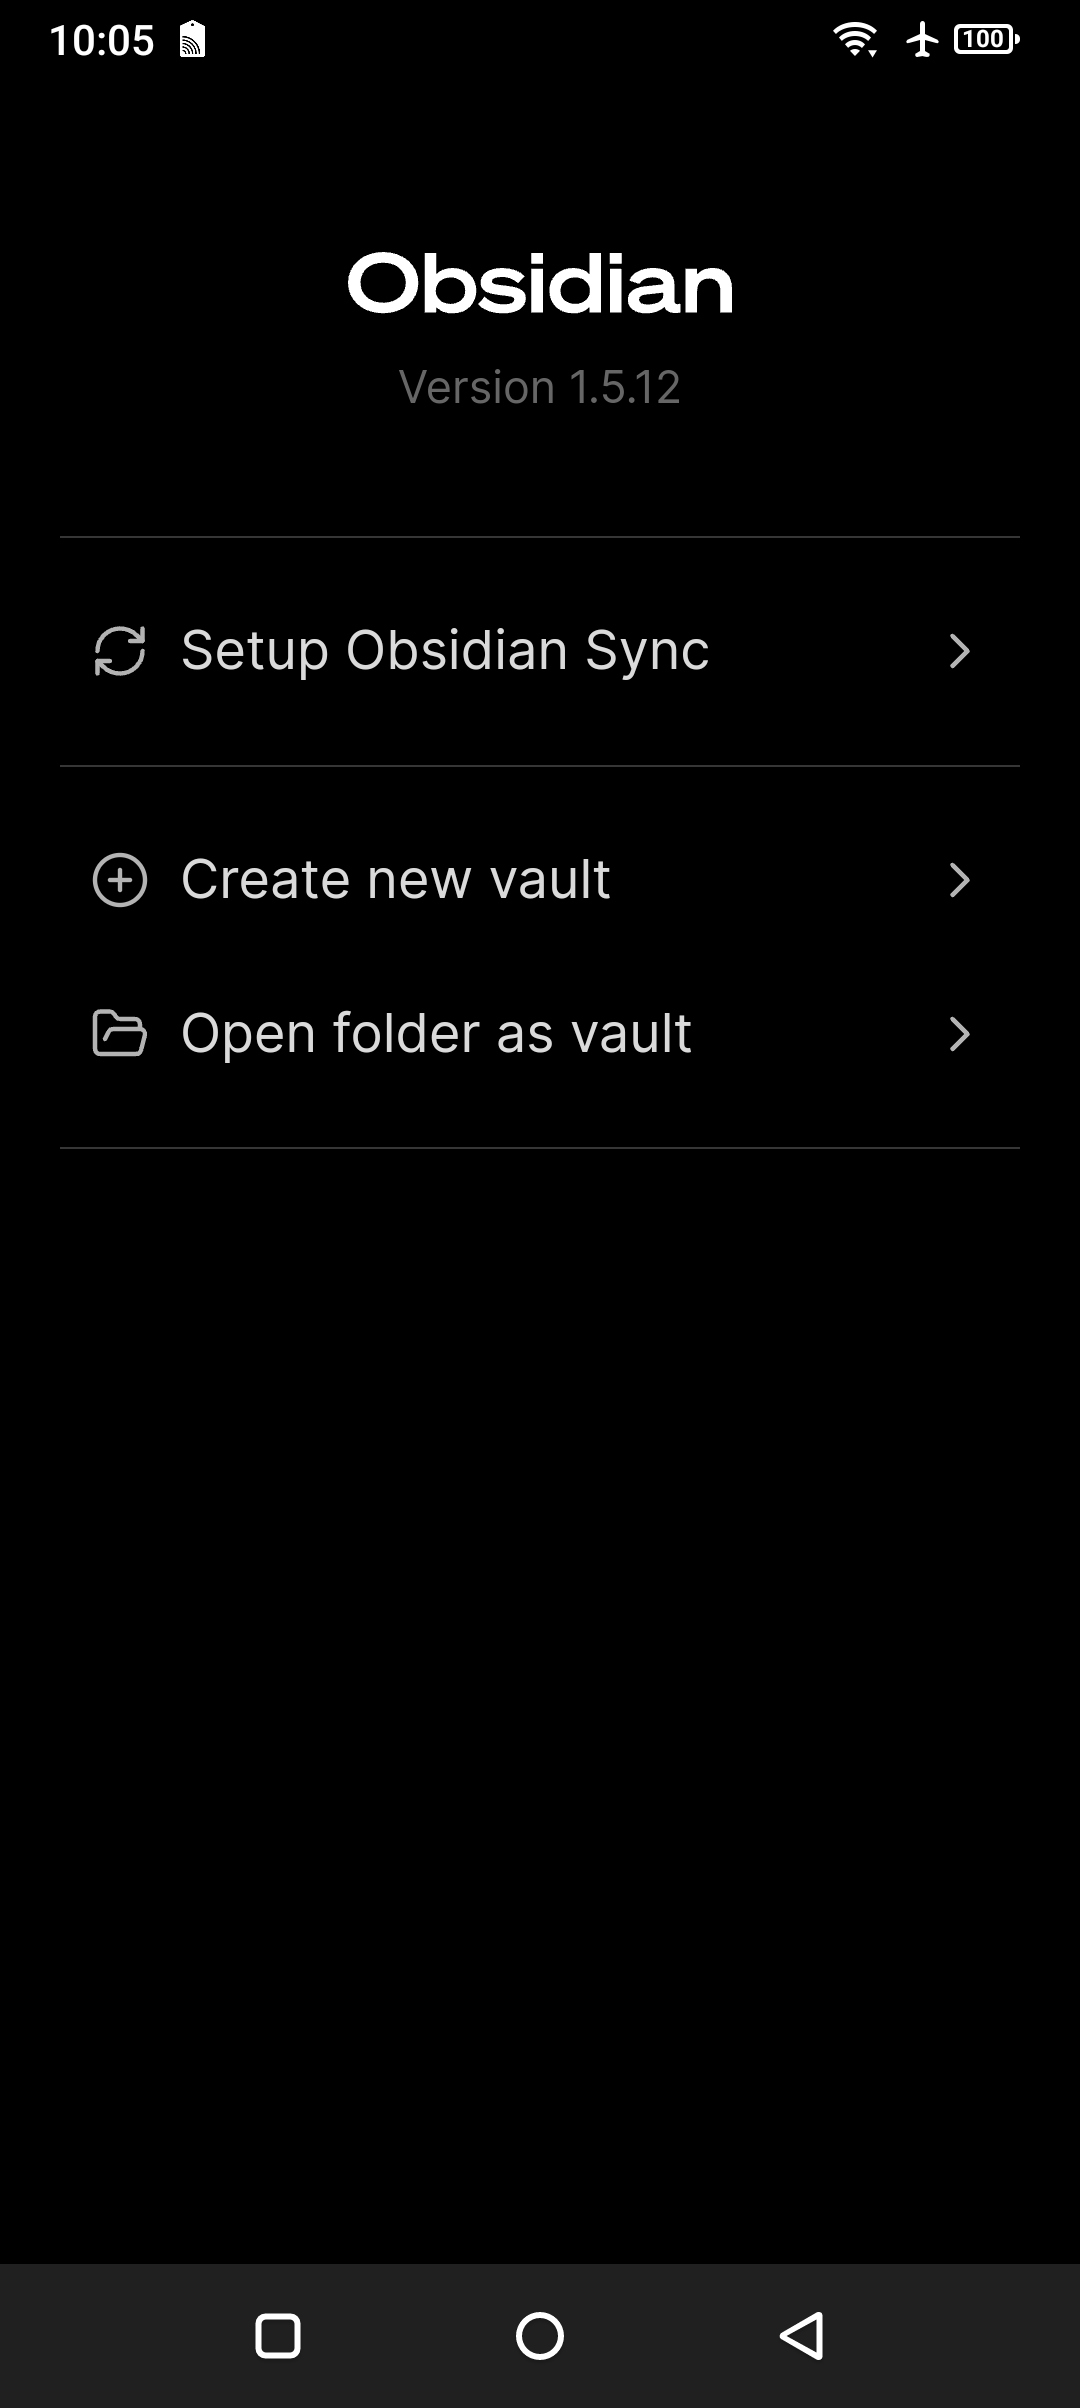
Obsidian stores notes as individual files in a sub-folder called a ‘vault’. The default location for all vaults is the same folder Obsidian is installed in, but Android tends to make it hard to externally access that folder (for your privacy obviously – only Google should be able to make money from your private data 8-)), so I recommend creating your intel collection vault folder as a sub-folder under ‘Documents’ on your microSD card. That’s considered a more public folder and other apps can access it, so it makes sharing your collected data a lot easier later on. Here’s a screenshot of the first time you start up Obsidian:
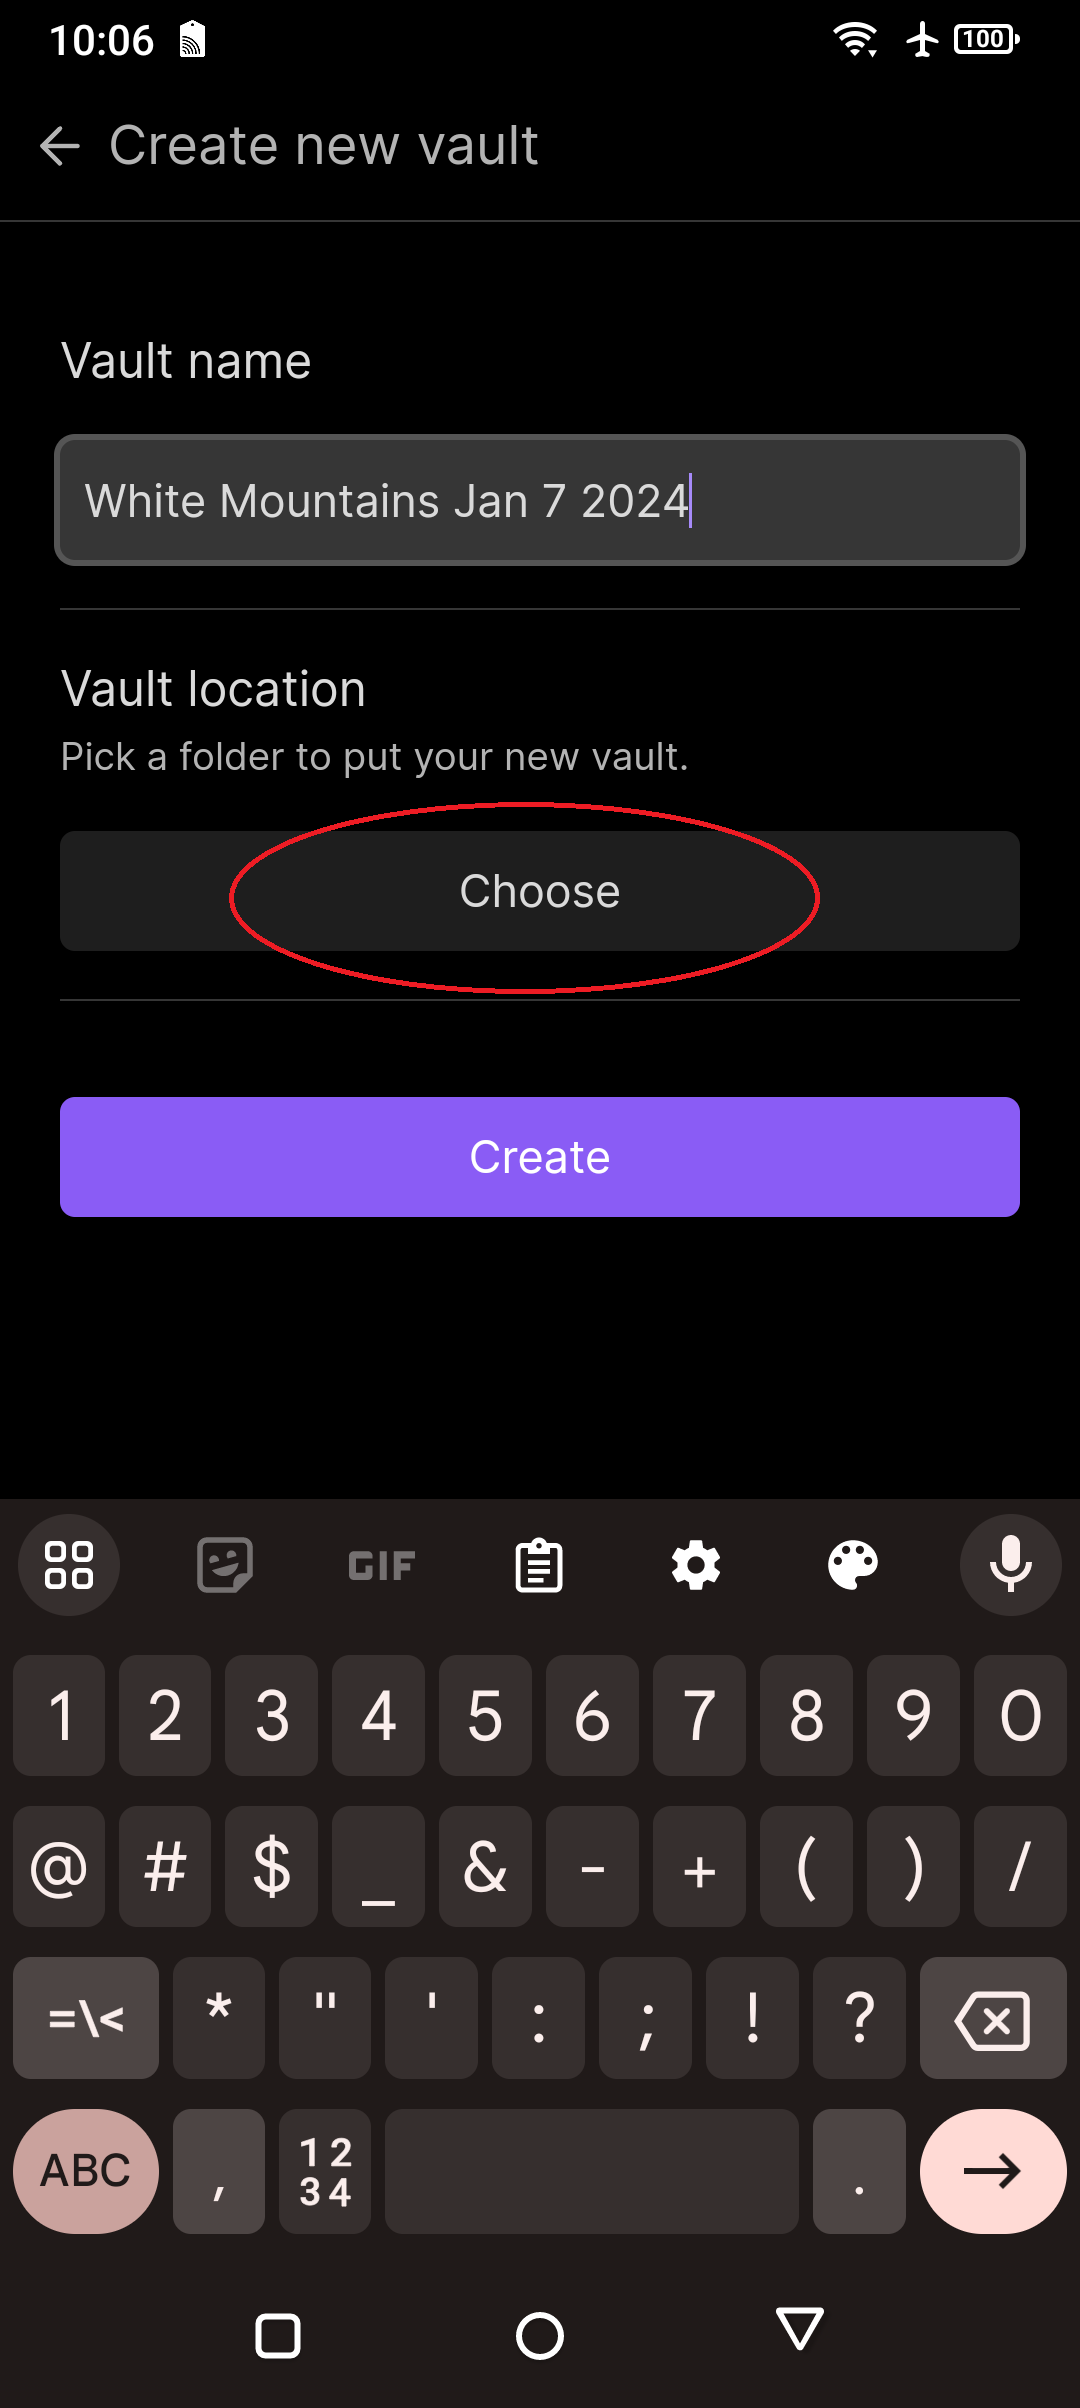
Select ‘Create new vault’ and you’ll get a screen asking you for the vault name and location. Type in a descriptive name for your vault (e.g. ‘Patrol to local town on Aug 6, 2025’) and click on ‘Choose’ under vault location:
A storage location navigation screen will be displayed, showing the top-level phone local storage (the phone’s name) and the SD card:
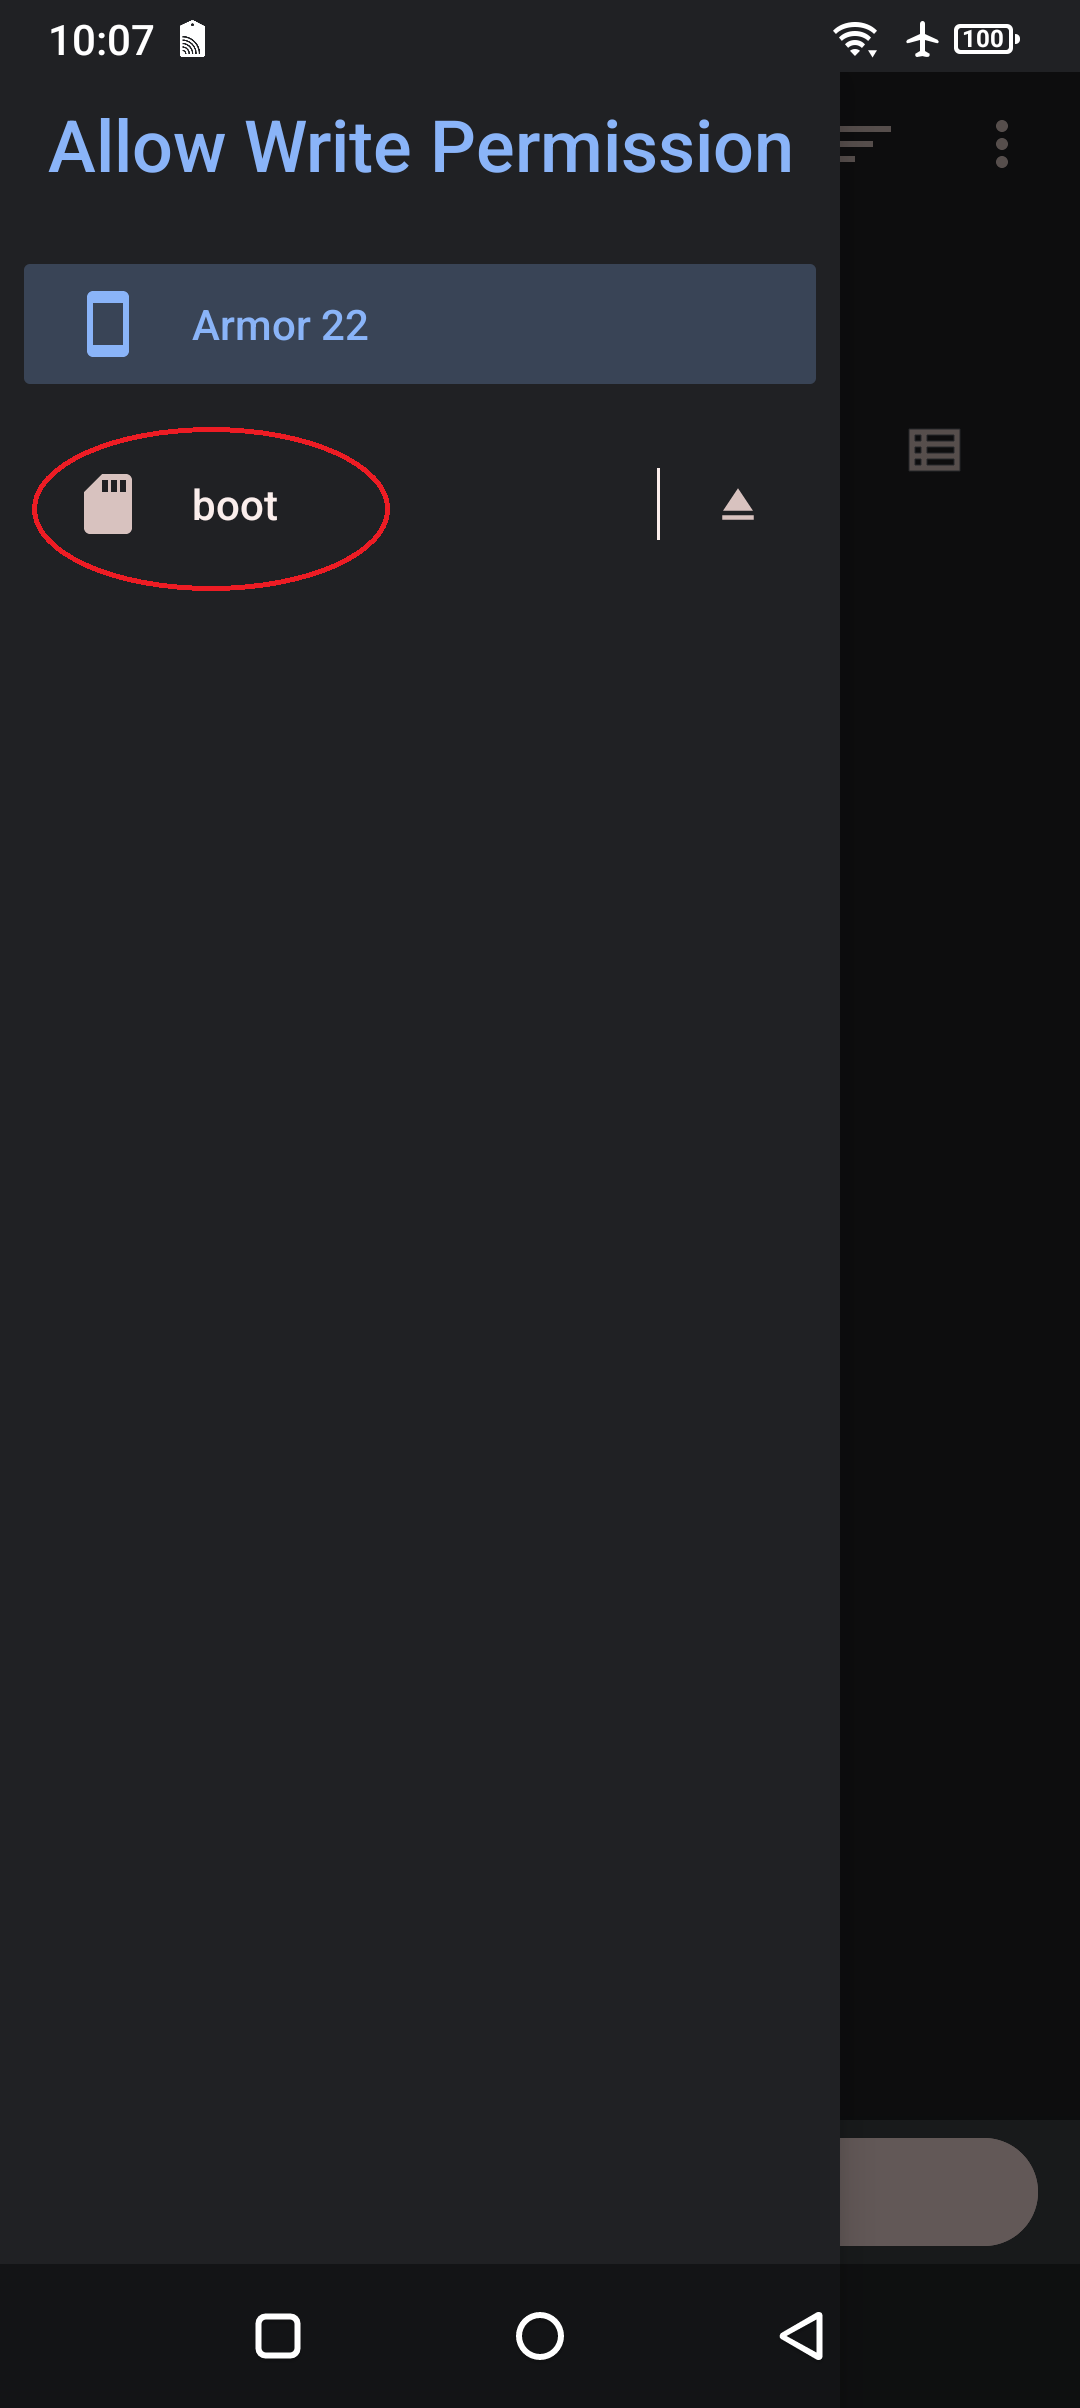
Note that on my phone the SD card shows an SD card image and the name ‘boot’ (that’s because the card was formatted and named ‘boot’ before I put it in the phone – your name will vary). Click on the SD card and it will bring up a list of folders on the SD card:
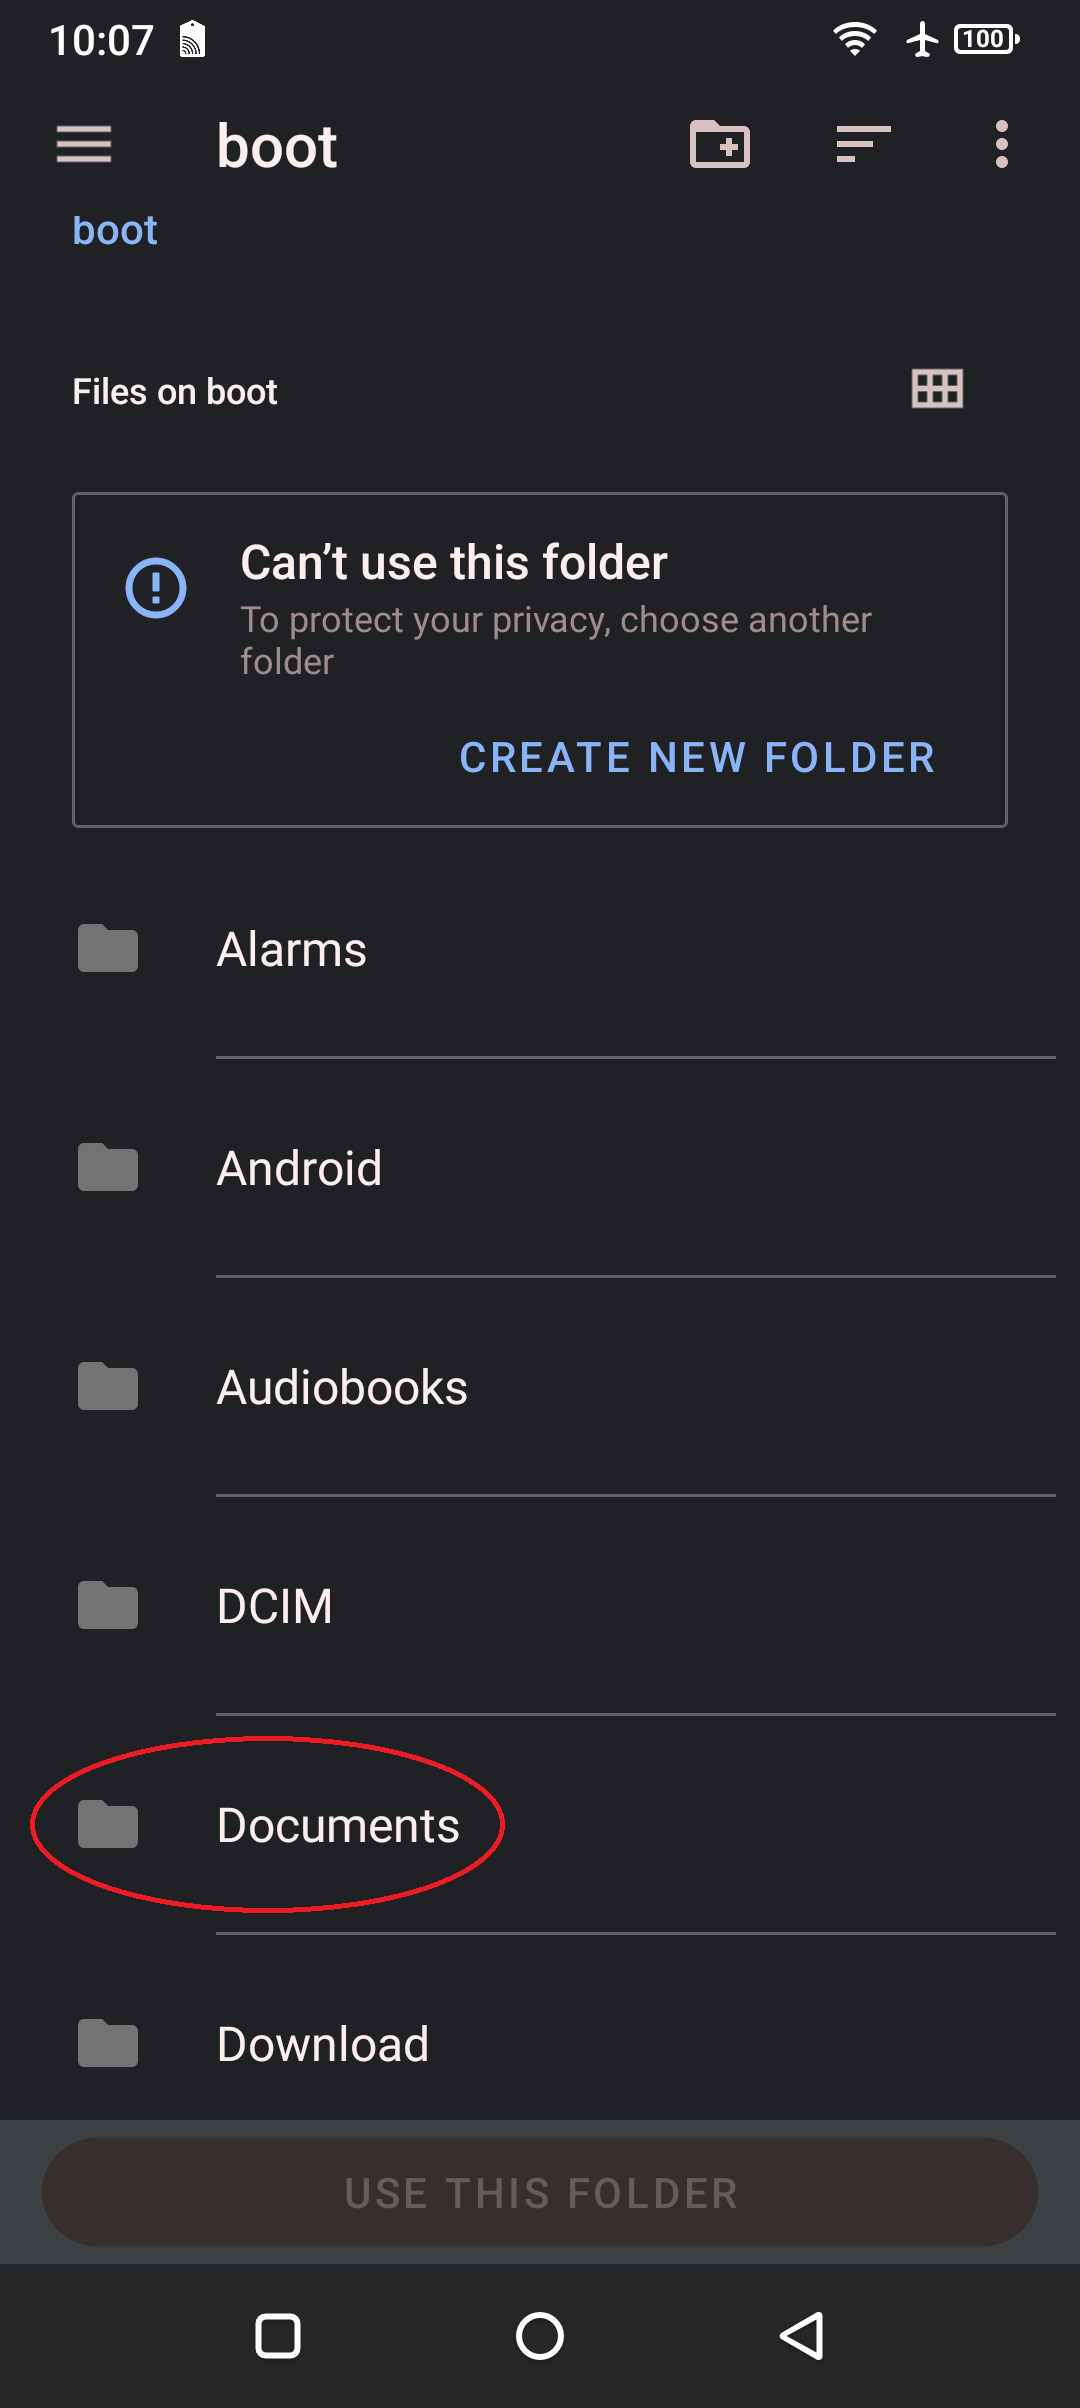
Select ‘Documents’ and click on ‘USE THIS FOLDER’ – that will take you back to the original Obsidian vault creation screen, so click on ‘Create vault’ and you’re all set to start adding notes. The next time you open Obsidian it will automatically open the last vault you were working in. Note: Every version of Android and every phone manufacturer tend to handle files and folders slightly differently, so the screens you see may vary slightly from what I’ve shown but the underlying process should be identical.
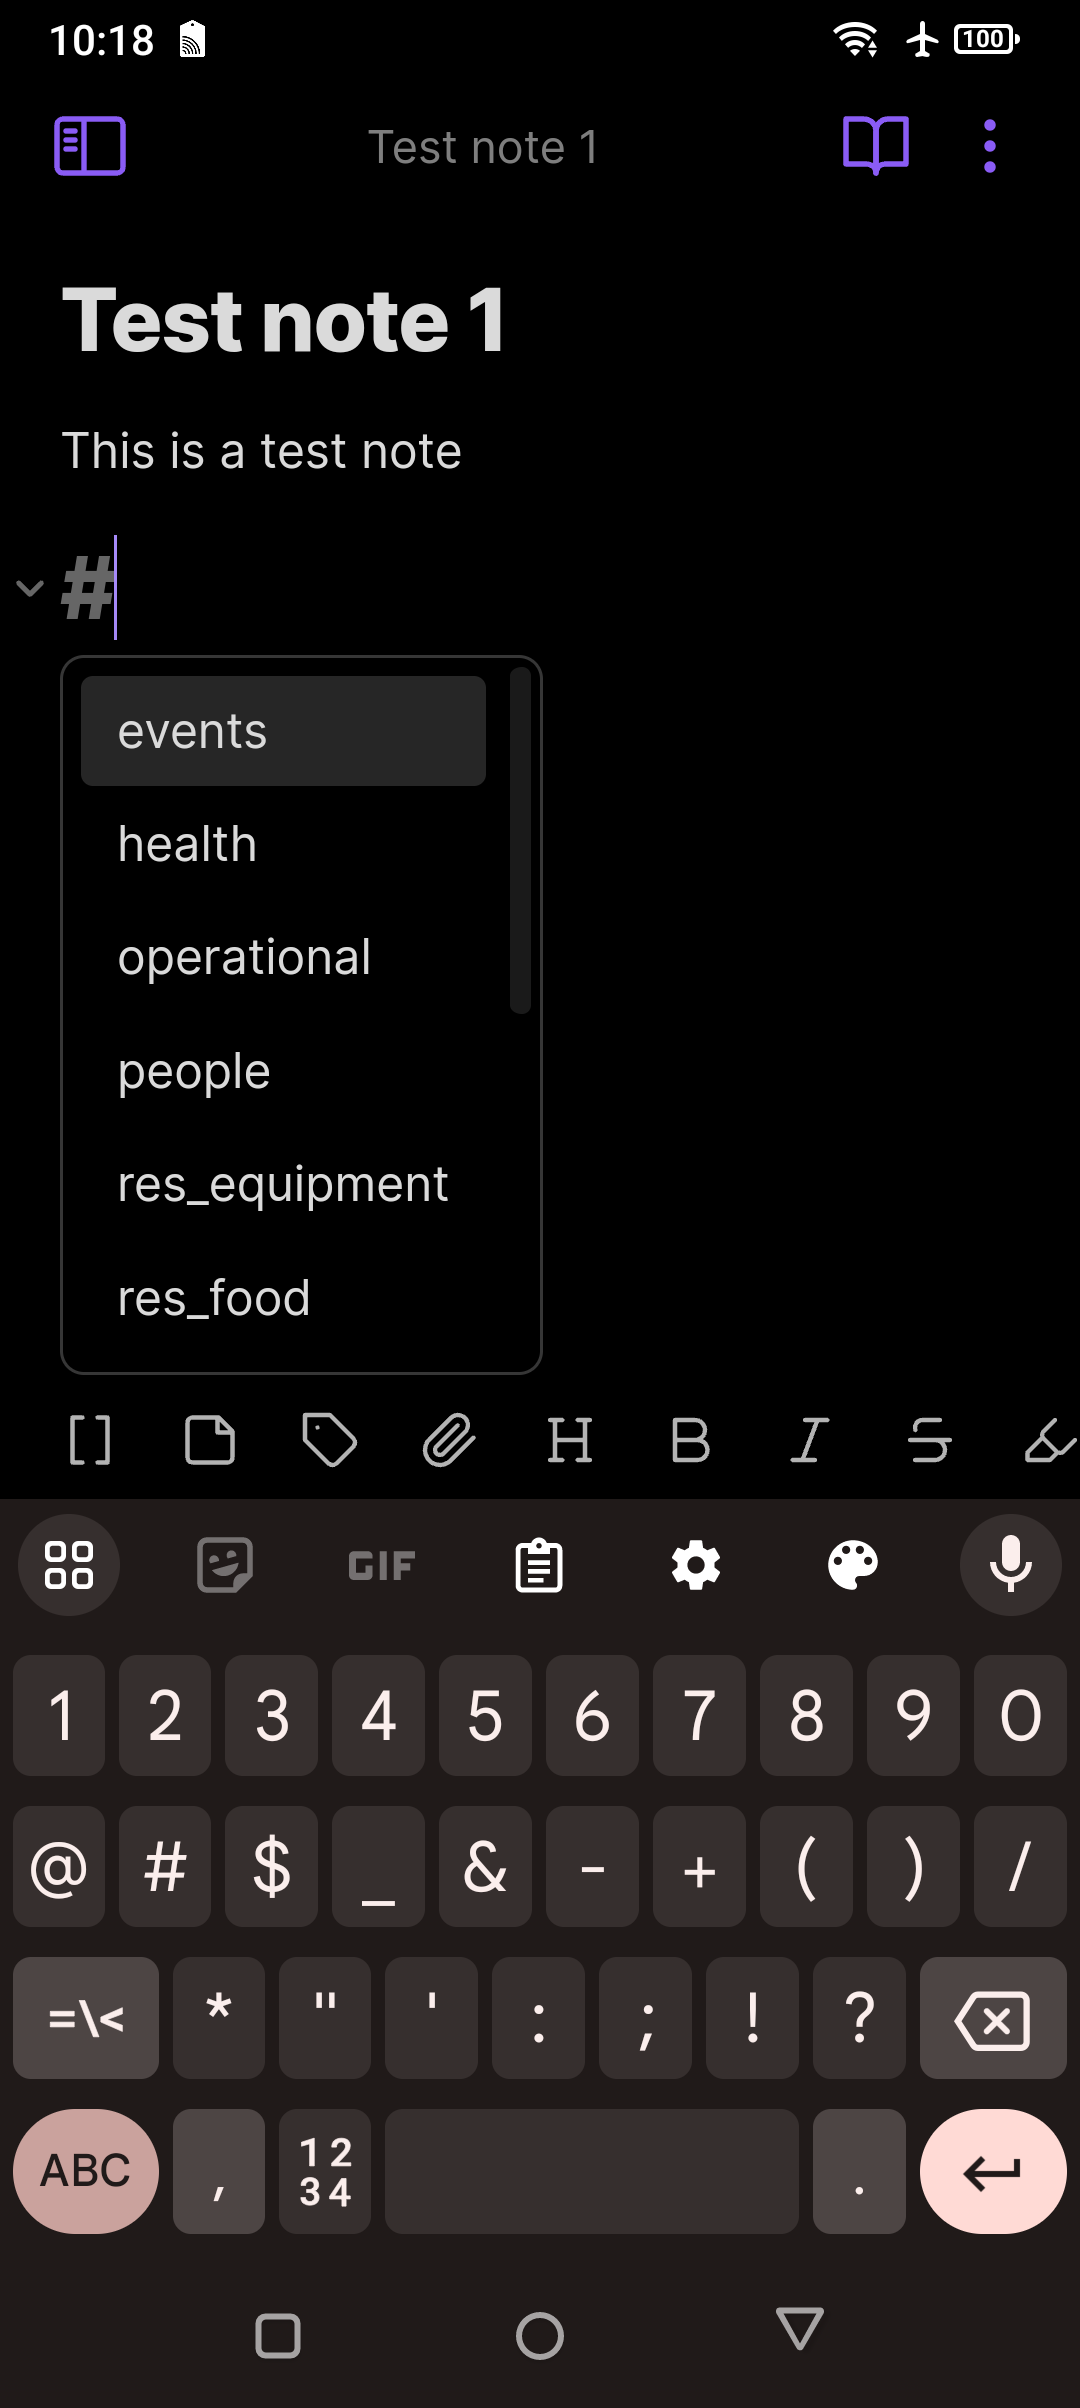
The next thing to do after you’ve created your vault is add the seed tags file you downloaded earlier. Use whatever file manager you’re comfortable with to copy the ‘Obsidian Seed Tags.md’ from the Documents folder on the SD card into the vault folder you just created (I use Solid Explorer, but the Google ‘Files’ app built into Android works just as well). The next time you run Obsidian it will automatically read in the new .md ‘seed’ file and make those tags available. Now when you’re adding a note you can just type a hash character (‘#’) and it will pop up a list of tags you can select from:
(To be continued tomorrow, in Part 3.)