


Being able to make your own clothing is an old-time skill that shouldn’t have been forgotten. Our forefathers made their own hunting shirts and buckskin leggings out in the wilderness but with modern cheap clothing few of us know how to make our own clothing anymore. I taught myself how to hand-sew garments and what I found is that it is an excellent project for intermittent spare time or for multitasking. It doesn’t tie up all your attention. You can make useful progress in 5 to 10 minutes. It’s easy to pick up and put down. You’re practicing a skill before you need it. And each step gets you closer to having a duplicate of that one great shirt or pair of shorts that fits just right. In this three-part article, I will show how to clone a pair of short pants.
I started looking into sewing because I found a perfect plaid button-up shirt. I love that shirt. Enough that even my Scottish genes said “Well, it’d be worth paying full price for that shirt” then I looked it up to get another and found it retailed for over $150. So, on the one hand, great find at the thrift shop. On the other hand….I ain’t paying 150 bucks for a shirt. Even at the rate my dollars are currently devaluing I can’t get over that sticker shock. So I started looking to clone it.
Here’s garment sewing in a nutshell: Sewing is essentially carpentry with cloth. You’re taking something flat (cloth or wood), cutting it, and assembling (joints or seams) into a 3-dimensional object (garment or wood project). Beginners worry about finding the perfect plan or pattern and perfectly measuring. More experienced practitioners look at the desired object and say “oh ok, he used blind dovetails there. These are the front panels, that’s decorative, that’s structural, I’ll extend that, I’ll shorten that… Yeah. I can make one of those sized for my living room”. It doesn’t take long before you have a good sense of how things come together, what you can free hand, what just needs to match, what’s close enough, what can be simplified, and what you want to complicate to achieve a specific goal.
Sources for principles
There are Youtube videos but I’m a firm believer that books are where the best information is found and the best book I found was “Patternmaking For A Perfect Fit”. The examples in the book are female-centric but the principles are universal. Worth looking into if you want a physical reference.
While the grid is up it is well worth watching some garment construction videos on YouTube to get an idea for how cloth becomes clothing. If you have a specific type of garment you want to clone watching someone go through all the steps can be very helpful. So if you are interested in cloning a specific men’s button-down shirt I would watch this video and and then follow his order of construction with the pattern cloning method in the book.
The bullet point version of it is this:
- Identify how many pieces (panels) make up the garment
- Trace each panel (with some extra for seam allowance)
- Use those traced paper panels to cut new panels out of cloth
- Join the cloth panels with seams
This gets a lot more complicated with things like collars, cuffs, pockets, and linings. There are lots of different seams and specialized equipment (sergers) that add a new dimension to garment construction. Some panels are cut on the fold some aren’t. Don’t worry about all the complicated stuff at first. It’s just that bullet list. It’s just carpentry. Cut, assemble, and have a garment. Each repetition will train your brain and make the process faster.
What this article will do
I will demonstrate something mainly the same as the book but slightly different. There are a few different approaches but it’s basically the same process no matter who you read, watch, or listen to explain it. The shorts I made I modified from the original. The original is lined and I did not line the clone that you’ll see me make. I also did not use any elastic and this is all hand-stitched.
Though there are some hand sewing guides out there mostly they’re using woven rather than knit fabric. Part of this was me learning how to join knits with hand stitches…which is a thing almost no one does. So you get to be one of the few people who know that back-stitching French seams work just fine for hand-sewing knit materials.
What’s a knit and why does it matter?
I’m not going to spend too much time on this but the quick way to understand it is that knits are t-shirt material. The down and dirty identification trick is that if the material stretches it’s knit (polo shirts, t-shirts) if it doesn’t stretch (button-up shirts, jeans) it’s woven. Knits are knit like sweaters but the threads and yarns are much smaller. Knits have come to dominate our clothing fabric because you get some stretch and return without elastic. People get scared of working with knits, especially on machines. Sewing machinists tend to use woven material as it doesn’t stretch as much and doesn’t need a specialized needle.
Why am I using knits? Because I am doing the equivalent of scrap woodworking. We live in a wealthy nation with an abundance of clothing and very much (if not most) of it is made of knit fabrics. There are t-shirts everywhere at every secondhand shop. It’s easy to realize that you can use an extra large woven shirt to turn into other clothing (there are a lot of “XL button up shirt into dress” videos on YouTube). It’s far less well-tread ground to repurpose the tons of extra large knit fabric t-shirts into something useful. Both now and in the aftermath of an economic downturn or world-ending event these knits are a cheap and abundant source of material that we can invest time into to get a high-quality item for ourselves.
Cloth to Paper
For pattern paper, I’m using paper grocery bags. I have also used cheap endroll paper and I have seen other people use wrapping paper. The “proper” choice is pattern design paper but I mentioned the Scottish genes, yes? Paper bags are free for the asking. The larger the item you’re cloning the more paper you need. Paper bags are a good choice if you’ll be making more than one clone. The pattern you will make out of the paper bag will be more durable. You can even up it to cardstock. Paper bag is the good answer for me right now. This particular pair of shorts is for exercising. I will eventually want to have 5 pairs so I can always have a fresh pair each day without running laundry midweek. Since I plan on using this pattern multiple times I’m making a durable pattern.
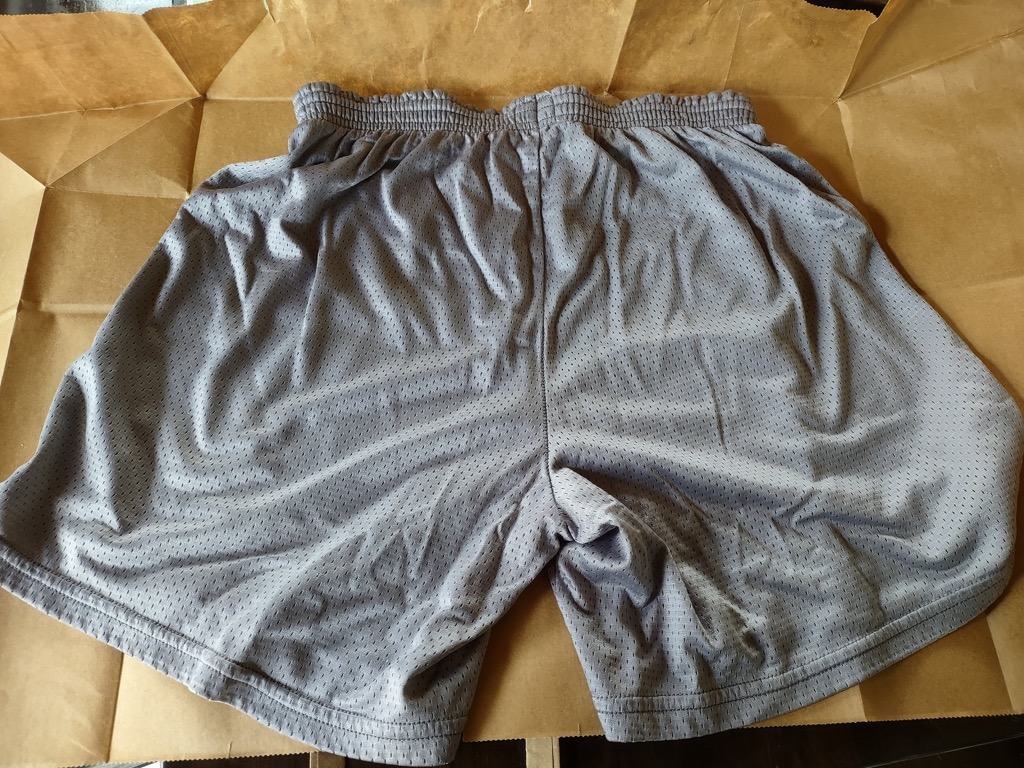
Figure 1 shows my favorite pair of exercise shorts I will be cloning on the flattened paper bag. The first step is to turn the shorts inside out. That shows you where the seams are and lets you understand how many panels there are. In this pair of shorts there 4 panels. 2 front panels and 2 back panels. For the pattern we actually only need 2 pieces: front and back because we can simply flip the pattern to get a mirrored version. If the front piece is face up it is the left front panel. If you flip it face down you will have the mirrored version (the right front panel). We’ll make sure to note that on the pattern.
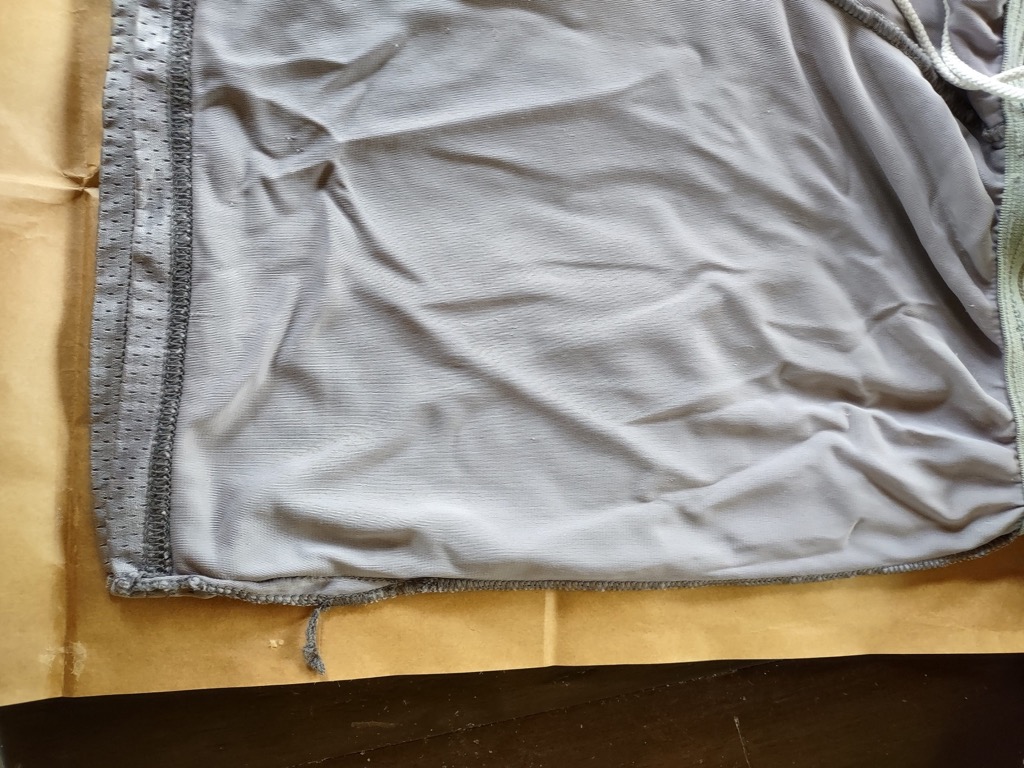
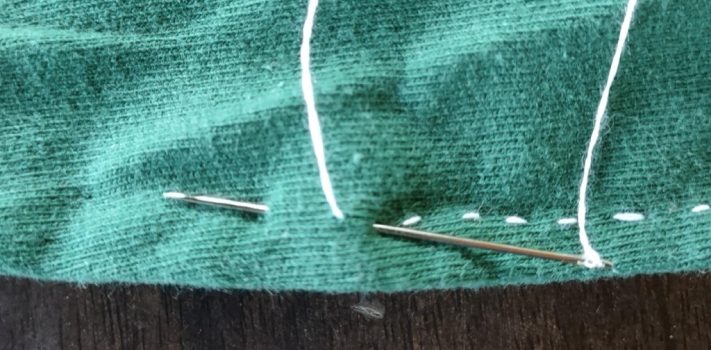
Figure 2 shows a close-up on the inside-out shorts. You want the seam to be the very edge of the fabric and then slide that seam fairly close to the edge of the paper. You also want to smooth down the panel that is touching the paper bag. That bottom layer of cloth is the one you will be copying and you want it as flat and smooth as possible.

Figure 3 Shows the method I used to trace the panel. I used the width of my finger as the “seam allowance” which is the amount of fabric that gets tied up in seam. The French seams I’m using here take more seam allowance than normal and this method yielded a good amount. Common seam allowances range from a quarter inch to an inch but for people using metric they often are 1-3cm. The difference between using a 1cm versus 1/2 in isn’t worth thinking about. Just be consistent and remember that seam allowances larger than a half inch are often trimmed close after the stitching. Especially for hand sewing, there’s a good amount of tolerance. Don’t obsess. This rule of thumb worked just fine. I just traced the edge of the cloth panel while keeping the marker contacting the paper at the exact width of my index finger.
Remember that you are tracing the bottom panel, the one actually in contact with the paper bag. Feel free to move the other parts of the shorts around while you do that. All you care about is the single panel that you are copying. Since they are not the same size they won’t both be flat at the same time. When the smaller panel is down, you will need to have the larger panel you aren’t working with bunched on top. When you are working with the larger panel you will need to trace part of it and then roll the garment (without shifting its position) to get the rest of the panel. It’s easier to do than it is to explain. Copy the front and back panels.
To be continued tomorrow, in Part 2.