


People tend to think if you have a greenhouse you sprinkle some seeds, water them, and the plants magically grow. It’s not that easy! Having a greenhouse, especially in a cold weather state, like where we live, has its own challenges. My goal with this article is to speed up the decade-long learning curve that we endured. Our greenhouse in Maine extends our growing season about a month and a half on the front end and about a month and a half on the back end. This is just an estimation, anything can happen with the weather!
Before building your greenhouse, study the solar exposure of your property for a whole year, if possible. The sun in Maine shifts drastically from summer to winter. Even if we had an extremely warm winter, we do not get enough sun to grow anything in an open-air garden plot. We would have to deforest a good chunk of our property to get adequate daylight in winter and I don’t want to do that. I like our trees and only remove the necessary ones. Our houseplants barely survive the miserly winter light!
Once you have figured out your greenhouse placement, remove any small trees around it. Small trees grow into big trees. That little sapling may seem insignificant now but just wait ten years. You also don’t want branches or the whole tree falling through your greenhouse. Determine the size, style, and materials you would like. Do your homework and research the pros and cons of different greenhouses, including buying a kit versus doing it yourself, or hiring someone. The plastic that we used for the first time lasted more than seven years. It was an opaque, reinforced plastic from Johnny Seeds of Maine. That plastic held up under serious amounts of snow and ice. We then used plastic from Farm Tek. It was not reinforced and only lasted three years. We were unable to get the reinforced plastic due to the COVID-19 pandemic shortages and had settled for what was available at the time.
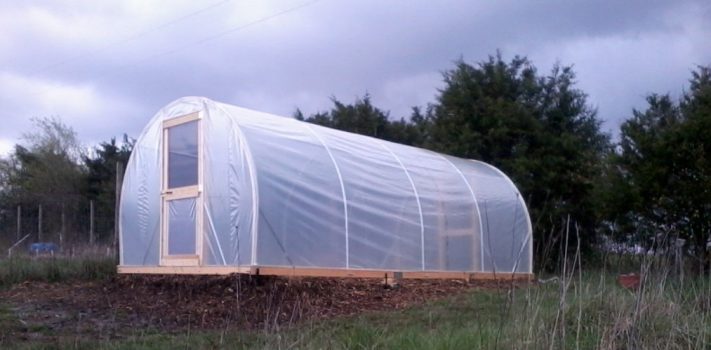
We settled on a 12×25 foot hoop house. It looks like a giant caterpillar. It was cheaper to hire our reliable, local carpenter whom we have used for years. He has pipe benders specially designed for greenhouses and can assemble them in a day. The area is cleared and the ground is made level. Some heavy beams make the base. We used hemlock beams to form the base. The ends are T1-11. The back end has two windows and the front has two windows, plus a door. Watching it go up was the easy part, now the hard work for me starts. The whole area inside is covered with weed cloth. This is just temporary as the cloth will break down after several years and the weeds will poke through. Weeds always find a way to get in!
Next, lay down more hemlock beams to form the beds. Make sure to secure the beams at the corners and then drill a hole and pound a spike into the ground to secure them even further. A lot of pressure from the dirt is against those beams. Then you get to start filling the beds. This is much more labor intensive and requires much more dirt than you realize! Make sure to get good-quality soil. Don’t even try to purchase bags of topsoil, you need a dump truck full and have them dump the soil as close to your greenhouse as possible. Wheelbarrow upon wheelbarrow load of dirt will eventually fill those beds. Over-fill the beds, since you will be surprised how much dirt settles.
Next comes the shelving and potting area. We used 2x4s and cinder blocks for shelving and use the top for re-potting. A word of caution: hornets and yellow jackets really like to nest in those cinder blocks so we filled them with spray foam. One year of flying, stinging insects was enough for me. Pots, seed cells and trays are all neatly organized on the shelves. I have a 5 gallon bucket that is filled with a bag or 2 of potting soil from the store. This I use when I need to re-pot a house plant. Hand tools are hung inside under one of the windows on hooks. An old plastic clothes hamper stores gardening stakes. Big coffee cans hold gloves, hand clippers, and razor knives and keeps them dry. Get a thermometer and you are ready to plant!
Make sure you plant taller plants towards the middle. Obviously, I am not going to plant corn inside a greenhouse. Plant like you would in a raised bed or row garden. We do not have a drip irrigation but they are available. We use a rainwater collection system uphill from the greenhouse so gravity does the work of watering for us. Just turn on the faucet and it trickles down. Temperatures inside get hot, I mean seriously hot, so ventilation is critical. With four windows and a door open we still felt more airflow was needed. A solar attic fan was installed over one of the windows and this produced more air flow. When the fan finally died after a few years, we purchased a big cheap box fan and an extension cord. Air flow problem solved and it uses very little electricity. It is not used every day.
The windows do have screens in them and during the day when I am growing stuff, the door stays propped open. This allows the pollinators free access the plants. Keep a butterfly net handy for the periodic bird which flies in but can’t seem to find its way out. In ten years I have had one rabbit inside chomping away on a kale plant. You can block the lower portion of the door with a screen or baby gate to keep out critters like this. Depending on the temperatures, I keep the windows open at night. Try to leave at least one window open to let out excessive moisture. I always shut the door because we have way too many vegetable eating critters wandering about at night.
The middle of the greenhouse is the warmest area, away from windows and doors. I set up a cold frame with an old storm window here. I can start lettuce very early and replant to a bigger bed as the temperatures warm up. I have also kept some sad-looking tomato, pepper and eggplant seedlings in the cold frame until they looked hardier and the temperatures came up. The cold frame is again used in fall and greens can be grown until the beginning of November. I restart the green within the first week or two of Match depending on the temperatures and snowfall.
It is still crucial that you monitor temperatures at the beginning and end of the growing season. It the temperature is below 50 degrees, I shut the windows. If a last-minute frost warning is posted, I shut the windows and door while there is still some daylight to raise the temperature inside warmer than usual. The ground will stay warm for quite a while into the evening. I have also had to use frost blankets inside on tomatoes, peppers, and eggplants. Those three vegetables really do well in Maine in greenhouses. I do have some tomatoes in a raised bed but most are in the greenhouse.
Humidity levels can run very high. Blight can be a big problem on tomato plants so I try to water only at the base of the plants. Remove any runner branches that don’t produce fruit. Squash and cukes do not do well in my greenhouse due to blight. I get them started in the greenhouse and move them out to a raised bed as soon as weather permits. Ground cherries grown beautifully in a greenhouse as do a lot of herbs. Ground cherries are a delicious little fruit and they grow in abundance on a small shrub-like plant. My chives and mint are poking their heads up by end of February usually. The mint has to be kept under control as it grows like crazy. Basil, cilantro and dill thrive in the extra warmth. The dill constantly reseeds itself also. The past two years I have experimented with growing ginger in a flower pot in the coldframe. Ginger is tropical and likes it hot. I dig up the ginger in late August. You can move the whole potted ginger into your house as soon as the temperatures start cooling down if you have room. Celery also does very well and I always have at least 2 kale plants inside the greenhouse. Kale is a cold hardy plant so I do grow some outdoors as well but the 2 indoor kale plants will produce well past the outside growing season.
Grasshoppers have been an issue in the past. It took many years to get rid of them. I wait for a cloudy, rainy stretch when I won’t need to water for a few days. I water the base of the plants and after a few hours liberally sprinkle diatomaceous earth all over the plants. It kills grasshoppers, cucumber beetles, squash beetles, and probably some other bugs I am not aware of, but it does not harm the plants and it is non-toxic. If I find little garden snakes on my property and relocate them. They seem to like living in the greenhouse. Keep a journal of your successes and failures and the weather for future reference.
Some seed catalogs offer seeds that are best suited for greenhouse growing. Starting seedlings requires some attention. Seedlings are flaky, too hot, too cold, too wet, or too dry and now you have dead seedlings. After many years of trial and error, I start my seedlings in my loft, where it is warm but not too hot. I give them a couple of weeks up there and use a grow light to keep them from getting too leggy, then they get moved to the greenhouse. If they are hardy enough, I plant them directly into the beds. They might look a little scraggly for the first week but then they take off. The weaker seedlings may sit in a cold frame for an additional week to strengthen up a bit.
Composting is important, as with any garden bed. I usually do direct composting of egg shells, coffee grinds and some chicken poop in late winter. The greenhouse is warm enough on a 35 degree sunny day to defrost some of the soil and I start mixing it in. I do this as soon as weather permits. The warmer temperatures inside help the composting process so I can safely plant in two months. I must be patient and wait!
So like any gardening, greenhouse growing is trial and error but it’s fun. Sitting inside the greenhouse on a cooler day in late winter will do wonders for your attitude. If you can afford a greenhouse, go for it. If you can’t please garden anyway. There is nothing in this world like homegrown tomatoes!