


(Continued from Part 1.)
Now, let’s dive in.
My Day One TEOTWAWKI Manual
Table of Contents
1. Do This First!
2. Don’t Do This!
3. Round Up the Group
4. Freezer and Refrigerator Contents
5. Meals and Menus
6. Fuel
7. Electricity: Generator
8. Lighting
9. Electricity: Using Car Batteries
10. Electricity: Whole-house Solar Panels
11. Inventory
12. Water
13. Sanitation
14. Garbage Management
15. DOM Copies for Neighbors
16. Defense
17. Nuclear war preps
Points 1-4 are ultra critical for any prepper’s manual and must have the highest priority in order to prevent wasting important and/or irreplaceable resources as well as to get the gang rounded up who will be part of our post-SHTF household.
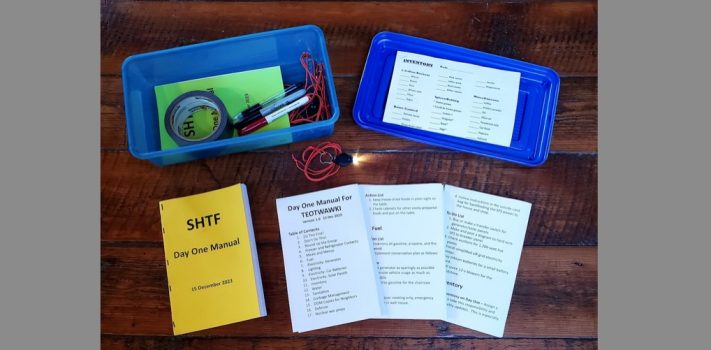
For quick access, my manual resides on top of a certain cabinet in a small tote along with 10 copies of my DOM, a roll of duct tape, necklace flashlights, inventory sheets, etc. (See photo, above.)
Like all preps, testing our manual as a household group will improve our success if we ever have to put it to use in a real situation. These types of drills will pay big dividends. DOM steps can also be tweaked based on what is learned from each drill. We’ve all seen movies where the submarine crew is carrying out a live drill, everybody at their stations carrying out their assigned and well-practiced duties. The captain throws in some curve balls like flooding in the torpedo room to be sure the crew is prepared for any possible situation. We need to do the same with each section of our manual where possible.
The Sections of My DOM
1. Do This First!
These first actions are absolutes, no discussion needed, just action. The reasons for these actions have been read and discussed by the group. To do these takes less than ten minutes. If these haven’t been practiced ahead of time, the group leader should take command of the situation and start giving rapid-fire orders to individuals: “Barney, go shut off the main water valve. Betty, don’t open the fridge and freezer, just duct tape the doors shut. Wilma, shut off the propane-tank valve. I’ll get the DOM box.”
My DOM Action List
Grab the SHTF box from its assigned spot.
Tape the refrigerator and freezer doors shut.
Turn off the main water valve in the well house, tap the water tank to see how full it is.
Turn indoor water valves to 50% for conservation until new routines are understood and put into practice.
Turn off the valve at the propane tank.
When everyone is back in the house, hand out the necklace flashlights and these manuals.
Take 10-15 minutes to review the Manual as group, or as a partial group based on Section 3 below.
Tape the refrigerator and freezer doors shut. Don’t open them for any reason at this time, especially to fetch some food. Speaking from experience, your first “Oh crap!” moment will be when you open the refrigerator and feel all that cold air streaming onto your feet. Taping the doors shut will prevent this from happening until very the moment when your food-preservation measures are being implemented. The cold temperatures must be preserved as long as possible.
Turn off the main water valve. This will prevent using water without the least thought like we do now until the water-conservation plan can be implemented. In my own situation with my own well, there’s a remote chance the generator will be out of commission and the water tank low so the valve gets shut off until all the components can be checked.
Turn inside water valves to 50% so when the main water valve is turned back on the decreased flow will act as a physical reminder that we’re on water-conservation status now.
Turn off the valve at the propane tank. As with water, we habitually turn on stoves and heaters without worrying about conservation. Turn the valve off until the DOM plan is discussed and new propane management strategies are implemented.
Hand out DOMs and necklace flashlights. Once the group is reassembled after completing the above steps, hand out the DOMs and flashlights from the SHTF box. These flashlights are discussed in more detail in the section on lighting.
Take fifteen minutes to review the first sections (in my case 1-7) of the DOM as group. Sit down and have a quick group discussion with the members of the household and review the Do This First section. Too many things will be forgotten and done out of order of priority. Don’t do anything without consulting the manual first. Daily habits are difficult to break. Again, practice drills will reduce the time needed to discuss the DOM principles.
Tasks can be assigned to groups or individuals:
1. Fred – take command
2. Group 1 – responsible for taking care of the first prioritized items in the Manual.
3. Group 2 – responsible for locating and rounding up any household members who may require it (such as kids at school, etc).
Everyone needs to be on the same page (literally!) from the very outset. Don’t think the world will be going to hell so rapidly that the group can’t take 15 minutes to review the first sections of the manual. It will simply be a quick refresher for those who did occasional practice drills. In those cases, it shouldn’t take much more time than that locker-room speech before the team storms the field. If mushroom clouds are visible, this paragraph may not apply.
2. Don’t Do This!
My DOM Action List
1. Don’t panic
2. Don’t ignore the manual and start winging it
Don’t panic. As a prepper you’ve planned for the SHTF ahead of time. Keep your head and calmly approach the challenges of Day One. The main purpose of the DOM is to keep you calm, organized, and busy concentrating on necessary tasks instead of panicking or doing less important tasks like inventorying the Q-tips. Panicking has a very negative effect on those who are maintaining cool heads trying to get the priorities taken care of. If you can’t get a panicker to calm down, send them to the bathroom to inventory the Q-tips.
Don’t skip the manual and start winging it! Daily routines are very hard to break. We’ll find ourselves disoriented at first, more than you can imagine. Skipping the manual will guarantee we’ll be doing things thoughtlessly instead of according to well-laid plans.
3. Round up Local Family Members and Group Members
Depending on a lot of variables, rounding up the gang can be difficult.
This is another important area to assign out responsibilities ahead of time such as who’s picking up the kids at school or Dad from the care center.
This section can get complicated with so many possible situations. Some of the variables:
The age of those needing rounding up
Distances involved
Transportation and communications
Transportation but no communications
No transportation or communications
Urgency: Instant (nuclear) or slow-motion SHTF (major civil unrest expanding exponentially)
Available time frame
Common sense and levelheadedness traits of those needing rounding up
Is it better to go get them or hold down the fort?
Have we previously disclosed to them we’re preppers? That would give us the huge option of planning things out ahead of time. (In my situation, none are aware.)
It’s impossible to go over all those possibilities in the limited space of this SurvivalBlog article so narrow it down in your DOM to your specific situation by what you consider the highest-probability events first. If we can read the signs of the times, it will be more and more evident as time passes how much the probability of a SHTF is increasing so getting the group together in that situation will be easier.
After several attempts, this section of my manual is still being worked on. There are no children or aged parents to fetch but as a closet prepper, the difficulty of planning for the others who will likely be joining me presents specific challenges. Hopefully, a slow-motion event will occur rather than an instant grid-down, giving me a better opportunity to explain to them the preps I’ve made and why they should head my way as soon as practical.
4. Freezer and Refrigerator Contents
This subject is so important as a Day and Week One subject it’s been split off to submit as a separate article to delve into more detail. Here are the highlights.
On Day One, for those with large amounts of food in the freezer(s), this item will be the highest priority labor-and time-wise.
One group should concentrate on preserving freezer contents as their top priority. Before removing the tape and opening the freezer, get all the necessary equipment in place: pressure canners out of storage, tools assembled, jars and lids ready, recipes and instructions front and center. Smokers, dryers, etc. are all ready to go.
Because the freezer contents are such an important resource any serious prepper with large or multiple freezers must have a pressure canner or three as part of their preps. It’s different than a water-bath canner so we need to be familiar with how to use it, not trying to learn while canning freezer contents. They can be a little scary so get over that ahead of time. Being very perishable, frozen items have a short life span once the grid goes down so a processing plan must be as detailed as possible. Things like meats cannot be canned without a pressure canner.
My DOM Action List
1. Check freezer alarms to be sure they are functioning properly.
2. From memory, make the best inventory possible so items can be prioritized.
3. If necessary use the generator to buy time but conserve fuel by processing freezer items ASAP.
4. Use food preservation methods as follows: (again this is my particular manual for my freezer contents)
Beef, pork, chicken: Pressure can.
Tilapia: smoke or use for first meals.
Italian sausage, brats, etc: Eat some in Week One meals then dice and pressure can the rest for future stew and chili batches.
Frozen/refrigerated butter and cheese: put in the coolest location possible such as root cellar or well house.
Fruits and veggies: If it’s canning season with lots of fruits and veggies in the freezer waiting to be canned in large batches, (tomatoes, cukes, beans) water-bath process ASAP using all three canners.
Bananas: 20 lbs., high calories so drink that last chocolate mint mocha banana smoothie and put the rest in the solar dryer on wax paper. Do these first while still frozen since bananas have a very low freezing point and will thaw and begin to spoil even below 30°F. All meats will still be thawing out.
Sliced cucumbers: drink last smoothies. If no time to make pickles, since there’s not much food value calorie-wise dump into the 1-gallon vinegar-making jars and add sugar.
Frozen pizza and ice cream: party time!
Check freezer temperature alarms to be sure they’re functioning properly. Wireless temperature alarms are a great invention to let you know if the well house is too cold or the freezer is too warm. During the first few days freezer temps can be monitored as we are preparing to start canning and during the several-day canning process. Knowing the temperatures will help us determine how much time we have left before the meat starts getting questionable. For those with generators, temperature alarms will let us know when it’s time to fire up the generator just long enough to bring the freezer temperature back down.
Use the generator to buy time but conserve fuel by processing freezer items ASAP. Freezers don’t run constantly so the generator can’t be left on full time. This topic is covered more fully in Section 7.
Use food-preservation methods that are pre-planned for each freezer food type. List them by priority of food value. Time is critical for those without a generator so some things may end up going to waste. Better to lose those frozen smoothie bananas than the beef roasts.
My DOM To-Do List
1. With so much canning at once, come up with additional propane burners and pressure canners. Check auctions.
2. If auction full-size stove available for $25, buy and experiment with disassembling it to convert just the top portion into a bench-top stove.
3. Check auctions for propane-powered camp stoves and turkey-fryer burners.
4. Test butter and cheese during summer in the root cellar
5. Put temp recorder in root cellar to get an understanding of cold/warm extremes over a year’s time. (This test is in process.)
(To be continued tomorrow, in Part 3.)