


(Continued from Part 1. This concludes the article.)
Pex pipe can be installed without regard to any water that is still dripping from the system since it uses mechanical connection methods. Coat the threads of two male adapters of the appropriate size with pipe dope and tightly thread one into each of the female fittings exposed in the previous step. I don’t know if electrolytic effects are of concern between galvanized steel and brass (for PEX substitution) or copper, but I trust pipe dope to be a better deterrent to any possible corrosion effects than Teflon tape. I refuse to use CPVC due to the number of threaded fittings I have unintentionally cracked by over-tightening, although plastic adapters are an option if you choose, or are limited to using it.
After installing the male adapters, you “sandwich” the new piece of pipe between them. Sounds simple right? Unfortunately, straight runs of water lines are often locked in place by the combination of clamps and the configuration of the other branch supplies. If after removing the initial broken section you can push (gently) either open end of the repair and find that you have a couple inches of give, then continue with your repair as described. If, however there is no give, then I would recommend making your repair with PEX since its flexibility enables it to be gently bent or manipulated for easier installation. Alternatively, fittings such as 90s or 45s can be incorporated with shorter pieces of pipe to build an offset into the repair and minimize the spacing challenges. In my worst-case situations, I have had to form an open box with four 90-degree elbows. This is a less-than-ideal long-term solution, but in an emergency, it works.
A version of the previously described method can be applied to any of the other standard water line materials. The primary difference is substitution of a coupling for the male adapters since threaded fittings are less common in copper, CPVC and PEX installations.
If the water line you find in your home is a flexible grey plastic, then it is likely Polybutylene. This water line was used extensively from the late 70’s through the mid 90’s when it was removed from the market. Current repairs require use of specific polybutylene to PEX couplings. There are two coupling options that I am aware of with the first being a brass barb coupling-sized for polybutylene on one end and pex on the other. Use of this fitting entails inserting the fitting into the pipe and forming a mechanical crimp seal with a special crimp tool. The poly side of the coupling will have the larger number of barbs and will be fastened using the copper-colored crimp ring from the kit. The PEX side of these couplings has fewer barbs and utilizes the black compression ring.
Leak-Prevention Note: The copper-colored crimp ring should be used only on the polybutylene side and the black ring should only be used on the PEX side. These rings are manufactured for the specific pipe because the pipes are slightly different in size. The polybutylene pipe is a thinner pipe material than the PEX. Also, if you buy crimp rings marked “For PEX” then you will only find black rings.
Alternatively, SharkBite has a push to connect coupling for polybutylene to PEX conversions. My closest big box home improvement store seldom stocks the push-to-fit, but they are easy to order online. I have found the mechanical crimp style adapter couplings available at multiple small-town hardware stores as well as the big box stores.
Love them or hate them for daily use, RWC’s SharkBite push-to-fit fittings are awesome emergency repair supplies. Available in quarter, half, three-quarter, and one-inch sizes and uniformly compatible with copper, CPVC and PEX these fittings will allow most DIY’ers to make water line repairs with minimal tools or plumbing experience. These fittings lock in place by gripping the exterior surface of the inserted pipe with a perimeter of stainless-steel teeth as an internal O-ring is compressed between the inner fitting and exterior pipe surface to form a water-tight seal. As an additional benefit, the brass versions of these fittings are removable and re-usable. They do not require glue, solder, compression rings, or dry pipe to install. Simply insert the pipe to a specific depth roughly between ¾ and 1-1/4 inches depending on the pipe size. There are even slip coupling options available that allow the repair of short bursts using a single fitting. In short, these fittings are awesome.
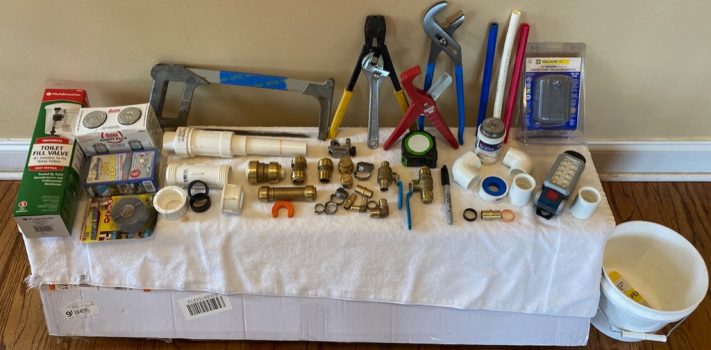
My Emergency Repair Kit
My current burst pipe emergency repair kit consists of the following:
4 each SharkBite couplings, caps, 90-degree elbows in half and three-quarter inch
2 each of the SharkBite tees and slip couplings in half and three-quarter inch
1 each SharkBite ball valve for both half and three-quarter inch water line
20 feet of PEX water line in both half and three-quarter inch
1 small can each of PVC all materials glue and primer, stored indoors so it will not freeze
A small selection of 1” PVC fittings and pipe
1 each of the 1” PVC HomeWerks compression coupling and expansion couplings
3 each of the SharkBite 1” PVC to 1” PEX couplings
Teflon tape and pipe dope
A 30/50 psi mechanical pressure switch
A ¼” x 4” brass nipple for the pressure switch
1 roll of water-activated fiberglass repair wrap
1 roll of self-fusing silicone-based wrap
A Fluidmaster toilet tank repair kit with valve and flapper
8- and 10-inch adjustable wrenches
2 pair of Channellock pliers, 430’s and 440’s are my preference
A Rigid #104 close quarters pipe cutter, this model has a range that allows it to handle ¼”-3/4”
A pair of non-ratchet plastic tubing cutters
A Lenox high-tension hack saw with a higher tpi blade
Tape measure
Sharpie marker
Flashlight
Small bucket
Three gallons of RV/non-toxic antifreeze.
Although a prolonged power or heat outage could still cause solenoids and pumps in appliances such as dishwashers and washing machines to freeze and crack, pouring antifreeze into them as well as down the drains of sinks, showers, tubs and into both the bowl and tank of a toilet couldn’t hurt. Additionally, if you find yourself in the first stages of an outage that is predicted to last a day or longer in freezing weather, you can bleed off water in your pipes by opening all of the fixtures at once and then leaving both an upper and lower fixture open for the duration. Since water expands as it freezes, creating some air gaps in your piping will provide some flex volume.
This may seem like a whole lot, but compared to the material-specific tool sets and supplies I once had to keep on hand for dealing with the different pipe types, this new emergency kit is tiny. So building from here, what alterations would you need to make to this kit to fit your needs?
As I wrap up here are a few lessons learned I would like to share. Sometimes it is impossible to shut the water supply off to undertake a repair. In this situation bleed off all of the incoming flow that you can by opening up-stream valves such as sinks, tubs, showers, outside spigots, and even water heater drains. After minimizing the flow as far as possible make your cut on the upstream side of the break. Slip an open push to fit ball valve into position then slowly close the valve. This can also be done with brass compression valves; it just requires a little more time to tighten the compression nut. Trust me this is no fun but it will work. You can then use the ball valve as a coupling and complete the repair. Be extra careful when using plastic-threaded female adapters. It is so very easy to overtighten the male portion of the joint into these and crack the fitting bell.
One key consideration when cutting copper water line is to not overtighten the pipe cutter and deform the pipe. One of the benefits of using a close-quarters pipe cutter as opposed to a larger model is the limited grip and torque that can be applied to the adjustment knob. If the copper line does become deformed move to a clear section and cut there. Neither copper fittings nor push fittings will seal a bent pipe. If using a hack saw to cut copper be careful not to create a burr on your final cutting stroke because this would damage a push-to-fit O-ring. If you do create a burr, it can be filed or sanded away.
When it comes to cutting either PVC or CPVC my recommendation is to use a fine-tooth saw. Neither of these materials ages especially well thus they become brittle with time. Hot water lines of CPVC are especially prone to getting brittle. Some of you may have noticed that I specified a non-ratcheting plastic tubing cutter earlier. I have either caused or witnessed shattering of aged plastic lines dozens of times, no matter how gently used or sharp the blade was when ratchet cutters were engaged. My standard practice now is to use a saw for the cuts and then ream the pipe. No exceptions! Lastly, if you are helping with a repair away from home take a towel and change of clothes. Work and travel while wet and cold is not enjoyable..
Being without water is always inconvenient and sometimes unavoidable. I hope my musings have been of some value or at a minimum that envisioning my missteps has brought a chuckle. My winter emergency inventory is complete: crawlspace block vents are shut, heat lamps on thermostats are in place within the well house and tankless water heater and the heat tapes are wrapped around the chicken waterers.
April is several months away so now we wait to see if my preparations were effective or if I will need to tackle another winter waterline emergency.