


“We are out of water!” were the words my dear bride spoke as she recently awakened me at 3 a.m. Hmmm said I, as I reached for my clothes to dress and began troubleshooting the issue.
Step 1, Open the faucet and listen for gurgling or sucking sounds. No noises to indicate a vacuum so likely the pump hasn’t lost prime nor has the main supply line broken.
Step 2, Check the panel and make sure the breaker hasn’t tripped. The weather has been clear ie. it’s unlikely lightening is my culprit and sure enough the breaker is fine.
Step 3, Grab my flashlight and multimeter and head out to the well head. After removing the “decorative rock” and insulation from the well head and pressure tank, I removed the cover from the pressure switch and voila—fire ants galore!
After returning to the panel to open the breaker I spent a few minutes with an old toothbrush wiping dozens of dead ants out from between the pressure switch contacts, using caned air to clean away what I couldn’t reach with the brush. Next step – performing a continuity check on the load side of the switch to make sure there wasn’t a short before repowering the circuit. Finally asking my wife to close the breaker, I held my flashlight beam on the spring-loaded contacts and saw the switch close followed by hearing the water begin to flow. I left the well uncovered so I could spread Amdro granules the next morning and went back to bed.
On a Friday evening a few weeks later, my 80-year-old neighbor was waiting for me as I came in from work. Like an echo of my wife, he said “I don’t know what to do, our water stopped at lunchtime and nobody is answering the phone”. We live in a rural area and he was referring to the fact that the single plumber in the town west of us had not been available and he couldn’t find a number for the driller who installed his well years ago. I told him that I needed to get something from my coat closet and then would be over. In short, corrosion had built up on the pressure switch contacts and a few seconds with sandpaper had water flowing. After the “no you are not paying me, we’re neighbors” social song and dance routine that exists between country folks, he asked me what I need from my closet. I reached into the truck seat and handed him a spare pressure switch. “You mean you just keep one of those?” he asked. Yes, yes, I do.
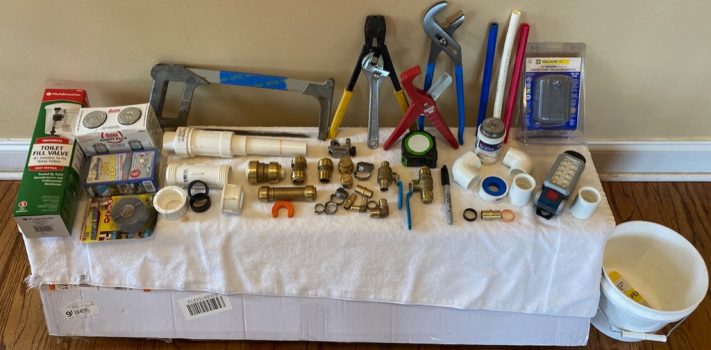
In the preparedness community, we talk at length about water storage, filtration, disinfection, necessary volumes, harvesting, sources and transport. I hope as you look at this list you have plans and supplies laid back for addressing each of these areas. My goal with what follows is to offer some repair techniques, identification of useful materials and tools, and share some hopefully useful observations or lessons learned for repair of a variety of plumbing “emergencies”.
Over Christmas last year, friends traveled out of state without making arrangements for anyone to daily check in on their recently purchased home. While they were away, three of the coldest days of the season occurred along with an inopportune series of “scheduled” power outages. A hot water line on the second floor burst and it wasn’t until a neighbor saw water running down the driveway that anyone knew there was a problem. It is likely that water ran “full pipe” for two days. It became a forced remodel that they never wanted. A similar experience befell more friends four years ago when they traveled over Thanksgiving. In this situation, a washing machine hose burst while they were away flooding the laundry room, pantry, and kitchen. Then, the most bizarre of my first-hand experiences, a former client’s finished basement flooded when on the main floor, the relay responsible for controlling his refrigerator’s ice dispenser/water dispenser hung in the “open” position, after a power outage.
I’ve used these situations to set up my first lesson learned. Either turning off your water supply when you are traveling or arranging for daily checks on your home could save you enormous headaches and thousands of dollars. We have a small farm with animals that need watering so we lean into hiring a farm-sitter on the rare occasions we are away overnight. I make it a point to show the sitter both the valve that shuts off our main line as well as which panel and breaker are responsible for our well pump. If you don’t know how or where to shut off your water supply, please put in the effort to find out especially if you are on a public utility. If you are on a well then remember that you can turn off the electricity to your pump and after your pressure tank discharges, you will have stopped the flow. This is less ideal than using a valve, but if mobility is an issue, breakers tend to be more accessible than shut-off valves in valve boxes or crawlspaces.
My other thoughts regarding mainline shut-offs are that like all valves, the longevity is improved by using the valves regularly. Closing and opening these valves a couple times a year will not only confirm their serviceability but also keep the packing and seals from seizing. The handles and valve stems on PVC gate valves (which thankfully are not common) are a weak point so be very gentle as you close them. Sometimes it is necessary to work a quarter turn clockwise then back the valve off, repeating incrementally to fully close. PVC ball valves have a weak connection between the handle and valve body also, so slowly ramp up torque if there is significant resistance from the outset.
Finally, brass gate valves that have seized are best left to a plumber or to your water department. A not uncommon occurrence is called a fallen gate, wherein the sliding vertical gate on the interior of the valve can break free of the stem and fall into an irreversibly closed position. This situation is frustrating on a private system but it is a whole level worse on public systems where repair can require shutting off neighborhoods or significant portions of the network. In my experience, brass ball valves are the least troublesome option for main supply lines.
Household supply in my area is mostly accomplished using 1-inch diameter schedule 40 PVC. By this I mean that the water supply line from the source (meter or wellhead) to the home is PVC. Seldom has there been enough flex in these buried water lines to make a repair using standard glue-in PVC couplings unless several feet of pipe are exposed (six feet on each side of the break isn’t uncommon). When it was not possible to excavate a larger work area, I have used both the Homewerks Worldwide (it is indeed Homewerks with an “e” instead of an “o”) PVC compression coupling or their PVC expansion coupling.
Each of these options allow for the elimination of a two-inch pipe section since these fittings are able to bridge the gap. For instance, a crack that would require me to remove 18 inches of pipe could be repaired with one of these specialty couplings and only 16 inches of new material including the coupling. It may not sound like much, but those two inches of difference allow for installation of the repair substantially easier than trying to fill in the full 18” using pipe with glue couplings on each end. In the case of the compression coupling, rubber gaskets are compressed to form a mechanical seal. The expansion coupling has an integral glue coupling on one end and is joined to the opposite pipe section using a separate glue-on PVC coupling. Installation of each of these specialty couplings benefit from maintaining straight alignment of the repair section. As I was restocking my winter freeze kit last season, I found for the first time, push-to-fit couplings sized for PVC. I have not needed these yet but I suspect their use will become my new favorite PVC emergency repair method.
Moving from the outside supply into a home’s distribution piping, galvanized steel, copper, hot and cold pvc better known as CPVC for cross-linked polyvinyl chloride, polybutylene, and PEX (cross-linked polyethylene) are the most common materials. Within our homes, 3/4 inch and 1/2 inch are standard distribution pipe sizes while flexible 3/8 inch supply lines are used for joining fixtures such as sink valves to the distribution line via shut-offs often called “stops”. The final common tubing is ¼ inch, copper or vinyl used for ice maker supply if an ice maker box was not installed during construction.
The largest caveat to these standard sizes that I am aware of are mobile homes that were built prior to the 1980s. Some manufacturers used fractional sized copper tubing and often three or more sizes within a given home. My strongest advice if you are in this situation is to go online and search for brass compression couplings or brass flare nut fittings that have the non-standard measure on one end and a common measure on the other. This way you can replace a leaking section of non-standard dimension with a piece of common tubing. Just thinking about these unusual sizes and the repair shenanigans they caused my past self gives me a headache. It also provides the opportunity to use the two is one and one is none adage. Recognize that if you have to replace a section of line you will need a fitting for each end, thus two fittings make a repair, one fitting typically does not.
Let’s start with galvanized pipe repairs since they are the most challenging. With its thick walls, freeze induced cracking is rare (at least in my experience and climate). Corrosion is a far more common cause for breakage in galvanized pipe. For repair, the best option is to locate a fitting on each end of the break from which you can unscrew the damaged section. Often it is a benefit to have a “bend” included in your repair section since 90’s and 45’s are easier to join in tight quarters than aligned couplings. Unless you are fortunate enough to have a union fitting adjacent the broken span, it will be necessary to cut the section in half to facilitate removal since the connections on the ends are not counter-threaded.
When it comes to cutting galvanized pipe, common tools would be a tubing cutter, hack saw, or my prefered tool: an angle grinder with a cut-off wheel. To separate the pipe from its joint, pipe wrenches are almost always needed. Twelve to 16” wrenches will typically suffice and be sure to back or support the fittings you need to save so you don’t unintentionally loosen a joint further up the line.
Please allow me to sidetrack for a minute: I lack the vise and threaders necessary to replace cut to length threaded pipe. As such, I install threaded male adapters into each of the open female fittings from the previous step. For many years, I filled in the missing pipe using Type L copper of the appropriate size. Newer products such as the push-to-fit couplings mentioned earlier have since simplified this technique and I plan to discuss these awesome options later. What I wanted to say at this time is that although copper and CPVC can be used for your repair, residual water in the surrounding pipes will play havoc on the soldering (for copper) or gluing (for CPVC) processes. As such, I strongly urge the use of PEX for inline repairs.
(To be concluded tomorrow, in Part 2.)