


(Continued from Part 1. This concludes the article.)
Now for the wings. Separate the wing at the first joint by using your knife, in the same manner as the feet removal. Due to the small amount of meat from the first joint to the tip of the wing, this part can be discarded.
Turn the bird around so you can see the neck. There is very little meat on the neck (although it is delicious and quite tender) so the neck can be cut short. You will need to remove the esophagus which can be found in the upper part of the cavity, as you go in from the neck area. The esophagus looks like a ribbed tube. Pull it out and discard it in your bucket.
You have now eviscerated your chicken. It is time to thoroughly rinse the inside and the outside of your bird. Remove any remaining feathers.
Your chicken can be cooked and enjoyed now or canned for later.
I have found that when I am processing chickens by myself, it helps to have a 35 gallon barrel cut in half horizontally and filled with ice water. Then after I get one bird plucked, it will go into the barrel until I get all the birds plucked. This seems to keep the process rolling smoothly, while keeping the birds from becoming an unsafe temperature.
The process for me looks like this: Grab a chicken and behead it and let it drain. Go grab another chicken and with one hand grab the first chicken and place it in the hot water pot and then behead the second chicken. While the second chicken is bleeding out, I take the first chicken and pluck it, the place it in the ice water barrel. Then I grab the third chicken and go through it all again.
Once you have dispatched, plucked, and eviscerated the chicken, rinse them thoroughly. There may be some of the smaller feathers that need removed. There will probably be some blood that needs to be removed also.
You can now cut up your chicken or leave it whole to cook it, which is what I do. I cook it at 350 degrees F until internal temperatures reach 160 degrees F in the breast area. Then I pressure can the meat (10 PSI for 90 minutes, for quarts).
PROCESSING RABBITS
Processing rabbits is similar, but a bit different. I will go through the steps to dispatch and eviscerate rabbits next.
Equipment needed to process rabbits:
- Sharp knives
- Large sharp snips (like the ones I use for chickens)
- Large barrel with side cuts made
- Short 2 x 4 board
- Bucket for waste
- Several towels
- Large pot of water- any temperature
DISPATCHING RABBITS
There are several ways to dispatch a rabbit. Some people prefer to cut the carotid artery located in the rabbit’s front neck area. I have never had good luck with this method, blaming it on the fluffy fur. So I use what is crudely called a hopper popper.
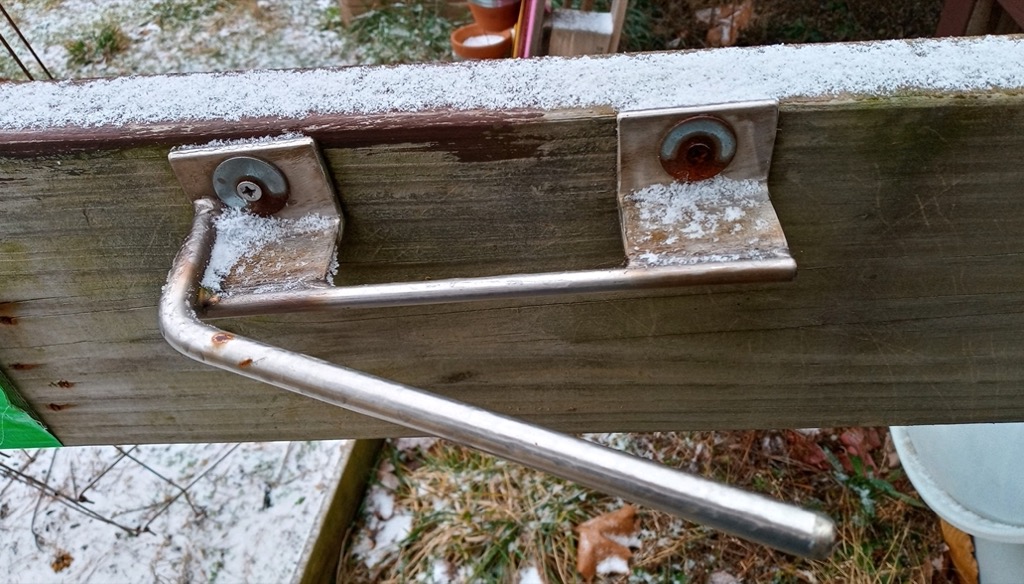 It is a metal “V”, with each side of the “V’ approximately 9 inches long. This device is used to separate the spinal cord, causing instant death. The hopper popper is attached to something that doesn’t move (think deck or tree) and the “V” prongs are parallel to the ground. The rabbit’s head is placed in the “V” and you firmly and steadily tug on the rabbit’s hind legs.
This method is best for me. I don’t have to yank the rabbit, just firmly tug and hold for about 30 seconds. Although this will kill the rabbit immediately (by separating the spinal cord) and is the most painless way to dispatch, the rabbit may still convulse (move and jerk) for a few seconds. Place the rabbit in the pot of cold water so as to dampen the fur. This will keep it from flying around and becoming a problem as you eviscerate the rabbit.
EVISCERATING A RABBIT
This is where the barrel comes into play… Here is the picture of the barrel.
 You can see that just under half of the barrel has been removed (think of removing the front section of an upright barrel) and there are also slits cut in the sides to hold the 2 x 4 in place. On the 2 x 4 is mounted the hopper holder.
Step 1
Place the barrel set-up on your work table so you will be working at a comfortable position and height.
The easiest way to eviscerate a rabbit is to hang it up by its hind feet. I have a hopper holder, another metal contraption that you place the hind legs in and it is meant to hold them there. I haven’t had good luck with this. So I have my twine and make a slip noose with noose on the other end. I place the rabbit’s foot into the slip noose and tighten it. Then I put the other end of the twine around the hopper holder- that is supposed to hold the leg. I then repeat it for the other hind leg. Make sure that when you hang up your rabbit that the underside (the belly) is facing you.
Step 2
Once your rabbit is hanging securely, it is time to remove the head. I use these snips for that job. (These are the same snips I use to behead the chickens.) When you have cut off the head, let it fall into the bottom of the barrel. This is where all of your waste will go- and it makes clean up so fast!
Step 3
Next you need to take your knife and cut the skin around each of the hind legs. Be sure to make this cut below the twine so your rabbit will still hang securely. After you make the cut around the leg, you will make another cut from the first cut on each leg down toward the body. Your cuts should now resemble a “Y”.
During this part of the process, it is best to angle the blade from the inside out toward the fur if possible. If you cut from the fur side in, it can cause a lot of hair to get on your meat.
Once you have cut down both legs toward the belly (but not into the belly area) try to get your fingers through from one side of the leg cut to the other leg. Then cut horizontally between the two rear legs.
Next, pull down firmly on the fur, as if you were removing a sweater from the rabbit. Don’t yank, just pull firmly. Pull the fur down until the front elbows pop out. With the fur dangling down, take your snips and cut at the last joint to remove the fur from the front legs. Snipping on both sides allow for you to finish pulling off the fur the rest of the way.
The tail will remain in place. Use your snips to cut off the tail. Pull off any fur remaining in the tail area.
Your next cut will be on the belly area. To avoid cutting in too deeply, simply pinch the skin where you want to start the cut (near the center line) and, using the tip of your knife, make a nick. Then carefully expand this hole using your fingers- so you can insert the tip of your knife blade into the nick. Make small, short cuts until the innards are exposed.
Once you expand this cut with your knife tip, you should see the urine sac on the inside, near the rear legs. Be careful not to break this sac. Gently lift the sac until you can see about 2-3 inches of the ureter (looks like a beige flimsy tube that goes from the urine sac to the inside of the rabbit). Cut the ureter as close to the body as possible.
To remove the colon (the intestines) without breaking it, you will need to make a few small cuts between the rear legs. This will help you spread the legs further apart. You should then be able to remove the colon and any poop left behind.
Now you can remove the rest of the innards. You can feed the liver, kidneys, and heart to your chickens. The rest of the innards are thrown away.
There is a piece of flesh that separates the belly area from the chest area. This is the diaphragm. Cut this to expose the organs in the chest area. Remove the heart and lungs. FYI- This area will be a bit bloody.
Now that you have completely eviscerated the rabbit, you can cut the back legs at the joint where the fur and the meat come together. Now place your rabbit in water and rinse it carefully, and then patting it dry.
If you choose, you can cut up your rabbit into pieces. I choose to let the rabbit sit in a covered pan in the refrigerator for 2 days and then cook it whole (350 degrees for approximately 50-60 minutes, until internal temperature reaches 160 degrees F). Then I remove the meat and pressure can it (10# pressure for 90 minutes for quarts).
Bon Appetite!
I hope that these instructions can help you when it becomes time to feed yourself and your family.