


(Continued from Part 4. This concludes the article.)
Cloud Dancing
Next, we’ll set up the Nextcloud application. Assuming your laptop and Raspberry Pi are still connected to your GL.iNet router and it has Internet access, open up a web browser on your laptop and enter the following address: ‘http://nextcloud.local’ – depending on your operating system and browser you may get a warning that says the connection isn’t private – just click to proceed anyway (or click on ‘Advanced’ and then ‘Proceed’). The first screen that will pop up is the following:
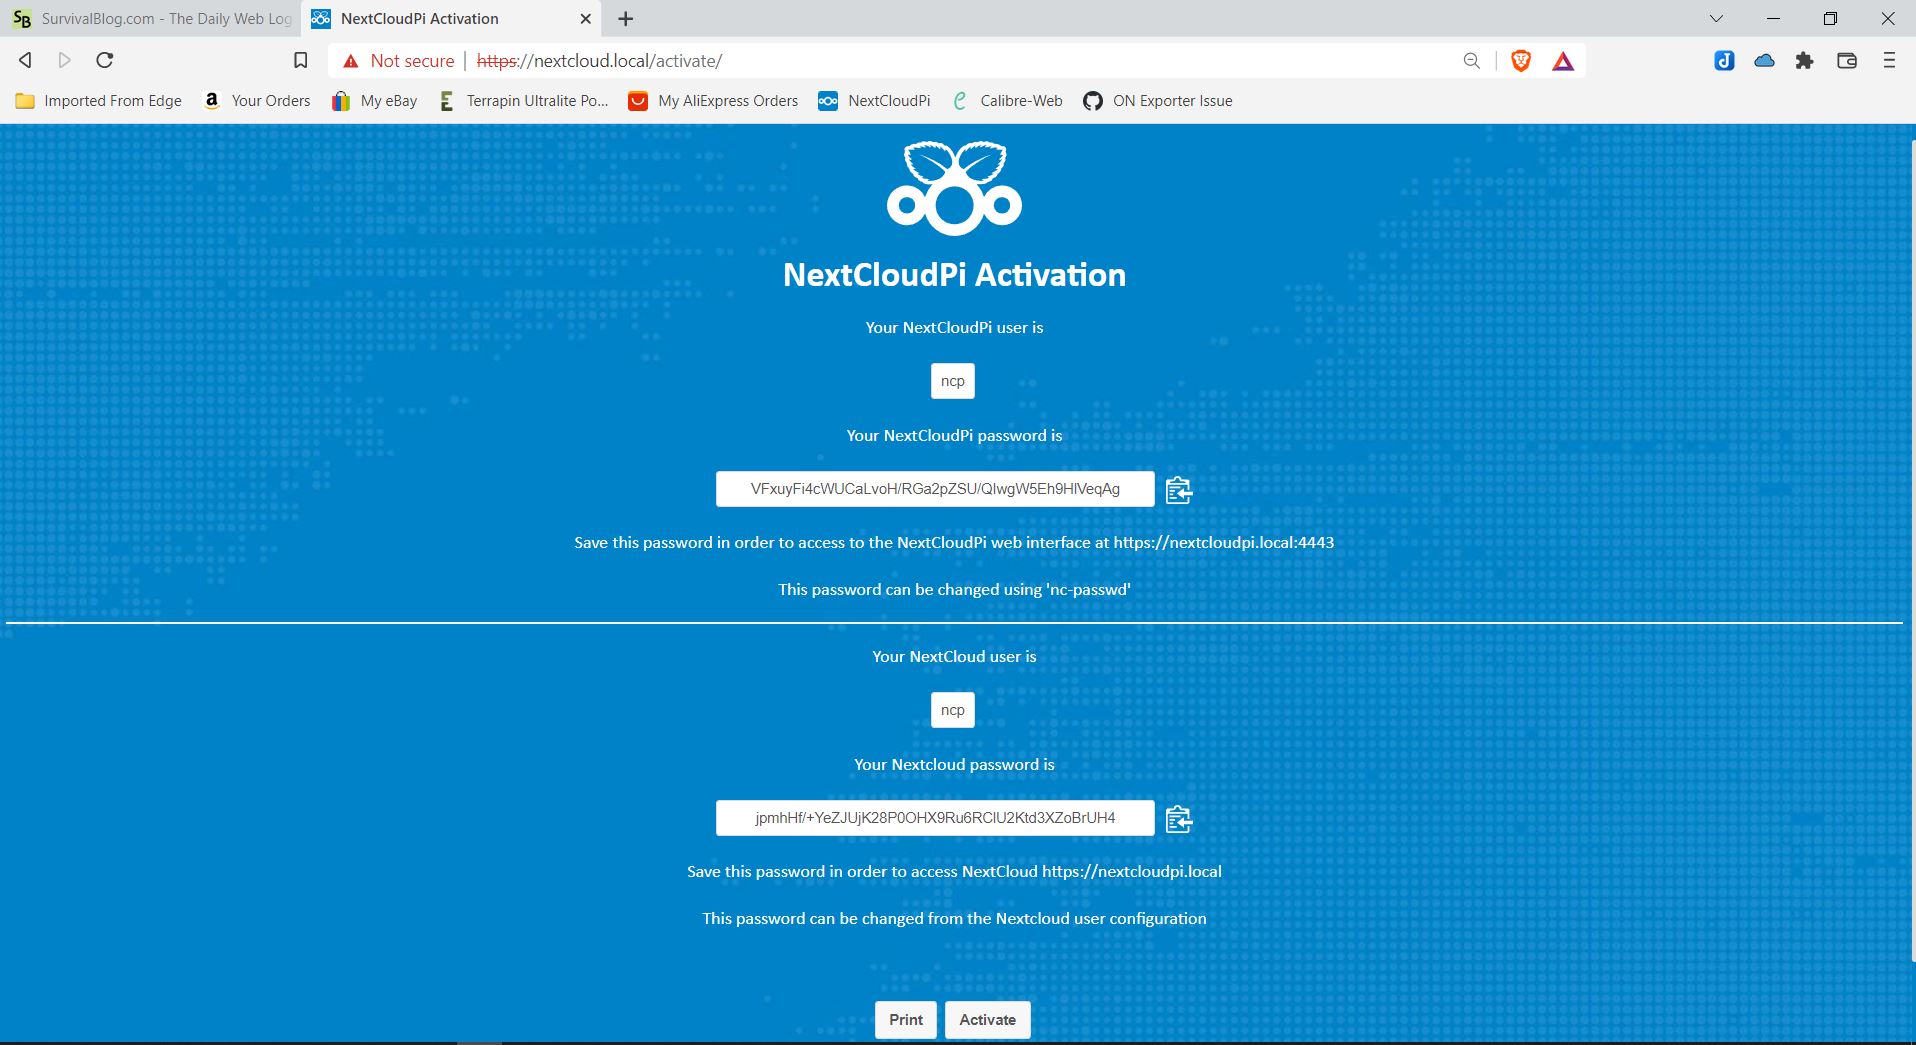
You’ll notice that there are two very very very long passwords displayed – the first one is for accessing the Nextcloud maintenance functions (http://nextcloud.local:4443) and the second one is for the default Nextcloud general user account ‘ncp’ (http://nextcloud.local). We’ll change these later on, but it’s absolutely critical that you save them somewhere like in a text file on your laptop for now. If you don’t and can’t remember them you’ll need to go back and re-image the microSD card from scratch.
Once you’ve saved the two passwords, click ‘Activate’ at the bottom. Once it’s done activating you will be automatically redirected to the Nextcloud maintenance interface and a login window will pop up that looks like this:
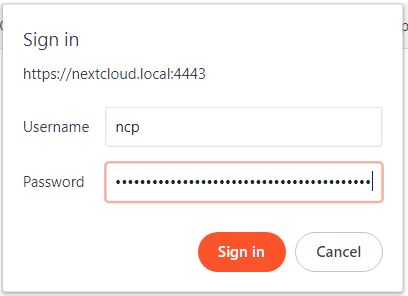
The username is ‘ncp’ and the password is that top really long Nextcloud maintenance password you saved from the previous screen. Enter those and click on ‘Sign In’. A configuration ‘First Run’ window will pop up – click on ‘skip’ since we’re not going to be doing any advanced set up at this time. You’ll next see the maintenance interface which looks like this:
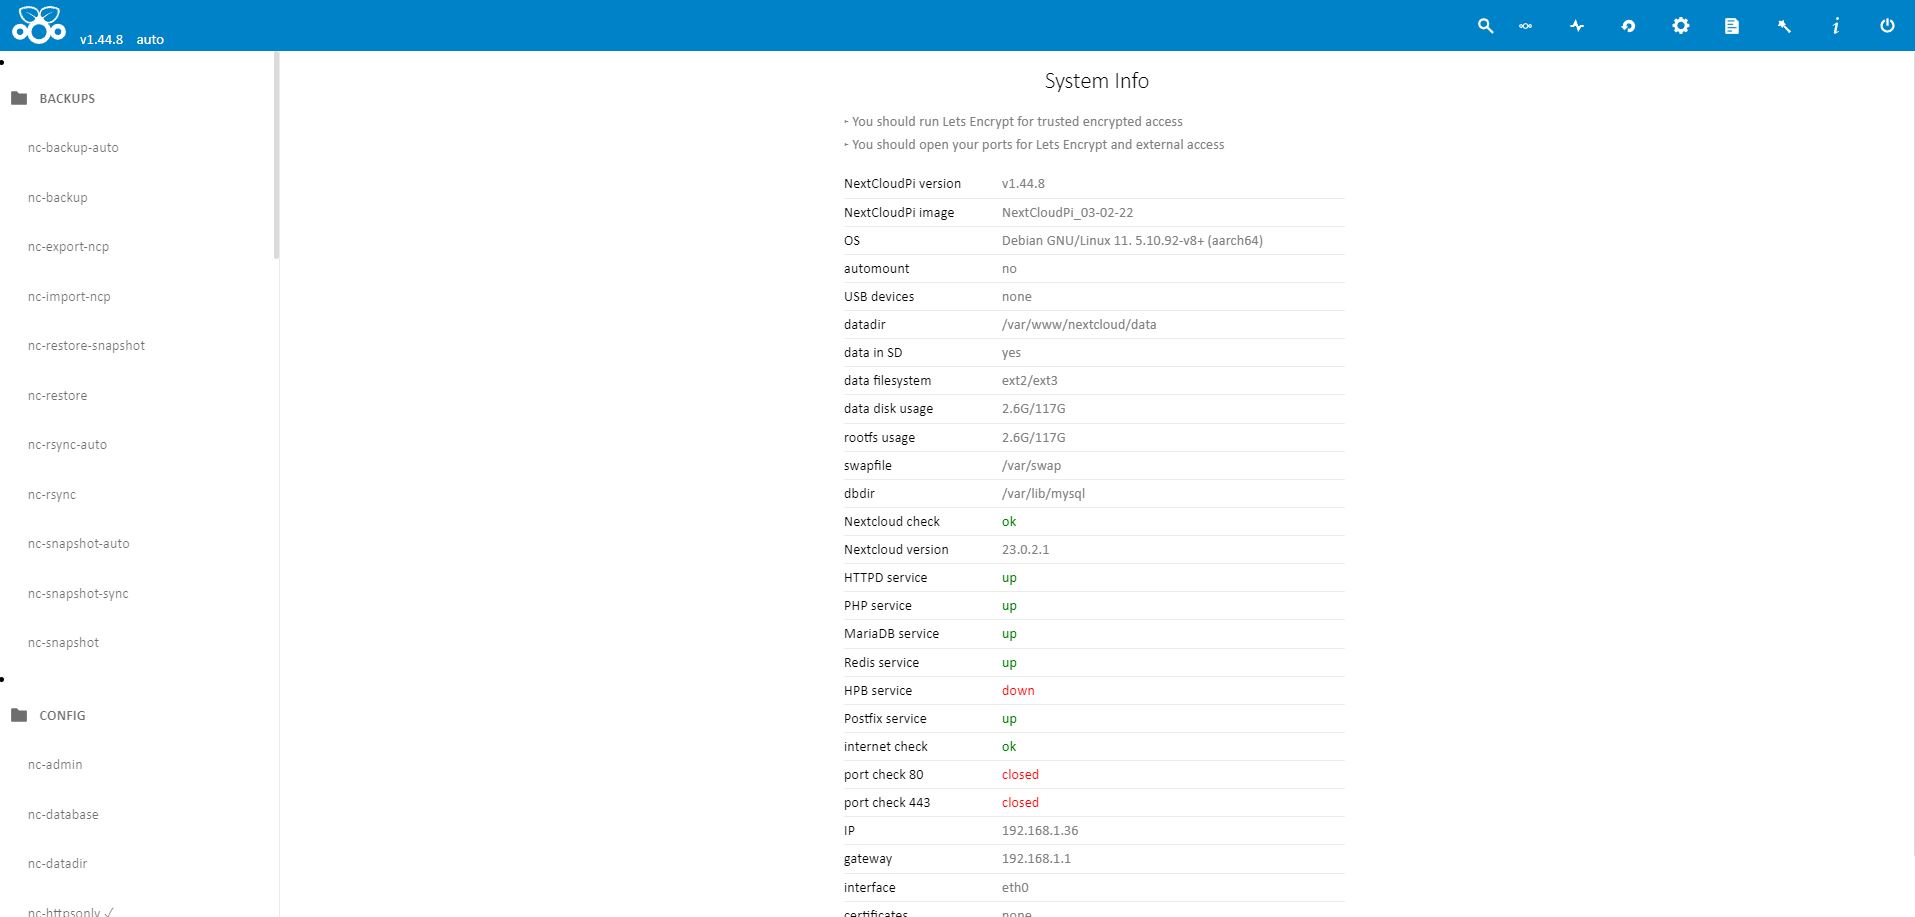
The first thing we’re going to do here is change that really long maintenance password – on the left side, scroll down until you see a function named ‘nc-passwd’ in the ‘Config’ section; click on nc-passwd and you’ll be prompted to enter a new maintenance password in the right frame. Enter and confirm a new password and click ‘Apply’. This replaces that first really long password you save from the activation screen, so write it down or save it somewhere as your ‘Nextcloud Maintenance Password’.
Next, scroll down on the left side and find ‘nc-httpsonly’ in the ‘Config’ section and click on it. On the right frame, uncheck the box labeled ‘Activate’ and click ‘Apply’. This is less secure, but since we’re not going to be permanently connecting this to the Internet it’ll will save a bunch of warning messages later on.
Next click on the small icon on the top right that looks like a circle with two smaller circles on each side – when you hover over it with your mouse pointer it’ll say ‘Launch Nextcloud’. That will take you into the main NextCloud window, which will walk you through the rest of the setup process. I’m not going to go through all of those in detail here, since they’re pretty straightforward and there’s lots of excellent online documentation and videos you can reference.
Once you’ve finished the initial setup you’re going to want to create a user account for each person that will be accessing NextCloud, download and install the NextCloud mobile app on your mobile devices and test everything out. NextCloud can obviously also be accessed via a web browser from your laptop connected to your disaster network, which is what I use to upload all of the various files, videos, pictures, eBooks, manuals, etc. that I’ll want folks to be able to access post-disaster.
There’s one important point to keep in mind with the NextCloudPi system – the underlying Linux operating system is configured with specific versions of libraries and applications in order to support the NextCloud app, so you never want to manually update Linux. If there’s a new version of NextCloudPi available the next time you plug your disaster network into the Internet, a small red notification dot will appear over your name in the upper right-hand corner on the NextCloud web page, which you can click on and follow the directions to install the update, which will typically update both the NextCloud application as well as the supporting Linux operating system.
Applications
What you’ve installed so far is the basic NextCloud cloud server, which provides a number of very useful capabilities out of the box, including:
- File sharing
- Photo sharing and management
- Calendar
- Notes
- Contacts
And a bunch more. NextCloud functionality can also be extended via plug-in applications (apps), several of which can be very useful for organizing, coordinating and communicating in disaster situations. Note that you’ll need to be connected to the Internet to initially install these plug-in apps in NextCloud, but they’ll all work without access to the Internet once they’re installed. Some potentially useful apps are:
- Collectives – A collaboration app, which allows you to create, share and update notes, calendars, documents, etc. on different subjects. Note that despite using terms like ‘collective’ and ‘comrades’ in the documentation, this is an extremely useful way to organize and manage information on different topics. You could have a collective for security, with a calendar for watch schedules and patrols, notes on security-related observations, security SOPs, etc., a collective on food production, with sub-collections on farming/gardening, fishing, information on livestock, etc.
- Talk – An audio/video conferencing application (similar to Zoom or Microsoft Teams) that runs entirely on your NextCloud server.
- DAVx5 – A synchronization protocol that makes it easy to synchronize files and other things between your mobile devices and the NextCloud server. I use it to automatically upload OSMAnd+ map notes, routes and pictures from my mobile device after I return from a hike, hunting trip, etc.
There are dozens of other NextCloud apps that may be useful, depending on your specific situation and requirements. Spend some time perusing the NextCloud apps page to see what might be of interest to you. Keep in mind that some of the apps do require Internet access to work, which won’t be of much use in a grid-down scenario.
Out of the Cloud
So far I’ve focused on NextCloud and its plug-in apps as the primary app to run on the Raspberry Pi, since it provides a ton of useful functionality for grid-down scenarios. However, there are a lot of other types of applications you can install and run on the Pi that may be of interest. Some possible options include:
- A game server – If you have children and they’re addicted to video games, you can install servers that will allow them to play things like Quake, Minecraft, Civilization, and many others with and against other players using their mobile devices. This can be potentially useful as a reward or incentive to support various activities (e.g. 15 minutes of game time for every 8 hours of working in the garden).
- Schooling – There are applications available such as Sugarizer designed to support teaching and classroom activities. You can download tons of free eBooks from places like Project Gutenberg to use as classroom textbooks.
- Social Networking – Despite the moronic wastelands that places like Twitter and Facebook have turned into, the concept of social networking itself can still provide benefits for sharing information and communicating. Apps like Rocket.Chat are designed to allow you to set up and run your own local social network.
- Android Tactical Assault Kit/Android Team Awareness Kit (ATAK) – ATAK was originally designed by the US military as a way to share geospatial, intelligence, targeting and other types of data with troops in the field using Android devices. Civilian version have been developed such as CivATAK and FreeTakServer that work with ATAK apps on your mobile devices. Note that ATAK is an extremely large and complicated system, so you’ll need to do a lot of research and learning before trying it out.
- Video surveillance – An application called Shinobi can allow you to use your Raspberry Pi as a video surveillance system to monitor IP cameras. Note that monitoring video requires a lot of processing power, so you’ll probably only be able to monitor two or three 720p or 1080p cameras before your Raspberry Pi runs out of horsepower.
Over the years I’ve installed several extra apps on my NextCloudPi server without impacting my NextCloud implementation, but you should plan on experimenting to see what does and doesn’t work before you invest a lot of time in customizing and populating NextCloud, because you may to to start over from scratch if an external app breaks it.
Power
Since I wanted to use this as a mobile network/server, I decided to power the whole setup with a big USB battery. The important thing to remember is that you want something that has one port that can provide at least 3 Amps (15W) of power to run the Raspberry Pi 4 – the Gl.Inet router can run on 2A with no problem. The one I chose is the 50,000mAh ‘Poiytl Power Bank 50000mAh’, which has two USB-A charging ports which can each provide up to 4.5A, and a single USB-C port that I use exclusively for charging the battery. In the field, the Poiytl battery will typically run the full setup for around 12-13 hours, depending on what type of activities you’re performing, the number of connected devices, etc.
Packaging
As I mentioned in the beginning you can store all of the components in a single .50 caliber ammo can set up as a Faraday cage, but then you’d probably have to take all of the components out and plug them together on a flat surface when you wanted to use them. Since I wanted a system that was easily transportable and fast to get up and running I used a MTM ACR4-18 Ammo Crate/Utility Box and made a few modifications to better support how I use it. I added a carry handle on the front and some rubber legs on the back so it would stand up vertically when I set it down, drilled some holes and ran some 1/8” shock cord to hold a few things in place on the lid, and drilled some holes and installed waterproof bulkhead connectors for externally connecting to the WAN and unused LAN Ethernet ports on the router, external antennas for the router, and a USB-C connector for charging the battery. Here’s a picture of the inside:
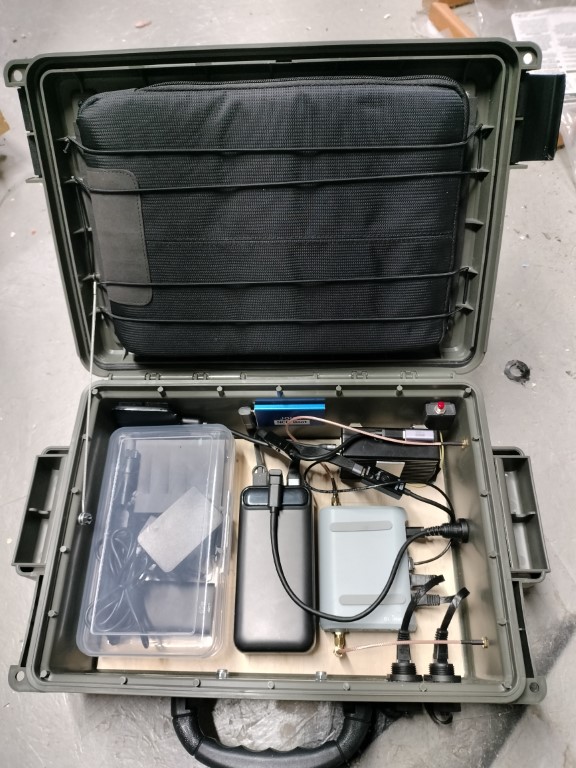
On the inside of the lid is a Chromebook inside a nylon slip case that I use in the field, held in place with the shock cord. In the bottom on the left side is a clear plastic case that holds various cables, chargers, adapter, etc., and the removable external WiFi antennas for the router. To the right of the plastic case is the Poyitl battery, and to the right of that is the Gl.iNet router. In the top right is the Raspberry Pi in its aluminum case, mounted sideways, and along the back inside wall are two SSDs connected to the Pi – a JOIOT 250GB SSD for the Pi’s system/boot disk, and a 2TB WD Elements SSD for extra storage (I have a ton of videos, pictures, manuals, eBooks, maps, etc. on it). I used a variety of short cables, connectors and adapters to connect everything together, and for connecting the Pi and router to the battery I used USB cables with built-in on/off switches so that I didn’t have to unplug them when I wanted to shut down. Since shutting off power to a running computer is never a good idea, I added an external shutdown button (the red button in the upper-right corner) to shut the Pi down cleanly before I turn off power. This is a slightly more advanced topic, but there are a lot of good articles on the web on how to add a shutdown button to a Raspberry Pi.
On the top of the crate I have a couple of more pieces of shock cord that I use to hold a FlexSolar 40W solar charging panel. Here’s a picture:
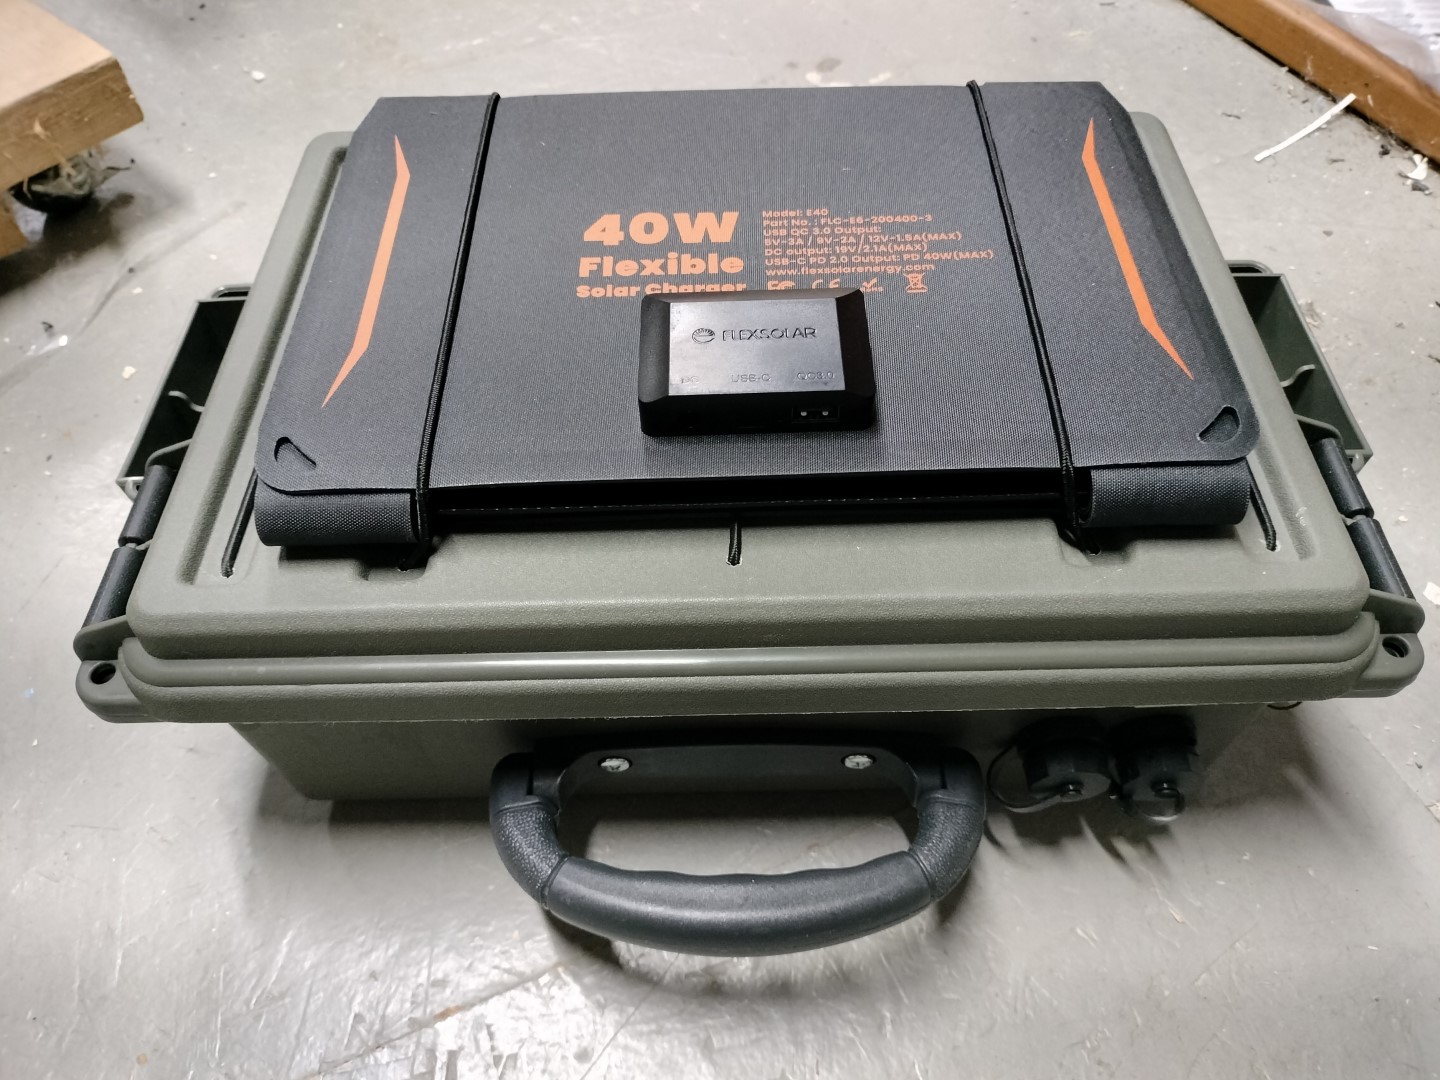
When I’m out in the cabin we usually only have the system powered on for a couple of hours in the evenings, so the 40W panel is more than enough to get back up to a full charge with a couple of hours of sunlight during the day.
Summary
While running a network/server during a grid-down scenario might seem like an unnecessary extravagance to some people, such a system can provide an easy way to share information, coordinate activities, manage time and resources and generally improve the efficiency of all of your daily activities. I’m certain that a lot of preppers will prefer to just do everything with paper, but writing paper will eventually run out, and it’s almost impossible to store nearly as much information in hardcopy as you can store on a 2TB solid state drive. In terms of reliability I’ve been using some variation of this setup for a couple of years, and I’ve never had a significant issue with it. I’m sure that something will eventually fail but I’m comfortable that it will continue to operate for a decade or more, and the components used are inexpensive enough that you can stock a complete set of spares for around $250.
I’ve also only scratched the surface of what you can do with this setup. There are thousands of applications you can run on the Raspberry Pi server and the supporting notebook computers and mobile devices. As with any preparation I recommend that you figure out what you think the highest-risk scenarios are and then configure your system to best support your response activities.