


(Continued from Part 1.)
Railroad tracks are another possible route that you could use to get home, but doing so can potentially be very dangerous – unless you’re in a grid-down scenario and you’re absolutely sure trains aren’t running then I strongly recommend you avoid them. If you can use them safely they could provide a possible route that’s typically isolated and free from obstacles. Railroad bridges are potentially less likely to be monitored or blocked, so if you need to cross a terrain feature like a river or steep gully while avoiding contact they may be a better option than road bridges. OSM and ORS do show railroad tracks as alternating white/black dashed lines is you zoom in enough, but they’re hard to identify on a wider-scale view.
A better alternative is to use the OpenRailwayMap (ORM) map, which uses color-coding to show pretty much every railroad track around the world on top of a gray-scale map. Keep in mind that the spacing on railroad ties can make it very difficult to match your stride for a comfortable walk, so you’re better off if you can find tracks with a wide right-of-way next to them. Since you’re never supposed to walk on them no available route planning software will include them in a possible route plan – when I’m route planning I’ll usually include a separate screen clip showing the major rail lines that I could use as alternate routes if the situation warrants it.
Power line right-of-ways are paths that power companies clear through forests, brush and other undeveloped terrain for running high-voltage power lines. These usually have a dirt path that runs along them so the power company can access the towers for maintenance. As with railroad tracks, there’s no routing software that will allow you to include these in an automatically calculated path, so you’ll have to manually include map snapshots in your route plan to show where they are.
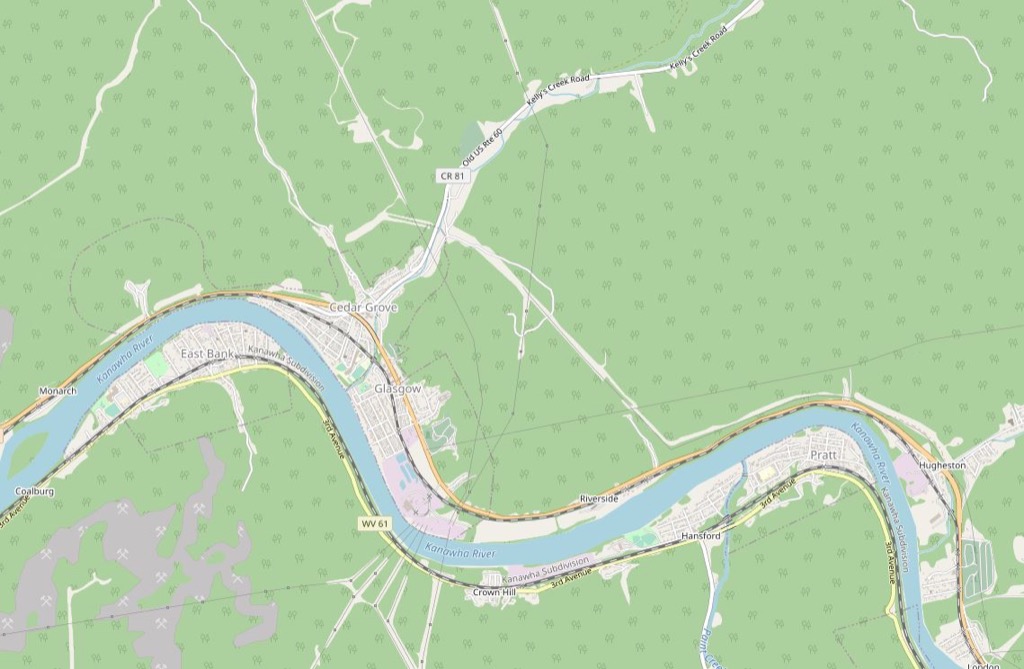
The good news is that OSM and ORS show them on their maps so you can figure out where they are. However, you may have to switch to satellite view to see is there’s actually a cleared lane where they run. Here’s a picture that shows a map view of Glasgow, West Virginia, with several power lines heading north and east from just south of the town (the gray lines with and without white squares):
This picture shows the same area with a satellite view:
 You can see the cleared path through the forests and hills that the power lines follow. Note that just because a power line right-of-way is visible that doesn’t mean it’s always navigable on foot or bike – there may be fences, gates, drop offs, etc. that could prevent you from using the path, so be prepared with alternate routes.
Trip Length
How fast you walk or bike will obviously determine how long your trip takes, and there are a lot of factors that will impact your speed. Most route planning maps and websites use around 3MPH (4.8KPH) as an average for walking, but unless you backpack or hike a lot on a regular basis most people won’t be able to sustain even that speed over a period of days. I backpack and hike on a regular basis and I like to think I’m in pretty good shape, but I’m not sure that anyone other than an accomplished through-hiker (someone that hikes trails that are hundreds of miles long in a single trip) could consistently make the mythical 20 miles a day a lot of people talk about for multiple consecutive days.
At 3 MPH, hiking 20 miles would take almost 7 hours, and that’s not including any breaks. And unless you do it consistently you’re going to be very sore the next day, so your pace and walking time will drop dramatically. Realistically, assuming perfect conditions and average physical condition, walking that 112-mile (180 km) route from Cincinnati to Camp Dix from the earlier example will probably take me somewhere around 7-10 days.
Riding a bike can potentially speed up your trip, and most route planning systems tend to assume a speed of around 10MPH (16KPH) for riding a bike. However, as with walking, unless you ride a bike for long distances on a regular basis, you probably won’t be able to sustain anywhere near that speed for multiple days. Long-distance bike riding uses very different muscles than walking, so you’ll still be very sore after the first day, just in different muscles. Steep inclines can also make using a bike a difficult proposition – if you scroll down on the left side of the ORS web page after you planned a route you’ll see an ‘Altitude’ graph, which shows how much you’ll be rising and falling during the trip. Trips with lots of steep rises will take a lot longer than you expect. Biking that 112-mile (180 km) route from Cincinnati to Camp Dix from the earlier example will probably take me somewhere around 4-5 days.
There are other factors that will impact your speed that you need to consider:
- Physical condition – What’s the longest distance you’ve actually walked or biked carrying a 20lb+ backpack in the last few years? If your idea of cardio is jumping up off the couch when your teams scores, you should probably double or even triple the time estimates.
- Medical conditions – I’m becoming what some people would call a ‘seasoned citizen’, and my knees and other joints aren’t as resilient as they once were, so now I wear soft knee braces when I hike and take more frequent rest stops, which will increase my time.
- Weather – Walking or biking in heavy blowing snow or rain is not easy (or even possible sometimes), so you may need to find shelter to hunker down and ride out a blizzard or hurricane.
There are a lot of other factors that will impact your trip home, and I’ll be discussing those in the following sections.
Water, Water, Everywhere…
Surface water represents both challenges and opportunities when planning a route. One of the potential opportunities is the use of water travel as part of your route. Take a look at the previous example of a route from Cincinnati, Ohio to Camp Dix, Kentucky – the route pretty much follows the Ohio River for most of the way, so you could include a lightweight pack raft like the Klymit Lightwater Dinghy or the Supai Makat and a lightweight collapsible paddle in your travel kit (or obtain a small vessel or inflatable boat when you start out) and paddle down the Ohio River to Vanceberg, Kentucky and you’ll almost be home.
Most major rivers tend to flow around 3-5MPH (1.9-4KPH) depending on a lot of factors, so it may not be significantly faster than walking or biking, but you can let the river do most of the work for you. However, even if you’re just steering with your paddle you’ll be giving your arms and shoulders a good workout, and you’ll still probably be sore every day after the first one.
You’ll also need to be aware of hazards on the river – for example, the Captain Anthony Meldahl Lock and Dam is about a third of the way between Cincinnati and Vanceberg, so you’ll need to get out and portage your raft over the land to get around it. There are lots of heavily wooded areas along the river where you can stop for breaks and sleeping, and there are even some islands along the way that should be completely deserted.
Another example of water obstacles as an opportunity would be a scenario where you had to route around a large body of water to get to your destination, so crossing the water could save you a significant amount of time. Say you live in Bremerton, Washington and you’re out hiking in the Olympic National Forest for a day when an EMP hits so you’re forced to walk home. Going strictly over land results in the following ORS route:
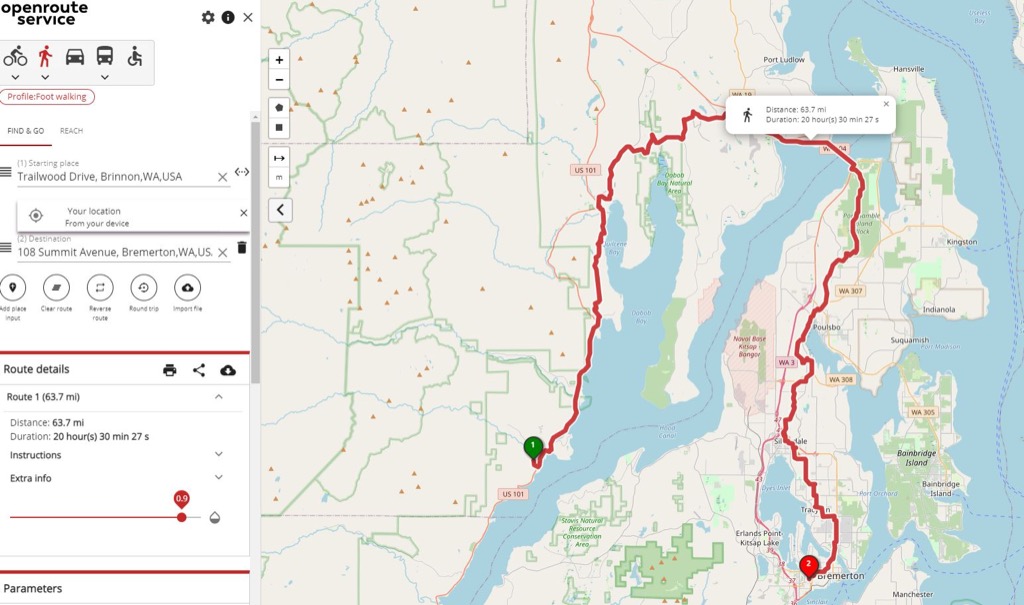 The proposed route is 63 miles, so it would probably take you at least 4-5 days to get home. However, if you could transit straight east across the Hood Canal over to Kitsap County you could reduce your walk to around 20 miles and get home in a day or two. The same applies to crossing rivers – having the ability to cross a water obstacle where you choose instead of having to use a bridge can provide a lot more flexibility in your route planning. If the weather is reasonably warm you may not even have to worry about a raft or a boat – if you include a large waterproof bag (like a garbage bag) in your GHB you can put your pack and clothes inside it, seal it up, and use it as a float to help you cross water.
If you’d like a ton of gory details regarding all major lakes, rivers and other waterways in the US and around the world, check out the online I-Boating charts – there’s a lot more information there then you’ll ever need, including depth, channel markers, navigation lights, etc., but some details like boat ramps can give you an idea of where you can easily put your raft into the water. You can also buy an app version of that online service for Android, iOS, Windows, etc. if you want to carry it with you. And if you really want to know what all of those symbols mean, NOAA has a 132-page PDF that explains all of them.
Note: If you plan on including a raft in your get-home kit to use for traveling on water, I highly recommend that you include a waterproof bag (like a trash bag) for your backpack and an inflatable life vest for yourself. A snorkel or belt-style inflatable vest is lightweight and packs down pretty small, but it could save your life in an emergency, no matter how good of a swimmer you are. You should also consider attaching a line to the bag with your backpack with the other end to yourself with a quick-detach knot or carabiner so that if your boat sinks or capsizes you don’t lose all of your supplies.
(To be continued tomorrow, in Part 3.)