


(Continued from Part 2. This concludes the article.)
Testing the Food
There are a few ways to test for dryness of your foods. You can weigh the food before and after, and then put it back in for a 2-hour Extra Dry cycle and weigh it again. If it changed weight, then the food wasn’t dry. This also helps determine how much water is needed for rehydration. The next is a moisture meter, but that doesn’t always work on small foods like berries or peas. Another is to use a thermometer. If there’s ice still present the food will be colder than the food that’s dry. It’s impossible to tell using the thermal method unless the food came out right away after the cycle completed, as the dryer will continue to run the refrigeration system to try to keep the water vapor down. At that point, the food will freeze again and may pick up condensation when taken out. There is an option to warm the trays before removal to prevent that. The last is to taste-test it and/or guess. The food should be crispy and break like Styrofoam and when tasted should not be cold in the center. If anything is still wet, put it in for extra drying again. Sometimes it’s best to put it back in the freezer, defrost the dryer, and run it again.
Remember: One wet piece can ruin a whole batch, when packaged!
Candy Mode
Since version 5.4.19 (current 5.4.24) there has been a candy mode. The candy mode can be accessed through the customize button. Go to the drying temperature and raise the value between 135 F and 150 F and the extra dry time between 2-3 hours. Then hit the save button. The screen will go back to the start screen. Press start which will then go to the cooling vacuum chamber screen. At 15 minutes, the screen will go to the loading screen. Load the candy and then there should be a red button on the screen. Press it and it will turn green, and then hit continue. The next screen will say warming trays. Press start. You will get a warming trays screen with a settable time counting down from 5 minutes. You may add or subtract time.
Once the timer runs out it will go to the drying screen and count down with a settable time, and the vacuum pump will turn on. Have fun watching the candy mutate before your eyes! At the end of the drying time it will go to the process complete screen but have different center button asking to start new candy run. Hitting either defrost or no defrost will reset the machine to normal drying parameters and to the selected operation.
Storage Options
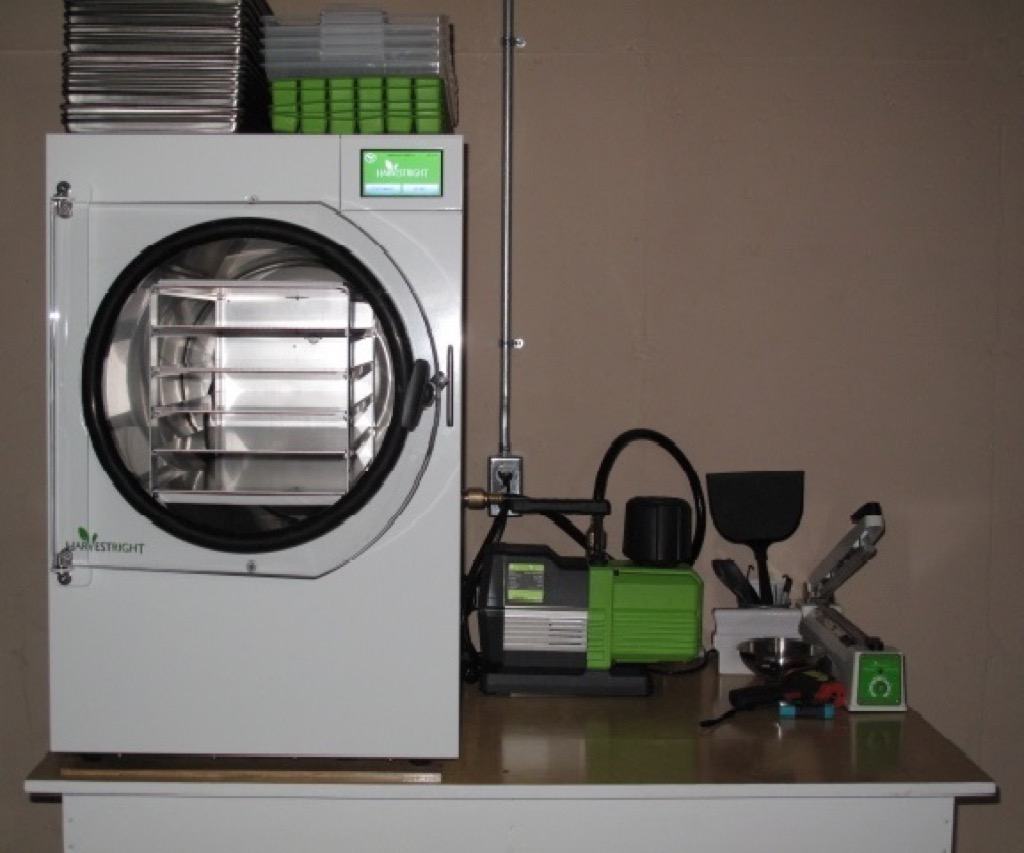
For short-term storage of your freeze-dried foods, you can use canning jars. I use this method for snacks and stuff I’ll use right away. Just toss it in, and screw the lid down. For longer storage, you can either use an O2 absorber or vacuum seal the jars. You can use the dryer as a vacuum chamber to seal the jars, just remove the rack and put in a tray, and use the test screen to control the pump. Put the lids on and screw the rings on loosely before using the vacuum. Once good vacuum is achieved, shut off the pump and open the drain valve. The pressure will force the lids down tight. Then screw the rings down tight.
Vacuum seal bags are not really recommended, but could be used to contain components for meals. Vacuum sealing can crush freeze-dried foods to powder. I’m experimenting with this for taco kits. The meat in one bag, taco sauce in another along with diced tomatoes, crushed corn chips, and cheese all within a larger mylar bag. The inner bags are vented so only one O2 absorber is needed for the kit. I don’t know if lettuce will freeze dry and reconstitute without turning to slime.
Mylar pouches are the next method. Stay away from the sprayed aluminum bags, as they can have flaws that let light and moisture in. There’s one company out there that uses these bags, and I’ve rarely seen their food come out intact. Only the foil bags should be used. Mountain House uses the foil bags, and I’ve never had a problem with them.
The last is metal cans. I’m looking at this option. Can sealers can be quite expensive. The manual sealer that I’m looking at will do #10 and #2 ½ cans for $1,750. This is the most bulletproof option, but you must be sure your food is dry. There are no testing options with cans like with pouches.
Accessories
Harvest Right Accessories
 The accessories I bought with the dryer were more trays, tray covers, and silicone molds. I did want the silicone tray mats but at the time they were sold out. With the large machine, you really want at least 3 sets in total. Also think about buying a set of trays for the medium and small freeze dryers, as these will come in useful for smaller batches that won’t fill a large tray. The silicone tray mats help to keep food from sticking to the trays and make cleaning them much easier. The silicone molds are like ice cube trays which are useful for pre-freezing liquids into cubes before drying them. The cubes come out 1x1x3/4”. The tray covers are PE plastic and can handle the dryer temps. They have divisions to divide the tray into quarters and can be used in the place of the stainless trays. The covers also make stacking the trays in the freezer easier.
Aftermarket Accessories
There are a few companies that make accessories for your dryer. FreezeDryingSupplies.com offers stacking tray covers, stacking corners, anti-siphon kits, tray dividers, and more. Their food funnel makes bagging trays much easier, and will be a future purchase for me. Prices are high, but that’s going to be the case when you’re having things manufactured in smaller quantities. The owner’s YouTube channel is Live Life Simple and is a wealth of information. Another place for information is Phil at 4800 feet. I’ve also seen a roller system for perforating berries out there as well. The roller is all stainless and quite expensive, but it will do a tray of blueberries really quick (lots better than poking each one with a toothpick).
Store-Bought Accessories
Some accessories can be bought locally. First is a funnel for filling the oil pump. Second is a foam dishwashing brush. You will need this for washing your rack as it’s impossible to get your hand in there to do it. Sharpies, you can never have enough! They always disappear when you need to mark your bags. Sharp scissors are needed for opening absorber bags and for trimming parchment paper. Parchment paper helps to keep food from sticking, as a spatter shield, or to make multiple layers of food in the tray. Use a table saw on the parchment paper roll to cut it to the width of the tray. It cuts surprisingly clean. Apple corer/slicer with narrow spacing (16 sections) will make each slice the perfect thickness for drying. A needle-type meat tenderizer works great for perforating berries. Berry skins hold moisture in and prevent proper drying. Freeze first, then perforate. A canning funnel helps to fill pouches and jars. A wide spatula is also useful for helping to load bags. You will want a waste basket close by for catching crumbs, used parchment and other trash created. A broom and dust pan are also good things to have at hand. Some hardware stores will have non-contact thermometers, kitchen scales, and moisture meters.
Minor Trouble
The only trouble I’ve had with the dryer was with it’s operating system. The dryer came with version 5.4.23 software. In this software, there can be a memory glitch where it looses it’s settings and sends you to the factory setup screen. You have to input the machine’s serial number and hit done before it will get you to the start screen. You will have to redo the pump setting, and system name. I called Harvest Right and they sent the new 5.4.24 update as a download. Use a 16 Gb flash drive to load it. Turn the dryer off, insert the drive, and turn the machine on. The software will automatically load. Since then, I’ve not seen any more problems.
Conclusion
Overall, I love this new freeze-dryer! I’ve already built up a good supply of items that commercial companies don’t produce. I’ve had a few failures as well, but you’ll never find out until you try. I’ve found that for items like fruit, that they’re better homemade than the commercial product. It’s a great way to save money on preps in the long run, but in the short term it’s quite expensive to get started. You do need to learn about the mechanicals of the machine, and repair then is relatively simple when problems arise. The freeze-drying community is growing so expect many new recipes and techniques to come out.
At the time I received my new dryer, Harvest Right came out with an Extra Large dryer. This dryer is a monster! It will do twice as much food per run as a Large. It comes with a new XL premier oil pump, so everything that my Large has but bigger. Have not seen accessories available yet, but expect them soon. Price is about $5,000 (that is $1,000 more than the Large size). With the size of the trays, you will need a chest freezer to pre-freeze the trays (trays measuring something like 30×11”). Live Life Simple just bought one, and already has an unboxing video up on YouTube. If you have a large garden or want to start a freeze-drying business, then this one is for you!