


(Continued from Part 1.)
Testing and Bread Run
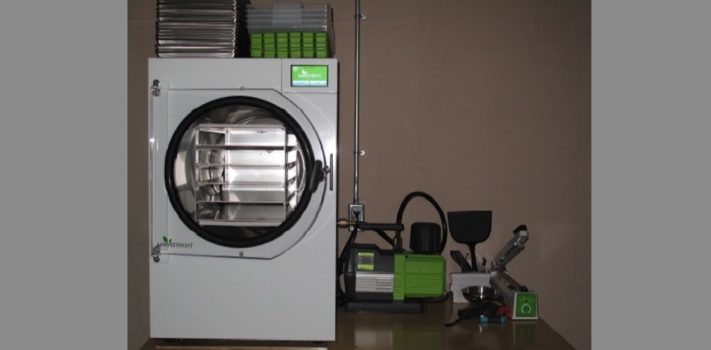
Once things are assembled, it’s time to test the machine. From the start screen, press the leaf logo to go to the testing screen. They want you to close the door and also close the drain valve. Begin by touching the freeze switch. The refrigeration system will kick on and the chamber will begin to cool. Next, turn on the vacuum switch, and the pump should start. Let both run for 30 minutes. Within 20 minutes the pressure should be below 500 mTorr. If it is not, call Harvest Right Customer Support. By that time, my machine was at 111 mTorr and holding. Turn both switches off and repressurize the chamber slowly by cracking open the drain valve. Once the door can be opened, turn on the heater switch and place your hand on the tray rack. It should begin to warm up. Turn the heater off as soon as you notice warmth on all rack levels. Press Done to go to the start screen.
Since I received my machine, I’ve seen many people that are having vacuum and refrigeration problems with their new machines. Some I think is due to squeeky wheel syndrome, but may also be the reason that Harvest Right is so adamant about inspection after shipping. My machine came with a factory test card in which it was tested before shipping. Failures upon receipt may be the shipper’s problem. I’ve worked with high vacuum equipment and you are always chasing a leak somewhere. It’s a real problem when fusing deuterium gas as it doesn’t react well with oxygen! The same goes for underwater photography, as you’re paranoid about your seals. Lose a seal in either case and it gets expensive fast. You really do need to become a service technician with this kind of equipment and many aren’t up to it. So, be ready to learn!
Now that the machine has passed the test it’s time for the Bread Run. You need about 2 loaves of cheap bread, since you are going to throw them out after the run. This run will help remove any chemicals that will vaporize under vacuum. Press Start. Your first time will take you to a Pump Setup screen. Select the pump that you have and hit Save. You will come to the Cooling Vacuum Chamber screen and the compressor will start. Load the trays with the bread slices and then spray them down with vinegar. At 15 minutes, it will prompt you to load the trays and close the drain valve. When you close the door you should notice a 1/8” ring completely around the door seal. If not complete, it may leak. Open the door and pull the door seal out a little bit and close the door again. If sealed, hit continue and the machine will go to the Freezing screen. Sit back and relax for the next 24 hours! During the freezing process, take a look in the chamber for hoar frost on the chamber walls, it’s really pretty! Once cold enough, the machine will go to a Vacuum Freezing screen and the pump will start. After it pumps down low enough, the Drying screen will come on.
At this point, you’re probably going to do what I did and watch the entire run! It ran for 19+ hours! Also a good time to check refrigerant level by the number of rings of ice that you see. If you have 11-12+ you’re fine, 9 or less and you are either low or have a coolant leak, call Harvest Right. Some runs of drier foods may produce fewer rings. If you were running 5 trays of chicken broth and saw only 9 rings, you really have a problem. I did a check with a non-contact thermometer and the ice on the walls was at -33F.
Also note the change in temperature and pressure in the machine. As the trays warm, you should notice the pressure rise. This is the ice sublimating into water vapor. Pressure will follow the temperature in a delayed manner. At the start of the drying run, the pressure will be from 250 mTorr and jump up to 6-700 mTorr as the trays begin heating. The pressure will oscillate and slowly get lower as the temperature slowly rises. Near the end, you will watch the pressure rise and fall about 1-2 mTorr each time the temps swing 10 degrees. At the very end, the pressure will not change and won’t go any lower. Ending pressure will be anywhere under 200 mTorr. Sometimes if the food is really wet, pressure will stall between 250 and 300 mTorr. If it does this, cancel the drying cycle and put the trays into the freezer and set the machine into a defrost cycle to clear the ice. After the ice is cleared start another run on the trays. This is a problem with single-chamber freeze dryers. The stalled dryer is sublimating the ice off the walls and running the vapor through the pump.
After the drying cycle completes, the machine will go into an Extra Dry Time screen and start counting down. You can hit cancel as you really don’t care about the bread. The screen will go to a Process Complete screen. Slowly open the drain valve and let the pressure equalize. Next, open the door and remove the trays. Close the door and hit the defrost button. It will prompt you to open the drain valve, remove the food, and close the door. When that’s done hit continue. The dryer shuts off the refrigeration pump and begins heating the tray rack to 154F. The screen will start a 2-hour countdown. All the melted ice will flow down the drain line into the bucket. At the end, it will ask if you want more defrost or if you’re done. Hit done and it goes back to the start screen.
Cleaning
After defrosting, I clean the machine. There will be microscopic food particles that get blasted out of the trays by the escaping water vapor, and in the case of raspberries and blackberries they like to spit syrup. Meats and dairy with fat also like to spatter. In one case, I had mold grow on two of the rack shelves (but not on the food) during a run, so keeping things clean is a must! My normal cleaning is removing the door seal and then wiping the water off the top of the rack. I then withdraw the rack and disconnect the cable. Next, I wipe down the inside of the chamber to remove the condensation and any residual water. I then wipe down the rack and clean the door seal. I then clean the acrylic door with a wet microfiber chamois cloth and reassemble.
For the door, as mentioned above I use a wet microfiber cloth. The cloth will not scratch the acrylic. For deeper cleaning use the cloth with some Dawn and keep it wet. Always clean in one direction only! I always use a top-to-bottom scrubbing pattern, and never circles. Circular motions will slowly fog the acrylic. (You can tell the Army aviator in me.) Do not use Windex or alcohol on it! Those products can cause crazing (micro cracking) to occur. The door under vacuum is under 1 ¼ tons of pressure, and if one of those cracks runs, you’ll have an implosion! If the door gets scratched, do not polish it! The heat generated by polishing can weaken the door. The giant aquarium that shattered in Germany had been polished as part of its restoration. If the scratch is causing a leak, call Harvest Right and order a new door.
At my oil change interval (10 runs), I wash the entire chamber with Dawn dish soap solution and rinse. Do not get water into any of the other holes at the right side and top. Only the drain hole at the bottom can get water. The rack can be put in a sink tray side down and scrubbed with a foam brush and sprayed down. Try to keep water out of the box at the rear.
Oil Changes
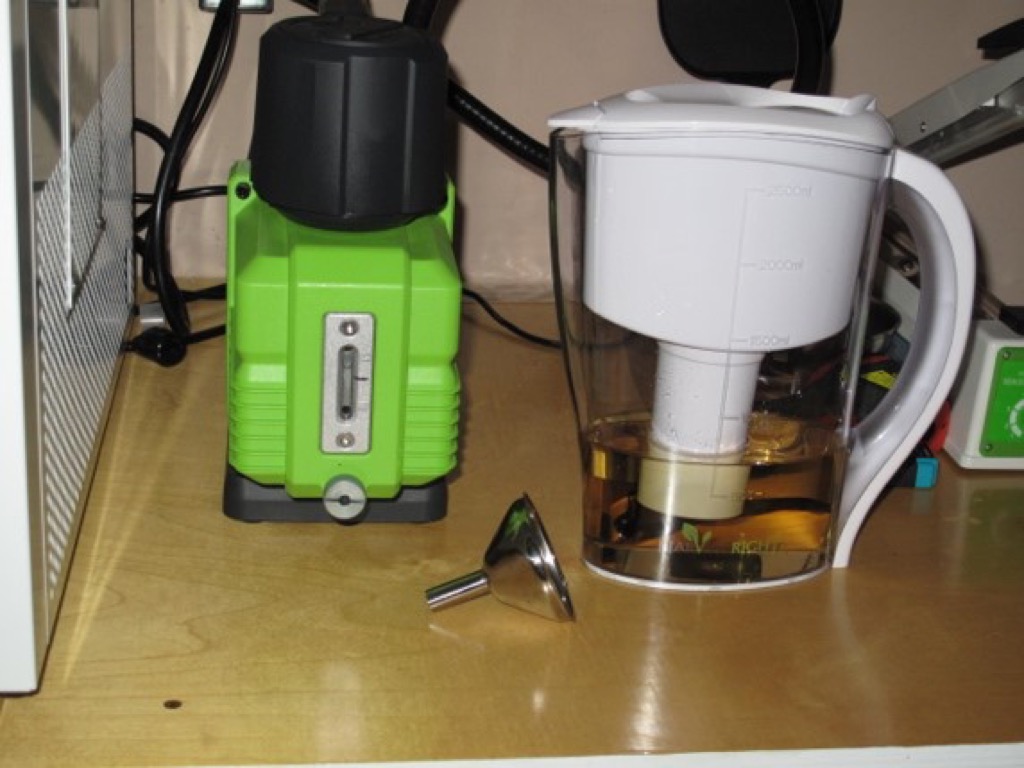 Oil changes really aren’t as bad as they may sound. I’m changing my premier pump’s oil every 10-12 runs. Harvest Right says you can do about 20-30 runs on the oil with that pump before filtering. The oil can be filtered about 3 times before it can be considered used up. With the premier pump, the Harvest Right and Robinair vacuum pump oils can be used. You must not use the Dairyland vacuum pump oil with the premier pump! The Harvest Right standard pump can use the Dairyland oil. The Robinair oil can be found at auto parts stores, and Tractor Supply stores also stock the Harvest Right oil, bags, and absorbers.
With my large machine, I received the most recent oil filter system. It’s basically like a Brita pitcher water filter system. Many have built their own with a Brita pitcher and use toilet paper for the filter. Even with filtration, the oil will take on a yellowish appearance once it has been used. The premier pump drives the water out of the oil, and I have not seen any water droplets in the filtered oil. I use the blue bottle that came with the pump to store the filtered oil. I rotate between 2 batches of oil, one in the pump, and one being filtered. The pitcher will filter the oil in about 24 hours.
Changing the oil is pretty simple. I put the pump on the edge of my bench so that the oil drain hangs over the side. I hold the filter pitcher underneath and open the drain valve at the bottom of the pump. The oil pours directly into the pitcher. When the oil stops, I then tip the pump forward a little and more oil will begin to drain. When it stops, you can then close the drain valve. Unscrew the demister and add fresh oil. I do the oil change at the end of a run, just after packaging the food. The oil will be warm and all the debris will still be in suspension.
(To be concluded tomorrow, in Part 3.)