


(Continued from Part 1. This concludes the article.)
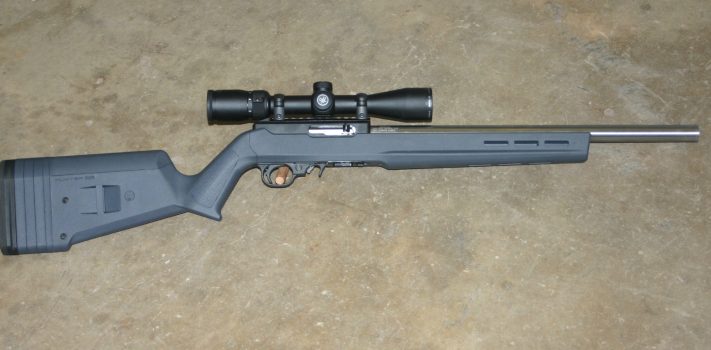
The stock:
I chose a gray Magpul Hunter X-22 stock because it is a full-sized stock and I have used one before. I did not want a folding stock. The stock has an adjustable length of pull, a nice butt pad, and an optional higher cheek riser. The grip is somewhat vertical which works very well to position the trigger finger properly on the trigger, which helps practical accuracy. This stock is fairly sleek, with not much to snag on. The bottom of the fore-end is flat to better stabilize the rifle when shooting from a rest. The stock can be set up for a sling, which I recommend and intend to install on my rifle.
An adjustable spacer is included to support the front of the bull barrel, which I think is a good idea. Adjust the spacer to just touch the barrel. The original Ruger 10/22 had the single action screw in the receiver but the front of the barrel was held in contact with the stock by the barrel band. A full floated heavy barrel can tip the receiver since there is still only one mounting screw in the receiver. Many people epoxy bed the rear of the receiver and the front of the barrel above the front tip of the stock with zero pressure with good results.
The scope rings:
Burris one-inch Zee rings were chosen for their size and toughness. Correct height steel rings are important to durability and practical accuracy. Look at a target at mid distance, close your eyes, and shoulder the rifle. When you open your eyes the crosshair should be on the target. If not, you need use higher or lower rings or modify the stock to place your cheek weld higher or lower.
The scope:
Optics are pretty intuitive to use and allow you to better utilize the full mechanical accuracy potential of the rifle. A scope lets you use more of the rifle’s accuracy and typically lets you shoot earlier and later in the day than iron sights. There is a benefit in that those with less than perfect eyesight can often use a scope effectively where they would not be able to use iron sights very well.
The scope I chose is the Vortex Diamondback 2-7 variable dedicated rimfire scope. It is an excellent quality mid-range price unit with crisp crosshairs and good brightness. It has no projecting knobs and a simple duplex reticle with good adjustments. It is a purpose-built rimfire scope with excellent optics and a one-inch tube.
The thing I like about this 2-7x variable is that if you are walking along you can set the magnification at 2x. If you see something interesting you can usually find it in the large field of view. If you have time you can use the 7x setting to better see a more distant or smaller target. Given that you know the bullet’s elevation at that distance and that you can compensate for windage in the field you can significantly extend the effective range of the rifle. Please note, you should never use the scope as binoculars. Be mindful that when you look at an object with your scope you are pointing a weapon at the target.
I like to use flip-up lens protectors to keep dust and trash out of the scope. Lens protectors should be on both front and back. I normally want iron sights available for backup if the scope fails. With the quality scope, the built in base, and the steel rings I think the package will be strong enough to withstand all but the worst abuse. You do have an extra scope that could replace the one on any of your other scoped rifles, don’t you? A limited but potentially useful iron sight setup on the top of the Picatinny rail would be something like same plane bolt on iron sights meant for an AR-15. You will have a very short sight radius, but you will have sights.
Putting the parts together:
Assembly of the parts was straightforward using common hand tools. Use a small amount of anti-seize compound on the barrel shank. If the barrel shank does not want to go into the receiver easily you might try to heat up the receiver with a hair dryer or heat gun and put the barrel in the freezer overnight. The aluminum receiver will expand while the barrel shrinks and you may be able to insert the barrel tenon without removing any material from either part.
Do not depend entirely on the barrel retainer “V” block to align the barrel rotationally to the receiver. While it is rare that the parts don’t line up correctly, visually check that the cutout in the barrel is in the same plane as the bottom of the receiver. Ensure that the extractor is in the middle of the extractor cutout on the barrel or you will get random jamming and broken parts. Snug down the two clamp screws alternately to around 45 inch-pounds.
Assemble the scope to the rifle and set your eye relief. Keep the scope loose in the rings. Get the scope’s relationship to the rifle correct by first using a level on the receiver flats to get the receiver level. Next, run a string from the ceiling on a plumb bob or other weight. Look through the scope and rotate the scope so that the vertical crosshair is parallel with the plumb bob string. Now the receiver is level with the horizontal crosshair vertical. The horizontal crosshair will be parallel to the receiver flats. Now the scope should track vertically with the trajectory of the bullet. Snug up the scope ring screws.
Installing the stock
Install the recoil spring and bolt into the reliever. Double-check that the extractor is not binding on the top or bottom of the extractor cut in the barrel. Use a few drips of oil on the bolt-bearing surfaces. Cycle the bolt repeatedly.
Install the barreled receiver assembly in the stock. It will probably be a tight fit so make sure the barreled action is fully seated. Snug up the receiver screw to hold the barreled action in the stock. Install the trigger housing being careful that the loose pins do not fall out as the trigger housing is installed. The pins are held in place by the receiver walls when the trigger housing is installed.
When the rifle is fully assembled you will notice that it is very heavy by .22 rifle standards, around eight pounds with magazine but no ammo or sling. To me, this is part of why it is a very good game-getter. The mass lends inertia to the rifle as it fires and contributes to keeping the crosshairs on the target during firing, which greatly improves practical accuracy. Test fire the rifle while following all the safety rules.
The zero:
Your hunting terrain will have a bearing on choosing your rifle’s zero. A very dense forested area usually means you will not have many long shots, so you can zero accordingly. A common and pretty good all-around zero is 25 yards.
Since the scope is higher than the bore at some point the bullet will cross the line of sight from below, rise higher than the line of sight, and at some distance will start to descend and again pass through the line of sight a second time and continue its parabolic arc below the line of sight.
The zero that you use will be somewhere along this path. You will have to compensate for the vertical difference in the bullet’s path to direct your bullet to its intended target. You may not have to compensate much close to the zeroed range but at some distance you will have to “hold over” to gain the elevation required for the bullet to hit a distant target. The vertical crosshair placement will be the same but the horizontal cross hair will be placed higher on the target. Please note that if the target is very close you may have to “hold under.” If you have to hold over with iron sights the front sight obscures the target by covering it up to some extent. With a scope you continue to see the entire target.
A fixed zero means that you will have to practice enough at various distances to learn how much holdover you will need to use as the range increases. You can put up targets every 5 yards out to 50 yards and shoot at them without changing the scope’s zero. One way to do this is to set up a target frame and just back away from the target to get each individual range distance you are interested in. You will find that the group moves up and down as the distance changes, that is, the elevation changes with distance. The windage should not change unless there is a lot of wind.
You might benefit from a very basic rifle data book. It can be as simple as a spiral wire bound notebook. You can make a drawing of a target for each range and draw in the bullet strikes from each target. Note the type of ammo and weather conditions. This should be done for the initial zero and when you repeat the exercise for different ammo types. If you change the zero you will have to start a new section in the notebook. This information will give you insight into the rifle’s performance at different ranges and into the flight path of different ammunition brands and bullet weights. You can then go back to this information at a later date with confidence.
I suggest that at least initially you should zero carefully at 25 yards and learn the required holdover or “hold under” as the distance to the target changes. This is what I have done and seems to be the easiest way for me. Your mileage may vary.
Good shooting, and be safe.