


I open the mailbox and oh… there it is! Nothing perks me up from the winter blues more than getting the McMurray Hatchery chick catalog or a garden/seed catalog. I spend hours pouring through the pages of the catalogs and planning and plotting where I can add more chickens or growing space! I really don’t need any more birds in my flock but that will not deter me from adding at least 4-5 more this season out of our incubator. The first time I purchased chicks I ordered 50 meat birds and 50 Leghorn layers figuring I would kill at least half, being a newbie at this. Well everyone lived, including the bonus chick from McMurray Hatchery and I used some of the birds for barter for other stuff or services we needed.
The firststep to chicks is to make sure you have a secure coop for the new birds and enough space for the number of birds in your flock. Have the outside coop ready before you get your new chicks. They will be inside your home for several weeks and no matter how clean you try to keep the wood shavings the plain truth is that they stink after a while. Do your homework and read up on different breeds. Do you want layers, meat birds, or dual-purpose birds? What birds are best for your climate? I highly recommend two books from Storey Publishers: Storey’s Guide to Raising Chickens and Storey’s Illustrated Guide to Poultry Breeds. Check out other homesteading books from Storey Publishers. Many of their books occupy space on our bookshelves.
ACQUIRING CHICKS
Chicks can be purchased at local feed stores, ordered from a hatchery to arrive by mail, incubated at home or purchased from a local breeder. Our big box feed store has chicks very early in the season as they are a southern based store and still have not gotten the idea that little chicks have no business being in Maine in February or March. Decide when you want to get the little cuties and start some preparations. We usually try to have chicks arrive by mail or incubator in the beginning of May in our northern clime. If they have been ordered from the hatchery and are arriving by mail I guarantee it will be cold and frosty that week.
McMurray is a great source for birds and I have never experienced any issues with their chicks and their customer service is excellent. I highly recommend them. They will e-mail or text message you when the chicks are mailed and you can track them across the country to your local post office. I am a worried mother the whole time they are in transport.
Our post office, which is located in another town, will call me at 6 a.m. to come get my new babies as they take them off the delivery truck. I have walked into the post office on days when hundreds of chicks have been delivered and you can hear the peeping from the parking lot! What a joyous sound! The box is opened in the post office so you can check for viability. McMurray will replace any chick that dies in transport. Have the truck or car running and the heater blasting away for the ride home. The chicks are stressed enough after a long journey. Make sure you are wearing only a t-shirt or you will roast on the way home.
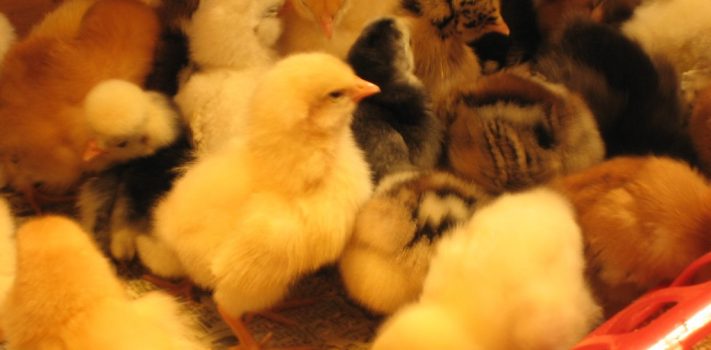
We raise our chicks in a plastic kiddie pool located in our loft, which is warmer due to hot air rising. This needs to be a draft free area. I have also used giant plastic totes or large cardboard boxes lined with plastic for the chicks. If you use a kiddie pool, tape a strip of upright cardboard along the top as they will start trying to hop out within a week. We have a wood frame with hardware cloth that covers the pool to prevent future escapes. They start getting curious quickly and some start fluttering and getting airborne. I have learned by the frantic chirping sound that some little chick has flown his home and is now in panic mode. You would think they would be easy to catch but good luck when this happens. Wood shavings about an inch deep and overhead lights that can be moved up as chicks grow are set up in advance. Add some food to an open dish and use a small waterer.
I start the chicks out on chick starter crumble. They get one 25 lb bag of this and then on to layer pellets. I prefer pellets to crumble. Just my personal preference. We place the waterer on a small piece of wood to try to keep the wood shavings out of it and keep the area dry. You will soon find out that this is a losing battle. Make sure the platform is not too high and they can reach the water. I do not recommend the closed chicken feeders where they stick their heads thru holes to eat. Although this prevents food from spilling out I have seen chicks not be able to figure out how to get their heads out of the food hole and panic and die.
Place the box of chicks in their new home and let them find their way out, then gently pick them up and place them by the food and water. Ninety percent of the time you will not need to dip their beaks in the food or water, they know what to do. As soon as they eat and drink they should settle under the heat light and snooze. Check their butts for dried poop that can sometimes cake up and clean it off with a warm washcloth. Do not pull off the poop dry or you can hurt the chick. They are very fragile beings.
The temperature under the lights should be about 95 degrees F. Every week lower the temp by 5 degrees by raising up the lights.
The wood shavings will quickly get damp from poop and water. I change it daily and after the chicks are about two weeks old the smell and dust begin. The chicks get more active and noisy every day. They start learning to scratch for food and begin trying out those new feathers you will notice sprouting on their wings. The pecking order also starts being established and some minor scuffles occur. Chicks can literally be startled to death so keep them away from curious youngsters, dogs, and cats. They need their own safe space. (Oh no, I sound like a snowflake!)
INCUBATING YOUR OWN EGGS
Our friend gave us an easy, low tech incubator. Make sure you read the instructions before starting. Little chick lives are at stake! Plug it in and let it come up to a temperature of 99 to 102 degrees F. Our incubator has a digital readout of temp and humidity. Humidity levels should be 50-55%. The instructions call for a ¼ cup of water to be added at start up. Our incubator has several plugs to add or remove to adjust humidity levels. We collect eggs out of our hen house for the incubator.
We primarily have white Leghorns. They are ugly, skinny, dirty-looking birds that lay like machines. Our roosters are always whatever anyone is getting rid of. Our current rooster is an Icelandic chicken named The Mighty Quinn. We have a Rhode Island Red hen and a Black Star hen also. I have two Copper Seabright bantams for fun and those girls lay 4 eggs a week in warmer weather. I love bantams and would have a separate flock of them if I had more space. The shells of the bantam birds are hard as a rock! Two smaller eggs equal one regular egg. I have not been able to successfully hatch a bantam egg in the incubator.
After experimenting with several breeds, we have found that for egg production the Leghorns are the best breed for us. Collect your eggs for the incubator and do not wash them off!! I use clean, nice-sized eggs. They come from the nest and go right into the incubator. The fertile eggs will hatch in 20-22 days. Check humidity and temps several times a day. We had a power failure once during the incubation period for several hours and all the eggs died but one. That poor chick looked like she would not make it but she did, and then I had to run to the big box store and get a few chicks to keep her company. Now we make sure to use the outlet hooked up to the generator. Our incubator turns the eggs automatically.
On about day 19 you may see some eggs rocking or hear them chirping inside the eggs. Eventually, a small hole will appear and after some time, a little chick pops out. Brace yourself, it won’t look cute or fuzzy for 24 hours. In fact it’s downright ugly til it dries off. Resist the temptation to “help” the chick hatch. God made them and He gave them the knowledge to get out of their shell. Sometimes a piece of shell may be stuck on the bird for a day. Do not attempt to remove it or you may harm the chick.
The new chicks remain inside the incubator for 24 hours to dry off and acclimate to the world. They will eat the inside of their eggshell during this time. If they still look a little damp after 24 hours, then give more time in the warm incubator to finish drying. Not all the eggs hatch at once, which would be convenient. By day 23, any unhatched eggs need to be disposed of or they develop a very unpleasant smell. As most of my birds are Leghorns, my new chicks look like Dalmatians. They are white with spots of color from the non Leghorn rooster. Anytime I go and feed the new chicks in the chick pool, I sing the same song to them as I sing to my older girls. This trains the new birds to recognize your voice and keeps the flock calm.
After 4-to-5 weeks and a close eye on the weather pattern, outside the little chicks go. By this time, they have all their feathers, are noisy and can get some vertical lift. My husband built a “brood house” outside, constucted out of pallets and leftover metal roofing. The floor is solid and the windows have hardware cloth and it’s very secure from predators. We have more heat lamps in here and a roost and they love their newfound freedom. We have tarps that are placed over the screens at night to keep in the heat.
Increase waterer and feeder size as they grow. I also introduce vegetable peelings, seeds and greens to their diet. They will stay in the brood house until they are about 3 ½ months old. During this time I will bring the rooster from the other established flock over to check out the new ladies. Any male birds at this time make the trip to “freezer camp”. If I am raising birds just for meat they will live their lives out in the brood house and not mingle with the layers.
Introducing new birds to the flock is always interesting. The pecking order needs to be established but I find it much easier to introduce multiple birds then just 1 or 2 at a time. The larger the number of new birds the less likely they will be picked on. We have found that moving them at night is best. We place the new birds on a roost with the older flock and it’s less disruptive. As it’s night and the older girls are already roosted up, the new birds are less likely to get hassled. My older girls usually ignore the new girls and after a couple of weeks everyone intermingles and is getting along. Depending on the breed of bird, she will start at laying at 4-6 months. You will get smaller pullet eggs initially which taste every bit as good as the larger eggs. The eggs will gradually increase in size. You may find them in strange places, like the corners of the hen house or outside, but eventually they get with the program and lay in the nest boxes.
Keep your coop clean. Wood shavings get changed when damp or smelly. I also sprinkle diatomaceous earth in the nest boxes and on the wood shavings for insect and mite control. I freshen the nest boxes daily and clean under the roost every morning (always wear a hat when cleaning up under the roost. I think you know why I mention this!) My girls tend to poop at night while roosting and I scrape it up and into the compost pile it goes. Every summer I have tomatoes, ground cherries, squash, and other bonus crops growing in the compost pile.
So there you have some information on raising chicks into chickens. We have had birds for over 12 years now and I still am excited every time I collect eggs. It’s a marvel to watch a tiny chick hatch and grow into a beautiful bird. I always thank the Lord first and then the chickens for their daily contribution to our table. So do your research, decide on a breed, and raise a flock of chickens.