


You are a safe and responsible firearms owner. After much research on the web and discussion with friends and family, you have made the decision to purchase or build up a general service AR15 style 5.56/.223 caliber rifle and accept the responsibility of doing so. You have a reasonable budget in mind. Now what? You can certainly go buy a complete factory rifle and do very well with it. However, particularly if you plan to use the rifle for a lot of different uses you may well wish to order it bult to your specifications or build it yourself.
By way of introduction, I have many years of experience with shooting competitively in Service Rifle matches, teaching and coaching marksmanship, hunting, plinking, assembling, repairing, maintaining, and reloading for this model of rifle. I have two different rifle instructor certifications.
I freely admit that my recommendations for a personal rifle like mine are subjective and incorporate my perception of the concept based on my experience and observations. To some extent my rifle was a thought exercise but it has worked very well for my needs. I try to be observant and learn constantly. I will make changes as I see better ideas. Your mileage may vary.
The rifle is used primarily at the ranch for predator control and general rock busting at various unknown ranges. The rifle is carried a lot more than it is shot but is very effective when it is shot. I do take it to Colorado when camping and fishing deep in the wilderness. If you travel with your rifle please note that some states such as Colorado have magazine capacity restrictions. I simply use 10-round magazines when in Colorado.
[JWR Adds This Clarification: Residents can possess and use 16+ round magazines in Colorado, per CRS 18-12-302. But with this state law that went into effect on July 1, 2013, they cannot be bought or sold. The law’s grandfather clause allows high-capacity magazines an individual possessed on or before the date the law went into effect and which someone has continually maintained possession.]
This rifle model has very good practical accuracy. The great ergonomics, low recoil, decent trigger, and optics make it easier to shoot and hit the intended target. Ultimately marksmanship is far more important than the cartridge used.
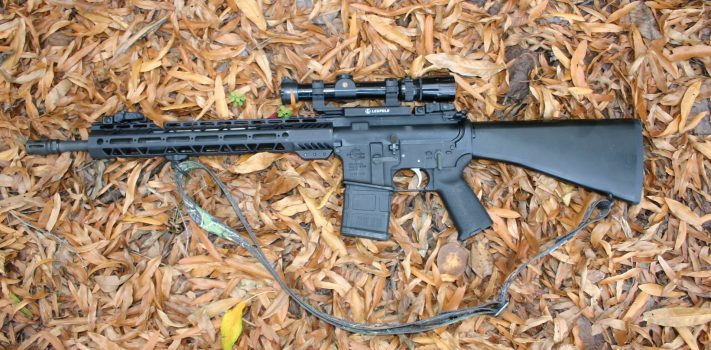
Here are my thoughts on putting together a personal rifle in the form of a general purpose AR-15 and a little on the safety aspects. I assembled the rifle by picking individual parts that met my perceived need with the intention of making a fairly light, versatile rifle that should be simple, very reliable with proper maintenance, and accurately shoot almost all commonly available ammunition bullet weights. Friends that have shot my rifle like it. They also tell me that it is definitely old school, which is probably correct and I am good with that.
Much of the parts selection decisions were based not only on the anticipated use but also on technical details related to the parts themselves. In a nutshell this rifle has a lighter weight 16-inch mid-length gas port blackened finish stainless steel barrel with a Wylde chamber and a 1-8 twist. It uses the original direct-impingement gas system and has a scope. With this barrel set up, the rifle will safely handle the commercial .223 Remington cartridge and the 5.56×45 NATO cartridge. It will also shoot any commonly available bullet weight accurately. The 16-inch barrel offers slightly less velocity than the 20-inch but is lighter and much handier.
A good quality bolt carrier is used and a better-quality bolt is used. A Picatinny rail upper receiver with M4 feed ramps was used, as is a basic sling. The trigger is an aftermarket standard configuration trigger factory tuned and coated with nickel-Teflon. The pull weight is four and a half pounds. I chose not to use a two stage trigger for this build. The rifle has the shorter and older style fixed A1 buttstock with cleaning kit and an entire spare bolt in the stock. I find the small storage area in the stock to be quite valuable. The pistol grip is larger than the factory one but fits my hand better.
Back-up iron sights are used along with a sturdy scope mount and a low magnification variable power Leupold scope. The scope makes accurate hits much easier for most people. This rifle will then be simple, fairly light and handy, easy for most people to shoot well, and have a large pool of relatively inexpensive ammunition, magazines and spare parts available. Should the scope fail in the field the backup iron sights can be used. The rifle can be single-loaded and fired if no magazines are available. In some cases one can use FMJ ammunition to practice with and softpoints of the same weight to take to the field. Such a rifle will also lend itself to users like me who wear glasses.
One guiding principle is to keep it simple, producing a semi-auto rifle that can do many things very well. While weight is important the lightest part is not necessarily the best part. I prefer to not use a bipod, range compensating scopes, any form of rifle-mounted light, or any other attachment that uses batteries. A properly cleaned rifle like this should be able to be stored in the back of the safe for years and be fully functional when taken out of the safe.
This is not a specialized rifle made to do one task perfectly. Once familiar with the rifle you should be able to keep it running under most field conditions. The spare bolt in the buttstock can be installed in a few minutes and covers just about any issues that are bolt related.
Some of the specific thoughts behind the parts chosen for the rifle are expanded on below. Keep in mind that this is not a written in stone recipe that only works when followed exactly as presented. I am sure many will not agree on how I have set up my rifle. They are entitled to their opinion.
There is always room for a knowledgeable person to make quality substitutions such as a chrome-lined barrel instead of a stainless one or a slightly different scope configuration. For instance, most people would not notice performance differences if the barrel had a 1:9 twist rate, but that is not what I wanted. One nice thing about this rifle is that changes to a component can be made relatively easily if desired. I recommend that you put your money in the barrel, bolt, scope, and scope mount.
The barrel is the heart of the rifle. Several aspects of choosing a barrel are often overlooked or misunderstood. One is twist rate. Most modern AR-15 barrels will come in on of three twist rates. The twist rate is defined as what length of barrel is required to make the bullet rotate in the barrel once, for instance, 1 rotation of the bullet in 9 inches, 8 inches, or 7 inches of barrel length. The twist rate shorthand fore those is: 1:9, 1:8, and 1:7.
The 1:7 twist was adopted by the U.S. military for use with the issue 62-grain M855 5.56 round and can have issues with lighter bullets due to its fast twist. The 1:9 barrel is better for stabilizing lighter and mid-weight bullets between 45 and 69 grains. The 1:8 twist barrel is the most versatile of the bunch, handling both the lighter bullets and the heavier bullets very well. The muzzle of the barrel should come threaded for a standard flash suppressor.
Another item to understand is the choice of chambers. There are two commonly used chambers, the .223 Remington and the 5.56 NATO specification, which the military chambering. The newer .223 Wylde chamber is a hybrid .223/5.56 chamber designed by Bill Wylde. The .223 Wylde has an improved chamber throat that is tighter than that of the 5.56 NATO but will still function reliably with military 5.56 ammunition since the external case dimensions are the same. This compromise chamber will give good accuracy with .223 Remington ammunition but without pressure or reliability failures when using high velocity 5.56×45 NATO spec ammunition.
Barrel length affects velocity and the handling of the rifle. Handling is also affected by the barrel weight, with the lightest barrels being referred to as “pencil barrels”. The longest common length is called the rifle length and is the original 20-inch barrel. A shorter, 16-inch carbine barrel was later developed. Gas from the fired cartridge is bled off the barrel at the front sight base, also referred to as the gas block, and transferred to the action via the gas tube. The longer barrel, as you would expect, uses a gas tube length referred to as the “rifle length”. The shorter carbine barrel uses the “carbine length” and a correspondingly shorter gas tube length.
Carbine-length gas systems can often create over-gassing, a problem that accelerates the wear and tear on internal parts due to delivering far more gas than required to reliably cycle the action. For this reason, a middle-of-the-road gas tube length was created for the carbine barrels. This is referred to as the “mid length” gas tube. When shooting these three gas tube lengths, you will notice that the longer the system, the less felt recoil and the smoother the action feels.
I deviated from using the simplest parts regarding the rifle’s front handguard. The way the handguard shown is mounted is more involved than the standard barrel to upper receiver nut. I did this because that handguard gives me a good front sight attachment point, many places to hold it from field positions, floats the thin barrel, and lets me mount a detachable sling mount where I want it.
If the front handguard used does not have a place to mount the front sight then the actual front sight base used should have a Picatinny rail on it to support the folding backup front sight. The gas block or front sight base is usually installed with set screws. After everything is where it should be dimensionally and test fired the gas block should be pinned in place so that you are not relying on the set screws to hold it securely. An Allen wrench that fits the set screws is stored in the buttstock.
(To be concluded tomorrow, in Part 2.)