


(Continued from Part 1.)
The components for black powder really are not all that hard to obtain. In many cases, you can buy potassium nitrate and sulfur locally with cash, generally at a nursery, garden or home improvement store, “Garden sulfur” is what I have used in powder making. It’s used as a fungicide and insecticide, and you can even make black powder without it. Black powder can be made with just potassium nitrate and charcoal. Sulfur serves to make black powder easier to ignite, so keep this in mind if you decide to make sulfur-free black powder.
Potassium nitrate is often used to accelerate the decomposition of tree stumps. I have had very good results with the “Spectracide” brand. I also found that Walmart sells potassium nitrate, at a very good price, via their website!
The last component—high-quality charcoal—is a multi-use item, often used in filtering and other applications, so it is not hard to find, should you decide to purchase it. As the fuel for the reaction, it is the most important component of good black powder, so your charcoal MUST be high quality, whether you purchase it or make it. “Charcoal” briquettes, by the way, are not really charcoal and don’t work in powder.
Homemade softwood charcoal may be better for black powder than charcoal from a chemical supply company, as their charcoal may have been made from hardwoods. As it is easy and relatively cheap to make good charcoal, I no longer see any reason to purchase charcoal. Willow is commonly recommended as the best choice, but I generally use leftover wood from some home repair projects (pine) or fence repair (cedar).
Charcoal is easy to make by heating a suitable softwood in a closed container, like an all-metal paint can. I buy brand-new, all-metal cans from my local hardware store. I cram small pieces of wood into the can and completely fill it. A small hole in the lid acts as a vent. The can is placed in a fire. After it heats up, the wood will start venting off gas through the hole. The gas may catch fire at some point. As soon the venting stops, I carefully remove the can from the fire and plug the vent hole immediately. Once it’s cool, the can is opened to reveal charcoal! For more information, you can view a number of videos on YouTube that show the process. Just go to YouTube and search with words such as: “making charcoal,” or “homemade charcoal.”
Caution: Any can that you use may have platings, coatings or other chemicals that will burn off when the can is heated. Charcoal making should be done in an open area, and all people and animals should stay out of the immediate downwind area, especially when a new can is being used to make charcoal.
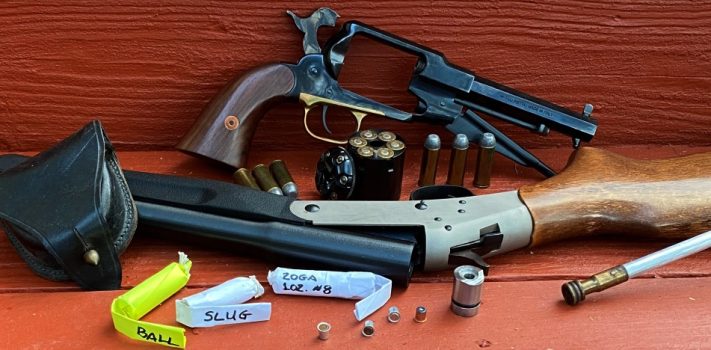
PERCUSSION CAPS
One of the ongoing discussions on black powder forums is the very short supply of percussion caps. Caps have become almost impossible to find. Some of us stocked up when they were still available, but we’ll run out sooner or later. I suspect that percussion caps are a low priority for ammunition companies facing high demand for ammunition and reloading components.
I see three options: (1) Check all of your sources and stock up whenever you get the chance. (2) Purchase a #11 Percussion Cap Maker from 22lrreloader.com, and learn to make caps with aluminum cans and “toy” paper roll caps. (3) Add at least one inline muzzleloader—one which uses shotgun primers for ignition— to your battery, and learn to recharge shotgun primers. I have pursued all three options.
PRIMERS
We will focus on Boxer-type primers, which have a tiny anvil within the primer cup. Boxer primers are in almost all of the high-quality ammunition made for the civilian market in the U.S. They are also the choice of almost all hobbyist reloaders in the U.S.
Berdan primers are used with cases that have a small, built-in anvil inside the primer cavity. They are reliable, but due to their design, they are much more difficult to work with for reloaders. In the U.S. Berdan primers are mostly found in imported ammunition, some of it steel-cased ammo in military calibers.
Boxer Primer Sizes
Boxer primers are available in six sizes: Small Pistol, Large Pistol, Small Rifle, Large Rifle, Shotgun, and .50 BMG. There are special names on some primer boxes, such as “Match” or “Bench Rest,” but these are still the exact same size as ordinary primers. “Magnum” primers are sometimes called for in loading data and are generally “hotter” than regular primers. Finally, “Military” primers can be assumed to be a little harder than ordinary primers, for use in military firearms, some of which may have free-floating firing pins or other features which may treat ammunition more harshly than a sporting firearm. A harder primer is thought to provide a safety margin in military arms.
Pistol primers are softer than rifle primers, to correspond to the smaller actions and weaker hammer or striker springs of handguns. I keep fired primers in containers marked SP (Small Pistol), LP (Large Pistol), SR (Small Rifle), LR (Large Rifle) and 209 (shotgun). By the way, the pistol vs. rifle designation for primers refers to cartridges, not to the size of firearm they are used in. For example, I reload .45 Colt ammo using Large Pistol primers, regardless of whether it will be used in a .45 Colt lever action rifle or in a revolver.
Loading data for rifle and pistol cartridges in reloading manuals does not specify primer brand, but just the size/type of primer (Large Rifle, Small Pistol, etc.). Some loads call for a Magnum primer, however. Note that manuals from some companies will always show their primers being used in the loading data, but other brands of primers may be used in rifle or pistol loads.
Shotgun loading manuals, on the other hand, call for specific brands and models of hulls (cases), as well as specific primer brands. For this reason, I strongly advise against using recharged shotgun primers in smokeless shotgun shell reloads. In my experiments, I’ve used recharged shotgun primers in black powder shotgun shells, as well as with musket-type (muzzleloading) paper cartridges for use in modern, break-open shotguns.
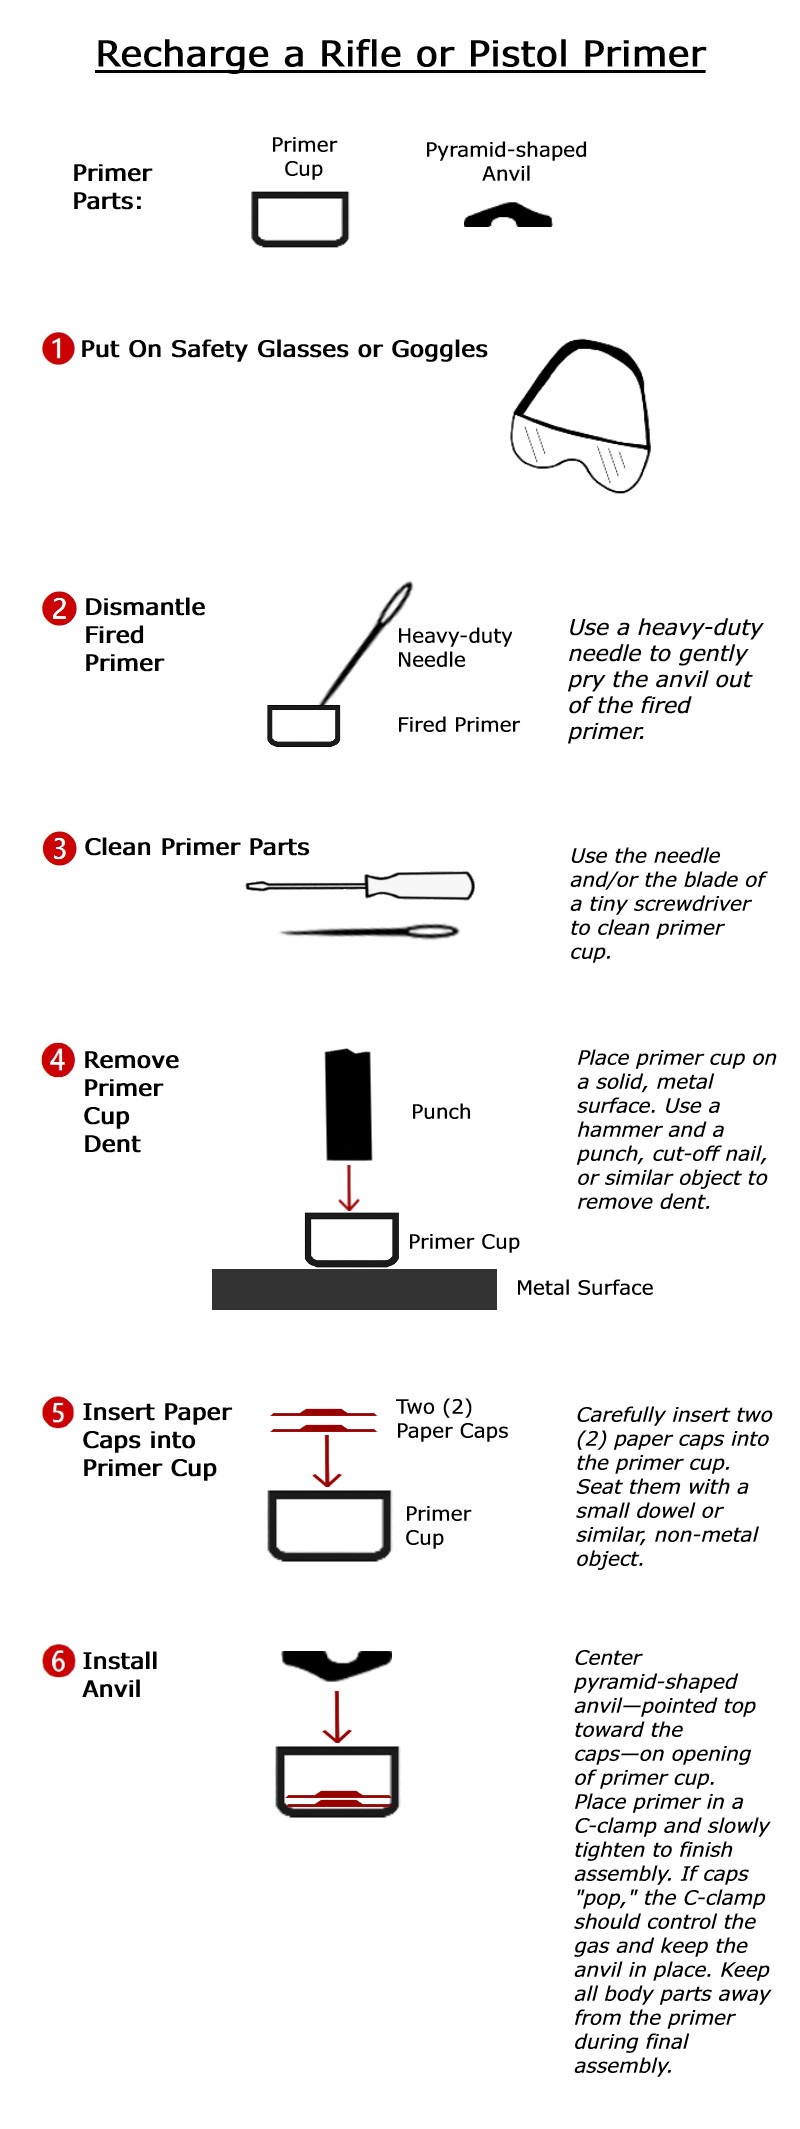
Boxer Primer Components
The four primer sizes used in rifle and pistol cartridges (Small Pistol, Large Pistol, Small Rifle, Large Rifle) all consist of two parts: a primer cup, and a tiny, pyramid-shaped anvil. The priming material is placed in the cup, and the anvil is pressed into the cup, “pointy” side first. The rear of a brass case has a primer “pocket,” or cavity at the back. The floor of the primer pocket supports the bottom of the anvil when the primer is seated. When the firing pin strikes the primer, the priming material is squeezed between the anvil and the primer cup and goes off, sending fire through the flash hole in the bottom of the primer pocket.
Shotgun shells do not have a primer pocket—just a hole in the back of the shell to receive the primer. Therefore, hotgun primers have three parts: the primer cup, a flat piece of metal as an anvil, and a primer body that holds the other two parts. The primer body fills the hole in the back of a shotgun shell and has a flash hole to allow the fire from the primer cup to reach the propellant.
RECHARGING PRIMERS
It’s tedious to recharge primers, but it is neither technically difficult nor expensive, nor is it dangerous if simple safety procedures are followed. The primers I recharged in my experiments were not as “hot” as factory-made primers. I was, however, able to find a way to make them work reliably and safely for me.
Tools and Materials Needed
Many of the tools needed for recharging primers are probably in your home already. The others can be purchased inexpensively or improvised. You will need:
- Safety glasses or goggles
- Paper roll caps – These are the old-fashioned paper caps that used to be widely used in cap pistols. I use “Legends of the Wild West” caps, sold in my local grocery store toy section. They are made in Germany. I used to pay under $3 for 2,400 caps. Due to Bidenflation, the price I see locally is currently $4.10, which comes out to about 1/6 of a cent for each cap.
- Small bench vise [recommended] – The vise can hold the C-clamp used as an assembly tool, and a vise usually has a flat metal surface intended as an anvil.
- Small metal surface as an anvil – I mount a small bench vise on a sawhorse and use the flat surface behind the jaws. Another useful option is a large, steel or iron hinge or other piece of fairly thick steel, screwed to a small board. I used a blade from a broken set of garden shears for this purpose.
- Hex nut or socket as a depriming stand – Any metal object with a hole through it can be used. The hole must be large enough for the primer to fall through and small enough to allow good support of the fired case or hull. A piece of hardwood with a hole drilled through it can also be used.
- Decapping pin – For knocking fired primers out of the case or hull. I use the Lee Universal Depriming and Decapping Die Pin. It’s available directly from Lee (factorysales.com). Lee’s product code number is 90783. The price is $2.99. The same item is available from Midway (www.midwayusa.com), for $3.99. The Midway product number is 274540.
- Heavy-duty needle – Used for prying the tiny anvil out of fired rifle or pistol primers.
- Flat-tipped metal punch – For knocking the firing pin dents out of the primer cups. Alternatively, a cut-off nail or bolt, or a hex or torx bit of appropriate size can be used.
- Small mallet or hammer
- Small C-clamp – Used to reassemble primers by gently squeezing the parts together. I clamp my C-clamp in the jaws of my small bench vise, to hold it upright and to free up one of my hands.
- Paper punch [optional] – For punching out paper caps, so they can be put into primer cups. Scissors can also be used.
- Small dowel – A wood BBQ skewer, a wooden matchstick or any other wooden object to seat paper caps in primer cups.
- Tweezers – For handling paper caps
- Small screwdriver – Useful for cleaning carbon from the inside of primer cups.
Here is the first of two infographics that I created. (Click to expand.):
(To be continued tomorrow, in Part 3.)